Page 378 of 473

377 Practical hints
What to do if …
Display symbolDisplay messagePossible cause/consequencePossible solution
.Turn signal
left frontThe left front turn signal lamp is
malfunctioning.�Replace the bulb as soon as possible.
Turn signal
right frontThe right front turn signal lamp is
malfunctioning.�Replace the bulb as soon as possible.
Turn signal
left mirrorThe left turn signal in the side mirror is
malfunctioning. This message will only
appear if all light emitting diodes have
stopped working.�Visit an authorized Mercedes-Benz
Center as soon as possible.
Turn signal
right mirrorThe right turn signal in the side mirror is
malfunctioning. This message will only
appear if all light emitting diodes have
stopped working.�Visit an authorized Mercedes-Benz
Center as soon as possible.
Turn signal
left rear
Substit. bulb on
The left rear turn signal lamp is
malfunctioning.
A substitute bulb is being used.�Replace the bulb as soon as possible.
Turn signal
right rear
Substit. bulb on
The right rear turn signal lamp is
malfunctioning.
A substitute bulb is being used.�Replace the bulb as soon as possible.
Page 396 of 473
395 Practical hints
Replacing bulbs
Bulbs Front lamps
LampType
1Additional turn signal
lampLED
2Halogen headlamp:
Turn signal lamp
Bi-Xenon* headlamp:
Turn signal lamp
1156 A
2357 A
3Halogen headlamp:
Low beam
Bi-Xenon* headlamp:
Low and high beam
1
1Vehicles with Bi-Xenon* headlamps: Low beam
and high beam use the same D2S-35W lamp. Do
not replace the Xenon bulbs yourself. Contact an
authorized Mercedes-Benz Center.
H7 (55 W)
D2S-35 W
LampType
4Halogen headlamp:
High beam/high beam
flasher
Bi-Xenon* headlamp:
High beam flasher
H7 (55 W)
H7 (55 W)
Parking and standing
lampW5W
5Front fog lampHB4 (51 W)
6Side marker lampW5W
Page 397 of 473

396 Practical hints
Replacing bulbs
Rear lamps Notes on bulb replacement
�Only use 12 volt bulbs of the same type
and with the specified watt rating.
�Switch lights off before changing a bulb
to prevent short circuits.
�Always use a clean lint-free cloth when
handling bulbs.
�Your hands should be dry and free of oil
and grease.
�If the newly installed bulb does not
come on, visit an authorized
Mercedes-Benz Center.
LampType
7High mounted brake
lampLED
8Brake lampP21W
9Turn signal lampPY 21 W
aParking and side
marker lampP 21/5 W
bBackup lampP21W
cLicense plate lampsC5W
dRear fog lamp (driver’s
side only), tail and
standing lampP 21/4 W
Warning!G
Bulbs and bulb sockets can be very hot.
Allow the lamp to cool down before
changing a bulb.
Keep bulbs out of reach of children.
Halogen lamps contain pressurized gas.
A bulb can explode if you
�touch or move it when hot
�drop the bulb
�scratch the bulb
Wear eye and hand protection.
Because of high voltage in Xenon lamps, it is
dangerous to replace the bulb or repair the
lamp and its components. We recommend
that you have such work done by a qualified
technician.
Page 398 of 473
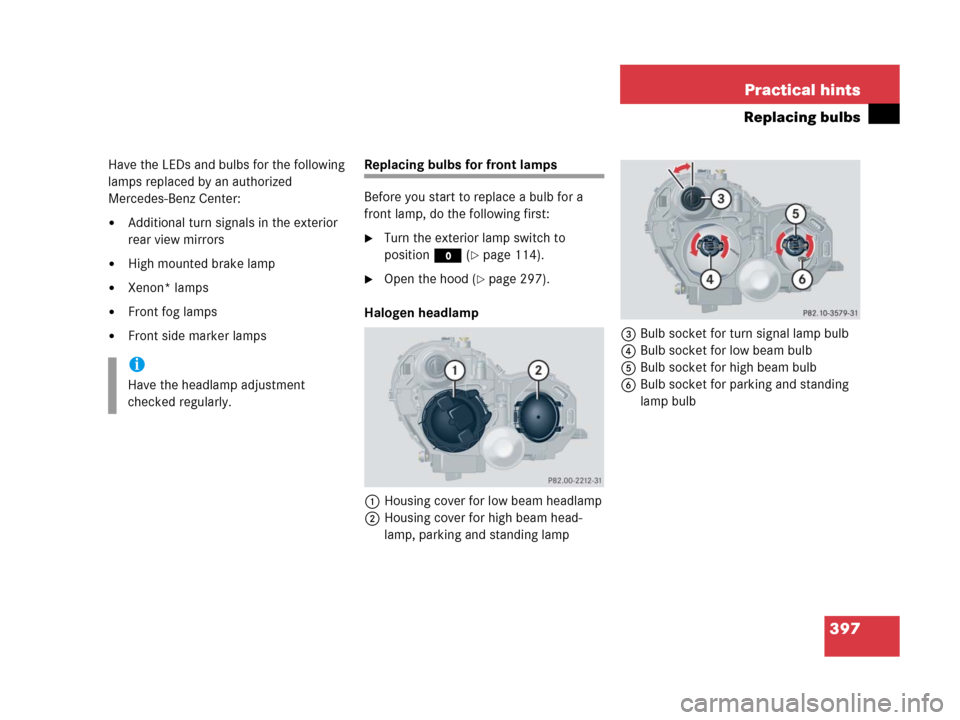
397 Practical hints
Replacing bulbs
Have the LEDs and bulbs for the following
lamps replaced by an authorized
Mercedes-Benz Center:
�Additional turn signals in the exterior
rear view mirrors
�High mounted brake lamp
�Xenon* lamps
�Front fog lamps
�Front side marker lamps
Replacing bulbs for front lamps
Before you start to replace a bulb for a
front lamp, do the following first:
�Turn the exterior lamp switch to
positionM (
�page 114).
�Open the hood (�page 297).
Halogen headlamp
1Housing cover for low beam headlamp
2Housing cover for high beam head-
lamp, parking and standing lamp3Bulb socket for turn signal lamp bulb
4Bulb socket for low beam bulb
5Bulb socket for high beam bulb
6Bulb socket for parking and standing
lamp bulb
i
Have the headlamp adjustment
checked regularly.
Page 399 of 473

398 Practical hints
Replacing bulbs
Low beam bulb
�Press the clamp on housing cover1
and remove it.
�Pull the electrical connector off.
�Turn bulb socket4 counterclockwise
and take out the bulb.
�Insert the new bulb so that its socket
locates in the recess of the lamp
housing.
�Turn bulb socket4 clockwise until it
engages.
�Plug the electrical connector onto the
bulb.
�Align housing cover1 and press until
it engages.High beam bulb
�Press the clamp on housing cover2
and remove it.
�Pull the electrical connector off.
�Turn bulb socket5 counterclockwise
and take out the bulb.
�Insert the new bulb so that its socket
locates in the recess of the lamp
housing.
�Turn bulb socket5 clockwise until it
engages.
�Plug the electrical connector onto the
bulb.
�Align housing cover2 and press until
it engages.Front turn signal lamp bulb
�Turn bulb socket3 with the bulb
counterclockwise and remove it.
�Press gently onto the bulb and turn it
counterclockwise out of bulb
socket3.
�Press new bulb gently into bulb
socket3 and turn clockwise until it
engages.
�Place bulb socket3 back into the
lamp and turn it clockwise.
Parking and standing lamp bulb
�Press the clamp on housing cover2
and remove it.
�Pull out bulb socket6 with the bulb.
�Pull the bulb out of bulb socket6.
�Press the new bulb into bulb socket6.
�Press bulb socket6 back into the
lamp.
�Align housing cover2 and press until
it engages.
Page 400 of 473
399 Practical hints
Replacing bulbs
Bi-Xenon* headlamp
1Housing cover for Bi-Xenon headlamp
2Housing cover for high beam flasher,
parking and standing lamp3Bulb socket for turn signal lamp bulb
4Bulb socket for high beam flasher bulb
5Bulb socket for parking and standing
lamp bulbHigh beam flasher bulb
�Press the clamp on housing cover2
and remove it.
�Pull the electrical connector off.
�Turn bulb socket4 counterclockwise
and take out the bulb.
�Insert the new bulb so that its socket
locates in the recess of the lamp
housing.
�Turn bulb socket4 clockwise until it
engages.
�Plug the electrical connector onto the
bulb.
�Align housing cover2 and press until
it engages.
Warning!G
Do not remove the cover1 for the
Bi-Xenon headlamp. Because of high voltage
in Bi-Xenon lamps, it is dangerous to replace
the bulb or repair the lamp and its compo-
nents. We recommend that you have such
work done by a qualified technician.
Page 401 of 473

400 Practical hints
Replacing bulbs
Front turn signal lamp bulb
�Turn bulb socket3 with the bulb
counterclockwise and remove it.
�Press gently onto the bulb and turn it
counterclockwise out of bulb
socket3.
�Press new bulb gently into bulb
socket3 and turn clockwise until it
engages.
�Place bulb socket3 back into the
lamp and turn it clockwise.
Parking and standing lamp bulb
�Press the clamp on housing cover2
and remove it.
�Pull out bulb socket5 with the bulb.
�Pull the bulb out of bulb socket5.
�Press the new bulb into bulb socket5.
�Press bulb socket5 back into the
lamp.
�Align housing cover2 and press until
it engages.Additional turn signal lamp bulbs
The additional turn signal lamps in the
exterior rear view mirrors have LEDs.
If a malfunction occurs or LEDs fail to func-
tion, the entire turn signal unit must be re-
placed. Have the turn signal unit replaced
by an authorized Mercedes-Benz Center.
Front side marker lamp bulbs
Since replacing the side marker lamp bulbs
is a technically highly demanding process,
we recommend you have the side marker
lamp bulbs replaced by an authorized
Mercedes-Benz Center.
Replacing bulbs for rear lamps
Before you start to replace a bulb for a rear
lamp, do the following first:
�Turn the exterior lamp switch to
positionM (
�page 114).
�Open the trunk (�page 99).
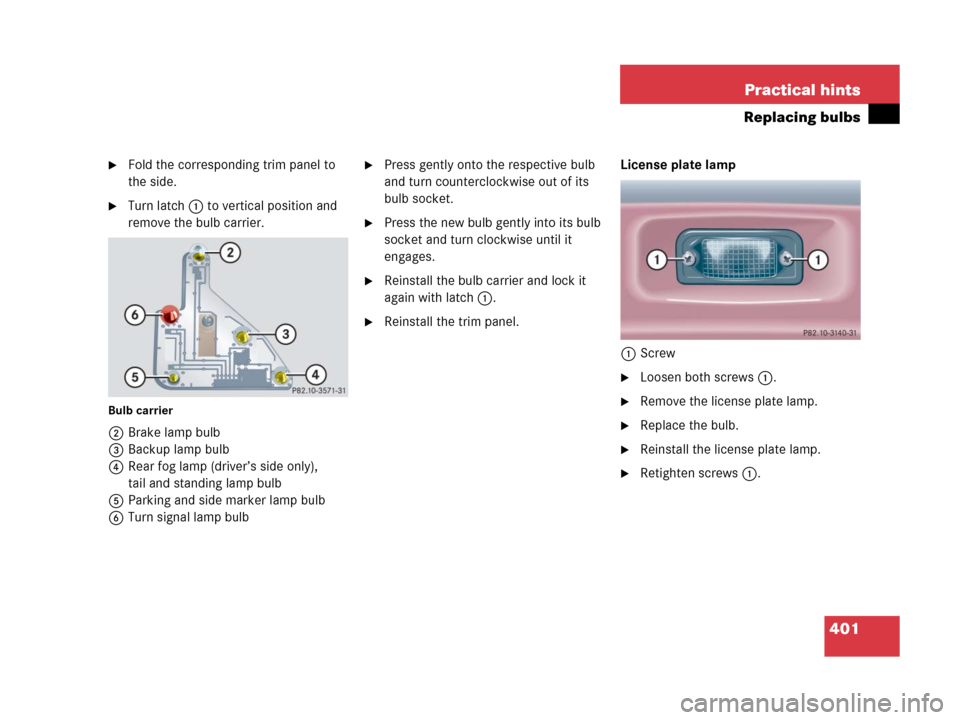
Tail lamp unit
1Latch
Page 402 of 473
401 Practical hints
Replacing bulbs
�Fold the corresponding trim panel to
the side.
�Turn latch1 to vertical position and
remove the bulb carrier.
Bulb carrier
2Brake lamp bulb
3Backup lamp bulb
4Rear fog lamp (driver’s side only),
tail and standing lamp bulb
5Parking and side marker lamp bulb
6Turn signal lamp bulb
�Press gently onto the respective bulb
and turn counterclockwise out of its
bulb socket.
�Press the new bulb gently into its bulb
socket and turn clockwise until it
engages.
�Reinstall the bulb carrier and lock it
again with latch1.
�Reinstall the trim panel.License plate lamp
1Screw
�Loosen both screws1.
�Remove the license plate lamp.
�Replace the bulb.
�Reinstall the license plate lamp.
�Retighten screws1.