Page 376 of 474

375 Practical hints
What to do if …
When the message
Check oil level at
next gas station appears while the en-
gine is running and at operating tempera-
ture, the engine oil level has dropped to
approximately the minimum level.
When this occurs, the warning will first
come on intermittently and then stay on if
the oil level drops further.Visually check for oil leaks. If no obvious oil
leaks are noted, drive to the nearest
service station where the engine oil should
be topped to the required level with an
approved oil specified in the Factory
Approved Service Products pamphlet.
Display symbol
Display message
Possible cause/consequence
Suggested solution
N
Check oil level
at next gas station
The engine oil has dropped to a critical
level.
�
Check the engine oil level
(�page 299) and add oil as required
(�page 300).
�
If you must add engine oil frequently,
have the engine checked for possible
leaks.!The engine oil level warnings should
not be ignored. Extended driving with
the symbol displayed could result in
serious engine damage that is not
covered by the Mercedes-Benz Limited
Warranty.
Page 382 of 474
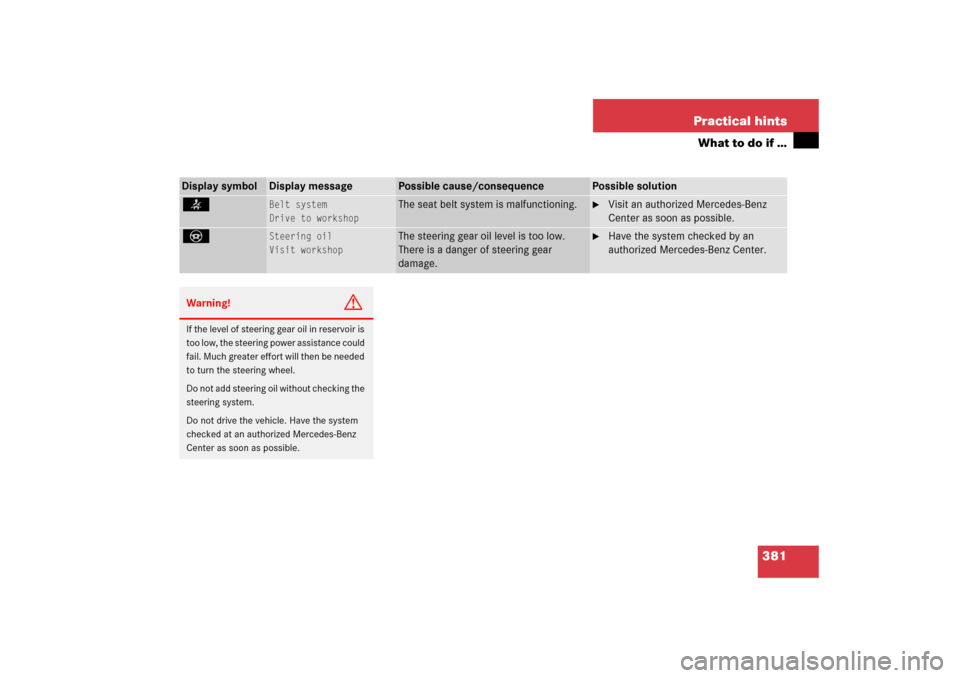
381 Practical hints
What to do if …
Display symbol
Display message
Possible cause/consequence
Possible solution
<
Belt system
Drive to workshop
The seat belt system is malfunctioning.
�
Visit an authorized Mercedes-Benz
Center as soon as possible.
_
Steering oil
Visit workshop
The steering gear oil level is too low.
There is a danger of steering gear
damage.
�
Have the system checked by an
authorized Mercedes-Benz Center.
Warning!
G
If the level of steering gear oil in reservoir is
too low, the steering power assistance could
fail. Much greater effort will then be needed
to turn the steering wheel.
Do not add steering oil without checking the
steering system.
Do not drive the vehicle. Have the system
checked at an authorized Mercedes-Benz
Center as soon as possible.
Page 386 of 474

385 Practical hints
Where will I find ...?
Vehicle jackThe vehicle jack is located in the storage
compartment underneath the trunk floor.
Storage position�
Turn crank handle in direction of arrow
as far as it will go.
�
Push crank handle up.
Operational position�
Turn crank handle clockwise.
Before storing the vehicle jack in its
compartment:
�
It should be fully collapsed.
�
The handle must be folded in (storage
position).
Warning!
G
The jack is designed exclusively for jacking
up the vehicle at the jack take-up brackets
built into both sides of the vehicle. To help
avoid personal injury, use the jack only to lift
the vehicle during a wheel change. Never
get beneath the vehicle while it is supported
by the jack. Keep hands and feet away from
the area under the lifted vehicle. Always
firmly set parking brake and block wheels
before raising vehicle with jack.
Do not disengage parking brake while the
vehicle is raised. Be certain that the jack is
always vertical (plumb line) when in use,
especially on hills. Always try to use the jack
on level surface. Make sure the jack arm is
fully seated in the jack take-up bracket.
Always lower the vehicle onto sufficient
capacity jackstands before working under
the vehicle.
Page 388 of 474

387 Practical hints
Where will I find ...?
1Vehicle tool kit
2Arrow
3Minispare wheel with spare wheel bolts
in container on wheel rim
4Vehicle tool kit storage well casing�
Remove vehicle tool kit storage well
casing4.
�
Remove Minispare wheel3.Storing the Minispare wheel
�
Place Minispare wheel3 in wheel
well.
�
Place vehicle tool kit storage well
casing4 over the Minispare wheel.
Make sure arrow2 on vehicle tool kit
storage well casing4 points in the
direction of travel.
�
Place storage well casing (
�page 383)
over vehicle tool kit storage well
casing4 and turn the retaining screw
(
�page 383) clockwise as far it will go
to secure the Minispare wheel.
iArrow2 on vehicle tool kit storage
well casing4 must point in the
direction of travel. Otherwise you
cannot place the storage well casing
(�page 383) on top and secure the
Minispare wheel with the retaining
screw (
�page 383).
!To prevent damage, always disengage
trunk floor handle from upper edge of
trunk and lower trunk floor before
closing the trunk lid.Warning!
G
The dimensions of the Minispare wheel are
different from those of the road wheels. As
a result, the vehicle handling characteristics
change when driving with a Minispare wheel
mounted.
The Minispare wheel should only be used
temporarily, and should be replaced with a
regular road wheel as quickly as possible.
Page 389 of 474
388 Practical hintsWhere will I find ...?In case of a flat tire, you may temporarily
use the Minispare wheel when observing
the following restrictions:�
Do not exceed a vehicle speed of
50 mph (80 km/h).
�
Drive to the nearest tire repair facility
to have the flat tire repaired or
replaced as appropriate.
�
Do not operate vehicle with more than
one Minispare wheel mounted.
For more information, see “Rims and Tires”
(
�page 432).
Spare wheel bolts
1Wheel bolt for light alloy rims
2Wheel bolt for Minispare wheel or other
steel rims (located in trunk with spare
wheel)
!Wheel bolts2 must be used when
mounting the Minispare wheel or other
steel rims. The use of any wheel bolts
other than wheel bolts2 for the
Minispare wheel or other steel rims will
physically damage the vehicle’s
brakes. Warning!
G
Make sure to use the original length wheel
bolts when remounting the original wheel
after it has been repaired.
Page 392 of 474
391 Practical hints
Unlocking/locking in an emergency
1Locking�
Insert the mechanical key into the
driver’s door lock until it stops.
�
Turn the mechanical key clockwise to
position1.
The driver’s door is locked.
Fuel filler flap
In case the central locking system does
not release the fuel filler flap, you can open
it manually.
The release button is on the right-hand
side of the luggage compartment behind
the side trim.1Side trim
2Release button
�
Open the trunk.
�
Remove the side trim1 from the
right-hand side of the luggage compart-
ment.
�
Turn release button2 clockwise as far
as will go.
The fuel filler flap is released.
�
Open the fuel filler flap from outside.
Warning!
G
If you operate the emergency release but-
ton, be careful of the sharp edges so that
you do not injure yourself.
Page 395 of 474

394 Practical hintsResetting activated head restraintsResetting activated head restraints
If the active head restraints has been trig-
gered in a rear-end collision, the active
head restraints must be reset. Otherwise,
the active head restraint cannot offer any
additional protection in the event of anoth-
er rear-end collision.
�
Take the reset tool out of the
Mercedes-Benz vehicle literature
pouch.
�
Guide reset tool into center of head re-
straint between head restraint cushion
and rear head restraint cover.
�
Press the reset tool forward in the di-
rection of the arrow.
�
Press reset tool downward until you
hear the head restraint release
mechanism audibly engage.
�
Pull out reset tool.
�
Firmly press the head restraint cushion
back toward the rear head restraint
cover until it engages.
�
Repeat this procedure on the active
head restraint for the second seat.
For information on active head restraints,
see “Active head restraint” (
�page 73).
For information on head restraint adjust-
ment, see “Seats” (
�page 35).
iFor your convenience, we recommend
that you have this work carried out by
an authorized Mercedes-Benz Center.
You will find the reset tool for manually
operating the active head restraints in
the Mercedes-Benz vehicle literature
pouch.
!Take care to avoid damaging the uphol-
stery.
Warning!
G
When pushing back the head restraint cush-
ion, take care that your fingers do not be-
come caught between the head restraint
cushion and the cover. Failing to do so may
lead to injury.
Page 396 of 474
395 Practical hints
Replacing SmartKey batteries
�Replacing SmartKey batteries
If the batteries in the SmartKey are
discharged, the vehicle can no longer be
locked or unlocked. It is recommended to
have the batteries replaced at an
authorized Mercedes-Benz Center.Batteries contain materials that can harm
the environment if disposed of improperly.
Recycling of batteries is the preferred
method of disposal. Many states require
sellers of batteries to accept old batteries
for recycling.Warning!
G
Keep the batteries out of reach of children.
If a battery is swallowed, seek medical help
immediately.
iWhen inserting the batteries, make
sure they are clean and free of lint.iWhen replacing batteries, always
replace both batteries.
The required replacement batteries are
available at any Mercedes-Benz
Center.