Page 292 of 390
Black plate (292,1)
If new fluid is required frequently, consult
an Authorized Mazda Dealer.
3.0-liter engine
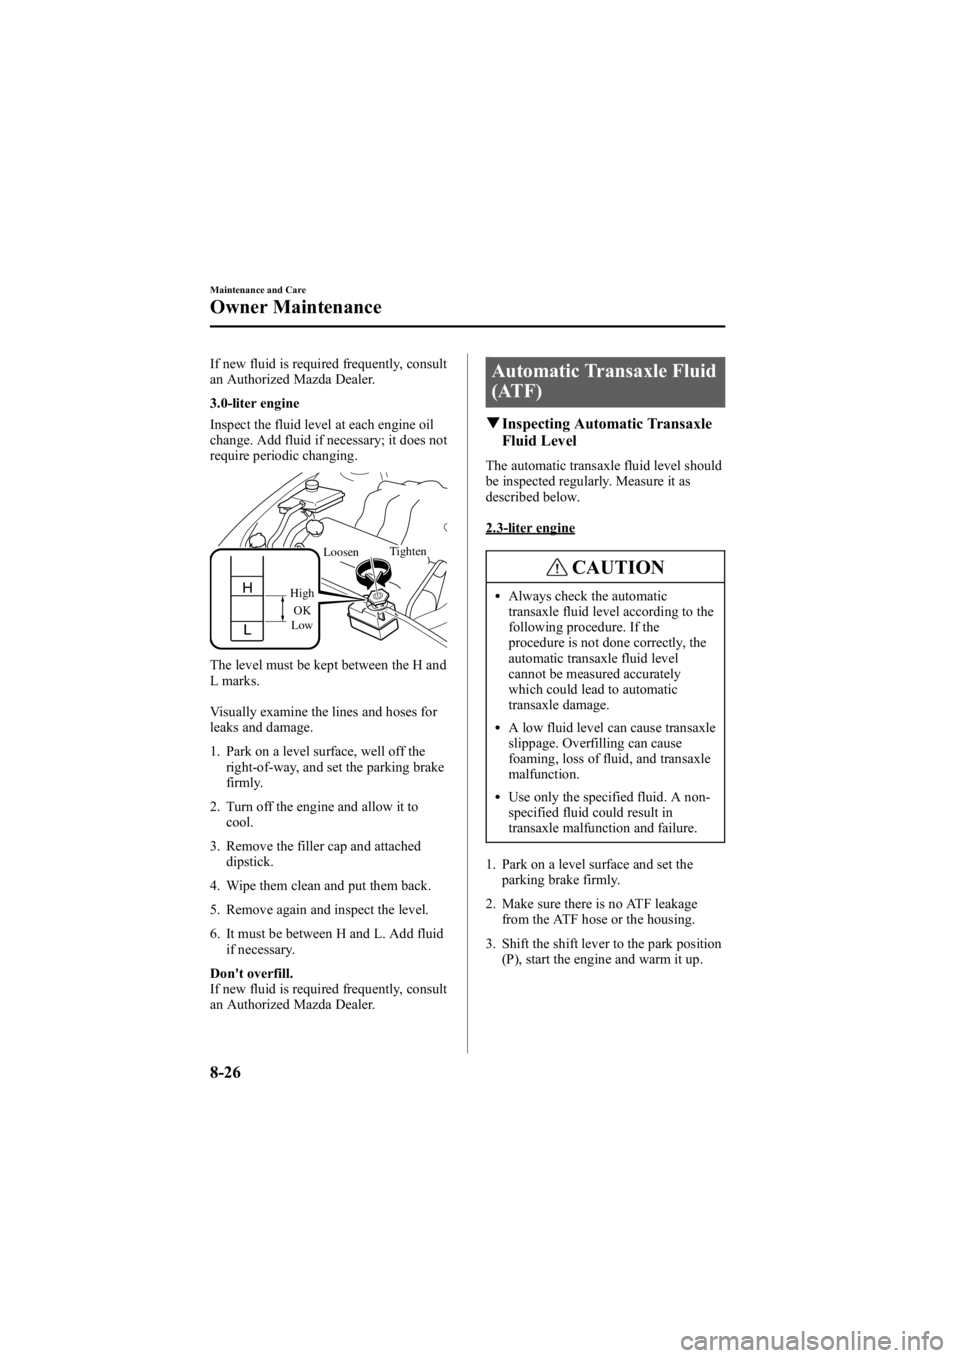
Inspect the fluid level at each engine oil
change. Add fluid if necessary; it does not
require periodic changing.
LowOK
High Loosen
Tighten
The level must be kept between the H and
L marks.
Visually examine the lines and hoses for
leaks and damage.
1. Park on a level surface, well off the
right-of-way, and set the parking brake
firmly.
2. Turn off the engine and allow it to cool.
3. Remove the filler cap and attached dipstick.
4. Wipe them clean and put them back.
5. Remove again and inspect the level.
6. It must be between H and L. Add fluid if necessary.
Don't overfill.
If new fluid is required frequently, consult
an Authorized Mazda Dealer.
Automatic Transaxle Fluid
(ATF)
q Inspecting Automatic Transaxle
Fluid Level
The automatic transaxle fluid level should
be inspected regularly. Measure it as
described below.
2.3-liter engine
CAUTION
lAlways check the automatic
transaxle fluid level according to the
following procedure. If the
procedure is not done correctly, the
automatic transaxle fluid level
cannot be measured accurately
which could lead to automatic
transaxle damage.
lA low fluid level can cause transaxle
slippage. Overfilling can cause
foaming, loss of fluid, and transaxle
malfunction.
lUse only the specified fluid. A non-
specified fluid could result in
transaxle malfunction and failure.
1. Park on a level surface and set the parking brake firmly.
2. Make sure there is no ATF leakage from the ATF hose or the housing.
3. Shift the shift lever to the park position (P), start the engine and warm it up.
8-26
Maintenance and Care
Owner Maintenance
Mazda6_8V40-EA-05L_Edition1 Page292
Monday, November 28 2005 6:11 PM
Form No.8V40-EA-05L
Page 293 of 390
Black plate (293,1)
CAUTION
Do not shift the shift lever while the
engine is warming up. If the ATF level
is extremely low, the automatic
transaxle could be damaged.
4. While the engine is still idling, pull out the dipstick and wipe it clean, and then
put it back.
5. Check the ATF level. If there is no ATF adhering 5 mm from the end of the
dipstick, add ATF.
CAUTION
If there is no ATF adhering to the
dipstick even after the engine has been
warmed up, do not drive the vehicle.
Otherwise, the automatic transaxle
could be damaged.
6. Shift the shift lever to each range and position, and make sure there is no
abnormality.
7. Drive the vehicle on city roads for 5 km (3.1 mile) or more.
8. Park on a level surface and set the parking brake firmly. 9. Shift the shift lever to the park position
(P), check the ATF level while the
engine is idling, and make sure that the
ATF level is within the proper level. If
the ATF level is not within the proper
level, add ATF.
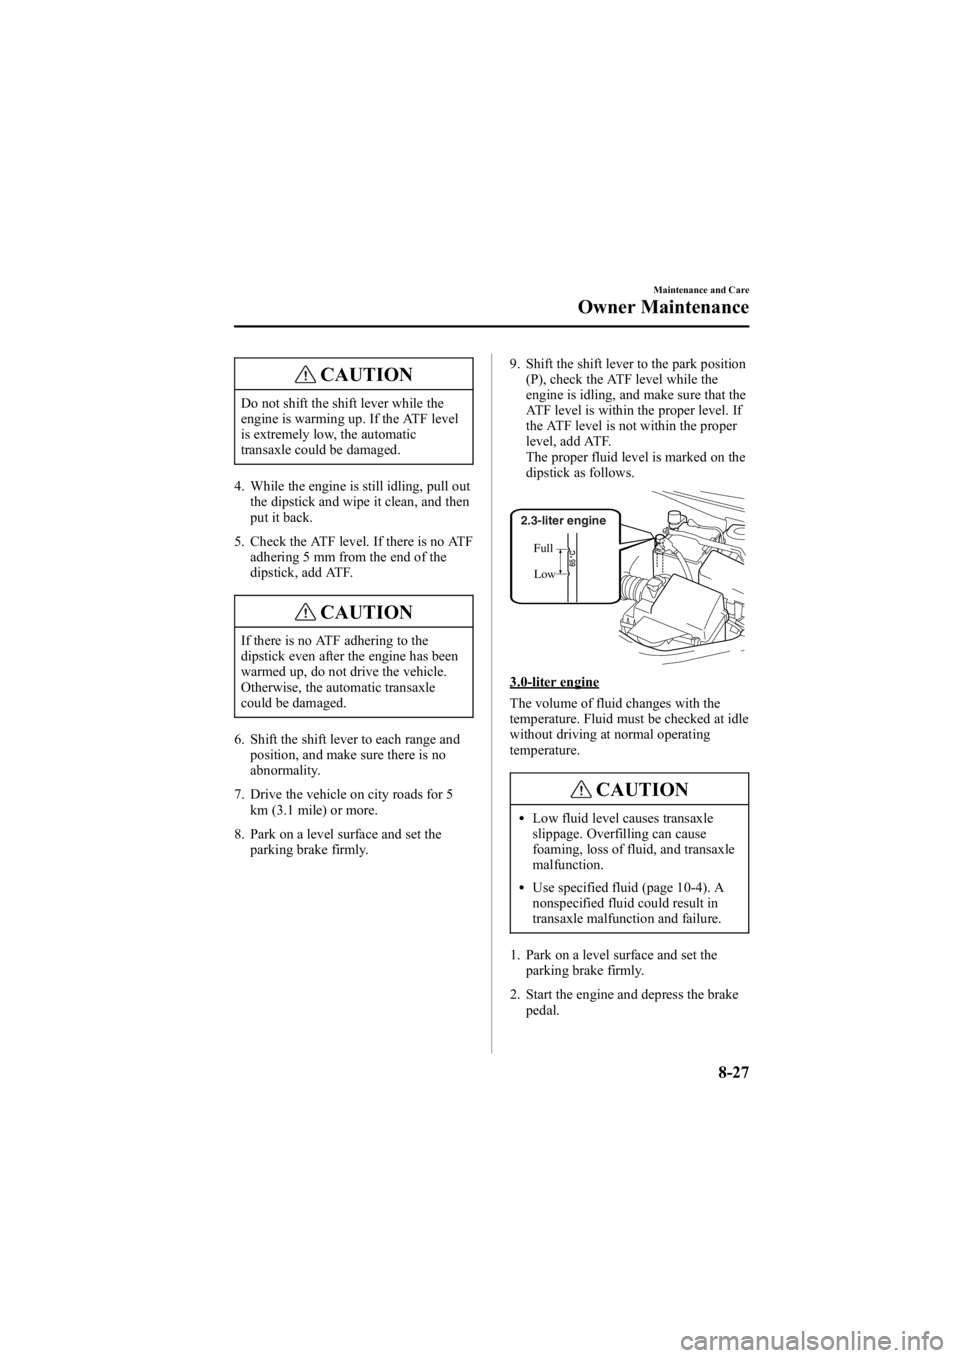
The proper fluid level is marked on the
dipstick as follows.
Low
Full
2.3-liter engine
3.0-liter engine
The volume of fluid changes with the
temperature. Fluid must be checked at idle
without driving at normal operating
temperature.
CAUTION
lLow fluid level causes transaxle
slippage. Overfilling can cause
foaming, loss of fluid, and transaxle
malfunction.
lUse specified fluid (page 10-4). A
nonspecified fluid could result in
transaxle malfunction and failure.
1. Park on a level surface and set the parking brake firmly.
2. Start the engine and depress the brake pedal.
Maintenance and Care
Owner Maintenance
8-27
Mazda6_8V40-EA-05L_Edition1 Page293
Monday, November 28 2005 6:11 PM
Form No.8V40-EA-05L
Page 294 of 390
Black plate (294,1)
3. Move the shift lever through all rangesand set it at P.
WARNING
Sudden Vehicle Movement:
Shifting the shift lever without first
depressing the brake pedal is
dangerous. The vehicle could move
suddenly and cause an accident.
Make sure the brake pedal is applied
before shifting the shift lever.
4. With the engine still idling, pull out the dipstick, wipe it clean, and put it back.
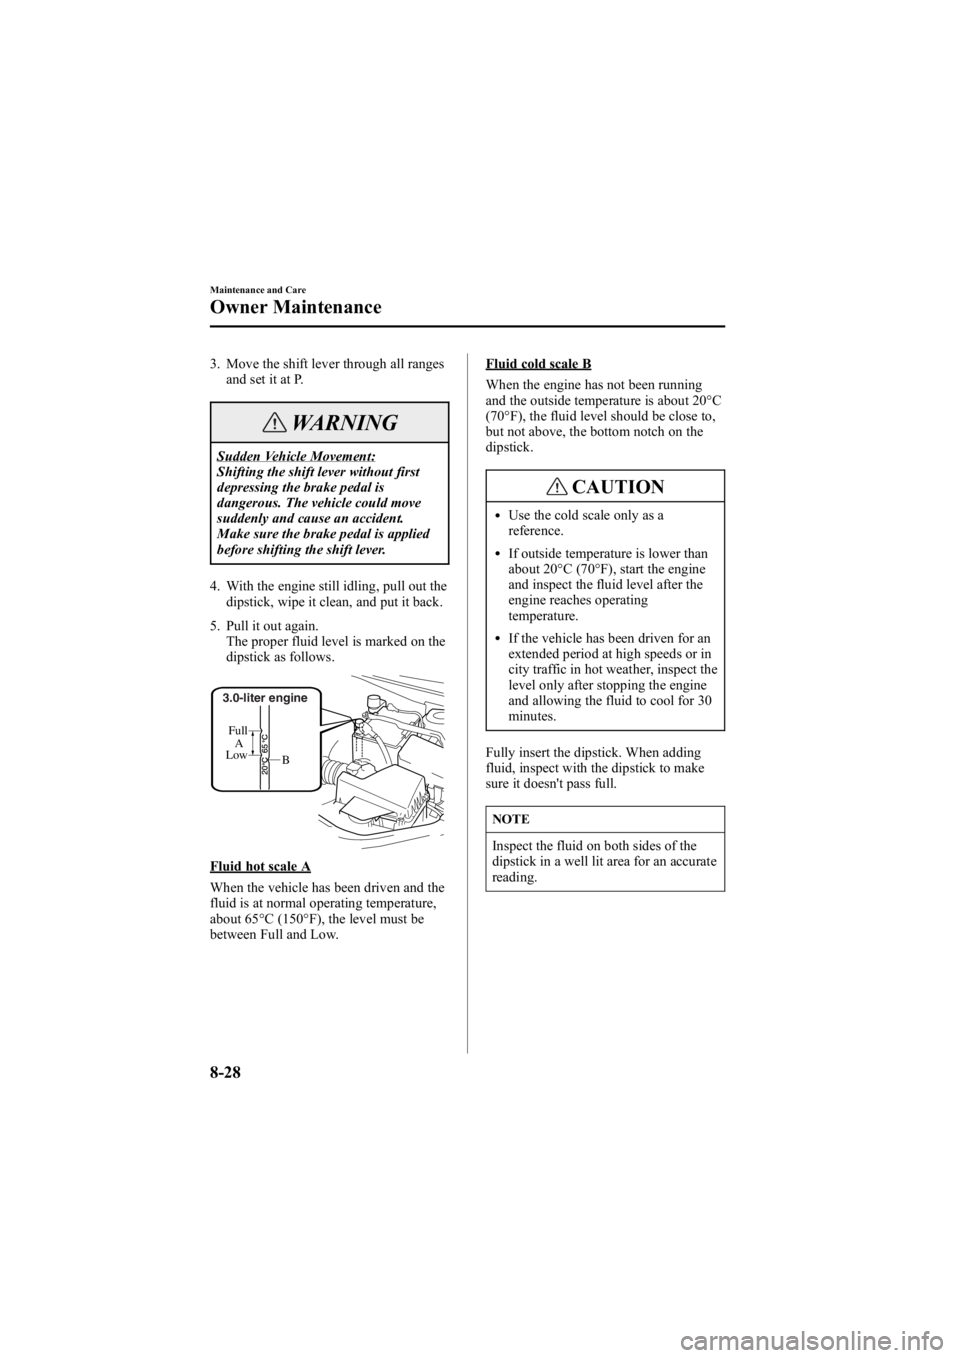
5. Pull it out again. The proper fluid level is marked on the
dipstick as follows.
A
Full
B
Low
3.0-liter engine
Fluid hot scale A
When the vehicle has been driven and the
fluid is at normal operating temperature,
about 65°C (150°F), the level must be
between Full and Low.
Fluid cold scale B
When the engine has not been running
and the outside temperature is about 20°C
(70°F), the fluid level should be close to,
but not above, the bottom notch on the
dipstick.
CAUTION
lUse the cold scale only as a
reference.
lIf outside temperature is lower than
about 20°C (70°F), start the engine
and inspect the fluid level after the
engine reaches operating
temperature.
lIf the vehicle has been driven for an
extended period at high speeds or in
city traffic in hot weather, inspect the
level only after stopping the engine
and allowing the fluid to cool for 30
minutes.
Fully insert the dipstick. When adding
fluid, inspect with the dipstick to make
sure it doesn't pass full.
NOTE
Inspect the fluid on both sides of the
dipstick in a well lit area for an accurate
reading.
8-28
Maintenance and Care
Owner Maintenance
Mazda6_8V40-EA-05L_Edition1 Page294
Monday, November 28 2005 6:11 PM
Form No.8V40-EA-05L
Page 296 of 390
Black plate (296,1)
Body Lubrication
All moving points of the body, such as
door and hood hinges and locks, should
be lubricated each time the engine oil is
changed. Use a nonfreezing lubricant on
locks during cold weather.
Make sure the hood's secondary latch
keeps the hood from opening when the
primary latch is released.
Air Filter
CAUTION
Don't drive without an air filter. This
could result in excessive engine wear.
This air filter may be cleaned with
compressed air and reused, or replaced,
depending on its condition. Unless it is
very dirty, simply shake it to remove
foreign particles. Each time you inspect it,
wipe inside the air cleaner housing with a
damp cloth.
q Replacing the Air Filter
NOTE
If the vehicle is operated in very dusty
or sandy areas, replace the filter more
often than recommended intervals.
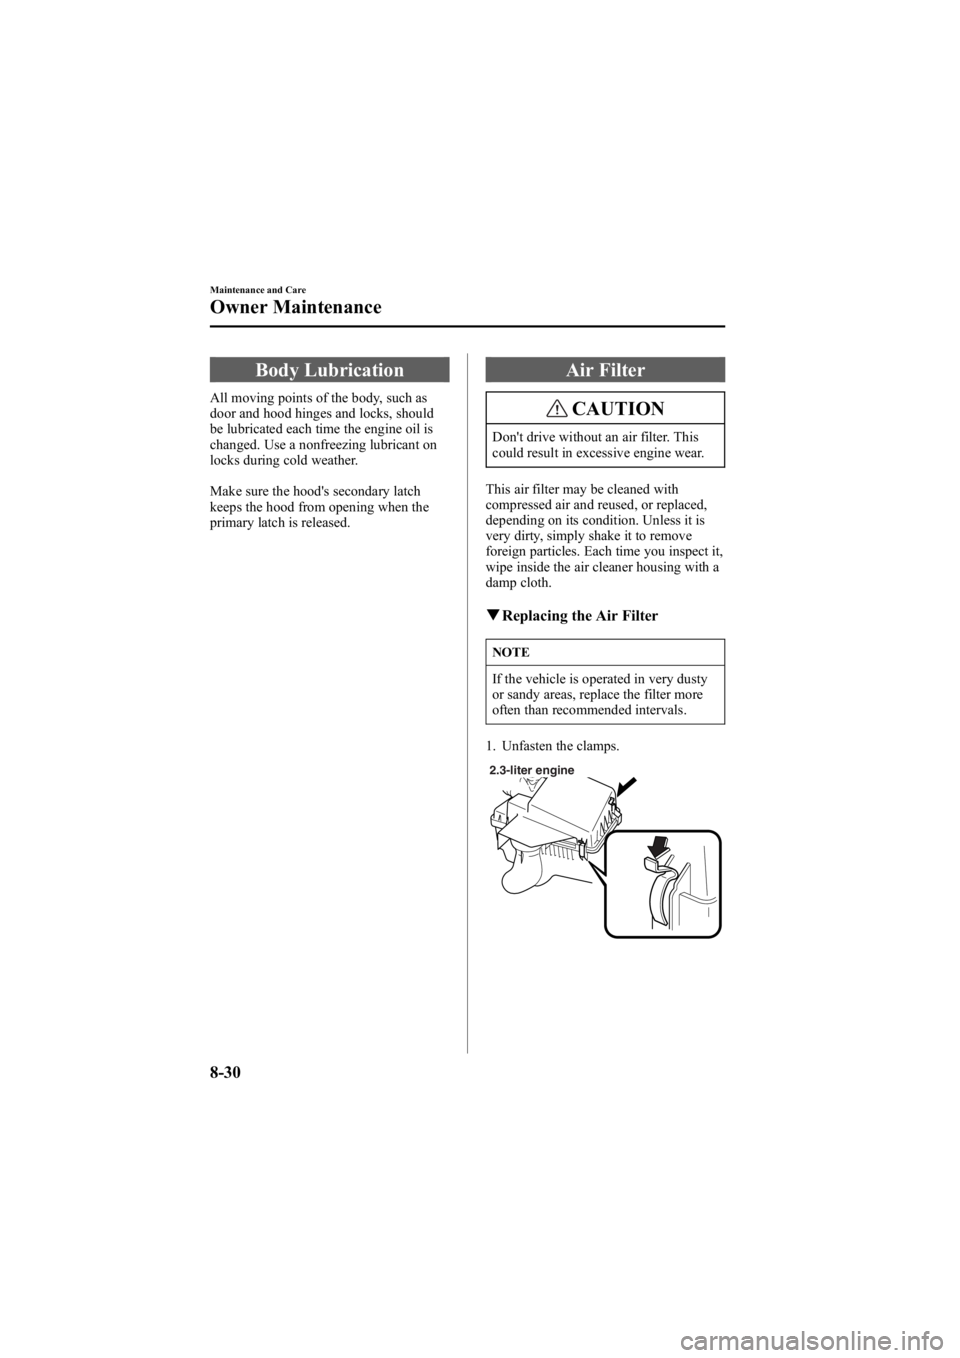
1. Unfasten the clamps.
2.3-liter engine
8-30
Maintenance and Care
Owner Maintenance
Mazda6_8V40-EA-05L_Edition1 Page296
Monday, November 28 2005 6:11 PM
Form No.8V40-EA-05L
Page 297 of 390
Black plate (297,1)
3.0-liter engine
2. Tilt or lift the air filter cover andremove the filter.
2.3-liter engine
Air filter cover Air filter
3.0-liter engine Air filter cover
Air filter
3. Wipe inside the air cleaner housing with a damp cloth.
4. Clean or replace the filter.
5. Install in the reverse order of removal. Replace the filter according to Scheduled
Maintenance (page 8-3).
Maintenance and Care
Owner Maintenance
8-31
Mazda6_8V40-EA-05L_Edition1 Page297
Monday, November 28 2005 6:11 PM
Form No.8V40-EA-05L
Page 310 of 390
Black plate (310,1)
WARNING
Xenon Fusion Bulb Replacement:
Replacing the xenon fusion bulbs
yourself is dangerous. Because the
xenon fusion bulbs require high
voltage, you could receive an electric
shock if the bulbs are handled
incorrectly. Do not replace the xenon
fusion bulbs yourself. Consult an
Authorized Mazda Dealer when the
replacement is necessary.
Handling Halogen Bulbs:
When a halogen bulb breaks, it is
dangerous. These bulbs contain
pressurized gas. If one is broken, it
will explode and serious injuries could
be caused by the flying glass.
If the glass portion is touched with
bare hands, body oil could cause the
bulb to overheat and explode when lit.
Never touch the glass portion of the
bulb with your bare hands and always
wear eye protection when handling or
working around halogen bulbs.
Children and Halogen Bulbs:
Playing with a halogen bulb is
dangerous. Serious injuries could be
caused by dropping a halogen bulb or
breaking it some other way.
Always keep halogen bulbs out of the
reach of children.
qReplacing Exterior Light Bulbs
Replacing the headlight, and parkinglight bulbs
Due to the complexity and difficulty of
the procedure, the bulbs should be
replaced by an Authorized Mazda Dealer.
Fog lights
1. If you are changing the left fog light
bulb, start the engine, turn the steering
wheel all the way to the right, and turn
off the engine. If you are changing the
right fog light bulb, turn the steering
wheel to the left.
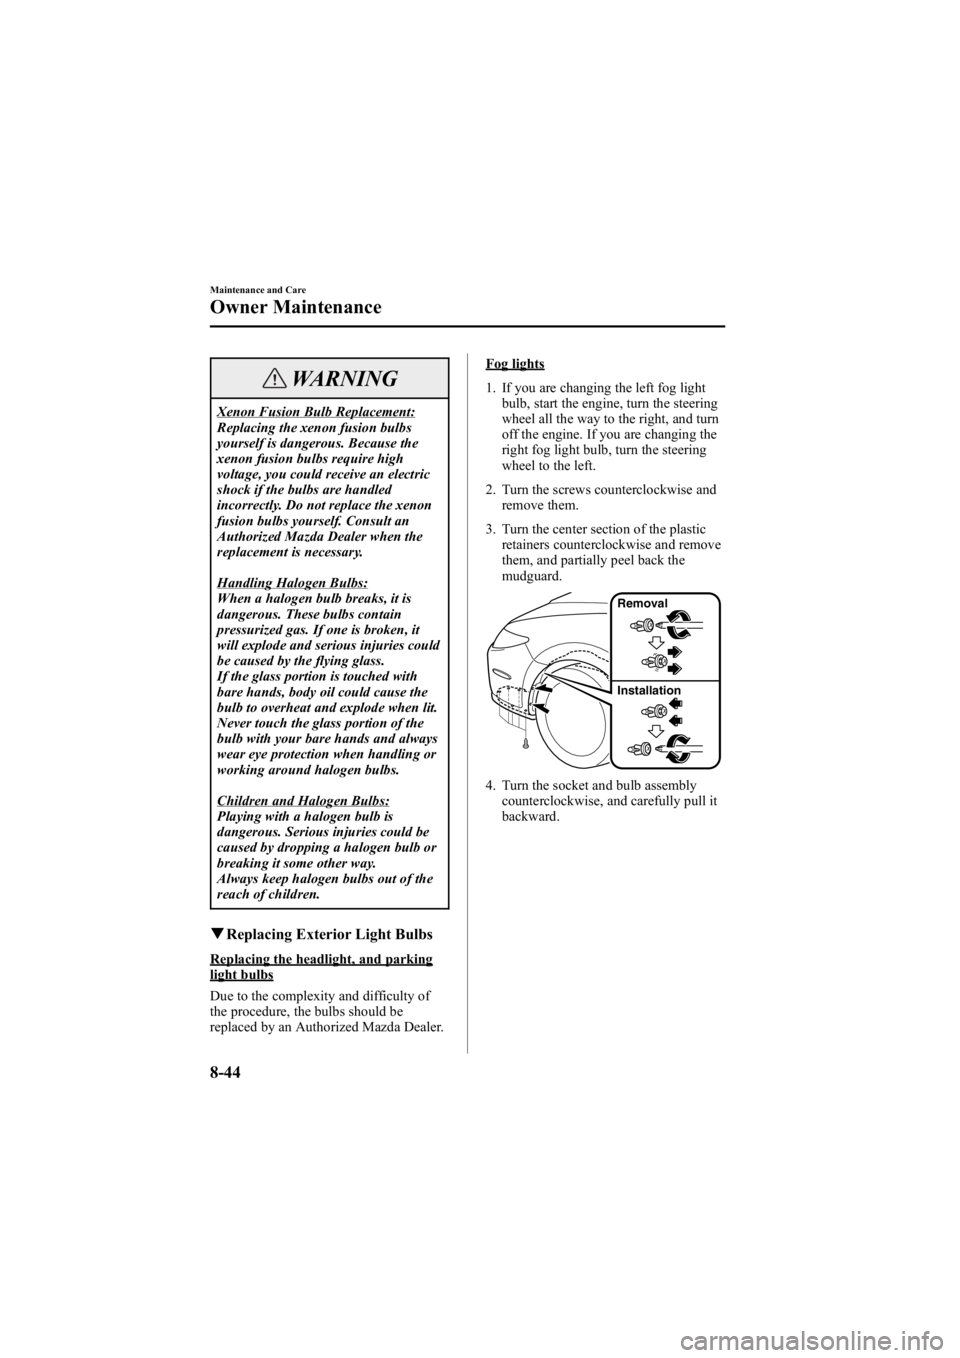
2. Turn the screws counterclockwise and remove them.
3. Turn the center section of the plastic retainers counterclockwise and remove
them, and partially peel back the
mudguard.
Removal
Installation
4. Turn the socket and bulb assemblycounterclockwise, and carefully pull it
backward.
8-44
Maintenance and Care
Owner Maintenance
Mazda6_8V40-EA-05L_Edition1 Page310
Monday, November 28 2005 6:11 PM
Form No.8V40-EA-05L
Page 311 of 390
Black plate (311,1)
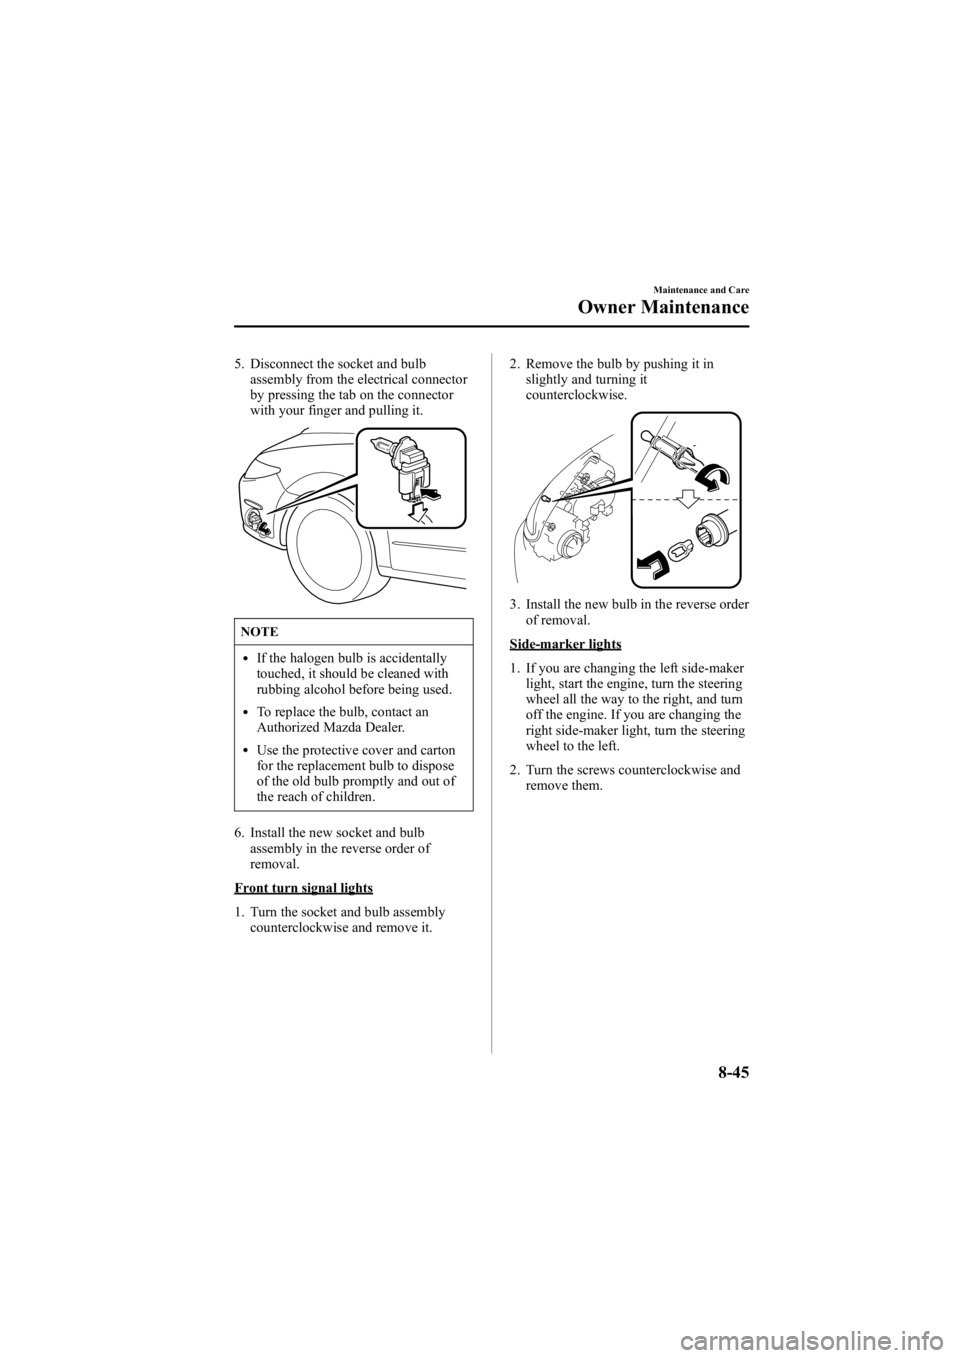
5. Disconnect the socket and bulbassembly from the electrical connector
by pressing the tab on the connector
with your finger and pulling it.
NOTE
lIf the halogen bulb is accidentally
touched, it should be cleaned with
rubbing alcohol before being used.
lTo replace the bulb, contact an
Authorized Mazda Dealer.
lUse the protective cover and carton
for the replacement bulb to dispose
of the old bulb promptly and out of
the reach of children.
6. Install the new socket and bulb assembly in the reverse order of
removal.
Front turn signal lights
1. Turn the socket and bulb assemblycounterclockwise and remove it. 2. Remove the bulb by pushing it in
slightly and turning it
counterclockwise.
3. Install the new bulb in the reverse orderof removal.
Side-marker lights
1. If you are changing the left side-maker
light, start the engine, turn the steering
wheel all the way to the right, and turn
off the engine. If you are changing the
right side-maker light, turn the steering
wheel to the left.
2. Turn the screws counterclockwise and remove them.
Maintenance and Care
Owner Maintenance
8-45
Mazda6_8V40-EA-05L_Edition1 Page311
Monday, November 28 2005 6:11 PM
Form No.8V40-EA-05L
Page 319 of 390

Black plate (319,1)
Fuses
Your vehicle's electrical system is
protected by fuses.
If any lights, accessories, or controls don't
work, inspect the appropriate circuit
protector. If a fuse has blown, the inside
element will be melted.
If the same fuse blows again, avoid using
that system and consult an Authorized
Mazda Dealer as soon as possible.
qFuse Replacement
Replacing the fuses on the driver's sidekick-panel
If the electrical system doesn't work, first
inspect fuses on the driver's side kick-
panel.
1. Turn off the ignition switch and other
switches.
2. Open the fuse panel cover by sliding the cover straight back toward you.
CAUTION
Pulling the cover off sideways may
break the retaining tabs off. 3. Pull the fuse straight out with the fuse
puller provided on the fuse block
located in the engine compartment.
4. Inspect it and replace if it's blown.
Normal Blown
5. Push in a new fuse of the same
amperage rating, and make sure it fits
tightly. If it doesn't, have an Authorized
Mazda Dealer install it.
If you have no spare fuses, borrow one
of the same rating from a circuit not
essential to vehicle operation, such as
the AUDIO or CIGAR circuit.
WARNING
Always replace a fuse with one of the
same rating. Otherwise you may
damage the electric system.
Maintenance and Care
Owner Maintenance
8-53
Mazda6_8V40-EA-05L_Edition1 Page319
Monday, November 28 2005 6:11 PM
Form No.8V40-EA-05L