2006 MAZDA MODEL 6 steering wheel
[x] Cancel search: steering wheelPage 180 of 390

Black plate (180,1)
Fully Automatic Type Air-Conditioning
CAUTION
Don't use sharp instruments or window
cleaners with abrasives to clean the
inside of the rear window surface. They
may damage the defroster grid inside
the window.
NOTE
This defroster is not designed for
melting snow. If there is an
accumulation of snow on the rear
window, remove it before using the
defroster.
Horn
To sound the horn, press around themark on the steering wheel.
5-46
Driving Your Mazda
Switches and Controls
Mazda6_8U66-EA-05F_Edition1 Page180
Friday, June 3 2005 8:47 AM
Form No.8U66-EA-05F
Page 187 of 390

Black plate (187,1)
6Interior Comfort
Use of various features for drive comfort, including air-conditioning and audio
system.
Climate Control System ............................................................... 6-2
Operating Tips ........................................................................... 6-2
Vent Operation .......................................................................... 6-3
Types of the Climate Control System ....................................... 6-5
Manual Type ............................................................................. 6-6
Fully Automatic Type ............................................................. 6-11
Audio System ............................................................................... 6-16
Antenna ................................................................................... 6-16
Operating Tips for Audio System ........................................... 6-16
Audio Set ................................................................................ 6-27
Audio Control Switch Operation (Steering Wheel)
í............. 6-43
Safety Certification ................................................................. 6-46
Interior Equipment ..................................................................... 6-47
Sunvisors ................................................................................. 6-47
Interior Lights ......................................................................... 6-47
Information Display ................................................................ 6-50
Cup Holder .............................................................................. 6-52
Bottle Holder ........................................................................... 6-53
Storage Compartments ............................................................ 6-54
Accessory Sockets .................................................................. 6-57
6-1íSome models.
Mazda6_8U66-EA-05F_Edition1 Page187
Friday, June 3 2005 8:47 AM
Form No.8U66-EA-05F
Page 202 of 390

Black plate (202,1)
Antenna
qDetachable Type
To remove the antenna, turn it
counterclockwise.
To install the antenna, turn it clockwise.
Make sure the antenna is securely
installed.
Install Remove
CAUTION
To prevent damage to the antenna,
remove it before entering a car wash
facility or passing beneath a low
overhead clearance.
NOTE
When leaving your vehicle unattended,
we recommend that you remove the
antenna and store it inside the vehicle.
Operating Tips for Audio
System
WARNING
Do Not Adjust Audio While Drivingthe Vehicle:
Adjusting the audio while driving the
vehicle is dangerous as it could
distract your attention from the vehicle
operation which could lead to a
serious accident. Always adjust the
audio while the vehicle is stopped.
Even if the audio control switches are
equipped on the steering wheel, learn
to use the switches without looking
down at them so that you can keep
your maximum attention on the road
while driving the vehicle.
CAUTION
For the purposes of safe driving, adjust
the audio volume to a level that allows
you to hear sounds outside of the
vehicle.
NOTE
lDo not use the audio for long periods
of time while the engine is off.
Otherwise the battery could go dead.
lIf a digital cellular phone or CB
radio is used in or near the vehicle, it
could cause noise to occur from the
audio system, however, this does not
indicate that the system has been
damaged.
6-16
Interior Comfort
Audio System
Mazda6_8U66-EA-05F_Edition1 Page202
Friday, June 3 2005 8:47 AM
Form No.8U66-EA-05F
Page 229 of 390

Black plate (229,1)
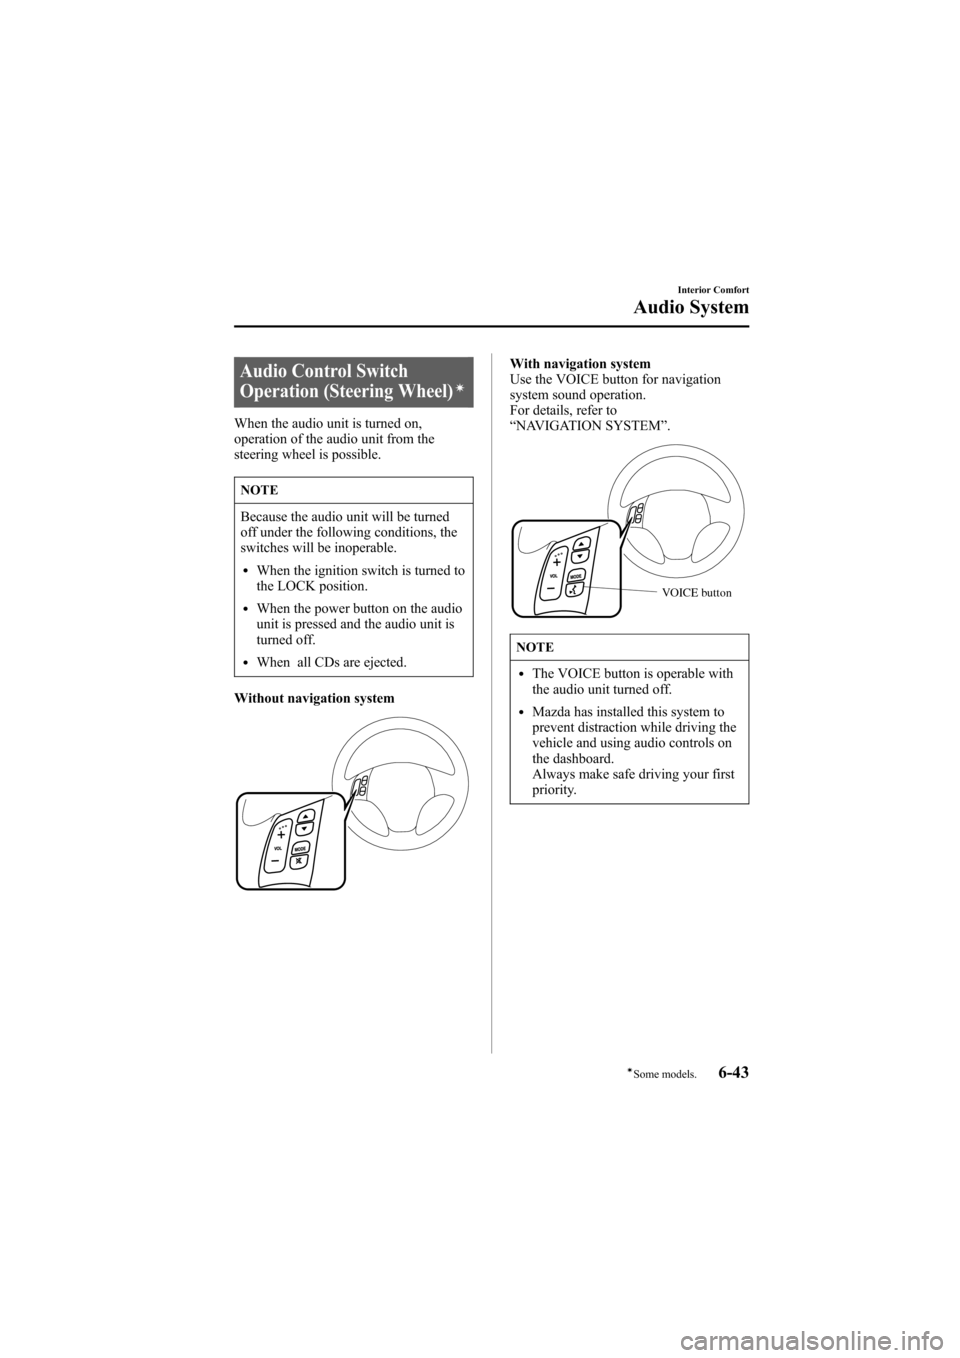
Audio Control Switch
Operation (Steering Wheel)í
When the audio unit is turned on,
operation of the audio unit from the
steering wheel is possible.
NOTE
Because the audio unit will be turned
off under the following conditions, the
switches will be inoperable.
lWhen the ignition switch is turned to
the LOCK position.
lWhen the power button on the audio
unit is pressed and the audio unit is
turned off.
lWhen all CDs are ejected.
Without navigation system
With navigation system
Use the VOICE button for navigation
system sound operation.
For details, refer to
“NAVIGATION SYSTEM”.
VOICE button
NOTE
lThe VOICE button is operable with
the audio unit turned off.
lMazda has installed this system to
prevent distraction while driving the
vehicle and using audio controls on
the dashboard.
Always make safe driving your first
priority.
Interior Comfort
Audio System
6-43íSome models. Mazda6_8U66-EA-05F_Edition1 Page229
Friday, June 3 2005 8:48 AM
Form No.8U66-EA-05F
Page 252 of 390

Black plate (252,1)
Changing a Flat Tire
NOTE
If the following occurs while driving, it
could indicate a flat tire.
lSteering becomes difficult.
lThe vehicle begins to vibrate
excessively.
lThe vehicle pulls in one direction.
If you have a flat tire, drive slowly to a
level spot that is well off the road and out
of the way of traffic to change the tire.
Stopping in traffic or on the shoulder of a
busy road is dangerous.
WARNING
Jacking a Vehicle:
Changing a tire is dangerous if not
done properly. The vehicle can slip off
the jack and seriously injure someone.
Be sure to follow the directions for
changing a tire, and never get under a
vehicle that is supported only by a
jack.
Passenger in Vehicle Supported by aJack:
Allowing someone to remain in a
vehicle supported by a jack is
dangerous. The occupant could cause
the vehicle to fall resulting in serious
injury. Never allow anyone inside a
vehicle supported by a jack.
NOTE
Make sure the jack is well lubricated
before using it.1. Park on a level surface off the right-of-
way and firmly set the parking brake.
2. Put a vehicle with an automatic
transaxle in Park (P), a manual
transaxle in Reverse (R) or 1, and turn
off the engine.
3. Turn on the hazard warning flasher.
4. Have everyone get out of the vehicle
and away from the vehicle and traffic.
5. Remove the jack, tool, and spare tire
(page 7-3).
6. Block the wheel diagonally opposite
the flat tire. When blocking a wheel,
place a tire block both in front and
behind the tire.
NOTE
When blocking a tire, use rocks or
wood blocks of sufficient size to hold
the tire in place.
7-8
In Case of an Emergency
Flat Tire
Mazda6_8U66-EA-05F_Edition1 Page252
Friday, June 3 2005 8:48 AM
Form No.8U66-EA-05F
Page 306 of 390

Black plate (306,1)
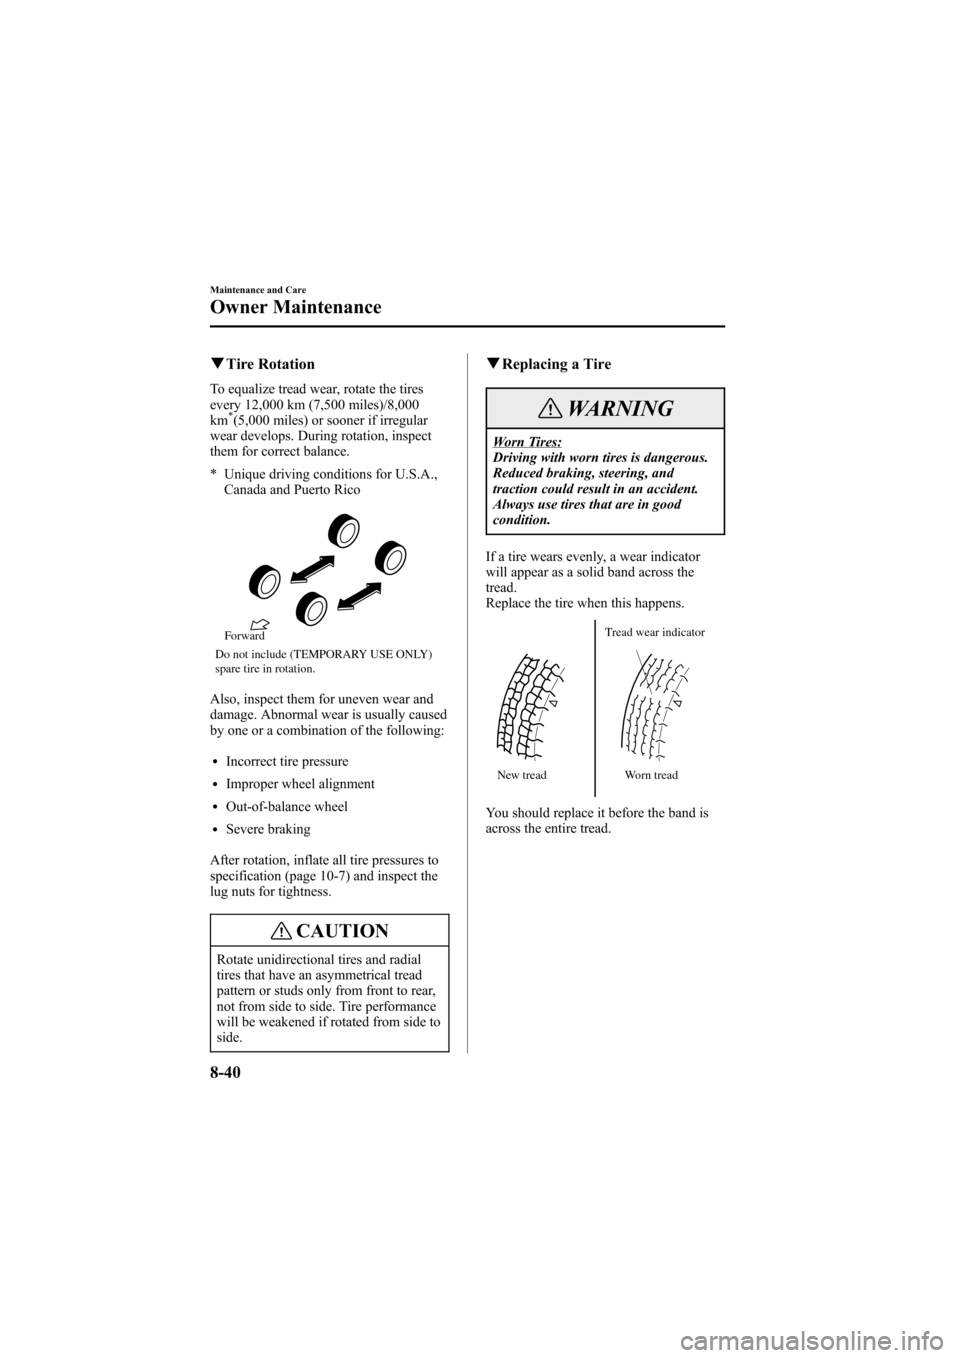
qTire Rotation
To equalize tread wear, rotate the tires
every 12,000 km (7,500 miles)/8,000
km
*(5,000 miles) or sooner if irregular
wear develops. During rotation, inspect
them for correct balance.
* Unique driving conditions for U.S.A.,
Canada and Puerto Rico
Do not include (TEMPORARY USE ONLY)
spare tire in rotation.Forward
Also, inspect them for uneven wear and
damage. Abnormal wear is usually caused
by one or a combination of the following:
lIncorrect tire pressure
lImproper wheel alignment
lOut-of-balance wheel
lSevere braking
After rotation, inflate all tire pressures to
specification (page 10-7) and inspect the
lug nuts for tightness.
CAUTION
Rotate unidirectional tires and radial
tires that have an asymmetrical tread
pattern or studs only from front to rear,
not from side to side. Tire performance
will be weakened if rotated from side to
side.
qReplacing a Tire
WARNING
Worn Tires:
Driving with worn tires is dangerous.
Reduced braking, steering, and
traction could result in an accident.
Always use tires that are in good
condition.
If a tire wears evenly, a wear indicator
will appear as a solid band across the
tread.
Replace the tire when this happens.
New treadTread wear indicator
Worn tread
You should replace it before the band is
across the entire tread.
8-40
Maintenance and Care
Owner Maintenance
Mazda6_8U66-EA-05F_Edition1 Page306
Friday, June 3 2005 8:49 AM
Form No.8U66-EA-05F
Page 310 of 390

Black plate (310,1)
WARNING
Xenon Fusion Bulb Replacement:
Replacing the xenon fusion bulbs
yourself is dangerous. Because the
xenon fusion bulbs require high
voltage, you could receive an electric
shock if the bulbs are handled
incorrectly. Do not replace the xenon
fusion bulbs yourself. Consult an
Authorized Mazda Dealer when the
replacement is necessary.
Handling Halogen Bulbs:
When a halogen bulb breaks, it is
dangerous. These bulbs contain
pressurized gas. If one is broken, it
will explode and serious injuries could
be caused by the flying glass.
If the glass portion is touched with
bare hands, body oil could cause the
bulb to overheat and explode when lit.
Never touch the glass portion of the
bulb with your bare hands and always
wear eye protection when handling or
working around halogen bulbs.
Children and Halogen Bulbs:
Playing with a halogen bulb is
dangerous. Serious injuries could be
caused by dropping a halogen bulb or
breaking it some other way.
Always keep halogen bulbs out of the
reach of children.
qReplacing Exterior Light Bulbs
Replacing the headlight, and parkinglight bulbs
Due to the complexity and difficulty of
the procedure, the bulbs should be
replaced by an Authorized Mazda Dealer.
Fog lights
1. If you are changing the left fog light
bulb, start the engine, turn the steering
wheel all the way to the right, and turn
off the engine. If you are changing the
right fog light bulb, turn the steering
wheel to the left.
2. Turn the screws counterclockwise and
remove them.
3. Turn the center section of the plastic
retainers counterclockwise and remove
them, and partially peel back the
mudguard.
Removal
Installation
4. Turn the socket and bulb assembly
counterclockwise, and carefully pull it
backward.
8-44
Maintenance and Care
Owner Maintenance
Mazda6_8U66-EA-05F_Edition1 Page310
Friday, June 3 2005 8:49 AM
Form No.8U66-EA-05F
Page 311 of 390

Black plate (311,1)
5. Disconnect the socket and bulb
assembly from the electrical connector
by pressing the tab on the connector
with your finger and pulling it.
NOTE
lIf the halogen bulb is accidentally
touched, it should be cleaned with
rubbing alcohol before being used.
lTo replace the bulb, contact an
Authorized Mazda Dealer.
lUse the protective cover and carton
for the replacement bulb to dispose
of the old bulb promptly and out of
the reach of children.
6. Install the new socket and bulb
assembly in the reverse order of
removal.
Front turn signal lights
1. Turn the socket and bulb assembly
counterclockwise and remove it.2. Remove the bulb by pushing it in
slightly and turning it
counterclockwise.
3. Install the new bulb in the reverse order
of removal.
Side-marker lights
1. If you are changing the left side-maker
light, start the engine, turn the steering
wheel all the way to the right, and turn
off the engine. If you are changing the
right side-maker light, turn the steering
wheel to the left.
2. Turn the screws counterclockwise and
remove them.
Maintenance and Care
Owner Maintenance
8-45
Mazda6_8U66-EA-05F_Edition1 Page311
Friday, June 3 2005 8:49 AM
Form No.8U66-EA-05F