Page 382 of 426

10
Getting started
Activation
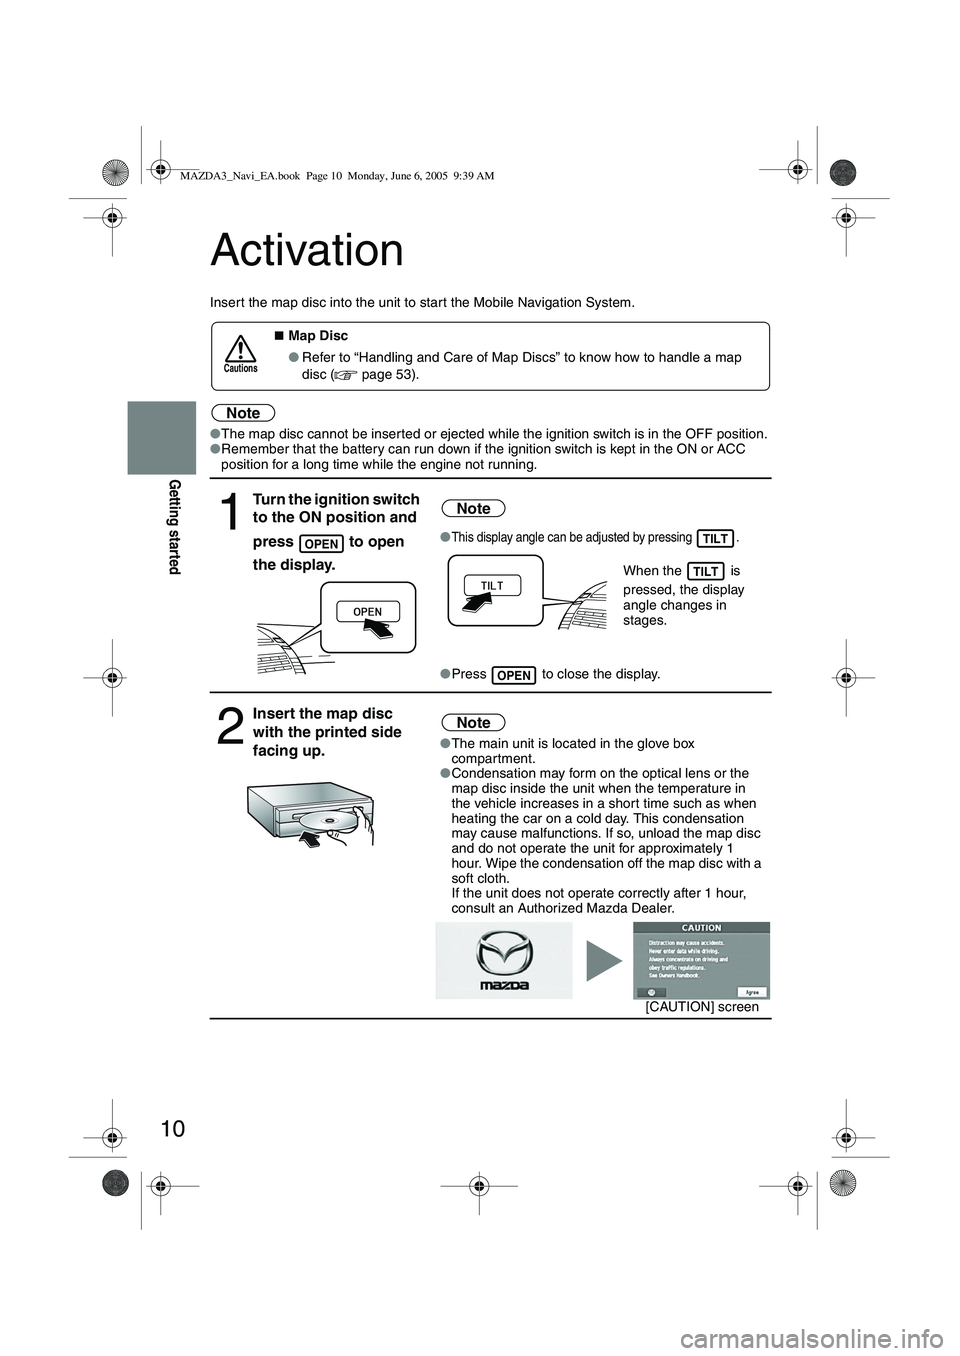
Insert the map disc into the unit to star t the Mobile Navigation System.
Note
●The map disc cannot be inserted or ejected while the ignition switch is in the OFF position.
● Remember that the battery can run down if the ignition switch is kept in the ON or ACC
position for a long time while the engine not running.
■Map Disc
● Refer to “Handling and Care of Map Discs” to know how to handle a map
disc (
page 53).
1
Turn the ignition switch
to the ON position and
press
to open
the display.
Note
●This display angle can be adjusted by pressing .
When the is
pressed, the display
angle changes in
stages.
● Press to close the display.
2
Insert the map disc
with the printed side
facing up.Note
●The main unit is located in the glove box
compartment.
● Condensation may form on the optical lens or the
map disc inside the unit when the temperature in
the vehicle increases in a shor t time such as when
heating the car on a cold day. This condensation
may cause malfunctions. If so, unload the map disc
and do not operate the unit for approximately 1
hour. Wipe the condensation off the map disc with a
soft cloth.
If the unit does not operate correctly after 1 hour,
consult an Authorized Mazda Dealer.
Cautions
OPENTILT
TILT
OPEN
[CAUTION] screen
MAZDA3_Navi_EA.book Page 10 Monday, June 6, 2005 9:39 AM
Page 384 of 426

12
Getting started
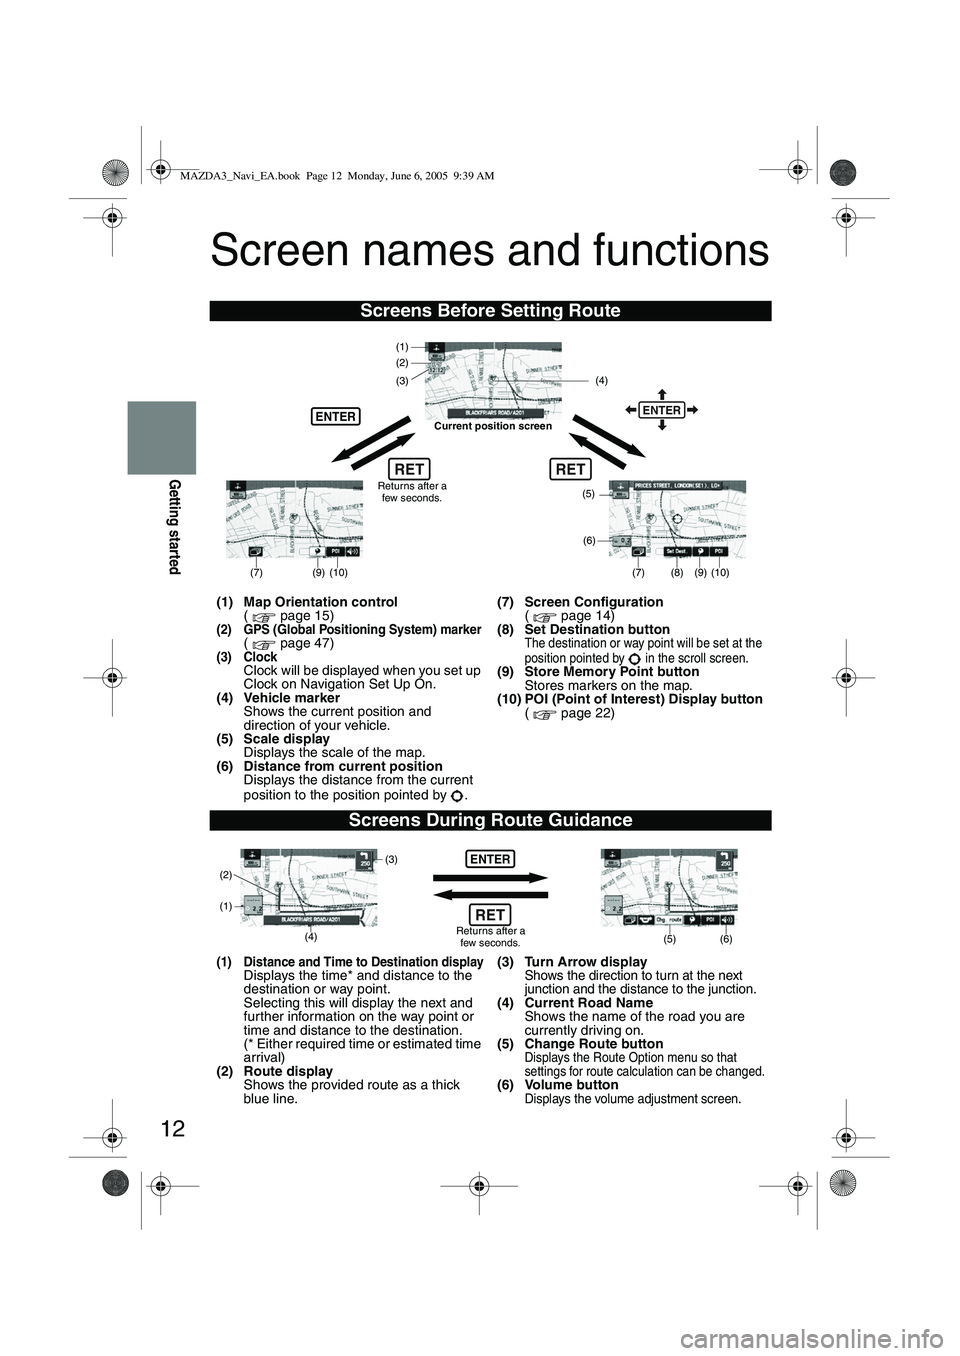
Screen names and functions
Screens Before Setting Route
(1) Map Orientation control( page 15)
(2) GPS (Global Positioning System) marker( page 47)(3) ClockClock will be displayed when you set up
Clock on Navigation Set Up On.
(4) Vehicle marker Shows the current position and
direction of your vehicle.
(5) Scale display Displays the scale of the map.
(6) Distance from current position Displays the distance from the current
position to the position pointed by . (7) Screen Configuration
( page 14)
(8) Set Destination button
The destination or way point will be set at the
position pointed by in the scroll screen.
(9) Store Memory Point button Stores markers on the map.
(10) POI (Point of Interest) Display button ( page 22)
Screens During Route Guidance
(1) Distance and Time to Destination displayDisplays the time* and distance to the
destination or way point.
Selecting this will display the next and
fur ther information on the way point or
time and distance to the destination.
(* Either required time or estimated time
arrival)
(2) Route display Shows the provided route as a thick
blue line. (3) Turn Arrow displayShows the direction to turn at the next
junction and the distance to the junction.
(4) Current Road Name
Shows the name of the road you are
currently driving on.
(5) Change Route button
Displays the Route Option menu so that
settings for route calculation can be changed.
(6) Volume buttonDisplays the volume adjustment screen.
RET
(6)
(7)
(8) (9) (10)
(5)
(4)
(3)
ENTER
(1)(2)
Returns after a
few seconds.
ENTER
RET
Current position screen
(7)
(9) (10)
ENTER
(5) (6)(4) (3)
(1)
(2)
Returns after a few seconds.RET
MAZDA3_Navi_EA.book Page 12 Monday, June 6, 2005 9:39 AM
Page 385 of 426

13
Getting started
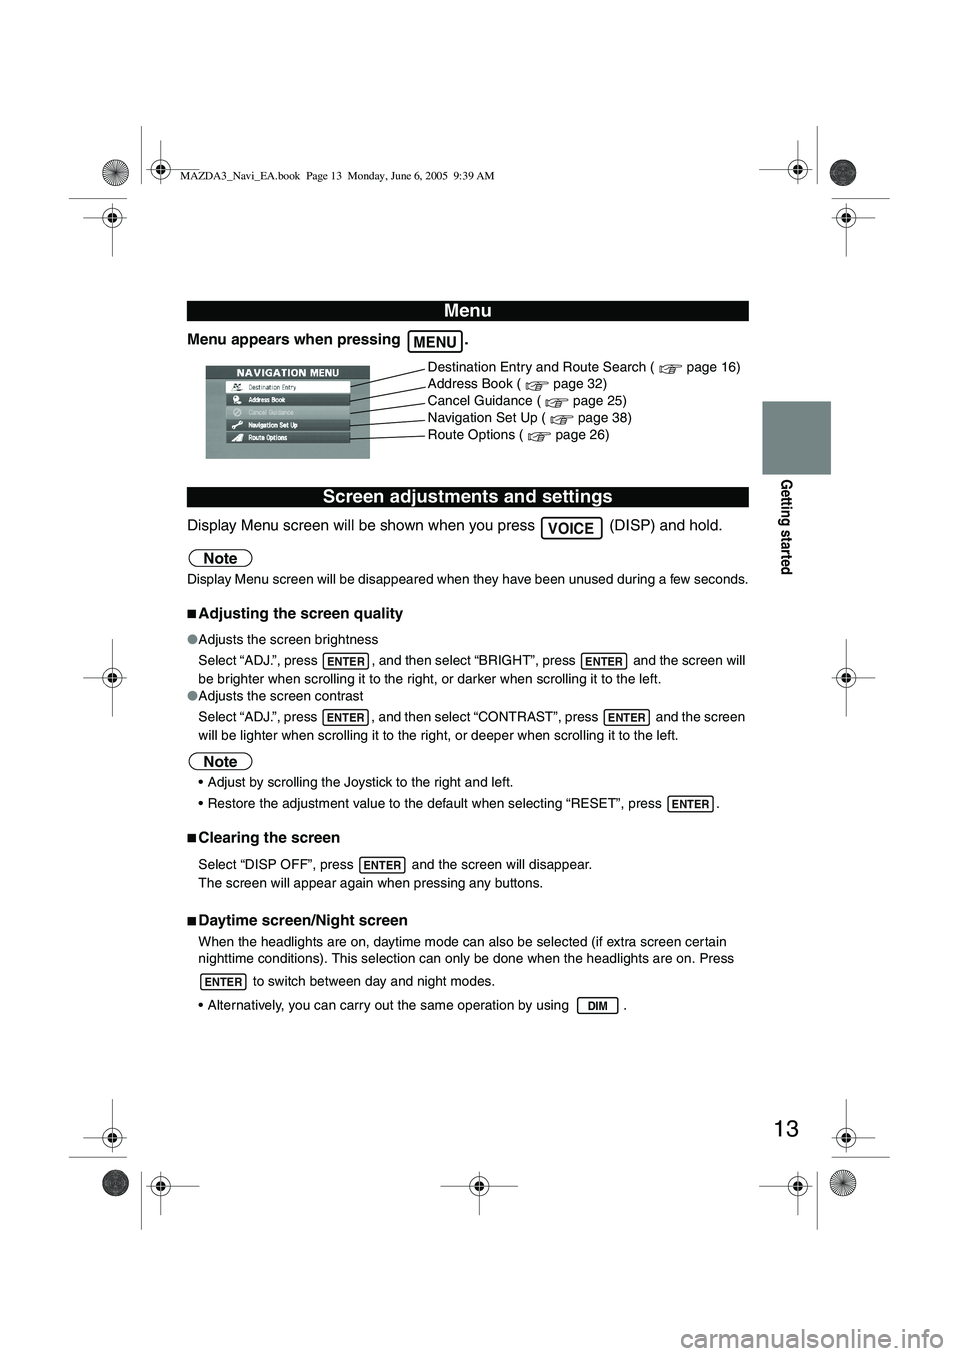
Menu appears when pressing .
Display Menu screen will be shown when you press (DISP) and hold.
Note
Display Menu screen will be disappeared when they have been unused during a few seconds.
■Adjusting the screen quality
●Adjusts the screen brightness
Select “ADJ.”, press , and then select “BRIGHT”, press and the screen will
be brighter when scrolling it to the right, or darker when scrolling it to the left.
● Adjusts the screen contrast
Select “ADJ.”, press , and then select “CONTRAST”, press and the screen
will be lighter when scrolling it to the right, or deeper when scrolling it to the left.
Note
Adjust by scrolling the Joystick to the right and left.
Restore the adjustment value to the default when selecting “RESET”, press .
■Clearing the screen
Select “DISP OFF”, press and the screen will disappear.
The screen will appear again when pressing any buttons.
■Daytime screen/Night screen
When the headlights are on, daytime mode can also be selected (if extra screen cer tain
nighttime conditions). This selection can only be done when the headlights are on. Press
to switch between day and night modes.
Alternatively, you can carry out the same operation by using .
Menu
Screen adjustments and settings
MENU
Destination Entry and Route Search ( page 16)
Address Book ( page 32)
Cancel Guidance ( page 25)
Navigation Set Up ( page 38)
Route Options ( page 26)
VOICE
ENTERENTER
ENTERENTER
ENTER
ENTER
ENTER
DIM
MAZDA3_Navi_EA.book Page 13 Monday, June 6, 2005 9:39 AM
Page 389 of 426

17
Routing
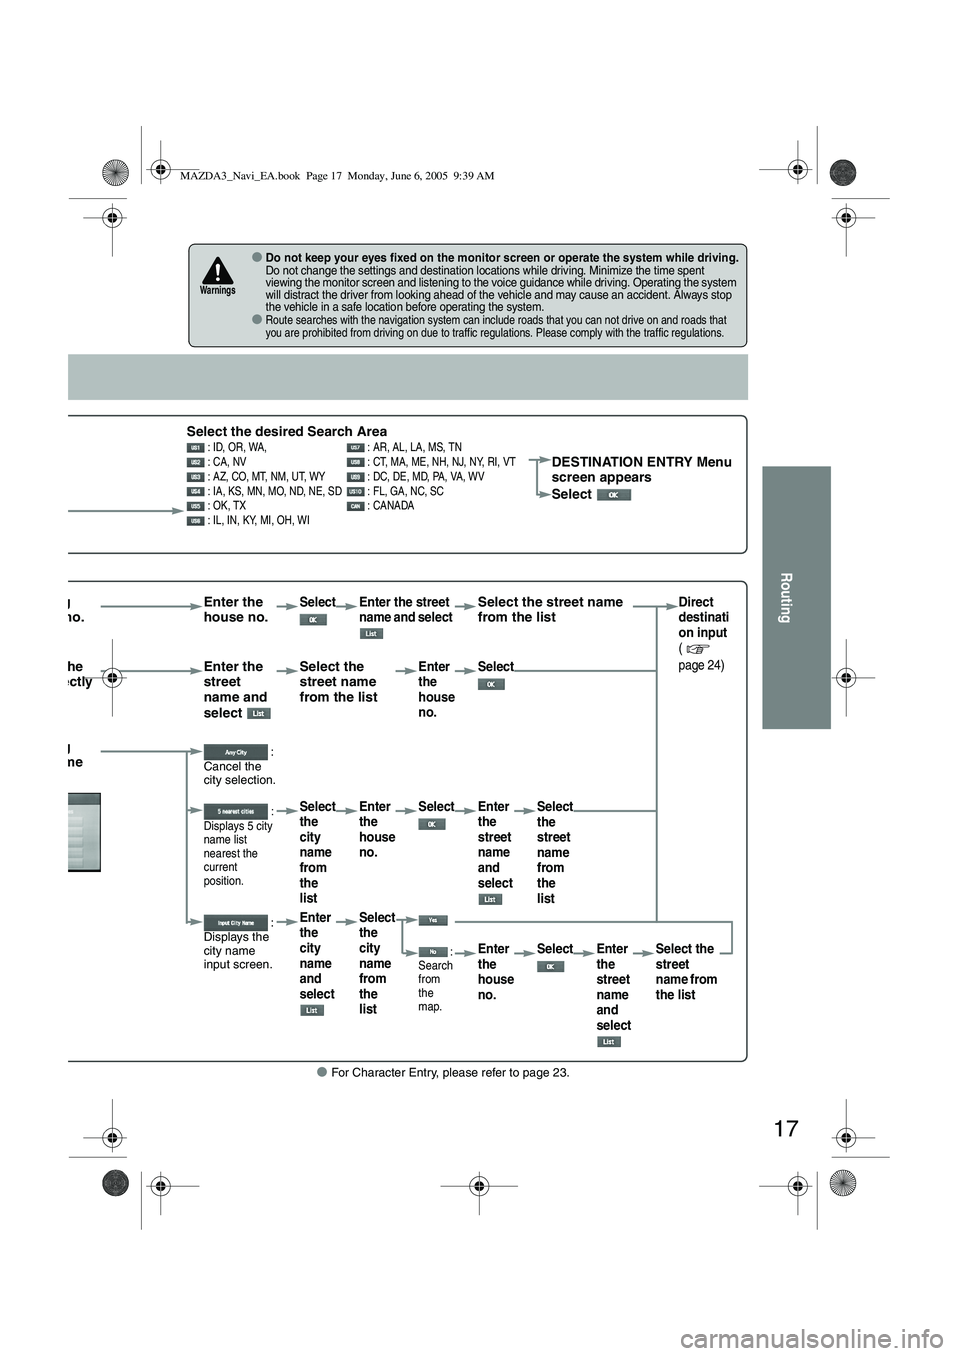
● For Character Entry, please refer to page 23.
●Do not keep your eyes fixed on the monitor screen or operate the system while driving.Do not change the settings and destination locations while driving. Minimize the time spent
viewing the monitor screen and listening to the voice guidance while driving. Operating the system
will distract the driver from looking ahead of the vehicle and may cause an accident. Always stop
the vehicle in a safe location before operating the system.
●Route searches with the navigation system can include roads that you can not drive on and roads that
you are prohibited from driving on due to traffic regulations. Please comply with the traffic regulations.
Warnings
Select the desired Search Area : ID, OR, WA, : AR, AL, LA, MS, TN
: CA, NV : CT, MA, ME, NH, NJ, NY, RI, VT
: AZ, CO, MT, NM, UT, WY : DC, DE, MD, PA, VA, WV
: IA, KS, MN, MO, ND, NE, SD : FL, GA, NC, SC
: OK, TX : CANADA
: IL, IN, KY, MI, OH, WIDESTINATION ENTRY Menu
screen appears
Select
rrowing house no. Enter the
house no.Select Enter the street
name and select Select the street name
from the listDirect
destinati
on input
(
page 24)
tering the
me directly Enter the
street
name and
select Select the
street name
from the listEnter
the
house
no.
Select
rrowing city name :
Cancel the
city selection.
:
Displays 5 city
name list
nearest the
current
position.Select
the
city
name
from
the
list Enter
the
house
no.
Select Enter
the
street
name
and
select Select
the
street
name
from
the
list
:
Displays the
city name
input screen.Enter
the
city
name
and
select Select
the
city
name
from
the
list
:
Search
from
the
map.Enter
the
house
no. Select Enter
the
street
name
and
select Select the
street
name from
the list
MAZDA3_Navi_EA.book Page 17 Monday, June 6, 2005 9:39 AM
Page 410 of 426
38
Navigation Set Up
Navigation Set Up
●You can alter the map display conditions, the route guidance conditions and show the
system information.
■Stop your vehicle before the following operations. Do not change the settings and destination locations while driving. Minimize the time
spent viewing the monitor screen and listening to the voice guidance while driving.
Operating the system will distract the driver from looking ahead of the vehicle and may
cause an accident.
Always stop the vehicle in a safe location and put the parking brake on before operating
the system.
Before Steps select
Warning
MENUENTERENTER
Open
[NAVIGATION SET UP] ( page 39)
( page 41)
( page 45)
( page 45)
( page 42)
( page 44)
MAZDA3_Navi_EA.book Page 38 Monday, June 6, 2005 9:39 AM
Page 411 of 426
![MAZDA MODEL 5 2006 Owners Manual 39
Navigation Set Up
Navigation Set Up
Before Steps
select
select
User Setting
MENUENTERENTER
ENTERENTER
Open the
[USER SETTINGS]
screen
Select page
■
How to exit
■MAP Color
Select MAZDA MODEL 5 2006 Owners Manual 39
Navigation Set Up
Navigation Set Up
Before Steps
select
select
User Setting
MENUENTERENTER
ENTERENTER
Open the
[USER SETTINGS]
screen
Select page
■
How to exit
■MAP Color
Select](/manual-img/28/41037/w960_41037-410.png)
39
Navigation Set Up
Navigation Set Up
Before Steps
select
select
User Setting
MENUENTERENTER
ENTERENTER
Open the
[USER SETTINGS]
screen
Select page
■
How to exit
■MAP Color
Select a screen color from of options.
■Map Mode
●Auto : The display will automatically switch between Day and Night illumination mode when the headlights are
turned off and on respectively.
●Day : The display will be presented in Day illumination mode regardless of whether the headlights are on or off.
●Night : The display will be presented in Night illumination mode regardless of whether the headlights are on or off.
■Distance
Select the distance unit from or .
■Notify traffic restriction
The display of warnings during route guidance when passing
through areas with traffic restrictions can be turned on or off
■Arrival Time
The time which is displayed until the destination or a way point
can be set as an estimated arrival time or the remaining time.
Select to display the estimated arrival time, or to
display the remaining time.
MAZDA3_Navi_EA.book Page 39 Monday, June 6, 2005 9:39 AM
Page 412 of 426
40
Navigation Set Up
Navigation Set Up
Before Steps
select
select
User Setting
MENUENTERENTER
ENTERENTER
Open the
[USER SETTINGS]
screen
Select page
Select page
■
How to exit
■Keyboard layout
The layout of input keys can be selected as or .
■Guidance Screen
Select whether Enlarged Junction diagram screen is displayed
automatically.
■freeway information
Allows selection of whether guidance screen is to be displayed
while driving on freeway.
■Clock
Allows selection of whether clock is to be displeyed.
■Beep
Allows selection of whether beep will sound.
MAZDA3_Navi_EA.book Page 40 Monday, June 6, 2005 9:39 AM
Page 413 of 426
41
Navigation Set Up
Navigation Set Up
This function allows you set the categories on the area displayed when the (Point of interest)
menu is selected on the map. Quick POI enables you store up to six different kinds category
which you use most regularly.
1 select
2 select
Quick POI Selection
MENUENTERENTER
ENTERENTER
Open the [QUICK POI SELECTION] screen
Select the button for Quick POI storage.
Note
●
Select the category to be changed
: This button allows you to restore the factory setting.
Select a category.
Once selected, subcategories will be displayed. : Subcategories from all of the individual categories will be
displayed together.
Select the subcategories to be displayed on the
map.
Repeat the above steps to add further POI markers displayed on the menu.
MAZDA3_Navi_EA.book Page 41 Monday, June 6, 2005 9:39 AM