Page 1 of 256
Introduction 4
Instrument Cluster 10
Warning and control lights 10
Gauges 13
Entertainment Systems 16
AM/FM stereo with in-dash six CD 16
Climate Controls 21
Electronic automatic temperature control 21
Rear window defroster 23
Lights 24
Headlamps 24
Turn signal control 27
Bulb replacement 29
Driver Controls 34
Windshield wiper/washer control 34
Power windows 40
Mirrors 42
Speed control 44
Message center 52
Tailgate 60
Locks and Security 63
Keys 63
Locks 63
Anti-theft system 74
Table of Contents
1
2006 Mark LT(mlt)
Owners Guide (post-2002-fmt)
USA(fus)
Page 12 of 256

Charging system:Illuminates when
the battery is not charging properly.
Door ajar:Illuminates when the
ignition is in the ON position and
any door is open.
Overdrive off:Illuminates when
the overdrive function of the
transmission has been turned off,
refer to theDrivingchapter. If the
light flashes steadily or does not illuminate, have the transmission
serviced soon, or damage may occur.
Four wheel drive low:Illuminates
when four-wheel drive low is
engaged.
Four wheel drive high:Illuminates
when four-wheel drive high is
engaged.
Speed control:Illuminates when
the speed control is activated. Turns
off when the speed control system
is deactivated.
Turn signal:Illuminates when the
left or right turn signal or the
hazard lights are turned on. If the
indicators stay on or flash faster, check for a burned out bulb.
High beams:Illuminates when the
high beam headlamps are turned on.
Key-in-ignition warning chime:Sounds when the key is left in the
ignition in the OFF/LOCK or ACCESSORY position and the driver’s door
is opened.
Headlamps on warning chime:Sounds when the headlamps or parking
lamps are on, the ignition is off (the key is not in the ignition) and the
driver’s door is opened.
O/D
OFF
4x4
LOW
4x4 HI
2006 Mark LT(mlt)
Owners Guide (post-2002-fmt)
USA(fus)
Instrument Cluster
12
Page 20 of 256

Radio reception factors:
There are three factors that can effect radio reception:
•Distance/strength: The further you travel from an FM station, the
weaker the signal and the weaker the reception.
•Terrain: Hills, mountains, tall buildings, power lines, electric fences,
traffic lights and thunderstorms can interfere with your reception.
•Station overload: When you pass a broadcast tower, a stronger signal
may overtake a weaker one and play while the weak station frequency
is displayed.
CD/CD player care
Do:
•Handle discs by their edges only. Never touch the playing surface.
•Inspect discs before playing. Clean only with an approved CD cleaner
and wipe from the center out.
Don’t:
•Expose discs to direct sunlight or heat sources for extended periods
of time.
•Insert more than one disc into each slot of the CD changer magazine.
•Clean using a circular motion.
CD units are designed to play commercially pressed 4.75 in (12 cm)
audio compact discs only. Due to technical incompatibility, certain
recordable and re-recordable compact discs may not function
correctly when used in Ford CD players. Irregular shaped CDs, CDs
with a scratch protection film attached, and CDs with homemade
paper (adhesive) labels should not be inserted into the CD player.
The label may peel and cause the CD to become jammed. It is
recommended that homemade CDs be identified with permanent
felt tip marker rather than adhesive labels. Ballpoint pens may
damage CDs. Please contact your dealer for further information.
Audio system warranty and service
Refer to theWarranty Guidefor audio system warranty information. If
service is necessary, see your dealer or qualified technician.
ACCESSORY DELAY
With accessory delay, the window switches, moon roof (if equipped) and
audio system may be used for up to ten minutes after the ignition switch
is turn to the OFF position or until any door is opened.
2006 Mark LT(mlt)
Owners Guide (post-2002-fmt)
USA(fus)
Entertainment Systems
20
Page 27 of 256
5. Locate the vertical adjuster on
each headlamp, then usea4mm
socket/wrench to turn the adjuster
either counterclockwise (to adjust
down) or clockwise (to adjust up)
aligning the upper edge of the light
pattern up to the horizontal line.
6. HORIZONTAL AIM IS NOT
REQUIRED FOR THIS VEHICLE
AND IS NON-ADJUSTABLE.
7. Repeat Steps 3–5 for the other headlamp.
8. Close the hood and turn off the lamps.
TURN SIGNAL CONTROL
•Push down to activate the left
turn signal.
•Push up to activate the right turn
signal.
INTERIOR LAMPS
Map lamps
To turn on the map lamps, press the
control next to each lamp.
2006 Mark LT(mlt)
Owners Guide (post-2002-fmt)
USA(fus)
Lights
27
Page 30 of 256
Function Number of
bulbsTrade number
Backup lamp 2 3155K
Rear stop/turn/sidemarker/tail
lamp2 4057K or 3057K
High-mount brakelamp 1 921
Cargo lamp 2 921
Map lamp 2 906
Rear dome lamp 1 921
License plate lamp 2 194
Exterior mounted mirror turn
signal indicator1 See your dealer
All replacement bulbs are clear in color except where noted.
To replace all instrument panel lights - see your dealer
Replacing headlamp bulbs
1. Make sure that the headlamp control is in the OFF position and open
the hood.
2. At the top and inboard side of the
headlamp, peel the protective cover
back and loosen the three retaining
screws.
3. Once the three retaining screws
have been removed, disengage the
tab at the top center of the
headlamp assembly by lifting it up.
4. Slide headlamp assembly forward
disconnecting the snap attachment
at the fender and disconnect the electrical connector from the bulb by
pulling rearward.
2006 Mark LT(mlt)
Owners Guide (post-2002-fmt)
USA(fus)
Lights
30
Page 31 of 256
5. Remove the bulb by turning it
counterclockwise, then pull it
straight out.
Handle a halogen headlamp bulb carefully and keep out of
children’s reach. Grasp the bulb only by its plastic base and do
not touch the glass. The oil from your hand could cause the bulb to
break the next time the headlamps are operated.
Install the new bulb in reverse order.
Replacing front parking lamp/turn signal/sidemarker bulbs
1. Make sure the headlamp control
is in the OFF position and open the
hood.
2. At the top and inboard side of the
headlamp, peel the protective cover
back and loosen the three retaining
screws.
3. Once the three retaining screws
have been removed, disengage the
tab at the top center of the
headlamp assembly by lifting it up.
2006 Mark LT(mlt)
Owners Guide (post-2002-fmt)
USA(fus)
Lights
31
Page 32 of 256
4. Slide the headlamp assembly
forward disconnecting the snap
attachment at the fender.
5. Remove bulb socket from the
lamp assembly by turning it
counterclockwise and then pull the
bulb straight out.
Install the new bulb(s) in reverse order.
Replacing tail/brake/turn signal/backup lamp bulbs
1. Make sure the headlamp control
is in the OFF position.
2. Open the tailgate to expose the
lamp assembly screws and remove
the two screws from the tail lamp
assembly.
3. Carefully pull the lamp assembly
straight rearward from the tailgate
pillar to disengage two hidden
snap-in retainers.
4. Remove bulb socket from the
lamp assembly by turning it
counterclockwise.
5. Pull bulb straight out of socket
and press in the new bulb.
Install the new bulb(s) in reverse order.
2006 Mark LT(mlt)
Owners Guide (post-2002-fmt)
USA(fus)
Lights
32
Page 33 of 256

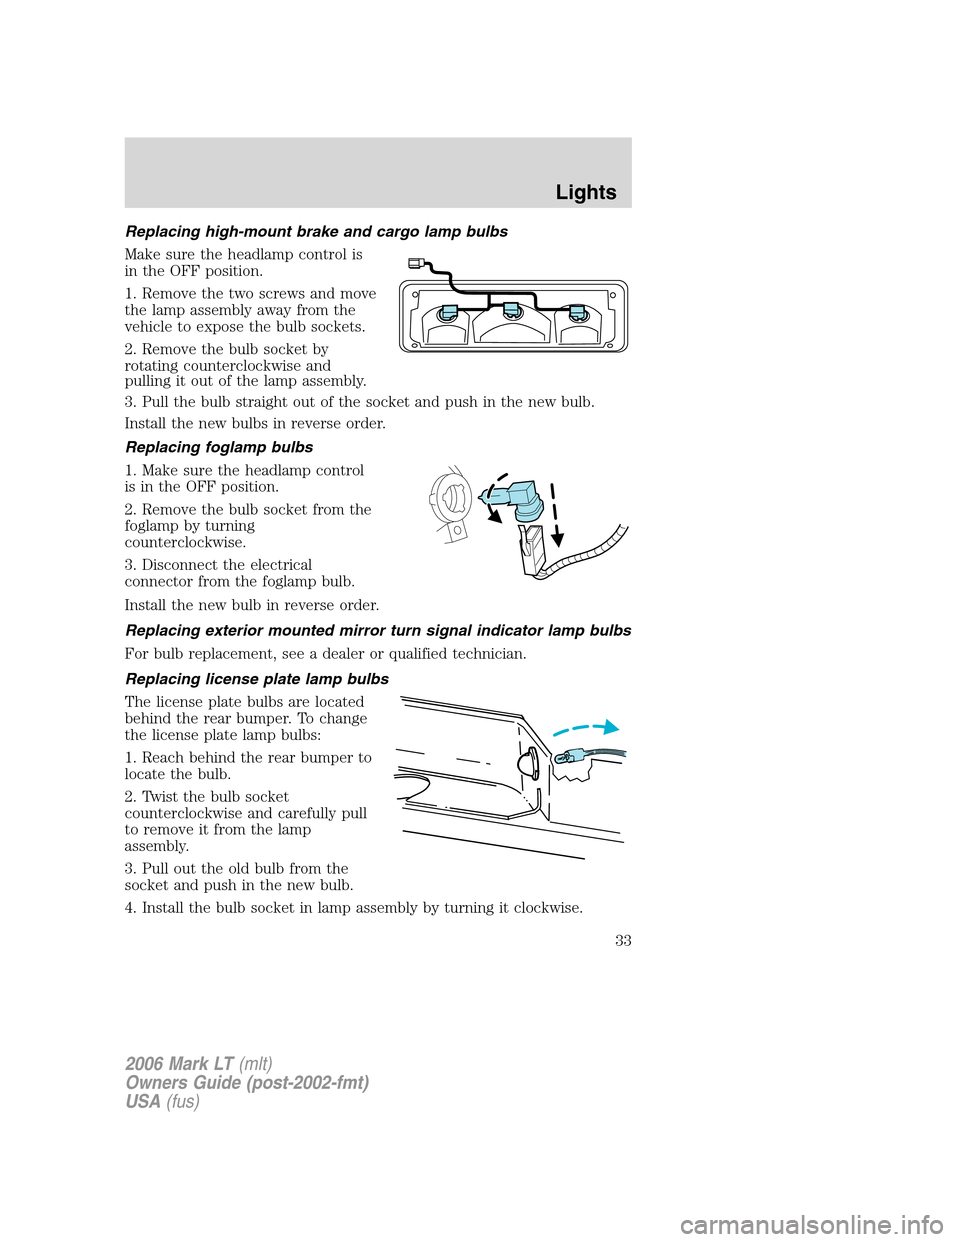
Replacing high-mount brake and cargo lamp bulbs
Make sure the headlamp control is
in the OFF position.
1. Remove the two screws and move
the lamp assembly away from the
vehicle to expose the bulb sockets.
2. Remove the bulb socket by
rotating counterclockwise and
pulling it out of the lamp assembly.
3. Pull the bulb straight out of the socket and push in the new bulb.
Install the new bulbs in reverse order.
Replacing foglamp bulbs
1. Make sure the headlamp control
is in the OFF position.
2. Remove the bulb socket from the
foglamp by turning
counterclockwise.
3. Disconnect the electrical
connector from the foglamp bulb.
Install the new bulb in reverse order.
Replacing exterior mounted mirror turn signal indicator lamp bulbs
For bulb replacement, see a dealer or qualified technician.
Replacing license plate lamp bulbs
The license plate bulbs are located
behind the rear bumper. To change
the license plate lamp bulbs:
1. Reach behind the rear bumper to
locate the bulb.
2. Twist the bulb socket
counterclockwise and carefully pull
to remove it from the lamp
assembly.
3. Pull out the old bulb from the
socket and push in the new bulb.
4. Install the bulb socket in lamp assembly by turning it clockwise.
2006 Mark LT(mlt)
Owners Guide (post-2002-fmt)
USA(fus)
Lights
33