Page 48 of 493

17X505
� Security indicator light (For vehicles without navigation
system)
Setting the system
1. Turn the igni")
KEYS AND DOORS
26
17X504
�Security indicator light (For vehicles with navigation
system)
17X505
� Security indicator light (For vehicles without navigation
system)
Setting the system
1. Turn the ignition key to the “LOCK” position and
remove it.
The engine immobilizer system causes the indicator light to
flash.
2. Close and lock all the doors and hood using an ignition
key or wireless remote control.
If you lock them with wireless remote control, the turn signals
flash once.*
NOTE: *The turn signals can be set not to flash. Ask your
Lexus dealer for details.
The flashing indicator light will remain on when all the doors
and hood are closed and locked.
3. After 30 seconds, the indicator starts flashing and the
system is set.
Cancelling the system
When you unlock any door using an ignition key or
wireless remote control, the system is cancelled.
If you unlock any door with wireless remote control, the turn
signals flash twice.* NOTE: *The turn signals can be set not to flash. Ask your
Lexus dealer for details.
Page 49 of 493

KEYS AND DOORS
27
Activating the system
The alarm sounds for 60 seconds if any of the following are
operated:
�Unlocking any door without using an ignition key or wireless
remote control.
� Opening the hood and any doors forcibly.
� Reconnecting the battery.
If any door is unlocked and the ignition key is not in the ignition
switch during the alarm sounding, its door is automatically
locked.
To stop the alarm: Use either of the following methods.
� Unlock the door using an ignition key or wireless remote
control.
� Start the engine, and the alarm stops after 2 seconds.
Testing the system
1. Open all the windows.
2. Set the system as described above.
The front doors should be locked with the ignition key or
wireless remote control. Be sure to wait until the indicator light
starts flashing.
3. Unlock one of the doors from the inside.
The system should activate the alarm.
4. Unlock any of the doors with a key or the wireless
remote control to cancel the system.
5. Repeat this operation for the other doors and hood.
When testing the hood, also check that the system is activated
when the battery terminal is disconnected and then
reconnected.
If the system does not work properly, have it checked by your
Lexus dealer.
NOTICE
Disconnecting the battery may result in the erasure of
information you have set in the computer memory. After
reconnecting the battery, check that the memorized
data has been retained. If it has been erased, input it into
the computer once more.
Page 53 of 493

SWITCHES
31
When you turn on the headlights, the lights automatically turn
off about 30 seconds after any of the doors is opened and
closed with the ignition switch turned to the “ACC” or “LOCK”\
position.* To
turn them on again, turn the ignition switch to the
“ON” position, or turn the headlight switch off and then twist the
knob until the first or second clickstop. If you are going to park
for over one week, make sure the headlight switch is off.
When the headlight switch is on with all the side doors and
back door locked, pushing the “LOCK” button on the wireless
remote control key turns off the headlights.
NOTE: *The time before turning off the lights can be
changed. Ask your Lexus dealer for details. Daytime Running Light System
The headlights turn on at reduced intensity when the parking
brake is released with the engine started, even with the light
switch in the “OFF” position. They will not go off until the
ignition switch is turned off.
To turn on the other exterior lights and instrument panel lights,
twist the knob to the first clickstop.
Twist
the knob to the second clickstop to turn on the headlights
to full intensity for driving at night.
When setting the knob to the third clickstop (“AUTO”), the
headlights will automatic ally adjust to full intensity and/or turn
on the other lights depending on the darkness of the
surroundings. Likewise, as the surroundings become brighter,
the headlights will turn to reduced intensity, ultimately turning
off the other lights.
NOTICE
To prevent the battery from being discharged, do not
leave the lights on longer than necessary when the
engine is not running.
Page 60 of 493
SWITCHES
38
NOTICE
�When cleaning the inside of the rear window, be
careful not to scratch or damage the heater wires or
connectors.
� To prevent the battery from being discharged, turn
the switch off when the engine is not running.
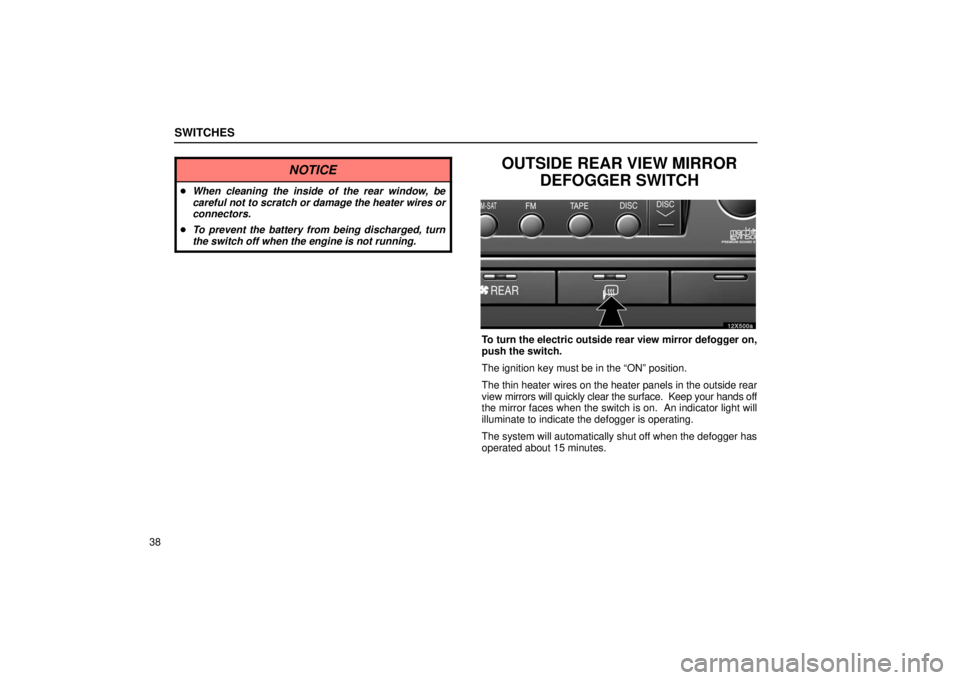
OUTSIDE REAR VIEW MIRROR
DEFOGGER SWITCH
12X500a
To turn the electric outside rear view mirror defogger on,
push the switch.
The ignition key must be in the “ON” position.
The thin heater wires on the heater panels in the outside rear
view mirrors will quickly clear the surface. Keep your hands off
the mirror faces when the switch is on. An indicator light will
illuminate to indicate the defogger is operating.
The system will automatically shut off when the defogger has
operated about 15 minutes.
Page 61 of 493

SWITCHES
39
CAUTION
Since the mirror surfaces can get hot, do not touch them
when the switch is on.
If further defrosting or defogging is desired, simply actuate the
switch again. When the surface has cleared, push the switch
once again to turn the defogger off. Continuous use may cause
the battery to discharge, especially during stop− and−go
driving. The defogger is not designed to dry rain water or to
melt snow.
If the outside rear view mirrors are heavily coated with ice, use
a spray de −icer before operating the switch.
NOTICE
To prevent the battery from being discharged, turn the
switch off when the engine is not running.
POWER WINDOW SWITCHES
12X006f
� 1
For driver’s window
2For front passenger’s window
3For left rear window
4For right rear window
To raise or lower the windows, use the switch on each
door. The passengers’ windows can also be controlled by
the switches on the driver’s door.
The power windows work when the ignition key is in the “ON”
position.
Retained accessory power: Even if the ignition key is turned
to the “ACC” or “LOCK” position with all the doors closed, t\
he
window can be operated until either of the front doors is
opened (or for about 45 seconds).
Page 65 of 493

SWITCHES
43
CAUTION
To avoid serious personal injury, you must do the
following.
�Always make sure the hands and other parts of the
bodies of all occupants are kept completely inside
the vehicle before you close the power quarter
windows. If someone’s hands get caught in a closing
window, it could result in a serious injury. When
anyone closes the power quarter windows, make
sure he/she operates the windows safely.
� When small children are in the vehicle, never let them
use the power rear quarter window switches without
supervision.
� Be sure to remove the ignition key when you leave
your vehicle.
� Never leave anyone (particularly a small child) alone
in your vehicle, especially with the ignition key still
inserted. Otherwise, he/she could use the power
quarter window switches and get trapped in a
window. Unattended person (particularly a small
child) can be involved in a serious accident.
EMERGENCY FLASHER SWITCH
12X503a
To turn on the emergency flashers, push the switch. To
turn them off, push the switch again.
All the turn signal lights will flash. The emergency flashers will
work with the engine running or off and with or without the
ignition key.
Turn on the emergency flashers to warn other drivers if you
must stop your vehicle where it might be a traffic hazard.
Always pull your vehicle as far off the road as possible.
The turn signal light switch will not work when the emergency
flashers are in operation.
NOTICE
To prevent the battery from being discharged, do not
leave the switch on longer than necessary when the
engine is not running.
Page 66 of 493

SWITCHES
44
SEAT HEATER SWITCHES
12X025c
� 1For driver’s seat 2For front passenger’s seat
3High heating temperature
4Low heating temperature
To turn on the seat heater, push the switch to “HI” (high
temperature) or “LO” (low heating temperature). To turn
off the seat heater, push the switch lightly on the opposite
side. At this time, the indicator light on either side will
illuminate to indicate the seat heater is operating.
The ignition key must be in the “ON” position to operate seat
heaters.
CAUTION
Occupants must use caution when operating the seat
heater because they may experience minor burns even
at low temperatures. Use extra caution for;
� Babies, small children, elderly persons, sick persons
or persons with physical disabilities
� Persons who have sensitive skin
� Persons who are exhausted
� Persons who have taken alcohol or drugs which
induce sleep (sleeping drug, cold remedy, etc.).
To prevent the seat from overheating, do not use the
seat heater with a blanket, cushion, or other insulating
objects which cover the seat.
NOTICE
� Do not put unevenly weighted objects on the seat and
do not stick sharp objects (needles, nails, etc.) into
the seat.
� When cleaning the seats, do not use organic
substances (paint thinner, benzine, alcohol,
gasoline, etc.). They may damage the heater and seat
surface.
� To prevent the battery from being discharged, turn
the switches off when the engine is not running.
Page 69 of 493
SECTION 1 – 3
47
INSTRUMENTS AND CONTROLS
Gauges, meters and service reminder
indicators
Fuel gauge48
. . . . . . . . . . . . . . . . . . . . . . . . . . . . . . . . . . . . .\
. . . . . . . . . .
Engine coolant temperature gauge 48
. . . . . . . . . . . . . . . . . . . . . . . . . .
Engine oil pressure gauge 49
. . . . . . . . . . . . . . . . . . . . . . . . . . . . . . . . .
Voltmeter 50
. . . . . . . . . . . . . . . . . . . . . . . . . . . . . . . . . . . . \
. . . . . . . . . . . .
Tachometer 51
. . . . . . . . . . . . . . . . . . . . . . . . . . . . . . . . . . . . \
. . . . . . . . . .
Odometer and trip meter 51
. . . . . . . . . . . . . . . . . . . . . . . . . . . . . . . . . . .
Service reminder indicators and warning buzzers 52
. . . . . . . . . . . . . .
Trip information display 63
. . . . . . . . . . . . . . . . . . . . . . . . . . . . . . . . . . . .
Instrument panel light control 66
. . . . . . . . . . . . . . . . . . . . . . . . . . . . . . .