Page 283 of 601

AUDIO
262Turning the system on and off
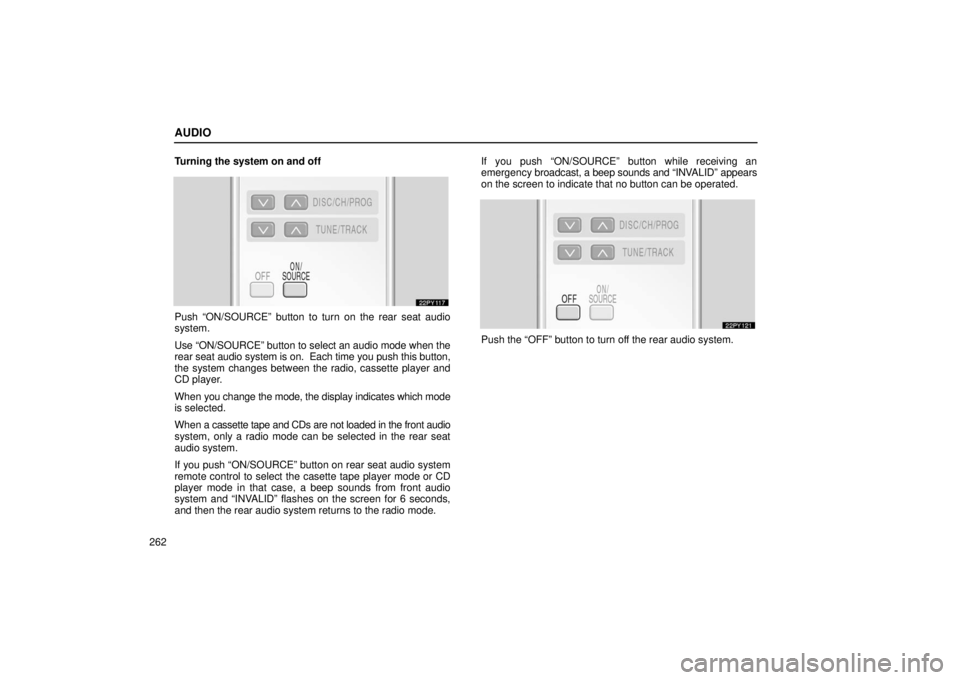
Push “ON/SOURCE” button to turn on the rear seat audio
system.
Use “ON/SOURCE” button to select an audio mode when the
rear seat
audio system is on. Each time you push this button,
the system changes between the radio, cassette player and
CD player.
When you change the mode, the display indicates which mode
is selected.
When a cassette tape and CDs are not loaded in the front audio
system, only a radio mode can be selected in the rear seat
audio system.
If you push “ON/SOURCE” button on rear seat audio system
remote control to select the casette tape player mode or CD
player mode in that case, a beep sounds from front audio
system and “INVALID” flashes on the screen for 6 seconds,
and then the rear audio system returns to the radio mode. If you push “ON/SOURCE” button while receiving an
emergency
broadcast, a beep sounds and “INV ALID” appears
on the screen to indicate that no button can be operated.
Push the “OFF” button to turn off the rear audio system.
Page 301 of 601
AUDIO
280
To turn off the system, push the “OFF” button.
When the front audio system is turned off, the rear audio
system and the DVD player will be turned off simultaneously.
Front audio system operation
All the modes of the front audio system can be operated on the
rear seat entertainment system.
When the same mode is selected on the front and rear audio
systems simultaneously, the system can be operated on the
front audio system.
If the radio mode is selected on the front and rear audio
systems at the same time, AM and FM modes cannot be
changed on the rear seat audio system.
Selecting the mode
Use the joy stick to select the mode. Push the “ENT”
button to enter the mode.
Page 318 of 601

AUDIO
297
DVD video/DVD audio player operation
NOTE: The playback condition of some DVD discs may be
determined by a DVD software producer . This DVD player
plays a disc as the software producer intended. So, some
functions may not work properly. Be sure to read the
instruction manual for the DVD disc separately provided.
For the detailed information about DVD video discs, see
“DVD video disc information” on page 326.
Precautions for DVD video discs
When recording on a DVD video, DVD audio, video CD or
audio tracks may not record in some cases while the menu is
displayed. As audio will not play in this case, verify that the
video tracks are playing and then activate playback.
When playback of a disc is completed:
� If an audio CD is playing, the first track starts.
� If a DVD video, DVD audio or video CD is playing, playback
will stop or the menu screen will be displayed.
The title/chapter number and playback time display may not
appear while playing back certain DVD video discs.CAUTION
Conversational speech on some DVDs is recorded at a
low volume to emphasize the impact of sound effects.
If you adjust the volume assuming that the
conversations represent the maximum volume level
available for the DVD, you may be startled by louder
sound effects or when you change to a different audio
source. Loud sounds may have a significant impact on
the human body or pose a driving hazard. Keep this in
mind when you adjust the volume.
Page 328 of 601
AUDIO
307
(j) Changing angle screen
22PY072
�1For DVD video2For DVD audio
3Remote control button
Push the “Angle” switch on the screen or the “ANGLE”
button on the remote control, and the changing angle
screen will appear.
The angle can be selected for discs that are multi
−angle
compatible when the “” mark appears on the screen. Each
time you push the “Angle” switch, the angle changes. The
angle number which you can select will appear on the screen.
Push the “Back” switch to return to the previous screen.
Page 334 of 601
AUDIO
313
Push the number for the password and the “Enter” switch. The
“Select Restriction Level” screen will appear.
If you enter a wrong number, push the “Clear” switch to delete
the number.
You cannot change the setting without inputting the password.
When you forget or change the password, push the “Clear”
switch ten times to initialize the password.
To return to the “Setup Menu 1” screen, push the “Back” switch.Push a parental level (1 — 8). The smaller the level number,
the stricter the age limit. Push the “Back” switch to return to the
“Setup Menu 1” screen.
Page 335 of 601
AUDIO
314(q) Setting the display mode
Each time you push the “Display Mode” switch on the
“Setup
Menu 2” screen, the display mode is changed from
wide mode to auto mode. (r) Language code list
Code
Language
1001Japanese
0514English
0618French
0405German
0920Italian
0519Spanish
2608Chinese
1412Dutch
1620Portuguese
1922Swedish
1821Russian
111 5Korean
0512Greek
0101Afar
0102Abkhazian
0106Afrikaans
0113Amharic
0118Arabic
0119Assamese
0125Aymara
Page 364 of 601

STARTING AND DRIVING
343
�
If the engine becomes difficult to start or stalls
frequently, take your vehicle in for a check�up as
soon as possible. Remember, your Lexus dealer
knows your vehicle and its three�way catalytic
converter system best.
� To ensure that the three�way catalytic converter and
the entire emission control system operate properly,
your vehicle must receive the periodic inspections
required by the Lexus Maintenance Schedule. For
scheduled maintenance information, refer to the
“Owner’s Manual Supplement/Scheduled
Maintenance”.
ENGINE EXHAUST CAUTION
CAUTION
�Avoid inhaling the engine exhaust. It contains
carbon monoxide, which is a colorless and odorless
gas. It can cause unconsciousness or even death.
� Make sure the exhaust system has no holes or loose
connections. The system should be checked from
time to time. If you hit something, or notice a change
in the sound of the exhaust, have the system checked
immediately.
� Do not run the engine in a garage or enclosed area
except for the time needed to drive the vehicle in or
out. The exhaust gases cannot escape, making this
a particularly dangerous situation.
� Do not remain for a long time in a parked vehicle with
the engine running. If it is unavoidable, however, do
so only in an unconfined area and adjust the heating
or cooling system to force outside air into the vehicle.
� Keep the back door closed while driving. An open or
unsealed back door may cause exhaust gases to be
drawn into the vehicle.
Page 392 of 601

STARTING AND DRIVING
371
(f) Parking and stopping tips
If you immediately stop the engine to park the vehicle after
off−road driving, the vehicle height is lowered slightly as the
vehicle becomes cool. When parking, make sure there is
nothing that will be in contact with the underbody of the vehicle.
When you start the engine, the vehicle returns to the previous
height.
If you park the vehicle for a long time, the vehicle height may
be gradually lowered. When parking for a long time, make sure
there is nothing that will be in contact with the underbody of the
vehicle. When you start the engine, the vehicle returns to the
previous height.
If you stop the engine, the vehicle height may change in
accordance with the change in the temperature. When you
start the engine, the vehicle returns to the previous height.
(g) Rear height control failure warning
If there is a problem somewhere in the rear height control air
suspension, the “N” mode is automatically selected. If this
occurs, the height control “OFF” indicator light blinks and the
vehicle height control cannot be activated until the malfunction
is corrected. If this is the case, bring your vehicle to your Lexus
dealer as soon as possible and have it checked.
ELECTRONIC MODULATED SUSPENSION
This electronic modulated suspension adjusts the
damping effect on the shock absorbers with the control
switch. Select one of the 4 modes which is suited to the
driving conditions with the control switch to provide good
riding comfort and stability.
1For driving on a bumpy road
2For ordinary driving such as in the city traffic
3For moderate high speed driving
4For sporty type driving such as on winding mountain
roads and high speed driving
5Soft
6Firm