Page 52 of 601
 SWITCHES
31
The automatic light control sensor is on top of the driver’s side
instrument panel.
Do not place anything on the instrument panel, and/or do not
affix anything on the windshield to bloc")
SWITCHES
31
The automatic light control sensor is on top of the driver’s side
instrument panel.
Do not place anything on the instrument panel, and/or do not
affix anything on the windshield to block this sensor.
When the headlights are on, they automatically turn off about
30 seconds after any side door is opened and closed with the
ignition key turned to the “ACC” or “LOCK” position.* If you
want to turn off the lights immediately, push the “LOCK” button
on the wireless remote control key twice. The lights also can
be turned off immediately by pushing the “LOCK” button on the
wireless remote control key with all the doors locked.
NOTE:
* The time before turning off the lights can be changed.
Ask your Lexus dealer for details. If any of the side door is kept opened, the lights automatically
turn off after 30 minutes.
When the headlight switch is on with all the doors locked,
pushing
the “LOCK” button on the wireless remote control key
turns off the headlights.
If you are going to park for over one week, make sure the
headlight switch is off.
Daytime Running Light System
The daytime running light system make your front turn signal
lights turn on when the parking brake is released with the
engine sta rted and the headlights are turned off. They will not
go off until the ignition switch is turned off.
NOTICE
To prevent the battery from being discharged, do not
leave the lights on longer than necessary when the
engine is not running.
Page 59 of 601
 SWITCHES
38
REAR WINDOW DEFOGGERSWITCH
�Vehicles without navigation system
�Vehicles with navigation system To turn the electric rear window defogger on, push the
switch.
The ignition key must be in t")
SWITCHES
38
REAR WINDOW DEFOGGERSWITCH
�Vehicles without navigation system
�Vehicles with navigation system To turn the electric rear window defogger on, push the
switch.
The ignition key must be in the “ON” position.
The thin heater wires on the inside of the rear window will
quickly clear the surface. An indicator light will illuminate to
indicate the defogger is operating.
The system will automatically shut off when the defogger has
operated about 15 minutes.
If further defrosting or defogging is desired, simply actuate the
switch again. When the
surface has cleared, push the switch
once again to turn the defogger of f. Continuous use may cause
the battery to discharge, especially during stop −and−go
driving. The defogger is not designed to dry rain water or to
melt snow.
NOTICE
� When cleaning the inside of the rear window, be
careful not to scratch or damage the heater wires or
connectors.
� To prevent the battery from being discharged, turn
the switch off when the engine is not running.
Page 60 of 601
 SWITCHES
39
OUTSIDE REAR VIEW MIRRORDEFOGGER SWITCH
To turn the electric outside rear view mirror defogger on,
push the switch.
The ignition key must be in the “ON” position.
The thin heater wires")
SWITCHES
39
OUTSIDE REAR VIEW MIRRORDEFOGGER SWITCH
To turn the electric outside rear view mirror defogger on,
push the switch.
The ignition key must be in the “ON” position.
The thin heater wires on the heater panels in the outside rear
view mirrors will quickly clear the surface. Keep your hands off
the mirror faces when the switch is on. An indicator light will
illuminate to indicate the defogger is operating.
The system will automatically shut off when the defogger has
operated about 5 minutes.
CAUTION
Since the mirror surfaces can get hot, do not touch them
when the switch is on.
If further defrosting or defogging is desired, simply actuate the
switch again. When the surface has cleared, push the switch
once again to turn the defogger of f. Continuous use may cause
the battery to discharge, especially during stop −and−go
driving. The defogger is not designed to dry rain water or to
melt snow.
If the outside rear view mirrors are heavily coated with ice, use
a spray de −icer before operating the switch.
NOTICE
To prevent the battery from being discharged, turn the
switch off when the engine is not running.
Page 64 of 601
 SWITCHES
43
�Never leave anyone (particularly a small child) alone
in your vehicle, especially with the ignition key still
inserted. Otherwise, he/she could use the power
window switches and get tra")
SWITCHES
43
�Never leave anyone (particularly a small child) alone
in your vehicle, especially with the ignition key still
inserted. Otherwise, he/she could use the power
window switches and get trapped in a window.
Unattended person (particularly a small child) can be
involved in a serious accident.
� Never try jamming any part of your body to activate
the jam protection function intentionally, as it could
result in a serious injury.
� The jam protection function may not work if
something gets caught just before the window fully
closed.EMERGENCY FLASHER SWITCH
To turn on the emergency flashers, push the switch. To
turn them off, push the switch again.
All the turn signal lights will flash. The emergency flashers will
work with the engine running or off and with or without the
ignition key.
Turn on the emergency flashers to warn other drivers if you
must stop your vehicle where it might be a traffic hazard.
Always pull your vehicle as far off the road as possible.
The turn signal light switch will not work when the emergency
flashers are in operation.
Page 65 of 601
SWITCHES
44
NOTICE
To prevent the battery from being discharged, do not
leave the switch on longer than necessary when the
engine is not running.
SEAT HEATER SWITCHES
The seat heater has two dials; one marked “L” (for the
driver’s seat) and the other marked “R” (for the front
passenger’s seat). To turn the seat heaters on, turn the
dials forward. The indicator lights come on. To turn them
off, turn the di als backward until they stop. The indicator
lights go off.
You can adjust the heating temperature to 5 stages. To
increase the temperature, turn them forward. To decrease the
temperature, turn them backward.
The ignition key must be in the “ON” position to operate seat
heaters.
Page 66 of 601
SWITCHES
45
CAUTION
Occupants must use caution when operating the seat
heater because they may experience minor burns even
at low temperatures. Use extra caution for;
�Babies, small children, elderly persons, sick persons
or persons with physical disabilities
� Persons who have sensitive skin
� Persons who are exhausted
� Persons who have taken alcohol or drugs which
induce sleep (sleeping drug, cold remedy, etc.)
To prevent the seat from overheating, do not use the
seat heater with a blanket, cushion, or other insulating
objects which cover the seat.
NOTICE
� Do not put unevenly weighted objects on the seat and
do not stick sharp objects (needles, nails, etc.) into
the seat.
� When cleaning the seats, do not use organic
substances (paint thinner, benzine, alcohol,
gasoline, etc.). They may damage the heater and seat
surface.
� To prevent the battery from being discharged, turn
the switches off when the engine is not running.
Page 68 of 601
SECTION 1 – 3
47
INSTRUMENTS AND CONTROLS
Gauges, meters and service reminder indicators
Fuel gauge48
. . . . . . . . . . . . . . . . . . . . . . . . . . . . . . . . . . . . .\
. . . . . . . . . .
Engine coolant temperature gauge 49
. . . . . . . . . . . . . . . . . . . . . . . . . .
Tachometer 50
. . . . . . . . . . . . . . . . . . . . . . . . . . . . . . . . . . . . \
. . . . . . . . . .
Odometer and trip meter 50
. . . . . . . . . . . . . . . . . . . . . . . . . . . . . . . . . . .
Service reminder indicators and warning buzzers 51
. . . . . . . . . . . . . .
Multi−information display 63
. . . . . . . . . . . . . . . . . . . . . . . . . . . . . . . . . . .
Instrument panel light control 74
. . . . . . . . . . . . . . . . . . . . . . . . . . . . . . .
Page 70 of 601
GAUGES, METERS AND SERVICE REMINDER INDICATORS
49
ENGINE COOLANT
TEMPERATURE GAUGE
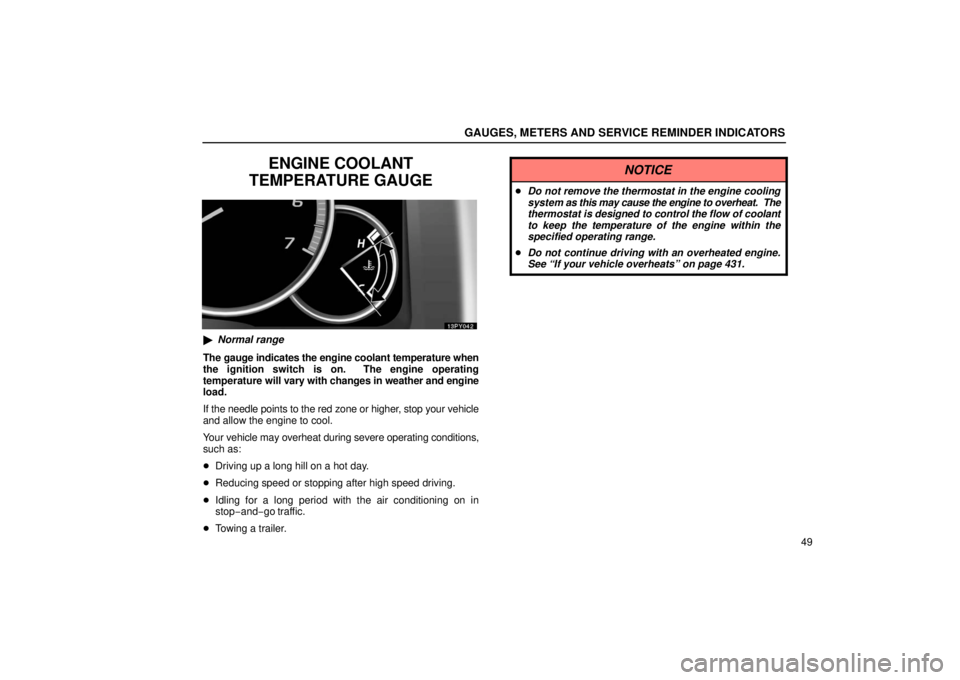
� Normal range
The gauge indicates the engine coolant temperature when
the ignition switch is on. The engine operating
temperature will vary with changes in weather and engine
load.
If the needle points to the red zone or higher, stop your vehicle
and allow the engine to cool.
Your vehicle may overheat during severe operating conditions,
such as:
� Driving up a long hill on a hot day.
� Reducing speed or stopping after high speed driving.
� Idling for a long period with the air conditioning on in
stop−and−go traffic.
� Towing a trailer.
NOTICE
�Do not remove the thermostat in the engine cooling
system as this may cause the engine to overheat. The
thermostat is designed to control the flow of coolant
to keep the temperature of the engine within the
specified operating range.
� Do not continue driving with an overheated engine.
See “If your vehicle overheats” on page 431.
 SWITCHES
44
NOTICE
To prevent the battery from being discharged, do not
leave the switch on longer than necessary when the
engine is not running.
SEAT HEATER SWITCHES
The seat heater has two dials; on")

 SECTION 1 – 3
47
INSTRUMENTS AND CONTROLS
Gauges, meters and service reminder indicators
Fuel gauge48
. . . . . . . . . . . . . . . . . . . . . . . . . . . . . . . . . . . . .\
. . . . . . . . .")