Page 140 of 622
INTERIOR EQUIPMENT
11 9
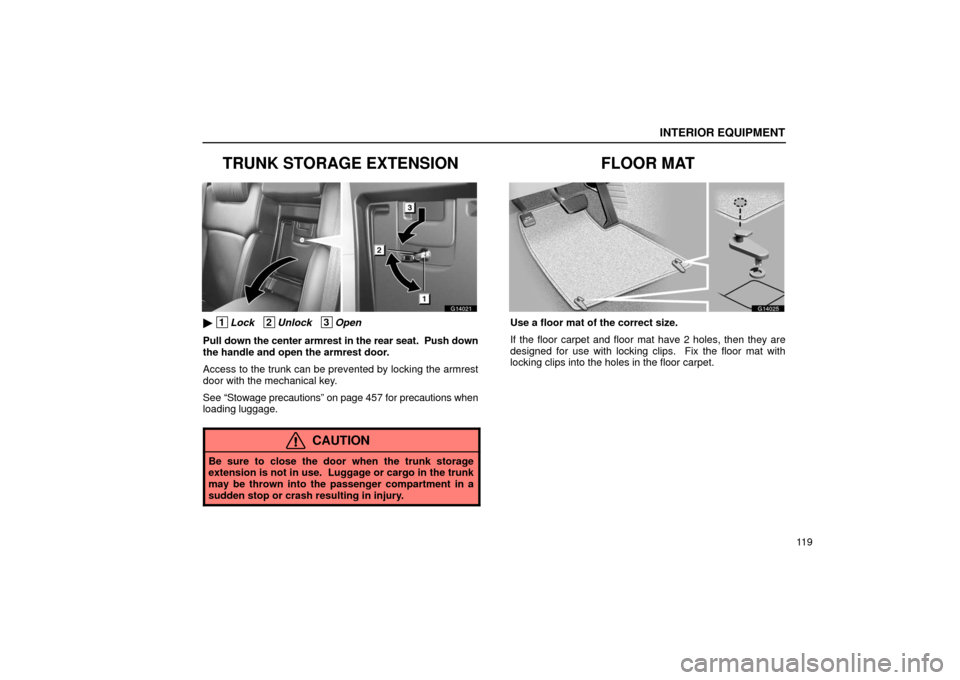
TRUNK STORAGE EXTENSION
G14021
� 1Lock 2Unlock 3Open
Pull down the center armrest in the rear seat. Push down
the handle and open the armrest door.
Access to the trunk can be prevented by locking the armrest
door with the mechanical key.
See “Stowage precautions” on page 457 for precautions when
loading luggage.
CAUTION
Be sure to close the door when the trunk storage
extension is not in use. Luggage or cargo in the trunk
may be thrown into the passenger compartment in a
sudden stop or crash resulting in injury.
FLOOR MAT
G14025
Use a floor mat of the correct size.
If the floor carpet and floor mat have 2 holes, then they are
designed for use with locking clips. Fix the floor mat with
locking clips into the holes in the floor carpet.
Page 160 of 622
 OCCUPANT RESTRAINT SYSTEMS
139
�If your steering wheel is adjustable, tilt it downward.
This points the airbag toward your chest instead of
your head and neck.
The seat should be adjusted as recommend")
OCCUPANT RESTRAINT SYSTEMS
139
�If your steering wheel is adjustable, tilt it downward.
This points the airbag toward your chest instead of
your head and neck.
The seat should be adjusted as recommended by
NHTSA above, while still maintaining control of the foot
pedals, steering wheel, and your view of the instrument
panel controls.
Front passenger seat
CAUTION
The SRS front passenger airbag also deploys with
considerable force, and can cause death or serious
injury especially if the front passenger is very close to
the airbag. The front passenger seat should be as far
from the airbag as possible with the seatback adjusted,
so the front passenger sits upright.
Front seats
CAUTION
The SRS front side airbags are installed in the driver and
front passenger seats. Observe the following
precautions.
� Do not lean against the front door when the vehicle
is in use, since the front side airbag inflates with
considerable speed and force. Otherwise, you may
be killed or severely injured.
� Do not use seat accessories which cover the parts
where the front side airbags inflate. Such
accessories may prevent the front side airbags from
activating correctly, causing death or serious injury.
� Do not modify or replace the front seats or upholstery
of the seats equipped with front side airbags. Such
change may prevent the side airbag system from
activating correctly, disable the system or cause the
front side airbags to inflate accidentally, resulting in
death or serious injury.
Page 232 of 622
 STEERING WHEEL AND MIRRORS
211
Pushing the “AUTO” button for longer than 3 seconds
turns on or off the compass display.
The compass may not show the correct direction in the
following conditions:")
STEERING WHEEL AND MIRRORS
211
Pushing the “AUTO” button for longer than 3 seconds
turns on or off the compass display.
The compass may not show the correct direction in the
following conditions:
�
The vehicle is stopped immediately after turning.
The compass does not adjust while the vehicle is stopped.
� The engine switch is turned off immediately after turning.
� The vehicle is on an inclined surface.
� The vehicle is in a place where the earth’s magnetic field is
subject to interference by artificial magnetic fields
(underground parking, under a steel tower, between
buildings, roof parking, near a crossing, near a large
vehicle, etc.).
� The vehicle is magnetized. (There is a magnet or a metal
object near the inside rear view mirror.)
� The battery has been disconnected.
� Any door is open.
If the deviation is small, the compass works to calibrate the
direction automatically while the vehicle is in motion.
For obtaining additional precision or for complete calibrating,
see “CALIBRATING THE COMPASS” below.
NOTICE
Do not put magnets or a metal object near the inside rear
view mirror. Doing this may cause malfunction of the
compass sensor.
CALIBRATING THE COMPASS (deviation calibration)
The direction display on the compass deviates from the true
direction determined by the earth’s magnetic field. The
amount of deviation varies according to the geographic
position of the vehicle.
To adjust for this deviation, stop the vehicle and push the
“AUTO” button for longer than about 6 seconds until the zone
number (1 −15) appears on the display. Then push the button
again, referring to the following map to select the number of the
zone where the vehicle is.
Page 234 of 622
 STEERING WHEEL AND MIRRORS
213
G17012
Drive the vehicle slowly (at 8 km/h (5 mph) or lower) in a circle
until the direction is displayed. If there is not enough space to
drive in a circle, drive ar")
STEERING WHEEL AND MIRRORS
213
G17012
Drive the vehicle slowly (at 8 km/h (5 mph) or lower) in a circle
until the direction is displayed. If there is not enough space to
drive in a circle, drive around the block until the direction is
displayed.
After driving in 1 to 3 circles in the above method, calibration
is complete with the “CAL” off the display and the direction
shown on the display.
If calibration cannot be performed because of the vehicle is
magnetized, take your vehicle to a Lexus dealer.
� Do not perform circling calibration of the compass in a place
where the earth’s magnetic field is subject to interference by
artificial magnetic fields (underground parking, under a
steel tower, between buildings, roof parking, near a
crossing, near a large vehicle, etc.).
� During calibration, do not operate electric systems (moon
roof, power windows, etc.) as they may interfere with the
calibration.
CAUTION
�When doing the circling calibration, be sure to secure
a wide space, and watch out for people and vehicles
in the neighborhood. Do not violate any local traffic
rules while performing circling calibration.
� Do not adjust the display while the vehicle is moving.
Be sure to adjust the display only when the vehicle is
stopped.
Page 243 of 622
TOUCH SCREEN
222
G18005
You can use the microphone above when talking on the
phone.
The party’s voice outputs from the driver’s speaker. When the
received calls or received voice outputs, the audio from the
audio system or voice guidance from the Navigation system
will be muted.
INFORMATION
� Talk alternately with your party on the phone. If you
talk at the same time, the voice may not reach each
other. (It is not a malfunction.)
� Keep the volume of receiving voice down. Otherwise,
echo is coming up. When you talk on the phone,
speak clearly towards the microphone.
� In the following situations, your voice may not reach
the party.
�Driving on unpaved road. (Making a traffic noise.)
�Driving at the high speed.
�The window is open.
�Turning the air conditioning vents towards the
microphone.
�The sound of the air conditioning fan is loud.
Page 283 of 622
 AIR CONDITIONING
262To change the sensitivity of the sensor switching between
the RECIRCULATED AIR and OUTSIDE AIR in the
AUTOMATIC mode, push the air intake control button and
hold it for a few secon")
AIR CONDITIONING
262To change the sensitivity of the sensor switching between
the RECIRCULATED AIR and OUTSIDE AIR in the
AUTOMATIC mode, push the air intake control button and
hold it for a few seconds. The display changes to the one
illustrated below.
The sensitivity of the sensor can be adjusted only while the
vehicle has been stopped.
G21023
The sensitivity of the switches is set to be higher toward “HI”
and lower toward “LO”.
Touch the desired switch on the screen.
When
you push any button except the air intake control button,
the above screen goes off. If manual on�off of the air conditioning is desired—
Touch
the ”A/C” switch to turn the air conditioning on and touch
it again to turn the air conditioning off. If you turn off the air
conditioning manually, the EXHAUST GAS AUTOMATIC
mode will be cancelled.
If the outside temperature is lowered down to around 0 �C
(32 �F), the air conditioning will turn off automatically. At this
time, the indicator on the A/C switch is off and the EXHAUST
GAS AUTOMATIC indicator light remains on. However, the
EXHAUST GAS AUTOMA TIC mode does not operate. When
the air conditioning turns on as with the raised temperature, the
EXHAUST GAS AUTOMATIC mode resumes.
If the system is used for ventilation, heating in dry weather or
removing frost or exterior fog on the windshield, turn the air
conditioning off once it is no longer required. This will improve
fuel economy. The air conditioning can be used for year −round
automatic temperature control including cooling and
dehumidifying operation.
If the air conditioning compressor does not operate, the
indicator of the ”A/C” switch will blink. If the indicator of the
”A/C” switch blinks even when the ”A/C” switch is touched
again, have the compressor checked by your nearest Lexus
dealer.
Page 286 of 622
 AIR CONDITIONING
265
(d) Operating tips
�To help cool down the interior after parking in the hot sun,
drive for the first few minutes with the windows open. After
the excess heat has blown away, clo")
AIR CONDITIONING
265
(d) Operating tips
�To help cool down the interior after parking in the hot sun,
drive for the first few minutes with the windows open. After
the excess heat has blown away, close the windows.
� Make sure the air inlet grilles in front of the windshield are
not blocked by leaves or other obstructions.
� If air flow control is not satisfactory, check the dashboard
vents and rear vents. (See (e) “Center vents, side vents and
rear vents”.)
� Only humid days, do not blow cold air on the windshield.
The windshield could fog up because of the difference in air
temperature on the inside and outside of the windshield.
� Keep the area under the front seats clear to allow air to
circulate throughout the vehicle.
� On cold days, set the fan speed to high for a minute to help
clear the intake ducts of snow or moisture. This can reduce
the amount of fogging on the windows.
� When driving on dusty roads, close all windows. If dust
thrown up by the vehicle is still drawn into the vehicle after
closing the windows, it is recommended that the air intake
control button be set to the OUTSIDE AIR mode to take in
the fresh air and the fan speed selector to any setting except
OFF. �
If following another vehicle on a dusty road, or driving in
windy and dusty conditions, it is recommended that the air
intake control button be temporarily pressed in to the
RECIRCULATED AIR mode, which will close off the outside
passage and prevent outside air and dust from entering the
vehicle interior.
Heating
For best results, set controls to:
For automatic operation—
Push in the “AUTO” button.
Temperature—To the desired temperature
Air intake—OUTSIDE AIR
Air conditioning—OFF
For manual operation—Fan speed—To the desired fan speed
Temperature—Towards high temperature
Air intake—OUTSIDE AIR
Air flow—FLOOR
Air conditioning—OFF
� For quick heating, select RECIRCULATED AIR mode for a
few minutes. To keep the windows from fogging, select
OUTSIDE AIR mode after the vehicle interior has been
warmed.
� Touch the “A/C” switch on for dehumidified heating.
� Choose floor/windshield air flow to heat the vehicle interior
while defrosting or defogging the windshield.
Page 287 of 622
AIR CONDITIONING
266Air conditioning
For best results, set controls to:
For automatic operation—
Push in the “AUTO” button.
Temperature—To the desired temperature
Air intake—OUTSIDE AIR
Air conditioning—OFF
For manual operation—Fan speed—To the desired fan speed
Temperature—Towards low temperature
Air intake—OUTSIDE AIR
Air flow—PANEL
Air conditioning—ON
� For quick cooling, select RECIRCULATED AIR mode for a
few minutes. Ventilation
For best results, set controls to:
For automatic operation—
Push in the “AUTO” button.
Temperature—Towards low temperature
Air intake—OUTSIDE AIR
Air conditioning—OFF
For manual operation—Fan speed—To the desired fan speed
Temperature—Towards low temperature
Air intake—OUTSIDE AIR
Air flow—PANEL
Air conditioning—OFF
 TOUCH SCREEN
222
G18005
You can use the microphone above when talking on the
phone.
The party’s voice outputs from the driver’s speaker. When the
received calls or received voice outputs, the aud")
 AIR CONDITIONING
266Air conditioning
For best results, set controls to:
For automatic operation—
Push in the “AUTO” button.
Temperature—To the desired temperature
Air intake—OUTSIDE AIR
Air")