2006 LAND ROVER FRELANDER 2 wheel
[x] Cancel search: wheelPage 322 of 3229
However, when the front and rear axl es st art t o rotat e at different s peeds , t he s wash-pl ate rot at es rel ati ve to the roll erswhich generat es the hydrauli c pres s ure. Thi s pres s ure i s us ed to force the opposi ng clut ch pl ates t oget her, i ncreas ing thet ransmis s ion of t orque t o the rear axl e. As the di fference in axl e s peed i ncreases the hydrauli c pres sure pushes t he clut chplat es further together t o increas e t he t orque to the rear axl e.
A control val ve/axi al s olenoid cont rols the amount of pres s ure appli ed to the clut ch plat es , and hence the amount oft orque transmit ted t o t he rear wheels . Clos e manufact uring t olerances and except ional ly low component wear ens uret orque cont rol remai ns accurat e t hroughout t he vehi cl e's l ife.
Mechanical Hydraulic Pump - Generation 4 Couplings - Vehicles from 2009MY
The Generati on 4 coupl ing does not us e the swas h pl at e t o mechanical ly rais e hydrauli c pres s ure; ins tead, a new hydraul icpump i s used to generat e hydrauli c pres sure and force the cl utch plat es toget her. The removal of t he s was h plat e all ows alarger overal l cl ut ch plat e s urface area, whi ch in t urn reduces t he hydrauli c pres sure requi rement. The press ure required toachi eve 1500Nm (1106 l b ft ) has been reduced from 100 Bar for Generat ion 3 coupli ngs to 40 Bar for Generati on 4coupl ings.
The posi ti oni ng of the Generat ion 4 coupl ing's i nput and output remains t he s ame as t he Generati on 3 coupl ing, asdescribed above.
By-pass Valve
On very low fricti on s urfaces, driveli ne drag t orque can occur, for exampl e:
revers e t orque from engi ne braking, orforced movement of t he dri ves haft by t he front wheel s .
This can i nfluence rear wheel s peed, maki ng it i mpos si ble t o determine the t rue fricti on capabil it y of the rear wheel s, bydis t orti ng t he wheel s peed s ignal. To prevent thi s, t he acti ve on-demand coupli ng is des i gned t o open i mmediat el y inres ponse to a s tabil it y cont rol event . This i s achi eved by a by-pass val ve ins tant ly reducing sys tem pres s ure t o nomi nal .
To balance the 4 bar bas e press ure (s ee below for detai ls ), t he Generati on 3 coupling us es a large Bel levill e s pri ng to forcet he cl utch plat es clear of each ot her t o prevent torque transmis si on t hrough the coupli ng. Even at 0°C, t orque t rans mis s ionis reduced from 300 Nm to Zero wi thi n 10 ms . The Generat ion 4 coupling however, does not require a Bel lvil le s pri ng t os eparate t he plat es as t he coupli ng does not have a si gni fi cant bas e pres s ure pus hi ng t he plates together.
Accumulator
The further t he cl utch pl at es have to move in order to contact each other, t he longer it t akes to di spl ace the hydrauli c fl uidneces s ary t o buil d pres s ure and t rans mit torque. To count er thi s, t he Generati on 3 coupling incorporates an accumulat or.This retains a nominal 4 bar pres sure wi thin the hydraul ic circui t. Al though thi s is not enough pres sure t o caus e s i gni fi cantt orque transmis s ion t hrough the coupli ng, i t forces t he plat es very clos e t oget her so that very l it tl e fluid di s pl acement i srequired t o achi eve full engagement and maxi mum t orque t rans fer. Ful l torque t rans miss i on can be achieved i n 150 ms .
On Generat ion 4 coupli ngs , t he 150ms act ivat ion t ime is achieved through the us e of a Bel lvil le s pri ng t hat acts to pus ht he plates t ogether (wi thout caus i ng si gnifi cant t orque t rans mis s ion t hrough t he coupl ing). As t he pump i s notcont inuousl y us ed to create t his bas e pres s ure (as i t was wit h Generat ion 3 coupli ng), improvement s i n fuel economy havebeen achi eved.
Wet Clutch Pack
The clutch pack is made up of 7 pairs of plat es ; t he inner dis cs are produced from hardened st eel wit h t he out er dis csmanufactured from s t eel wi th a s int ered face. The clutch pl ates operat e in trans mi s si on fl uid.
Torque t rans mis s ion acros s t he clutch pack is li mit ed t o 1500 Nm (1106 lb ft ). This ens ures t he l ower gears ret ai n anelement of front-wheel -drive for t ract ion s t abi lit y. W i thin the hi gher gears the coupl ing i s t heoreti call y capabl e oft ransmit ti ng all t he dri ve to the rear axle; al though condit ions woul d have to be ext reme for t his t o occur.
PRINCIPLES OF OPERATION
Generation 3 Couplings - up to 2009MY
An i nt ernal electroni cal ly-controll ed pump provides hydrauli c pre-charge pres sure wit hin the coupling. The pre-chargepres s ure s upplies t he requi red operat ing pres s ure to the clut ch plates to el imi nat e i nit ial wheel -s pin as the vehicleaccelerates from s tandst il l.
In conjunct ion wi th the pre-charge pres s ure a mechanical hydraul ic pump operates wi thi n the cl utch plat es to s upply thecoupl ing's mai n hydraulic operat ing pres sure. The mechanical pump is funct ioned by the 'i nput ' and 'output' of t he coupli ng:
input - dri ves haft connect ion from the front axle,output - different ial connecti on to the rear axl e.
Any s peed di fference bet ween t he front and rear axl es wil l st art t he operat ion of t he mechanical hydraul ic pump. Theamount of hydrauli c pres s ure appli ed to the cl ut ch pack by the pump det ermines the gap bet ween t he cl utch plat es. Forexampl e, the great er the hydraul ic pres s ure, t he s maller t he gap between t he plat es and s ubs equent ly t he great er thet orque transmit ted t hrough t he coupli ng from the front axle t o t he rear axle.
This mai n hydrauli c pres sure is des i gned t o t rans mit the t orque for tract ion demands of off-road drivi ng, and t o provi delock-up as requi red.
Generation 4 Couplings - from 2009MY
The Generati on 4 coupl ing s t il l us es an el ect ri cal ly-controlled pump to provide hydrauli c pre-charge to el imi nat e wheel-s pinfrom st ands t il l; however, the s ame pump is al s o used to provi de t he coupli ng's mai n hydraul ic operat ing press ure.
Page 338 of 3229
Publi s hed: 11-May-2011
Rear Drive Axle/Differential - Differential Case
Removal and Inst all ati on
Removal
• NOTE: Removal s t eps in t his procedure may cont ain i nst all ati on det ail s.
1. W ARNING: Make sure t o s upport the vehicle wit h axles tands .
Rais e and s upport t he vehi cl e.
1.
Remove t he LH rear wheel and ti re.
Refer t o: W heel and Ti re (204-04 W heel s and Tires, Removal andInst all at ion).
2.
W it h ass i st ance, remove the rear muffler.
Refer t o: Exhaus t Sys t em (309-00A Exhaus t Sys t em - I6 3.2L Pet rol ,Removal and Ins tall ati on).
3.
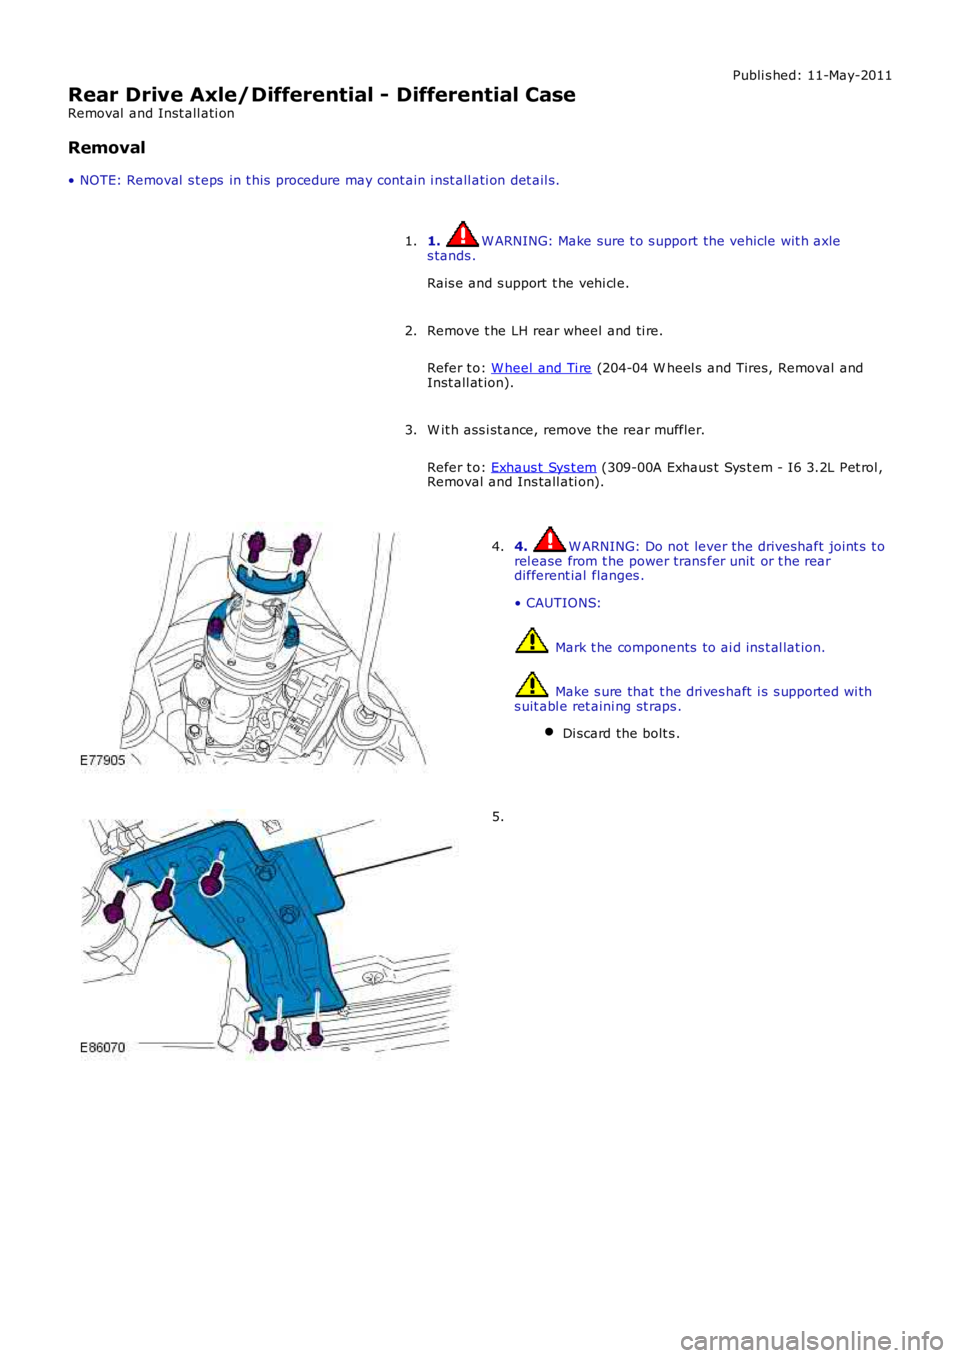
4. W ARNING: Do not lever the driveshaft joint s t orel ease from t he power trans fer unit or t he reardifferent ial flanges .
• CAUTIONS:
Mark t he components to ai d ins t al lat ion.
Make s ure that t he dri ves haft i s s upport ed wi ths uit abl e ret aini ng st raps .
Di scard the bolt s .
4.
5.
Page 342 of 3229
Inst all t he rear different ial rear bus h ret aining bol ts .
T orque: 110 Nm Inst all t he LH halfshaft.
Refer t o: Rear Hal fs haft LH (205-05 Rear Dri ve Halfs haft s , Removal
and Inst all at ion).
9.
Connect t he Act ive On-demand Coupl ing modul e electrical connect or.
10.
Inst all t he dri ves haft rear s upport bracket .
T orque: 35 Nm 11.
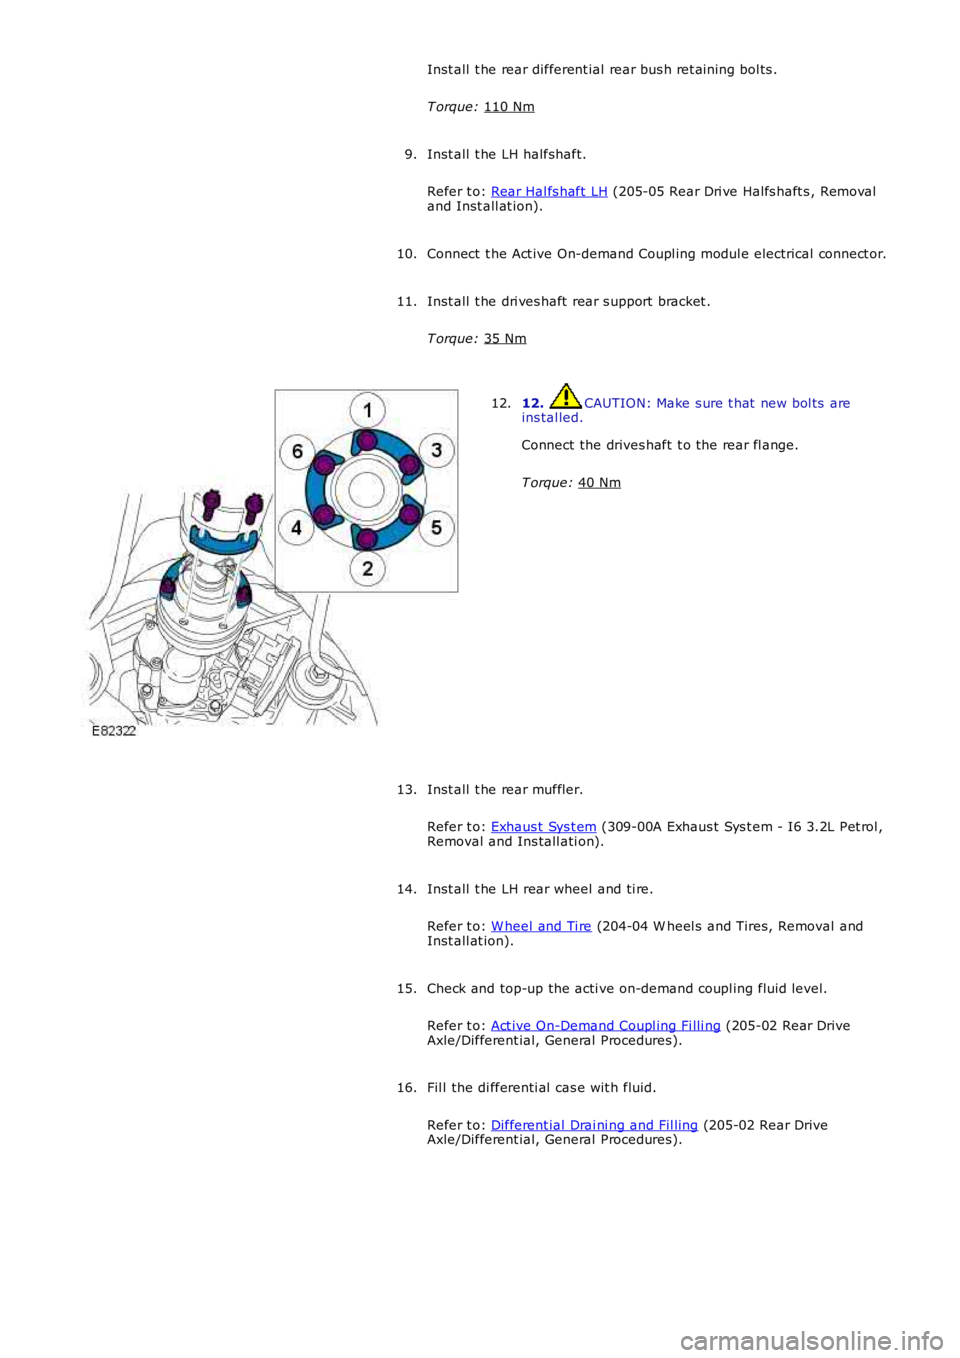
12. CAUTION: Make s ure t hat new bol ts are
ins tal led.
Connect the drives haft t o the rear fl ange.
T orque: 40 Nm 12.
Inst all t he rear muffler.
Refer t o: Exhaus t Sys t em (309-00A Exhaus t Sys t em - I6 3.2L Pet rol ,
Removal and Ins tall ati on).
13.
Inst all t he LH rear wheel and ti re.
Refer t o: W heel and Ti re (204-04 W heel s and Tires, Removal and
Inst all at ion).
14.
Check and top-up the acti ve on-demand coupl ing fluid level.
Refer t o: Act ive On-Demand Coupl ing Fi lli ng (205-02 Rear Drive
Axle/Different ial, General Procedures).
15.
Fil l the di fferenti al cas e wit h flui d.
Refer t o: Different ial Drai ni ng and Fil ling (205-02 Rear Drive
Axle/Different ial, General Procedures).
16.
Page 346 of 3229
Removal
1. W ARNING: Make sure t o s upport the vehicle wit h axle
s tands .
Rais e and s upport t he vehi cl e.
1.
Remove both rear wheel s and t ires .
Refer t o: W heel and Ti re (204-04 W heel s and Tires, Removal and
Inst all at ion).
2.
Remove t he rear different ial.
Refer t o: Different ial Case (205-02 Rear Drive Axle/Different ial,
Removal and Ins tall ati on).
3. 4.
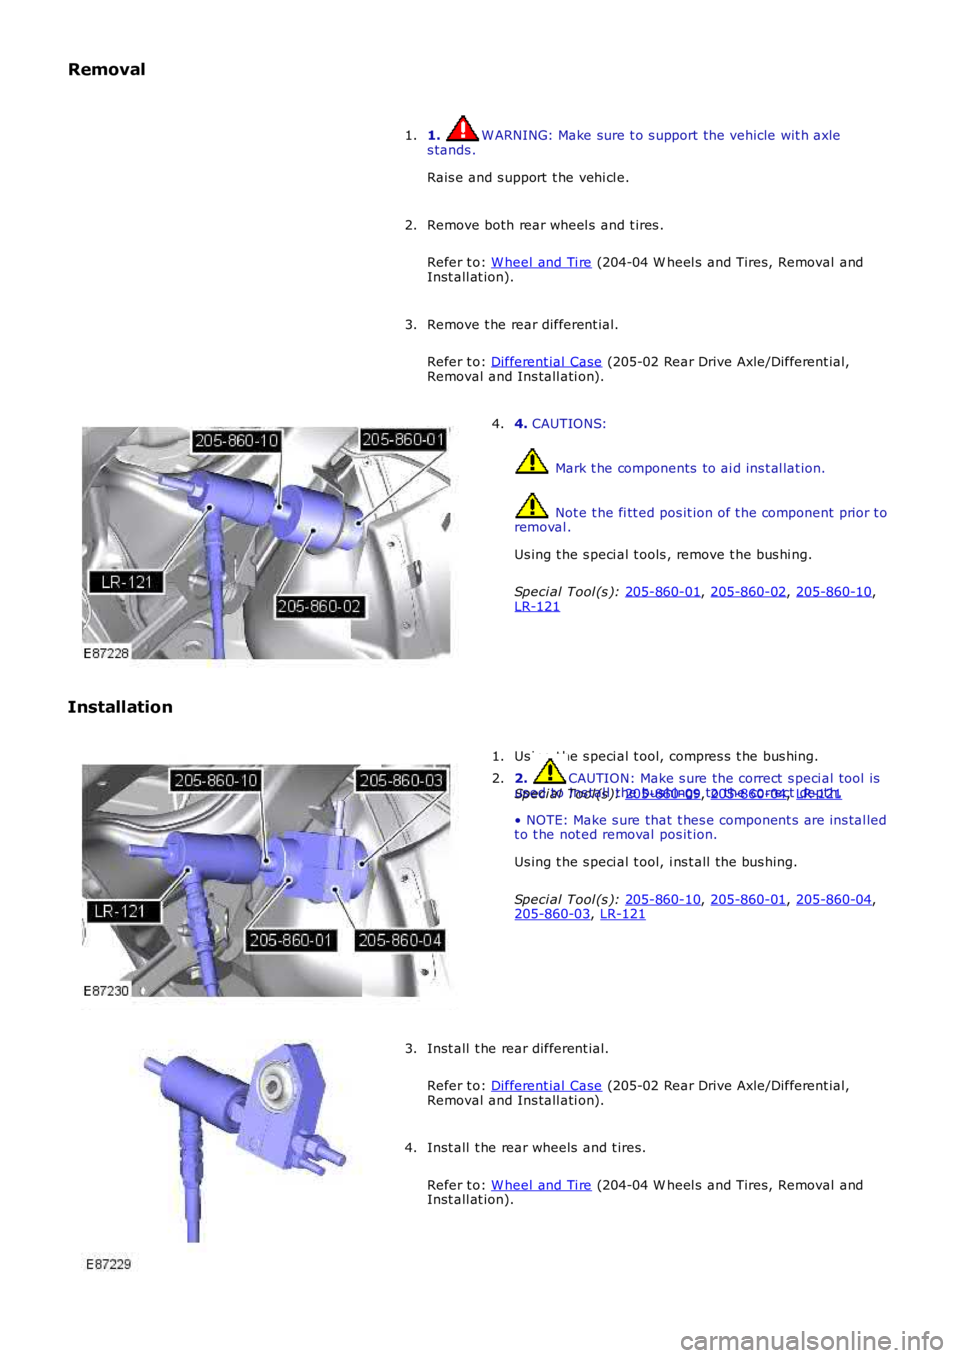
CAUTIONS: Mark t he components to ai d ins t al lat ion.
Not e t he fi tt ed pos it ion of t he component prior t o
removal .
Us ing t he s peci al t ools , remove t he bus hi ng.
Speci al Tool (s ): 205-860-01 ,
205-860-02 ,
205-860-10 ,
LR-121 4.
Installation Us ing t he s peci al t ool, compres s t he bus hing.
Speci al Tool (s ): 205-860-09 ,
205-860-04 ,
LR-121 1.
2. CAUTION: Make s ure the correct s peci al tool is
us ed to ins tal l the bus hings to the correct dept h.
• NOTE: Make s ure that t hes e component s are ins tal led
t o t he not ed removal pos it ion.
Us ing t he s peci al t ool, i ns t all the bus hing.
Speci al Tool (s ): 205-860-10 ,
205-860-01 ,
205-860-04 ,
205-860-03 ,
LR-121 2.
Inst all t he rear different ial.
Refer t o: Different ial Case (205-02 Rear Drive Axle/Different ial,
Removal and Ins tall ati on).
3.
Inst all t he rear wheels and t ires.
Refer t o: W heel and Ti re (204-04 W heel s and Tires, Removal and
Inst all at ion).
4.
Page 348 of 3229
Removal
1. W ARNING: Make sure t o s upport the vehicle wit h axle
s tands .
Rais e and s upport t he vehi cl e.
1.
Remove both rear wheel s and t ires .
Refer t o: W heel and Ti re (204-04 W heel s and Tires, Removal and
Inst all at ion).
2.
Remove t he rear different ial.
Refer t o: Different ial Case (205-02 Rear Drive Axle/Different ial,
Removal and Ins tall ati on).
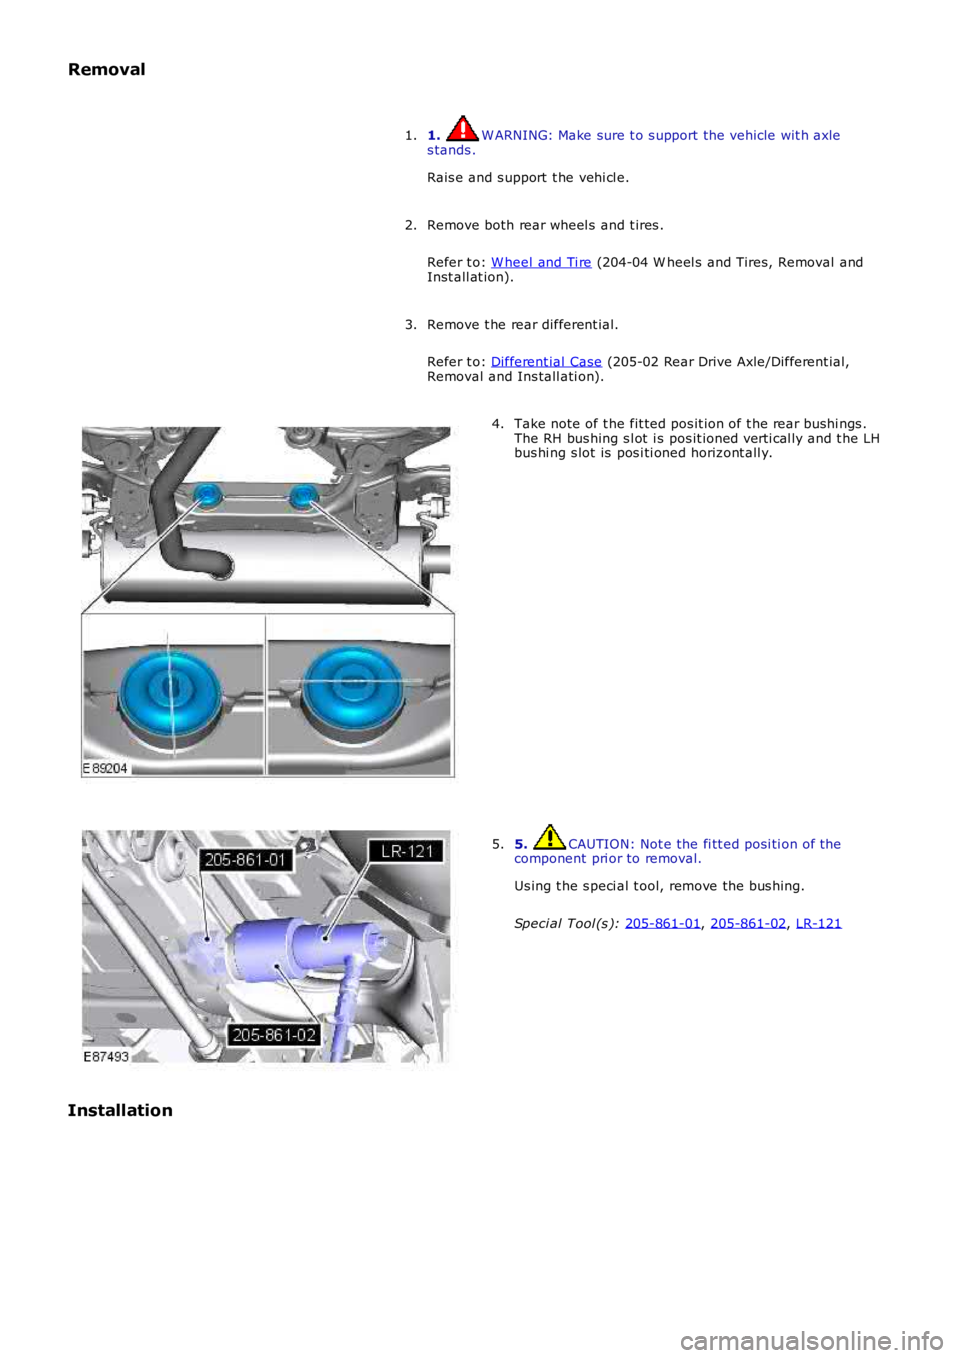
3. Take note of t he fit ted pos it ion of t he rear bushi ngs .
The RH bus hing s l ot i s pos it ioned verti cal ly and t he LH
bus hi ng s lot is pos i ti oned horizont all y.
4. 5. CAUTION: Not e the fi tt ed posi ti on of the
component pri or to removal.
Us ing t he s peci al t ool, remove the bus hing.
Speci al Tool (s ): 205-861-01 ,
205-861-02 ,
LR-121 5.
Installation
Page 349 of 3229
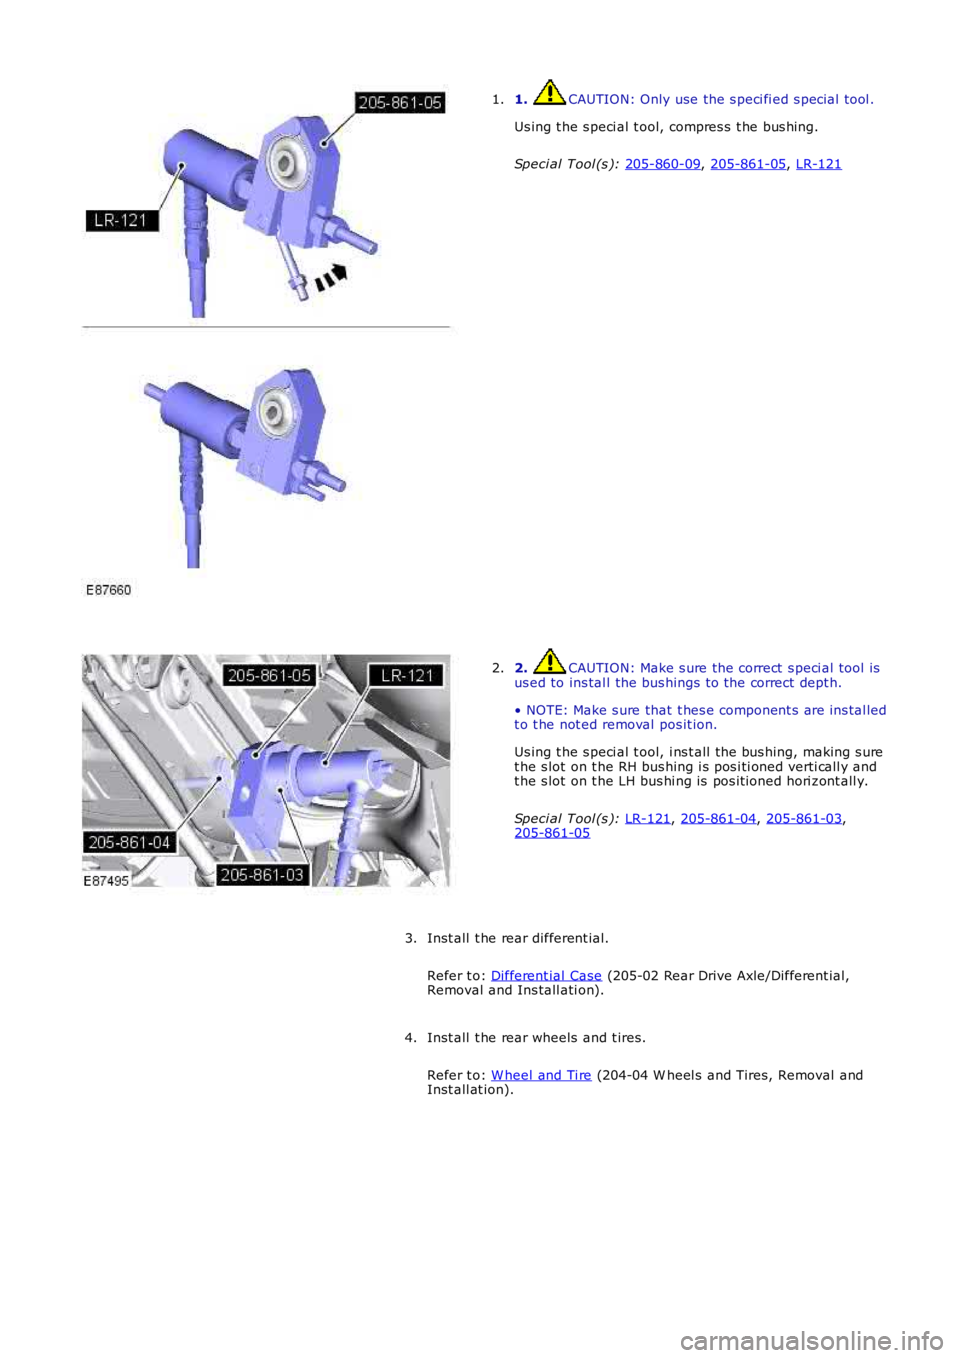
1. CAUTION: Only use the s peci fi ed s pecial t ool .
Us ing t he s peci al t ool, compres s t he bus hing.
Speci al Tool (s ): 205-860-09 ,
205-861-05 ,
LR-121 1.
2. CAUTION: Make s ure the correct s peci al tool is
us ed to ins tal l the bus hings to the correct dept h.
• NOTE: Make s ure that t hes e component s are ins tal led
t o t he not ed removal pos it ion.
Us ing t he s peci al t ool, i ns t all the bus hing, making s ure
t he s lot on t he RH bus hing i s pos i ti oned verti call y and
t he s lot on t he LH bus hi ng is pos it ioned hori zont all y.
Speci al Tool (s ): LR-121 ,
205-861-04 ,
205-861-03 ,
205-861-05 2.
Inst all t he rear different ial.
Refer t o: Different ial Case (205-02 Rear Drive Axle/Different ial,
Removal and Ins tall ati on).
3.
Inst all t he rear wheels and t ires.
Refer t o: W heel and Ti re (204-04 W heel s and Tires, Removal and
Inst all at ion).
4.
Page 354 of 3229
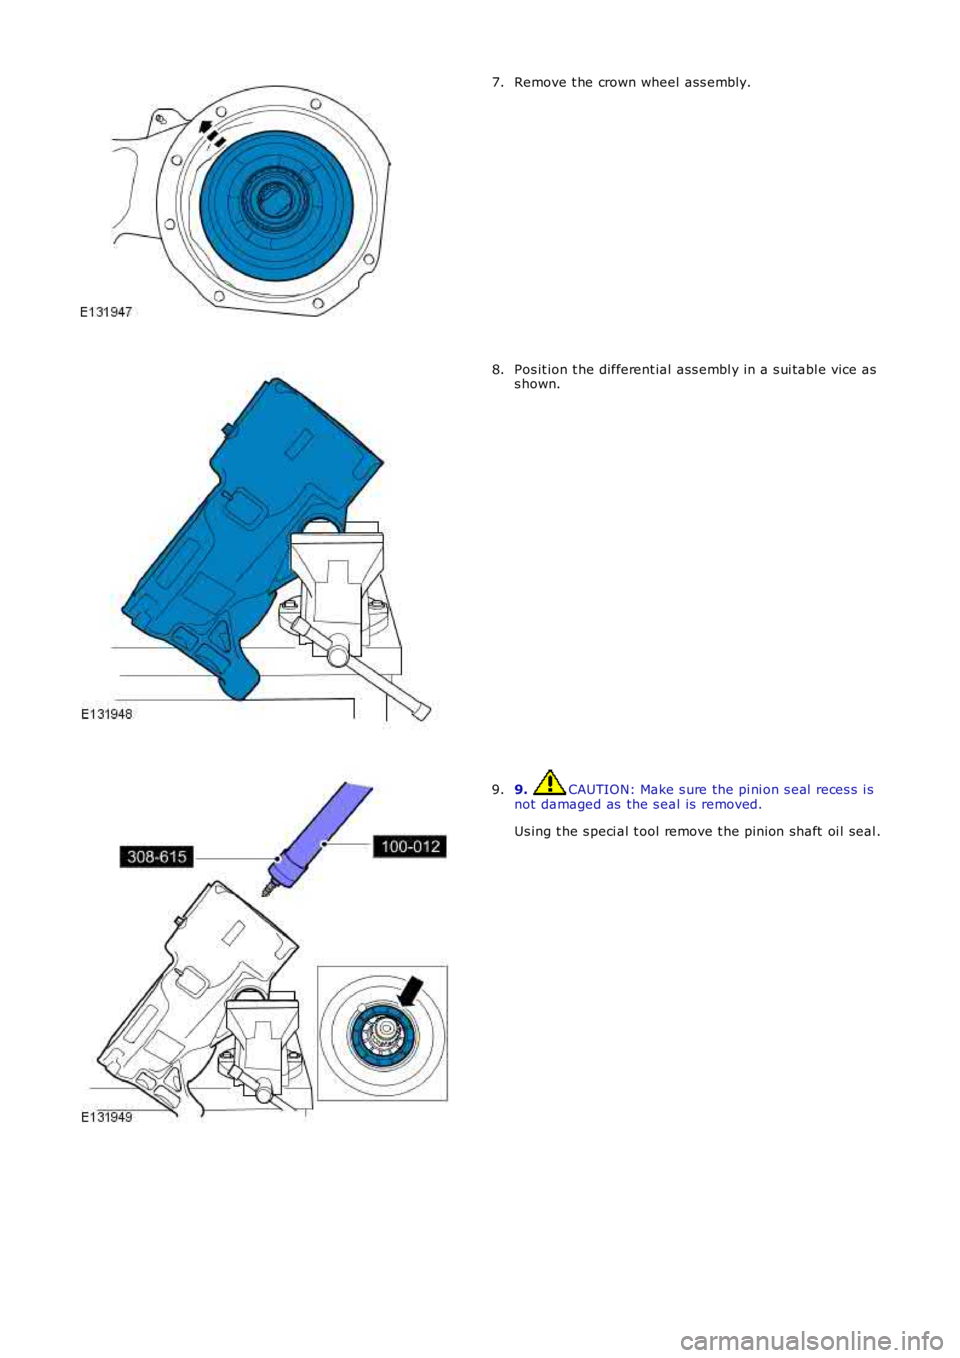
Remove t he crown wheel ass embly.7.
Pos it ion t he different ial ass embl y in a s ui tabl e vice ass hown.8.
9. CAUTION: Make s ure the pi ni on s eal reces s i snot damaged as the s eal is removed.
Us ing t he s peci al t ool remove t he pinion shaft oi l seal .
9.
Page 359 of 3229
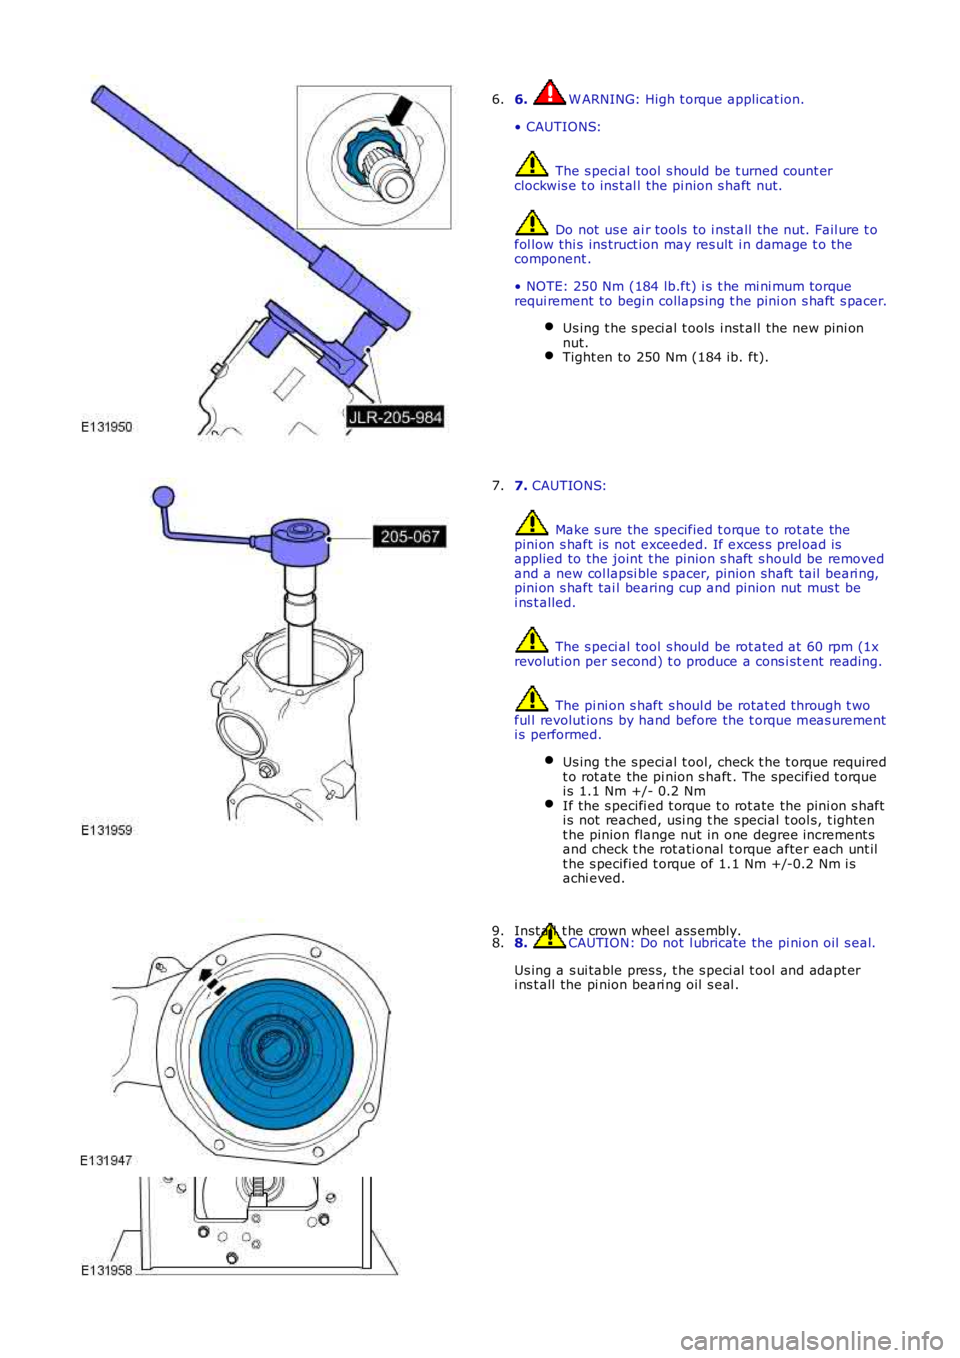
6. W ARNING: High t orque applicat ion.
• CAUTIONS:
The s peci al tool s hould be t urned count erclockwis e t o ins t al l the pi nion s haft nut.
Do not us e ai r tools to i nst all t he nut. Fail ure t ofol low thi s ins truct ion may res ult i n damage t o thecomponent .
• NOTE: 250 Nm (184 lb.ft) i s t he mi ni mum torquerequi rement to begi n collaps ing t he pini on s haft s pacer.
Us ing t he s peci al t ools i nst all t he new pini onnut.Tight en to 250 Nm (184 ib. ft).
6.
7. CAUTIONS:
Make s ure the specified t orque t o rot ate thepini on s haft is not exceeded. If exces s prel oad isapplied to the joint t he pinion s haft s hould be removedand a new col lapsi ble s pacer, pinion shaft tail beari ng,pini on s haft tai l bearing cup and pinion nut mus t bei ns t alled.
The s peci al tool s hould be rot ated at 60 rpm (1xrevolut ion per s econd) t o produce a cons i st ent reading.
The pi ni on s haft s houl d be rotat ed through t woful l revolut ions by hand before the t orque meas urementi s performed.
Us ing t he s peci al t ool, check t he t orque requiredt o rot ate the pi nion s haft . The specified t orquei s 1.1 Nm +/- 0.2 NmIf the s pecifi ed t orque t o rot ate the pi ni on s hafti s not reached, usi ng t he s pecial t ool s, t ight ent he pinion flange nut in one degree increment sand check t he rot ati onal t orque after each unt ilt he s pecified t orque of 1.1 Nm +/-0.2 Nm i sachi eved.
7.
8. CAUTION: Do not l ubricate the pi ni on oil s eal.
Us ing a s ui table pres s, t he s peci al t ool and adapt eri ns t all the pi nion beari ng oil s eal .
8.Inst all t he crown wheel ass embly.9.