2006 KIA Sportage seat adjustment
[x] Cancel search: seat adjustmentPage 44 of 354
387
1
2
3
4
5
6
7
8
9
Knowing your vehicle
Outside rearview mirror heater
(if equipped)
The outside rearview mirror heater is
actuated in connection with the rear
window defroster. To heat the outside
rearview mirror glass, push the but-
ton for the rear window defroster.
The rearview mirror heater (and rear
window defroster) will not operate
unless the engine is running.
The outside rearview mirror glass will
be heated for defrosting or defogging
and will give you improved rear
vision in inclement weather condi-
tions. Push the button again to turn
the heater off. The outside rearview
mirror heater automatically turns off
after 20 minutes.
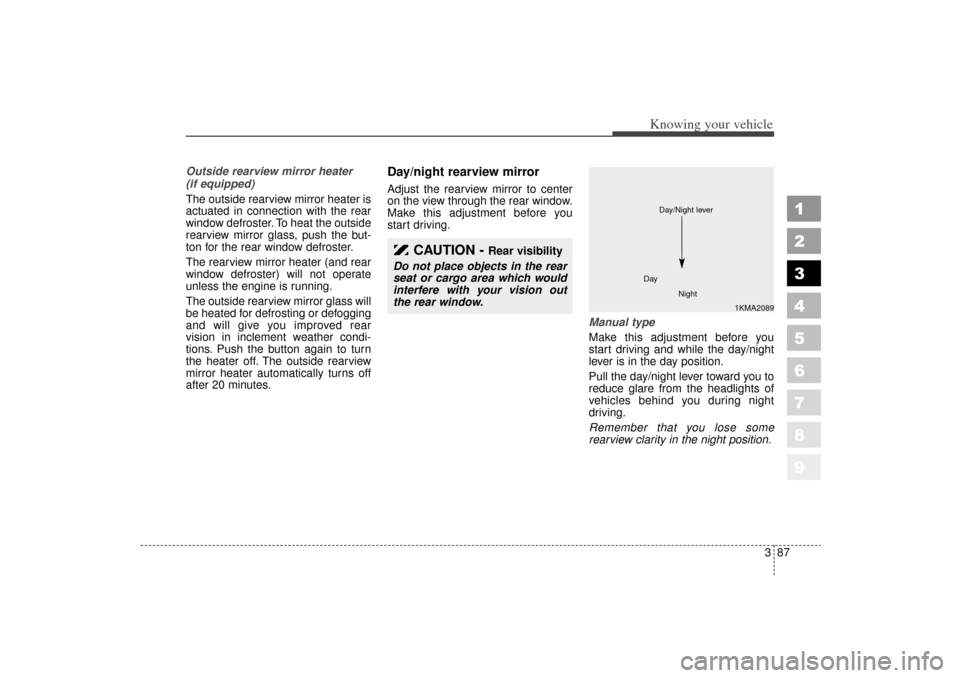
Day/night rearview mirror Adjust the rearview mirror to center
on the view through the rear window.
Make this adjustment before you
start driving.Manual type
Make this adjustment before you
start driving and while the day/night
lever is in the day position.
Pull the day/night lever toward you to
reduce glare from the headlights of
vehicles behind you during night
driving.
Remember that you lose some
rearview clarity in the night position.
CAUTION -
Rear visibility
Do not place objects in the rear
seat or cargo area which would
interfere with your vision out
the rear window.
1KMA2089
Day
Night
Day/Night lever
KM CAN (ENG) 3 (55~)new.qxd 7/29/05 9:37 AM Page 87
Page 85 of 354

319
Knowing your vehicle
1
2
3
4
5
6
7
8
9
Driver’s seat➀
Seat adjustment, forward /
backward (see page 3- 21)
➁
Seatback recliner(see page 3- 21)
➂
Seat adjustment, height(see page 3- 22)
➃
Seat heater switch*(see page 3- 22)
➄
Headrest adjustment (see page 3- 23)Front passenger seat
\b
Seat adjustment, forward /
backward (see page 3- 21)
➆
Seatback recliner(see page 3- 21)
➇
Seat heater switch* (see page 3- 22)
➈
Headrest adjustment (see page 3- 23)
Rear seat
\f
Armrest (see page 3- 29)
Headrest adjustment (see page 3- 30)
Split folding rear seat (see page 3- 27)
* if equipped
SEAT
1KMA2034
1112
KM CAN (ENG) 3 (~54)new.qxd 7/29/05 9:33 AM Page 19
Page 87 of 354

321
Knowing your vehicle
1
2
3
4
5
6
7
8
9
Front seat adjustmentAdjusting the seat forward and
backward
To move the seat forward or back-
ward:
1. Pull the seat slide adjustmentlever under the front edge of the
seat cushion up and hold it.
2. Slide the seat to the position you desire.
3. Release the lever and make sure the seat is locked in place. Adjust the seat before driving, and
make sure the seat is locked secure-
ly by trying to move forward and
backward without using the control
knob. If the seat moves, it is not
locked properly.
Adjusting the seatback recliner
To recline the seatback:
1. Lean forward slightly and lift up onthe seatback recline lever located
on the outside of the seat, at the
rear.
2. Carefully lean back on the seat and adjust the seatback of the
seat to the position you desire.
3. Release the lever and make sure the seatback is locked in place.
(The lever MUST return to its orig-
inal position for the seatback to
lock.)
1KMA2035
1KMA2037
KM CAN (ENG) 3 (~54)new.qxd 7/29/05 9:33 AM Page 21
Page 89 of 354

323
Knowing your vehicle
1
2
3
4
5
6
7
8
9
✽ ✽NOTICE The seat warmer will not operate
if ambient temperature is above
37±3°C (98.5±5.5°F).
If the seat warmer doesn't work when the ambient temperature is
below 28±3.5°C (82.5±5.5°F), have
the system checked by an author-
ized dealer.✽ ✽ NOTICE When cleaning the seats, do not
use an organic solvent such as
thinner, benzene, alcohol and
gasoline. Doing so may damage
the surface of the heater or seats.
To prevent overheating the seat warmer, do not place blankets,
cushions or seat covers on the
seats while the seat warmer is in
operation.
Do not place heavy or sharp objects on seats equipped with
seat warmers. Damage to the seat
warming components could occur.
Front headrest adjustment
Adjusting the height up and down
The headrest not only provides com-
fort for the driver and passengers,
but also helps to protect the head
and neck in the event of a collision.
To raise the headrest, pull it up to the
desired position (
➀). To lower the
headrest, push and hold the release
button (
➁) on the headrest support
and lower the headrest to the desired
position (➂). For best protection,
adjust the headrest so its center is as
high as your ears. Also adjust the
headrest so its distance from the
head is as wide as your fist.
WARNING
- Seat heater
burns
Passengers should use extreme
caution when using seat warm-
ers due to the possibility of
excess heating or burns. In par-
ticular, the driver must exercise
extreme care for the following
types of passengers:
1. Infants, children, elderly or handicapped persons, or hos-
pital outpatients
2. Persons with sensitive skin or those that burn easily
3. Fatigued individuals
4. Intoxicated individuals
5. Individuals taking medication that can cause drowsiness or
sleepiness (sleeping pills,
cold tablets, etc.)
1KMA2040
KM CAN (ENG) 3 (~54)new.qxd 7/29/05 9:33 AM Page 23
Page 92 of 354

Knowing your vehicle26
3
1
2
3
4
5
6
7
8
9
Seatback pocket
A seatback pocket is provided on the
back of the front passenger and driv-
ers seatbacks.
Rear seat adjustmentAdjusting the seatback recliner
To recline the seatback:
1. Pull the lock release lever located
on the top of the seatback.
2. Recline the seatback to the desired position.
3. Release the lever and make sure the seatback is locked in place. Split folding rear seat
The rear seatbacks fold forward to
provide additional cargo space and
to provide access to the cargo area.
To fold the rear seatback(s) down,
pull the lock release lever, then fold
the seatback forward and down.
To raise the seatback, lift and push it firmly until it clicks into place.
When you return the seatback to its upright position, reposition the
rear safety belts so that they can
be used by rear seat passengers.
1KMA2042
WARNING
- Seatback
pockets
Do not put heavy or sharp
objects in the seatback pockets.
In an accident they could come
loose from the pocket and injure
vehicle occupants.
1KMA2049
CAUTION -
Rear seatback
locks
When reclining the seatback,
you should adjust the lock
release lever while standing and
holding the seatback.
KM CAN (ENG) 3 (~54)new.qxd 7/29/05 9:33 AM Page 26
Page 95 of 354

329
Knowing your vehicle
1
2
3
4
5
6
7
8
9
Armrest
The armrest is located in the center
of the rear seat. Pull the armrest
down from the seatback.Rear headrest adjustment
Adjusting the height up and down
The headrest not only provides com-
fort for the rear passengers, but also
helps to protect the head and neck in
the event of a collision.
To raise the headrest, pull it up to the
desired position (
➀). To lower the
headrest, push and hold the release
button (
➁) on the headrest support
and lower the headrest to the desired
position (➂). For best protection,
adjust the headrest so its center is as
high as your ears. Also adjust the
headrest so its distance from the
head is as wide as your fist. Removal
To remove the headrest, raise it as
far as it can go then press the
release lever (
➀) while pulling
upward (
➁).
1KMA2046
1KMA2047
WARNING
- Rear head-
rests
To reduce the risk of head and
neck injuries to rear passen-
gers, do not operate the vehicle
with the rear headrests removed
or improperly positioned.
1KMA2048
KM CAN (ENG) 3 (~54)new.qxd 7/29/05 9:33 AM Page 29
Page 97 of 354

331
Knowing your vehicle
1
2
3
4
5
6
7
8
9
Load limiter
When the pre-tentioner activates, if
the system senses excessive seat
belt tension on the driver or passen-
ger’s seat belt, the load limiter inside
the pre-tensioner will release some
of the pressure on the affected seat
belt.
CAUTION -
Airbag/Pre-
tensioner dust
When the airbags and pre-ten-
sioners are activated, a loud
noise may be heard and fine
dust, which may appear to be
smoke, may be visible in the
passenger compartment. This
dust is not toxic. The dust may
cause skin irritation and should
not be breathed for prolonged
periods. Ventilate the vehicle
after impact and wash your
hands and face thoroughly after
an accident.
WARNING
- Airbag/pre-
tensioner warning light
If the SRS airbag warning light
does not illuminate when the
ignition key is turned to “ON” ,
or if it remains illuminated after
approximately 6 seconds, or if it
illuminates while the vehicle is
being driven, please have an
authorized Kia dealer inspect
the pre-tensioner and airbag
system as soon as possible.
WARNING
- Safety belt adjustment
To obtain maximum benefit from
a pre-tensioner seat belt:
The safety belt must be worn correctly.
The safety belt must be adjusted to the correct posi-
tion.
KM CAN (ENG) 3 (~54)new.qxd 7/29/05 9:33 AM Page 31