2006 KIA Rio audio
[x] Cancel search: audioPage 105 of 220
Knowing your vehicle96
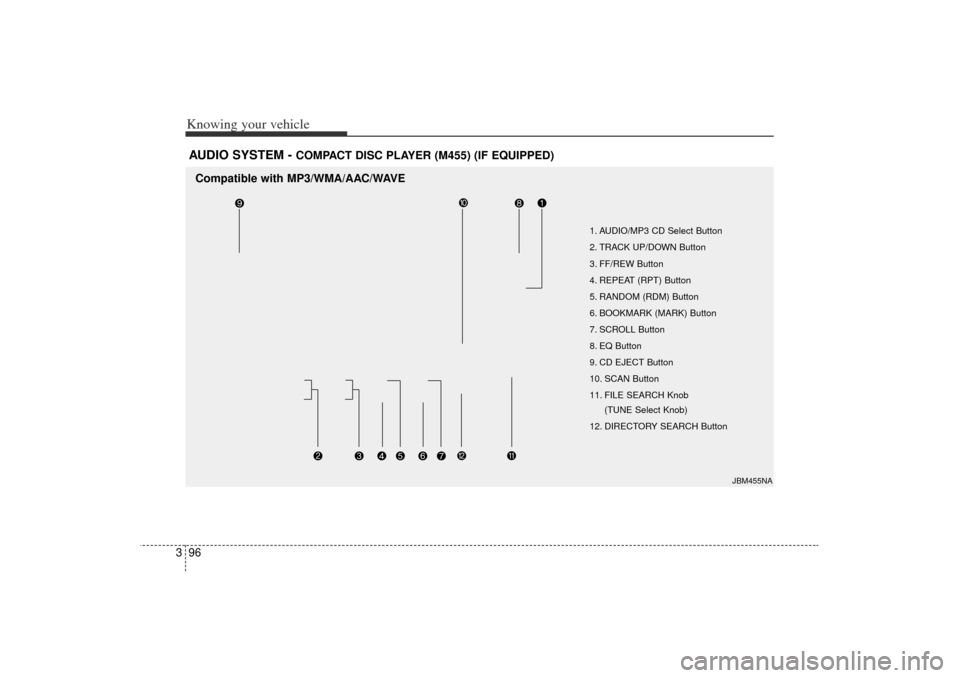
3AUDIO SYSTEM -
COMPACT DISC PLAYER (M455) (IF EQUIPPED)
1. AUDIO/MP3 CD Select Button
2. TRACK UP/DOWN Button
3. FF/REW Button
4. REPEAT (RPT) Button
5. RANDOM (RDM) Button
6. BOOKMARK (MARK) Button
7. SCROLL Button
8. EQ Button
9. CD EJECT Button
10. SCAN Button
11. FILE SEARCH Knob
(TUNE Select Knob)
12. DIRECTORY SEARCH Button
JBM455NA
Compatible with MP3/WMA/AAC/WAVE
JB CAN 3.qxd 7/29/05 8:57 AM Page 96
Page 106 of 220
397
Knowing your vehicle
1. AUDIO/MP3 CD Select ButtonInsert the CD with the label facing
upward.
Insert the CD to start CD playback,
during radio operation or cassette tape
playing.
If you press the CD button while a disc
is in the CD deck, the CD player will
begin playing even if the radio or cas-
sette player is being used.
The CD player can be used when the
ignition switch is in either the “ON”or
“ACC ”position.
Push the CD button to turn on that
function without pushing Power ON-
OFF control knob.✽ ✽
NOTICE Do not stick paper or tape etc., on the
label side or the recording side of any
discs, as it may cause a malfunction.
The unit can play a multi-session CD- R (recordable CD) and CD-RW
(rewritable CD) that consists of more
than two sessions. (Continued)(Continued)
Please refer to the manual of CD-
R/CD-RW recorder or CD-R/CD-RW
software for more information on
finalization process.
Depending on the recording status, some CD-Rs/CD-RWs may not be
played on this unit.
2. TRACK UP/DOWN Button The desired track on the disc currently
being played can be selected using the
track number.
Press button once to skip forward to
the beginning of the next track.
Press within a second after play-
back begins to quickly move backward
through a CD.
If you press after more than a sec-
ond, it will take you to the beginning of
the file you are now listening to.3. FF/REW Button If you want to fast forward or reverse
through the compact disc track, push and
hold the FF or REW button.
When you release the button, the com-
pact disc player will resume playing.
4. REPEAT (RPT) ButtonTo repeat the track you are currently
listening to, press the RPT button. To
cancel, press it again.
To repeat the music within selected
folder, press the RPT button for more
than 0.8 second. To cancel, press it
again. (MP3 CD only)
If you do not release RPT operation
when the track ends, it will automati-
cally be replayed.
This process will be continued until you
push the button again or power
ON/OFF.5. RANDOM (RDM) ButtonPress the RDM button to listen to
recorded tracks in random sequence.
Press RDM again to cancel or turn the
audio unit OFF then ON. The unit
defaults to playing tracks in sequential
order.
To listen the music within the selected
folder in random order, press the RDM
button within a second. To cancel,
press it again or power ON/OFF.(MP3
CD only)
JB CAN 3.qxd 7/29/05 8:57 AM Page 97
Page 108 of 220
399
Knowing your vehicle
✽
✽NOTICE To assure proper operation of the
unit, keep the vehicle interior temper-
ature within a normal range by using
the vehicle's air conditioning or heat-
ing system.
When replacing the fuse, replace it with a fuse having the correct capaci-
ty.
All stored bookmarks are all erased when the car battery is disconnected
or power to the vehicle is lost. If this
occurs, the bookmarks will have to be
reset.
This equipment is designed to be used only in a 12 volt DC battery system
with negative ground.
This unit is made of precision parts. Do not attempt to disassemble or
adjust any parts.
When driving your vehicle, be sure to keep the volume of the unit set low
enough to allow you to hear sounds
coming from the outside.
Do not expose this equipment (includ- ing the speakers and tape) to water or
excessive moisture.
CAUTION
Do not insert warped or poor
quality discs into the CD player
as damage to the unit may occur.
Do not insert anything like coins into the player slot as damage to
the unit may occur.
Do not place beverages close to the audio system. The playback
mechanism may be damaged if
you spill them.
Do not strike or allow anything to impact the audio system, damage
to the system mechanisms could
occur.
Off-road or rough surface driving may cause the compact disc to
skip. Do not use the compact
disc when driving in such condi-
tions as damage to the compact
disc face could occur.
(Continued)
(Continued)
Do not attempt to grab or pull thecompact disc out while the disc is
being pulled into the audio unit
by the self-loading mechanism.
Damage to the audio unit and
compact disc could occur.
Avoid using recorded compact discs in your audio unit. Original
compact discs are recommended.
JB CAN 3.qxd 7/29/05 8:57 AM Page 99
Page 163 of 220

67
In case of an emergency
Driver-side panel bolster
1. Turn the ignition switch and all otherswitches off.
2. Open the cover (1, 2).
3. Remove the small storage box (3,4). 4. Pull the suspected fuse straight out.
Use the removal tool (1) provided in
the engine compartment fuse/relay
box.
5. Check the removed fuse; replace it if it is blown.
Spare fuses are provided in the fuse
panel in engine compartment.
6. Push in a new fuse of the same rating, and make sure it fits tightly in the clips.
If it fits loosely, consult an authorized Kia
dealer. If you do not have a spare, use a fuse of
the same rating from a circuit you may
not need for operating the vehicle, such
as the audio fuse.
If the headlights or other electrical com-
ponents do not work and the fuses are
OK, check the fuse block in the engine
compartment. If a fuse is blown, it must
be replaced.
1JBA6004
1
1JBN6003
JB CAN 6.qxd 7/29/05 9:10 AM Page 7
Page 167 of 220
611
In case of an emergency
Driver-side knee bolster
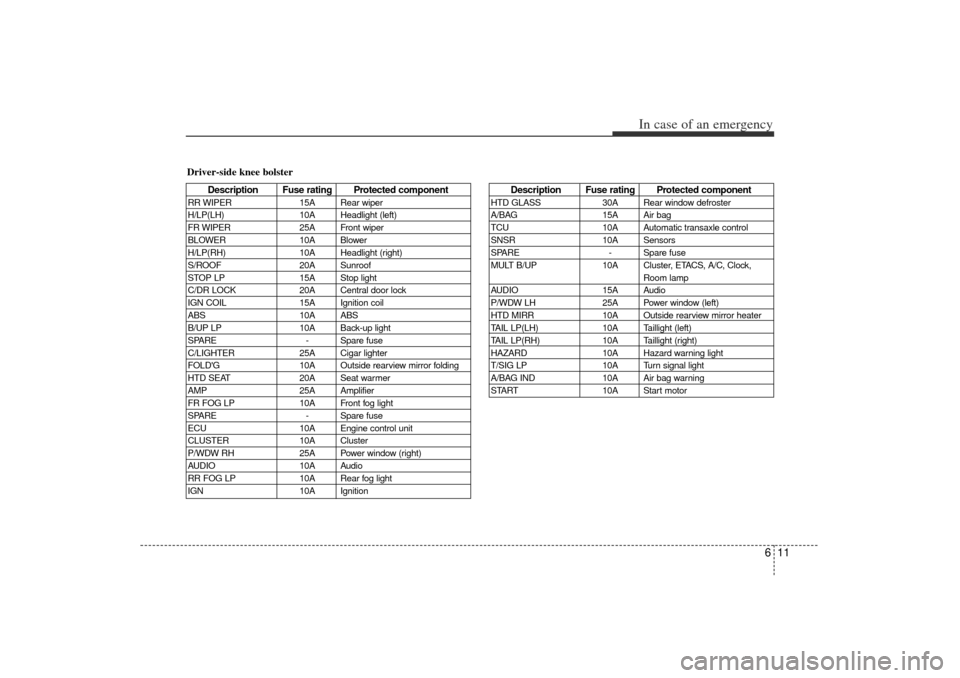
Description Fuse rating Protected component
RR WIPER15A Rear wiper
H/LP(LH) 10A Headlight (left)
FR WIPER 25A Front wiper
BLOWER 10A Blower
H/LP(RH) 10A Headlight (right)
S/ROOF 20A Sunroof
STOP LP 15A Stop light
C/DR LOCK 20A Central door lock
IGN COIL 15A Ignition coil
ABS 10A ABS
B/UP LP 10A Back-up light
SPARE - Spare fuse
C/LIGHTER 25A Cigar lighter
FOLD'G 10A Outside rearview mirror folding
HTD SEAT 20A Seat warmer
AMP 25A Amplifier
FR FOG LP 10A Front fog light
SPARE - Spare fuse
ECU 10A Engine control unit
CLUSTER 10A Cluster
P/WDW RH 25A Power window (right)
AUDIO 10A Audio
RR FOG LP 10A Rear fog light
IGN 10A Ignition
Description Fuse rating Protected component
HTD GLASS30A Rear window defroster
A/BAG 15A Air bag
TCU 10A Automatic transaxle control
SNSR 10A Sensors
SPARE - Spare fuse
MULT B/UP 10A Cluster, ETACS, A/C, Clock,
Room lamp
AUDIO 15A Audio
P/WDW LH 25A Power window (left)
HTD MIRR 10A Outside rearview mirror heater
TAIL LP(LH) 10A Taillight (left)
TAIL LP(RH) 10A Taillight (right)
HAZARD 10A Hazard warning light
T/SIG LP 10A Turn signal light
A/BAG IND 10A Air bag warning
START 10A Start motor
JB CAN 6.qxd 7/29/05 9:10 AM Page 11
Page 168 of 220

In case of an emergency12
6Memory fuseYour vehicle is equipped with a memory
fuse to prevent battery discharge if your
vehicle is parked without being operated
for prolonged periods. Use the following
procedures before parking the vehicle for
prolonged period.
1. Turn off the engine.
2. Turn off the headlights and tail lights.
3. Open the driver-side knee bolster
cover and pull up the “MULT B/UP 10A
/ AUDIO 15A”.
✽ ✽NOTICE• If the memory fuse is pulled up from
the fuse panel, the warning chime,
audio, clock and interior lamps, etc.,
will not operate. Some items must be
reset after replacement.
Even though the memory fuse is pulled up, the battery can still be dis-
charged by operation of the head-
lights or other electrical devices.
If emergency towing is necessary, we
recommend having it done by an author-
ized Kia dealer or a commercial tow-truck
service. Proper lifting and towing proce-
dures are necessary to prevent damage
to the vehicle. The use of wheel dollies or
flatbed equipment is recommended.
For trailer towing guidelines information,
refer to section 5 “Driving Tips”.
1JBA6010
TOWING
1JBA6501
JB CAN 6.qxd 7/29/05 9:10 AM Page 12
Page 200 of 220

Maintenance22
7For best battery service : Keep the battery securely mounted.
Keep the top of the battery clean and
dry.
Keep the terminals and connections clean, tight, and coated with petroleum
jelly or terminal grease.
Rinse any spilled electrolyte from the battery immediately with a solution of
water and baking soda.
If the vehicle is not going to be used for an extended time, disconnect the bat-
tery cables.
Battery recharging Your vehicle has a maintenance-free,
calcium-based battery.
If the battery becomes discharged in ashort time (because, for example, the
headlights or interior lights were left on
while the vehicle was not in use),
recharge it by slow charging (trickle)
for 10 hours.
If the battery gradually discharges because of high electric load while the
vehicle is being used, recharge it at 20-
30A for two hours.
Items to be reset after the battery has
been discharged or the battery has
been disconnected.
Clock (See Chapter 3)
Audio (See Chapter 3)
Sunroof (See Chapter 3)
✽ ✽ NOTICE Before performing maintenance or
recharging the battery, turn off all
accessories and stop the engine.
The negative battery cable must be removed first and installed last when
the battery is disconnected.
1JBA7017
WARNING
- Recharging
battery
When recharging the battery,
observe the following precautions:
The battery must be removed
from the vehicle and placed in an
area with good ventilation.
(Continued)
(Continued)
Do not allow cigarettes, sparks, orflame near the battery.
Watch the battery during charg- ing, and stop or reduce the charg-
ing rate if the battery cells begin
gassing (boiling) violently or if
the temperature of the electrolyte
of any cell exceeds 49°C (120°F).
Wear eye protection when check- ing the battery during charging.
Disconnect the battery charger in the following order.
1. Turn off the battery charger main switch.
2. Unhook the negative clamp from the negative battery terminal.
3. Unhook the positive clamp from the positive battery terminal.
JB CAN 7.qxd 7/29/05 9:11 AM Page 22
Page 219 of 220
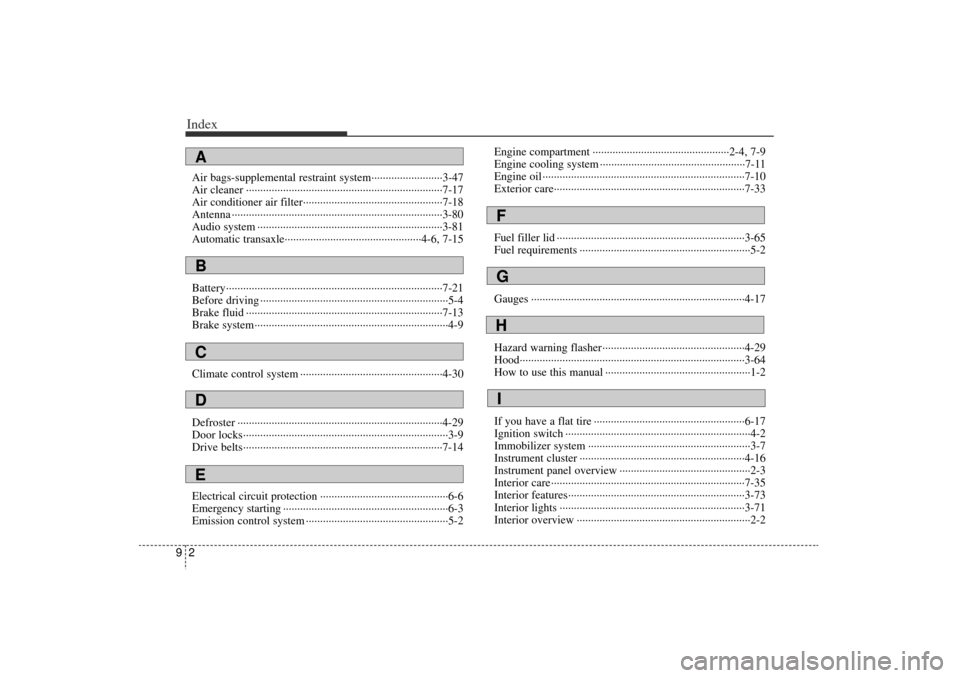
Index29Air bags-supplemental restraint system··················\
·······3-47
Air cleaner ··················\
··················\
··················\
···············7-17
Air conditioner air filter··················\
··················\
·············7-18
Antenna ··················\
··················\
··················\
··················\
··3-80
Audio system ··················\
··················\
··················\
···········3-81
Automatic transaxle··················\
··················\
············4-6, 7-15
Battery··················\
··················\
··················\
··················\
····7-21
Before driving ··················\
··················\
··················\
············5-4
Brake fluid ··················\
··················\
··················\
···············7-13
Brake system··················\
··················\
··················\
··············4-9
Climate control system ··················\
··················\
··············4-30
Defroster ··················\
··················\
··················\
··················\
4-29
Door locks··················\
··················\
··················\
··················\
3-9
Drive belts··················\
··················\
··················\
················7-14
Electrical circuit protection ··················\
··················\
·········6-6
Emergency starting ··················\
··················\
··················\
····6-3
Emission control system ··················\
··················\
··············5-2Engine compartment ··················\
··················\
············2-4, 7-9
Engine cooling system ··················\
··················\
···············7-11
Engine oil ··················\
··················\
··················\
·················7-10\
Exterior care··················\
··················\
··················\
·············7-33
Fuel filler lid ··················\
··················\
··················\
············3-65
Fuel requirements ··················\
··················\
··················\
······5-2
Gauges ··················\
··················\
··················\
··················\
···4-17
Hazard warning flasher··················\
··················\
··············4-29
Hood··················\
··················\
··················\
··················\
·······3-64
How to use this manual ··················\
··················\
···············1-2
If you have a flat tire ··················\
··················\
·················6-17\
Ignition switch ··················\
··················\
··················\
···········4-2
Immobilizer system ··················\
··················\
··················\
···3-7
Instrument cluster ··················\
··················\
··················\
····4-16
Instrument panel overview ··················\
··················\
··········2-3
Interior care··················\
··················\
··················\
··············7-35
Interior features··················\
··················\
··················\
········3-73
Interior lights ··················\
··················\
··················\
···········3-71
Interior overview ··················\
··················\
··················\
·······2-2ABCED
FGHI
JB CAN 9.qxd 7/29/05 9:12 AM Page 2