Page 90 of 315
379
1 23456789
Knowing your vehicle
1. Stop the engine.
2. To open the fuel filler lid, pull therelease lever. 3. Pull the fuel filler lid out to open.
4. To remove the cap, turn the fuel
tank cap counter-clockwise.
5. Refuel as needed.
6. To install the cap, turn it clockwise until it “clicks”. This indicates that the cap is securely tightened.
7. Close the fuel filler lid and push it lightly and make sure that it issecurely closed.
FUEL FILLER LID
1LDA20181LDA2019
CAUTION
To avoid injury from sharp
objects, it is recommended that protective gloves be worn whenopening the fuel filler door man-ually.
WARNING - Refueling
If pressurized fuel sprays out, it can cause serious injuries.
Always remove the fuel cap
carefully and slowly. If the cap is
venting fuel or if you hear a
hissing sound, wait until the
condition stops before com-
pletely removing the cap.
Page 91 of 315

Knowing your vehicle
80
3
1 23456789
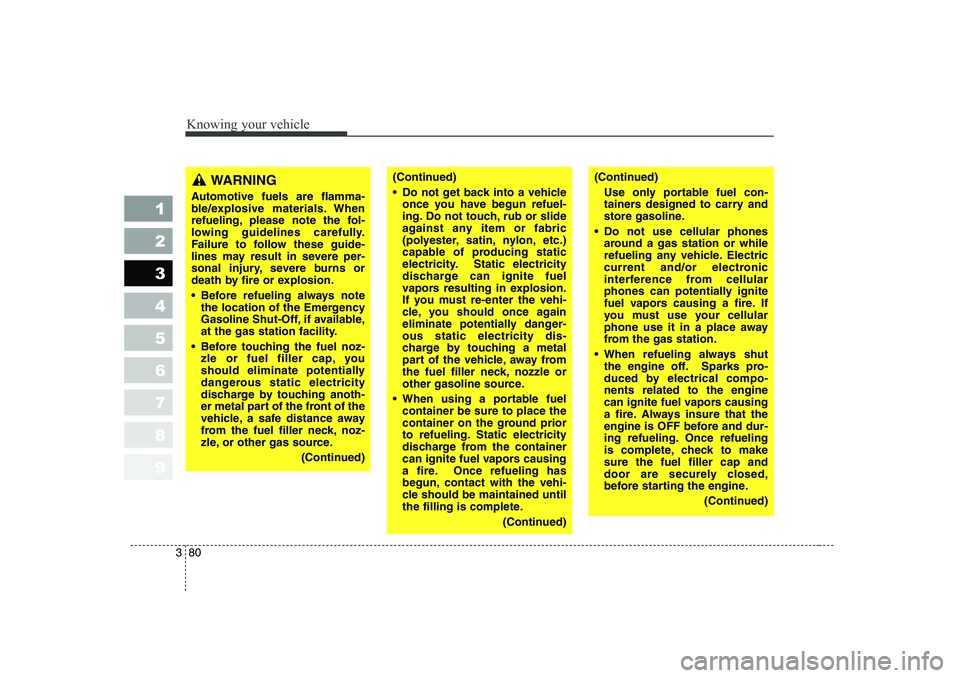
WARNING
Automotive fuels are flamma-
ble/explosive materials. When
refueling, please note the fol-
lowing guidelines carefully.
Failure to follow these guide-
lines may result in severe per-
sonal injury, severe burns or
death by fire or explosion.
Before refueling always note the location of the Emergency
Gasoline Shut-Off, if available,
at the gas station facility.
Before touching the fuel noz- zle or fuel filler cap, you
should eliminate potentially
dangerous static electricity
discharge by touching anoth-
er metal part of the front of the
vehicle, a safe distance away
from the fuel filler neck, noz-
zle, or other gas source.
(Continued)(Continued)
Do not get back into a vehicleonce you have begun refuel-
ing. Do not touch, rub or slide
against any item or fabric
(polyester, satin, nylon, etc.)
capable of producing static
electricity. Static electricity
discharge can ignite fuel
vapors resulting in explosion.
If you must re-enter the vehi-
cle, you should once again
eliminate potentially danger-ous static electricity dis-
charge by touching a metal
part of the vehicle, away from
the fuel filler neck, nozzle or
other gasoline source.
When using a portable fuel container be sure to place the
container on the ground prior
to refueling. Static electricity
discharge from the container
can ignite fuel vapors causing
a fire. Once refueling has
begun, contact with the vehi-
cle should be maintained until
the filling is complete.
(Continued)(Continued)
Use only portable fuel con-
tainers designed to carry and
store gasoline.
Do not use cellular phones around a gas station or while
refueling any vehicle. Electric
current and/or electronic
interference from cellular
phones can potentially ignite
fuel vapors causing a fire. If
you must use your cellular
phone use it in a place away
from the gas station.
When refueling always shut the engine off. Sparks pro-
duced by electrical compo-nents related to the engine
can ignite fuel vapors causing
a fire. Always insure that the
engine is OFF before and dur-
ing refueling. Once refueling
is complete, check to makesure the fuel filler cap and
door are securely closed,
before starting the engine.
(Continued)
Page 147 of 315
435
1 23456789
Driving your vehicle
Engine temperature gauge
This gauge shows the temperature of the engine coolant when the igni-
tion switch is ON.
Do not continue driving with an over-
heated engine. If your vehicle over-
heats, refer to “Overheating ”in the
Index.
✽✽
NOTICE
If the gauge pointer moves beyond
the normal range area toward the“H” position, it indicates overheat-ing that may damage the engine.
Fuel gauge
The fuel gauge indicates the approx- imate amount of fuel remaining in thefuel tank.
Fuel tank capacity - 55 liters.
The fuel gauge is supplemented by a
low fuel warning light, which will illu-
minate when the fuel level has
dropped to about 8.5 liters.
Trip computer (if equipped)
Trip computer is a microcomputer-
controlled driver information gauge
that displays information related to
driving, such as estimated distance
to empty, average speed and driving
time on the LCD.
1LDA2095
Page 211 of 315
Driving tips
14
5
Your vehicle can tow a trailer. To
identify what the vehicle trailering
capacity is for your vehicle, you
should read the information in
“Weight of the Trailer” that appearslater in this section.
Remember that trailering is different
than just driving your vehicle by itself.
Trailering means changes in han-
dling, durability, and fuel economy.
Successful, safe trailering requirescorrect equipment, and it has to be
used properly.
This section contains many time-
tested, important trailering tips and
safety rules. Many of these are
important for your safety and that of
your passengers. Please read this
section carefully before you pull a
trailer.
1 23456789
4 Door 5 Door
1LDE5039
Page 250 of 315

1 23456789
75
Maintenance
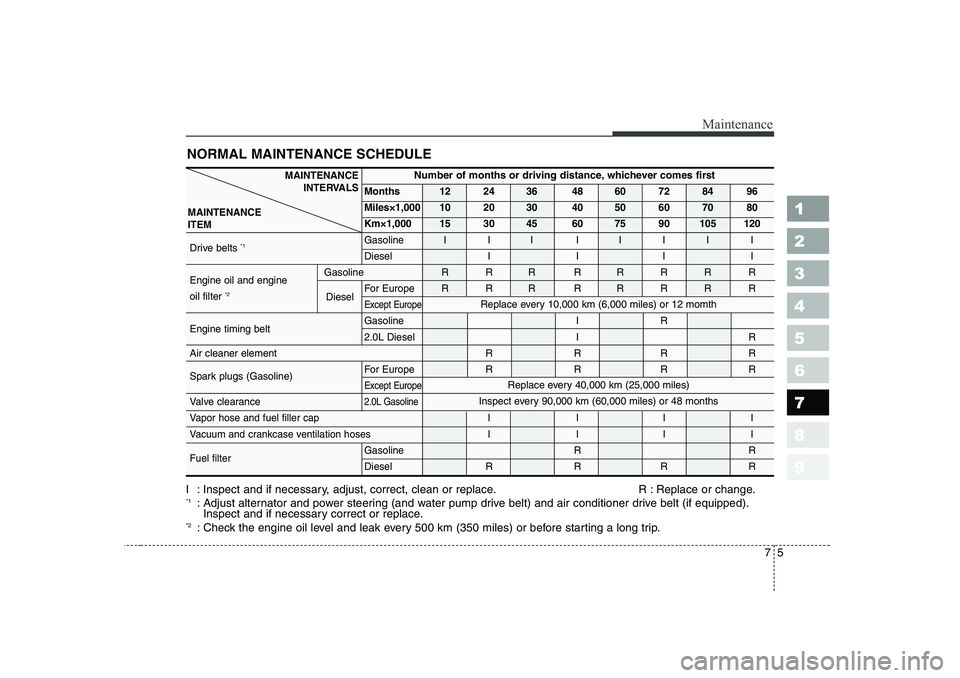
NORMAL MAINTENANCE SCHEDULE
I : Inspect and if necessary, adjust, correct, clean or replace. R : Replace or change. *1: Adjust alternator and power steering (and water pump drive belt) and air conditioner drive belt (if equipped).
Inspect and if necessary correct or replace.
*2 : Check the engine oil level and leak every 500 km (350 miles) or before starting a long trip.
MAINTENANCE
INTERVALS
MAINTENANCE ITEMNumber of months or driving distance, whichever comes first
Months 12 24 36 48 60 72 84 96
Miles×1,000 10 20 30 40 50 60 70 80
Km×1,000 15 30 45 60 75 90 105 120
Drive belts *1 Gasoline I I I I I I I I
Diesel I I I I
Engine oil and engine Gasoline R R R R R R R R
oil filter *2 For Europe R R R R R R R R
Except Europe
Engine timing belt Gasoline
I R
2.0L Diesel I R
Air cleaner element I R I R I R I R
Spark plugs (Gasoline) For Europe R R R R
Except Europe
Valve clearance 2.0L Gasoline
Vapor hose and fuel filler cap
I I I I
Vacuum and crankcase ventilation hoses I I I I Fuel filter
Gasoline RR
Diesel R R R R Replace every 40,000 km (25,000 miles)
Inspect every 90,000 km (60,000 miles) or 48 months
DieselReplace every 10,000 km (6,000 miles) or 12 momth
Page 260 of 315
715
Maintenance
1 23456789
1LDE5002/6LDE5002
1. Power steering fluid reservoir
2. Radiator cap
3. Engine oil filler cap
4. Brake fluid reservoir
5. Fuel filter
6. Air cleaner
7. Fuse box
8. Negative battery terminal
9. Positive battery terminal
10. Engine oil dipstick
11. Engine coolant reservoir
12. Windshield washer fluid reser-
voir
■
■
2.0L Diesel Engine
■
■ 1.6L Diesel Engine
Page 310 of 315
83
1 23456789
Specifications
*¹Refer to the recommended SAE viscosity numbers on the page 7-57.
Lubricant Volume Classification
3.3 l (3.5 US qt.) API Service SJ, SL or above,
4.0 l (4.2 US qt.) ILSAC GF-3 or above
5.3 l (5.6 US qt.) API Service CH-4 or above,
ACEA B4 or above
API Service CF-4 or above,
5.9 l (6.2 US qt.)
ACEA B4 or above
2.15 l (2.27 US qt.)
2.0 l (2.11 US qt.) API Service GL-4
2.10 l (2.22 US qt.) SAE 75W-85 (fill for-life)
Automatic transaxle fluid 6.1
l (6.45 US qt.) DIAMOND ATF SP-III,
7.8 l (8.2 US qt.) SK ATF SP-III
Power steering 0.8 l (0.8 US qt.) PSF-III
Coolant 8.14
l (8.6 US qt.) Ethylene glycol base for
6.97 l (7.37 US qt.) aluminum radiator
Brake/Clutch fluid 0.7~0.8
l
FMVSS116 DOT-3 or DOT-4
(0.7~0.8 US qt.)
Fuel 55 l (14.5 US gal) -
Engine oil *1
(with filter change)
Manual transaxle fluid Gasoline
Engine
Gasoline Engine
Diesel
Engine Diesel
Engine 1.6L
2.0L
2.0L
1.5L/1.6L
2.0L
1.5L/1.6L
2.0L
1.6L
1.6L
1.5L
Capacities