Page 240 of 315
In case of an emergency
20
6
1 23456789
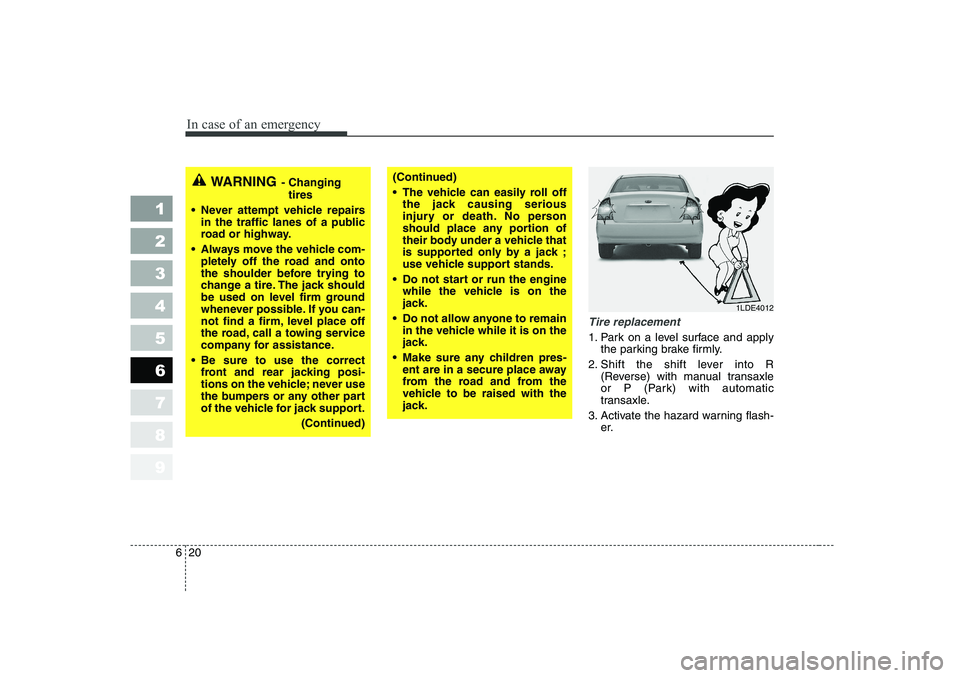
Tire replacement
1. Park on a level surface and apply
the parking brake firmly.
2. Shift the shift lever into R (Reverse) with manual transaxle
or P (Park) with automatic
transaxle.
3. Activate the hazard warning flash- er.
WARNING - Changing
tires
Never attempt vehicle repairs in the traffic lanes of a public
road or highway.
Always move the vehicle com- pletely off the road and onto
the shoulder before trying to
change a tire. The jack should
be used on level firm ground
whenever possible. If you can-
not find a firm, level place off
the road, call a towing service
company for assistance.
Be sure to use the correct front and rear jacking posi-
tions on the vehicle; never use
the bumpers or any other part
of the vehicle for jack support.
(Continued)(Continued)
The vehicle can easily roll offthe jack causing serious
injury or death. No person
should place any portion of
their body under a vehicle that
is supported only by a jack ;
use vehicle support stands.
Do not start or run the engine while the vehicle is on the
jack.
Do not allow anyone to remain in the vehicle while it is on the
jack.
Make sure any children pres- ent are in a secure place away
from the road and from the
vehicle to be raised with the
jack.
1LDE4012
Page 243 of 315
623
In case of an emergency
1 23456789
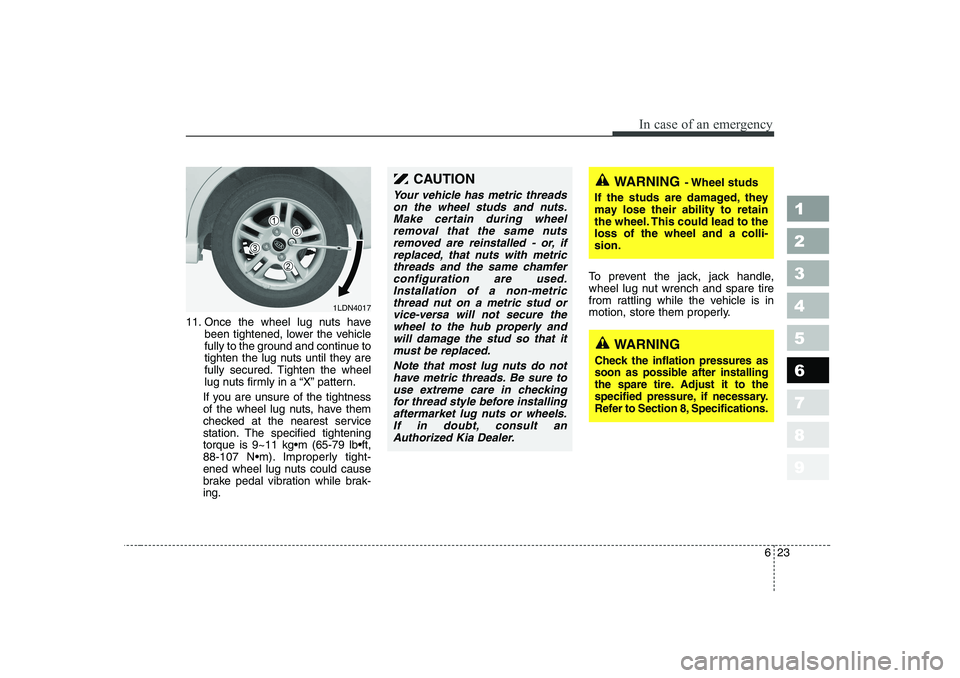
11. Once the wheel lug nuts havebeen tightened, lower the vehicle
fully to the ground and continue to
tighten the lug nuts until they are
fully secured. Tighten the wheel
lug nuts firmly in a “X” pattern.
If you are unsure of the tightness
of the wheel lug nuts, have them
checked at the nearest service
station. The specified tighteningtorque is 9~11 kgm (65-79 lbft,
88-107 Nm). Improperly tight-
ened wheel lug nuts could cause
brake pedal vibration while brak-ing. To prevent the jack, jack handle,
wheel lug nut wrench and spare tire
from rattling while the vehicle is in
motion, store them properly.
1LDN4017
CAUTION
Your vehicle has metric threads
on the wheel studs and nuts. Make certain during wheelremoval that the same nutsremoved are reinstalled - or, if replaced, that nuts with metricthreads and the same chamferconfiguration are used. Installation of a non-metricthread nut on a metric stud orvice-versa will not secure thewheel to the hub properly and will damage the stud so that itmust be replaced.
Note that most lug nuts do nothave metric threads. Be sure to use extreme care in checkingfor thread style before installingaftermarket lug nuts or wheels.If in doubt, consult an Authorized Kia Dealer.
WARNING - Wheel studs
If the studs are damaged, they
may lose their ability to retain
the wheel. This could lead to theloss of the wheel and a colli-sion.
WARNING
Check the inflation pressures as
soon as possible after installing
the spare tire. Adjust it to the
specified pressure, if necessary.
Refer to Section 8, Specifications.
Page 246 of 315
1 234567891 23456789
10
Maintenance services / 7-3 Normal maintenance schedule / 7-5
Maintenance under severe usage conditions / 7-8
Owner maintenance / 7-10Engine compartment / 7-13
Engine oil and oil filter / 7-16Engine cooling system / 7-19Brakes and clutch / 7-22Parking brake / 7-23Drive belts / 7-24
Power steering / 7-25
Steering wheel / 7-26Manual transaxle / 7-26Automatic transaxle / 7-28Lubricants and fluids / 7-31
Fuel filter / 7-32
Air cleaner / 7-33
Climate control air filter / 7-35
Wiper blades / 7-37
Maintenance
Page 248 of 315
73
Maintenance
MAINTENANCE SERVICES
You should exercise the utmost care
to prevent damage to your vehicle
and injury to yourself whenever per-
forming any maintenance or inspec-
tion procedures.
Should you have any doubts con-
cerning the inspection or servicing of
your vehicle, we strongly recom-
mend that you have an Authorized
Kia Dealer perform this work.
An Authorized Kia Dealer has facto-
ry-trained technicians and genuine
Kia parts to service your vehicle
properly. For expert advice and qual-
ity service, see an Authorized Kia
Dealer.
Inadequate, incomplete or insuffi-
cient servicing may result in opera-
tional problems with your vehicle that
could lead to vehicle damage, an
accident, or personal injury. Owner’s responsibility
✽✽
NOTICE
Maintenance Service and Record
Retention are the owner's responsi-
bility.
You should retain documents that
show proper maintenance has been
performed on your vehicle in accor-dance with the scheduled mainte-
nance service charts shown on the
following pages. You need this infor-
mation to establish your compliance
with the servicing and maintenance
requirements of your Kia warranties.
Detailed warranty information is pro-
vided in your Warranty & Maintenancebook. Repairs and adjustments required asa result of improper maintenance or
a lack of required maintenance are
not covered.
We recommend you have your vehi-
cle maintained and repaired by an
authorized Kia dealer.
An authorized Kia dealer meets Kia’s
high service quality standards and
receives technical support from Kia
in order to provide you with a high
level of service satisfaction.
1 23456789
Page 253 of 315
Maintenance
8
7
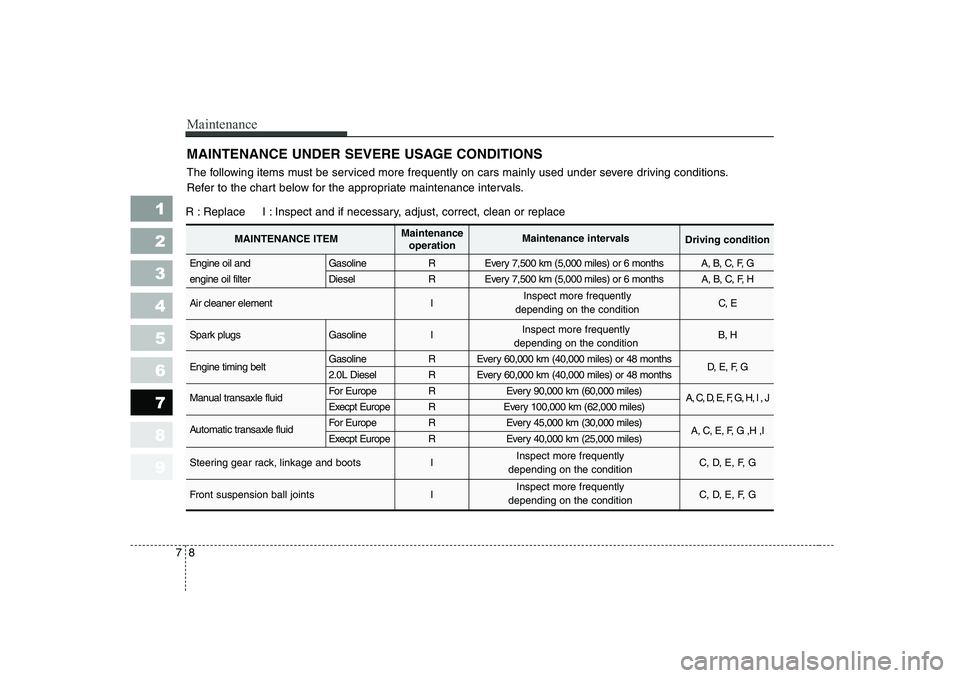
MAINTENANCE UNDER SEVERE USAGE CONDITIONS
1 23456789
The following items must be serviced more frequently on cars mainly used under severe driving conditions.
Refer to the chart below for the appropriate maintenance intervals.
R : Replace I : Inspect and if necessary, adjust, correct, clean or replace
Engine oil and Gasoline R Every 7,500 km (5,000 miles) or 6 months A, B, C, F, G
engine oil filter Diesel R Every 7,500 km (5,000 miles) or 6 months A, B, C, F, H
Air cleaner element I C, E
Spark plugs Gasoline I B, H
Engine timing belt Gasoline R Every 60,000 km (40,000 miles) or 48 months
D, E, F, G
2.0L Diesel R Every 60,000 km (40,000 miles) or 48 months
Manual transaxle fluid For Europe R Every 90,000 km (60,000 miles)
A, C, D, E, F, G, H, I , J
Execpt Europe R Every 100,000 km (62,000 miles)
Automatic transaxle fluid For Europe R Every 45,000 km (30,000 miles)
A, C, E, F, G ,H ,I
Execpt Europe R Every 40,000 km (25,000 miles)
Steering gear rack, linkage and boots I C, D, E, F, G
Front suspension ball joints I C, D, E, F, G
MAINTENANCE ITEMMaintenance
operation Maintenance intervals
Driving condition
Inspect more frequently
depending on the condition
Inspect more frequently
depending on the condition
Inspect more frequently
depending on the condition Inspect more frequently
depending on the condition
Page 257 of 315
Maintenance
12
7
1 23456789
Owner maintenance precau- tions
Improper or incomplete service may
result in problems. This section gives
instructions only for the maintenance
items that are easy to perform.
As explained earlier in this section,
several procedures can be done only
by an Authorized Kia Dealer with
special tools.
✽✽
NOTICE
Improper owner maintenance dur- ing the warranty period may affect
warranty coverage. For details, read
the separate Kia Warranty &
Maintenance book provided with
the vehicle. If you're unsure about
any servicing or maintenance proce-
dure, have it done by an Authorized
Kia Dealer.
WARNING - Maintenance
work
Performing maintenance work on a vehicle can be danger-
ous. You can be seriously
injured while performing some
maintenance procedures. If
you lack sufficient knowledge
and experience or the propertools and equipment to do the
work, have it done by an
Authorized Kia Dealer.
Working under the hood with the engine running is danger-
ous. It becomes even more
dangerous when you wear
jewelry or loose clothing.These can become entangled
in moving parts and result in
injury. Therefore, if you must
run the engine while working
under the hood, make certain
that you remove all jewelry
(especially rings, bracelets,
watches, and necklaces) and
all neckties, scarves, and sim-
ilar loose clothing before get-ting near the engine or cool-ing fans.
Page 263 of 315
Maintenance
18
7
1 23456789
7. Install the oil filter and tighten it.
(Refer to the oil filter caution label
for tightening instructions.)
8. Install a new washer on the drain plug. Don’t use an old washer
repeatedly.
9. Replace the drain plug after the oil has thoroughly drained. Torque theplug to 4.0~4.5 kgm (28.9~32.5lbft, 39.2~44.1 Nm).
10. Refill the engine with new oil to the F mark on the dipstick. Do not
overfill.
11. Reinstall the oil filler cap secure- ly.
12. Start the engine and inspect around the oil filter seal for leaks.
Stop the engine.
13. Check the oil level and fill to the F mark as necessary.Oil capacity
■1.6 L Gasoline Engine
With filter change : 3.3 liters (3.5 US qt.)Without filter change :3.0 liters (3.2 US qt.)
■ 2.0 L Gasoline Engine
With filter change :4.0 liters (4.2 US qt.)Without filter change :3.7 liters (3.9 US qt.)
■ 1.5 L/1.6L Diesel Engine
With filter change :5.3 liters (5.6 US qt.)Without filter change :4.8 liters (5.07 US qt.)
■ 2.0 L Diesel Engine
With filter change :5.9 liters (6.2 US qt.)Without filter change :5.4 liters (5.7 US qt.)
Use only the specified Service
Grade engine oil. (Refer to“Recommended Lubricants” later inthis section.)
✽✽ NOTICE
Page 285 of 315
Maintenance
40
7
1 23456789
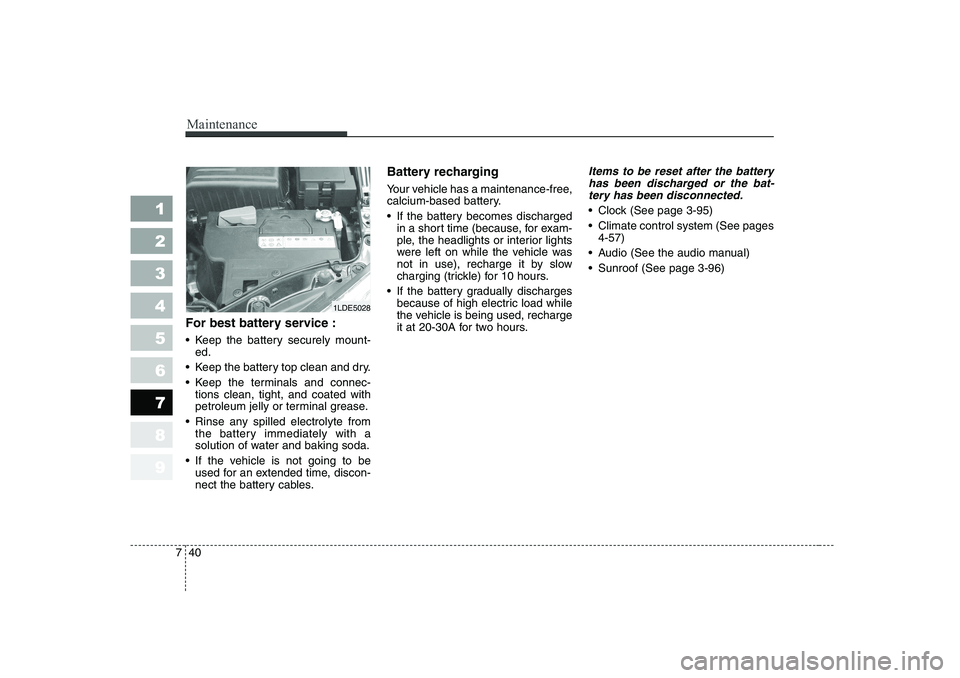
For best battery service :
Keep the battery securely mount-
ed.
Keep the battery top clean and dry.
Keep the terminals and connec- tions clean, tight, and coated with
petroleum jelly or terminal grease.
Rinse any spilled electrolyte from the battery immediately with a
solution of water and baking soda.
If the vehicle is not going to be used for an extended time, discon-
nect the battery cables. Battery recharging
Your vehicle has a maintenance-free,
calcium-based battery.
If the battery becomes discharged
in a short time (because, for exam-
ple, the headlights or interior lights
were left on while the vehicle was
not in use), recharge it by slow
charging (trickle) for 10 hours.
If the battery gradually discharges because of high electric load while
the vehicle is being used, recharge
it at 20-30A for two hours.
Items to be reset after the battery
has been discharged or the bat-tery has been disconnected.
Clock (See page 3-95)
Climate control system (See pages 4-57)
Audio (See the audio manual)
Sunroof (See page 3-96)
1LDE5028