2006 KIA CERATO brake light
[x] Cancel search: brake lightPage 214 of 315
517
Driving tips
1 23456789
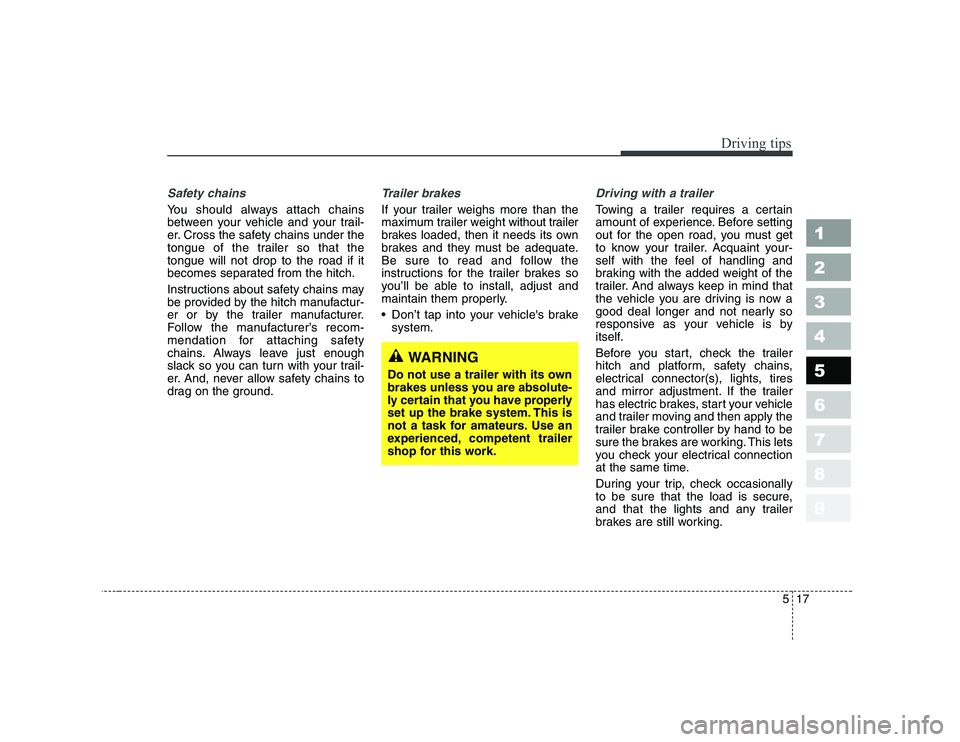
Safety chains
You should always attach chains
between your vehicle and your trail-
er. Cross the safety chains under the
tongue of the trailer so that thetongue will not drop to the road if it
becomes separated from the hitch.
Instructions about safety chains may
be provided by the hitch manufactur-
er or by the trailer manufacturer.
Follow the manufacturer’s recom-
mendation for attaching safety
chains. Always leave just enough
slack so you can turn with your trail-
er. And, never allow safety chains to
drag on the ground.
Trailer brakes
If your trailer weighs more than the
maximum trailer weight without trailer
brakes loaded, then it needs its own
brakes and they must be adequate.
Be sure to read and follow the
instructions for the trailer brakes so
you’ll be able to install, adjust and
maintain them properly.
Don’t tap into your vehicle's brake system.
Driving with a trailer
Towing a trailer requires a certain
amount of experience. Before setting
out for the open road, you must get
to know your trailer. Acquaint your-
self with the feel of handling and
braking with the added weight of the
trailer. And always keep in mind that
the vehicle you are driving is now a
good deal longer and not nearly so
responsive as your vehicle is by
itself.
Before you start, check the trailer
hitch and platform, safety chains,
electrical connector(s), lights, tires
and mirror adjustment. If the trailer
has electric brakes, start your vehicle
and trailer moving and then apply the
trailer brake controller by hand to be
sure the brakes are working. This lets
you check your electrical connection
at the same time.
During your trip, check occasionally
to be sure that the load is secure,
and that the lights and any trailer
brakes are still working.
WARNING
Do not use a trailer with its own
brakes unless you are absolute-
ly certain that you have properly
set up the brake system. This is
not a task for amateurs. Use an
experienced, competent trailer
shop for this work.
Page 216 of 315
519
Driving tips
1 23456789
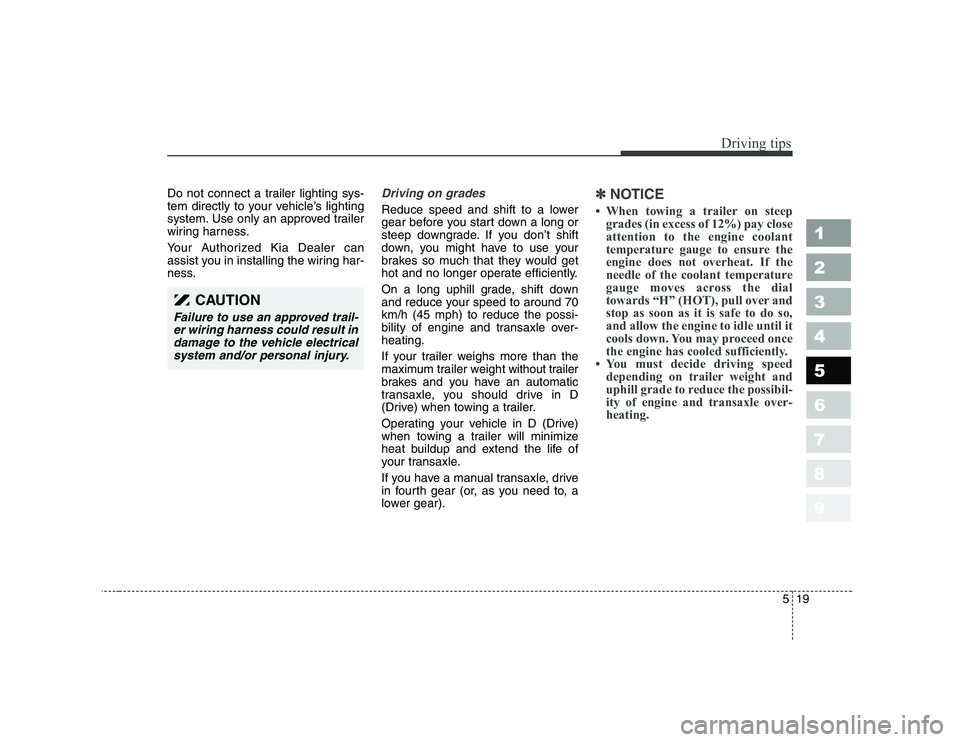
Do not connect a trailer lighting sys-
tem directly to your vehicle’s lighting
system. Use only an approved trailer
wiring harness.
Your Authorized Kia Dealer can
assist you in installing the wiring har-
ness.Driving on grades
Reduce speed and shift to a lower
gear before you start down a long or
steep downgrade. If you don’t shift
down, you might have to use your
brakes so much that they would get
hot and no longer operate efficiently.
On a long uphill grade, shift down
and reduce your speed to around 70km/h (45 mph) to reduce the possi-
bility of engine and transaxle over-heating.
If your trailer weighs more than the
maximum trailer weight without trailer
brakes and you have an automatic
transaxle, you should drive in D
(Drive) when towing a trailer.
Operating your vehicle in D (Drive)
when towing a trailer will minimize
heat buildup and extend the life of
your transaxle.
If you have a manual transaxle, drive
in fourth gear (or, as you need to, a
lower gear).
✽✽ NOTICE
Page 231 of 315
611
In case of an emergency
1 23456789
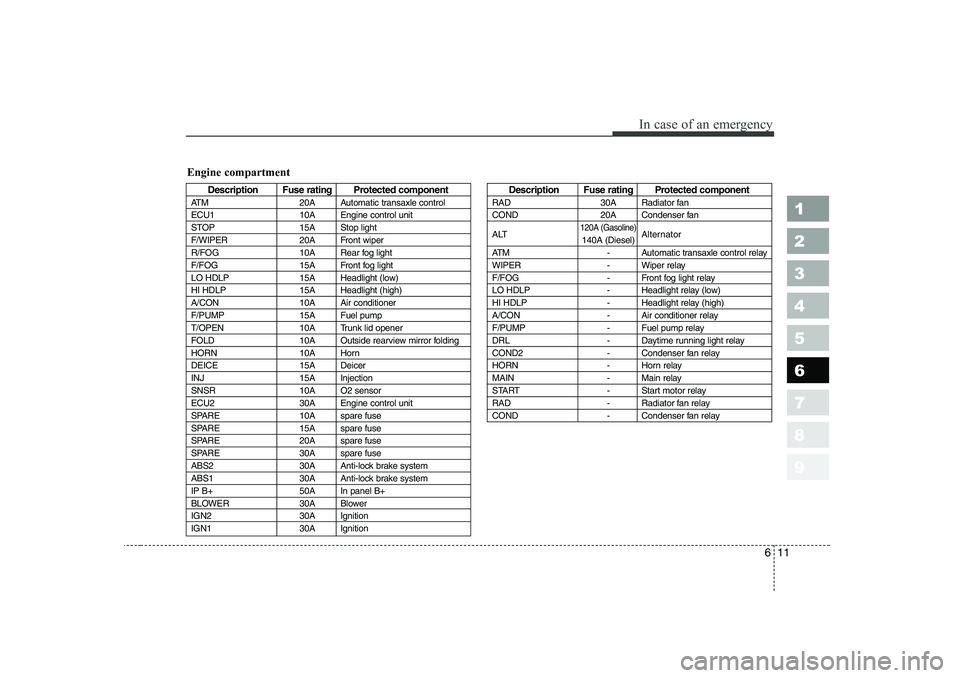
Description Fuse rating Protected component
ATM 20A Automatic transaxle control
ECU1 10A Engine control unit
STOP 15A Stop light
F/WIPER 20A Front wiper
R/FOG 10A Rear fog light
F/FOG 15A Front fog light
LO HDLP 15A Headlight (low)
HI HDLP 15A Headlight (high)
A/CON 10A Air conditioner
F/PUMP 15A Fuel pump
T/OPEN 10A Trunk lid opener
FOLD 10A Outside rearview mirror folding
HORN 10A Horn
DEICE 15A Deicer
INJ 15A Injection
SNSR 10A O2 sensor
ECU2 30A Engine control unit
SPARE 10A spare fuse
SPARE 15A spare fuse
SPARE 20A spare fuse
SPARE 30A spare fuse
ABS2 30A Anti-lock brake system
ABS1 30A Anti-lock brake system
IP B+ 50A In panel B+
BLOWER 30A Blower
IGN2 30A Ignition
IGN1 30A IgnitionDescription Fuse rating Protected component
RAD 30A Radiator fan
COND 20A Condenser fan
ALT
120A (Gasoline)Alternator
140A (Diesel)
ATM - Automatic transaxle control relay
WIPER - Wiper relay
F/FOG - Front fog light relay
LO HDLP - Headlight relay (low)
HI HDLP - Headlight relay (high)
A/CON - Air conditioner relay
F/PUMP - Fuel pump relay
DRL - Daytime running light relay
COND2 - Condenser fan relay
HORN - Horn relay
MAIN - Main relay
START - Start motor relay
RAD - Radiator fan relay
COND - Condenser fan relay
Engine compartment
Page 232 of 315
In case of an emergency
12
6
1 23456789
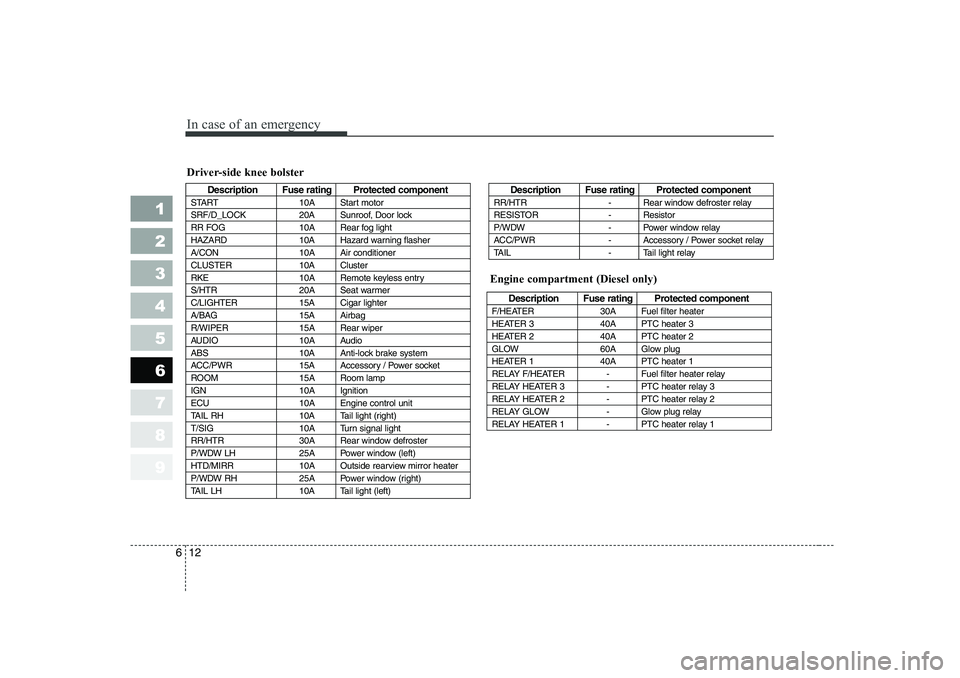
Driver-side knee bolster
Description Fuse rating Protected component
START 10A Start motor
SRF/D_LOCK 20A Sunroof, Door lock
RR FOG 10A Rear fog light
HAZARD 10A Hazard warning flasher
A/CON 10A Air conditioner
CLUSTER 10A Cluster
RKE 10A Remote keyless entry
S/HTR 20A Seat warmer
C/LIGHTER 15A Cigar lighter
A/BAG 15A Airbag
R/WIPER 15A Rear wiper
AUDIO 10A Audio
ABS 10A Anti-lock brake system
ACC/PWR 15A Accessory / Power socket
ROOM 15A Room lamp
IGN 10A Ignition
ECU 10A Engine control unit
TAIL RH 10A Tail light (right)
T/SIG 10A Turn signal light
RR/HTR 30A Rear window defroster
P/WDW LH 25A Power window (left)
HTD/MIRR 10A Outside rearview mirror heater
P/WDW RH 25A Power window (right)
TAIL LH 10A Tail light (left)Description Fuse rating Protected component
RR/HTR - Rear window defroster relay
RESISTOR - Resistor
P/WDW - Power window relay
ACC/PWR - Accessory / Power socket relay
TAIL - Tail light relay
Description Fuse rating Protected component
F/HEATER 30A Fuel filter heater
HEATER 3 40A PTC heater 3
HEATER 2 40A PTC heater 2
GLOW 60A Glow plug
HEATER 1 40A PTC heater 1
RELAY F/HEATER - Fuel filter heater relay
RELAY HEATER 3 - PTC heater relay 3
RELAY HEATER 2 - PTC heater relay 2
RELAY GLOW - Glow plug relay
RELAY HEATER 1 - PTC heater relay 1
Engine compartment (Diesel only)
Page 255 of 315
Maintenance
10
7
1 23456789
OWNER MAINTENANCE
Owner maintenance schedule
The following lists are vehicle checks and inspections that should be per-
formed by the owner or an
Authorized Kia Dealer at the fre-quencies indicated to help ensure
safe, dependable operation of your
vehicle.
Any adverse conditions should be
brought to the attention of your deal-
er as soon as possible.
These Owner Maintenance Checks
are generally not covered by war-
ranties and you may be charged for
labor, parts and lubricants used.
When you stop for fuel:
Check the engine oil level.
Check coolant level in coolant reservoir.
Check the windshield washer fluid level.
Look for low or under-inflated tires.
While operating your vehicle:
Note any changes in the sound of the exhaust or any smell of
exhaust fumes in the vehicle.
Check for vibrations in the steering wheel. Notice any increased steer-
ing effort or looseness in the steer-
ing wheel, or change in its straight-ahead position.
Notice if your vehicle constantly turns slightly or “pulls” to one side
when traveling on smooth, levelroad.
When stopping, listen and check for strange sounds, pulling to one
side, increased brake pedal travel
or “hard-to-push” brake pedal.
If any slipping or changes in the operation of your transaxle occurs,
check the transaxle fluid level.
Check automatic transaxle P (Park) function.
Check parking brake.
Check for fluid leaks under your vehicle (water dripping from the air conditioning system after use is
normal).
WARNING
Be careful when checking your
engine coolant level when the
engine is hot. Scalding hot
coolant and steam may blow out
under pressure. This could
cause serious injury.
Page 256 of 315
711
Maintenance
1 23456789
At least monthly:
Check coolant level in the coolantrecovery reservoir.
Check the operation of all exterior lights, including the stoplights, turn
signals and hazard warning flash-
ers.
Check the inflation pressures of all tires including the spare.
At least twice a year
(i.e., every Spring and Fall) :
Check radiator, heater and air con- ditioning hoses for leaks or da-
mage.
Check windshield washer spray and wiper operation. Clean wiper
blades with clean cloth dampened
with washer fluid.
Check headlight alignment.
Check muffler, exhaust pipes, shields and clamps.
Check the lap/shoulder belts for wear and function.
Check for worn tires and loose wheel lug nuts.
At least once a year :
Clean body and door drain holes.
Lubricate door hinges and checks,and hood hinges.
Lubricate door and hood locks and latches.
Lubricate door rubber weather- strips.
Check the air conditioning system before the warm weather season.
Check the power steering fluid level.
Inspect and lubricate automatic transaxle linkage and controls.
Clean battery and terminals.
Check the brake fluid level.
Page 274 of 315
729
Maintenance
1 23456789
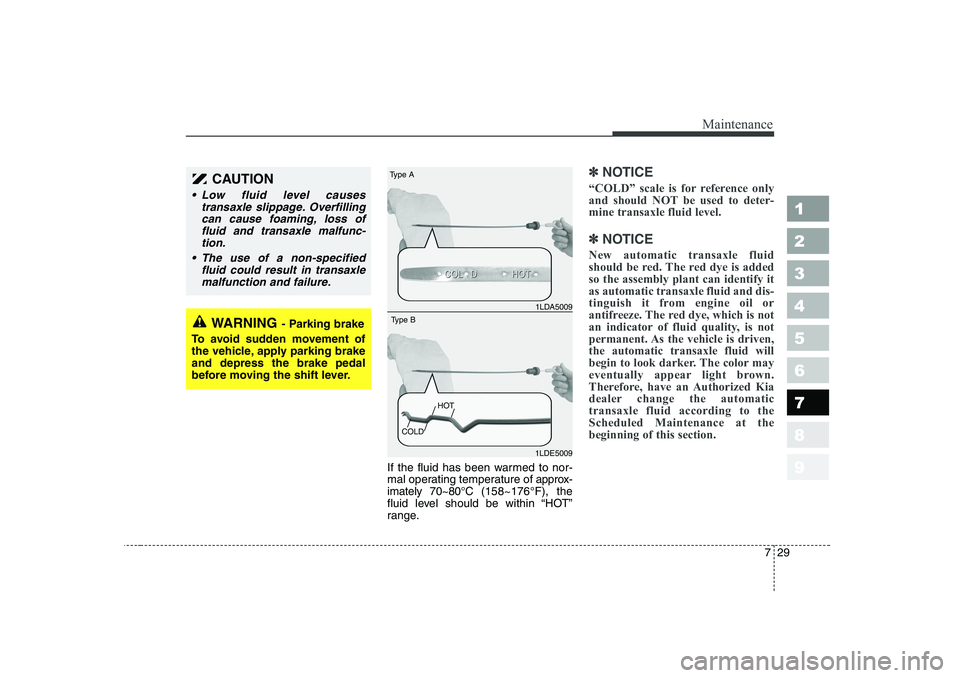
If the fluid has been warmed to nor-
mal operating temperature of approx-
imately 70~80°C (158~176°F), the
fluid level should be within “HOT”
range.
✽✽ NOTICE
“COLD” scale is for reference only
and should NOT be used to deter-mine transaxle fluid level.
✽
✽ NOTICE
New automatic transaxle fluid
should be red. The red dye is addedso the assembly plant can identify itas automatic transaxle fluid and dis-
tinguish it from engine oil or
antifreeze. The red dye, which is not
an indicator of fluid quality, is not
permanent. As the vehicle is driven,the automatic transaxle fluid will
begin to look darker. The color may
eventually appear light brown.
Therefore, have an Authorized Kia
dealer change the automatictransaxle fluid according to theScheduled Maintenance at thebeginning of this section.
CAUTION
Low fluid level causes transaxle slippage. Overfillingcan cause foaming, loss offluid and transaxle malfunc- tion.
The use of a non-specified fluid could result in transaxlemalfunction and failure.
WARNING - Parking brake
To avoid sudden movement of
the vehicle, apply parking brakeand depress the brake pedal
before moving the shift lever.
1LDA5009
Type A
1LDE5009
Type B
COLD HOT
Page 294 of 315

749
Maintenance
1 23456789
BULB REPLACEMENT
Use only the bulbs of the specifiedwattage.
✽✽ NOTICE
If you don’t have necessary tools,
the correct bulbs and the expertise,
consult an Authorized Kia Dealer. In
many cases, it is difficult to replacevehicle light bulbs because other
parts of the vehicle must be removed
before you can get to the bulb. Thisis especially true if you have to
remove the front bumper to get tothe bulb(s). Removing/installing the
front bumper or bumper hardware
can result in damage to the vehicle.
Headlight bulb replacement
✽✽ NOTICE
After heavy, driving rain or washing, headlight and taillight lenses could
appear frosty. This condition is
caused by the temperature differencebetween the lamp inside and outside.
This is similar to the condensation on
your windows inside your vehicleduring the rain and doesn’t indicate
a problem with your vehicle. If the
water leaks into the lamp bulb cir-
cuitry, have the vehicle checked by
an Authorized Kia Dealer.
WARNING - Working on
the lights
Prior to working on the light,
firmly apply the parking brake,
ensure that the ignition switch
is turned to the “LOCK” position
and turn off the lights to avoid
sudden movement of the vehi-
cle and burning your fingers or
receiving an electric shock.
➀ Headlight (High/Low)
➁ Position light
➂ Front turn signal light
➃ Front fog light (if equipped)
1LDN5032/1LDE5032
4 Door5 Door