Page 91 of 315

Knowing your vehicle
80
3
1 23456789
WARNING
Automotive fuels are flamma-
ble/explosive materials. When
refueling, please note the fol-
lowing guidelines carefully.
Failure to follow these guide-
lines may result in severe per-
sonal injury, severe burns or
death by fire or explosion.
Before refueling always note the location of the Emergency
Gasoline Shut-Off, if available,
at the gas station facility.
Before touching the fuel noz- zle or fuel filler cap, you
should eliminate potentially
dangerous static electricity
discharge by touching anoth-
er metal part of the front of the
vehicle, a safe distance away
from the fuel filler neck, noz-
zle, or other gas source.
(Continued)(Continued)
Do not get back into a vehicleonce you have begun refuel-
ing. Do not touch, rub or slide
against any item or fabric
(polyester, satin, nylon, etc.)
capable of producing static
electricity. Static electricity
discharge can ignite fuel
vapors resulting in explosion.
If you must re-enter the vehi-
cle, you should once again
eliminate potentially danger-ous static electricity dis-
charge by touching a metal
part of the vehicle, away from
the fuel filler neck, nozzle or
other gasoline source.
When using a portable fuel container be sure to place the
container on the ground prior
to refueling. Static electricity
discharge from the container
can ignite fuel vapors causing
a fire. Once refueling has
begun, contact with the vehi-
cle should be maintained until
the filling is complete.
(Continued)(Continued)
Use only portable fuel con-
tainers designed to carry and
store gasoline.
Do not use cellular phones around a gas station or while
refueling any vehicle. Electric
current and/or electronic
interference from cellular
phones can potentially ignite
fuel vapors causing a fire. If
you must use your cellular
phone use it in a place away
from the gas station.
When refueling always shut the engine off. Sparks pro-
duced by electrical compo-nents related to the engine
can ignite fuel vapors causing
a fire. Always insure that the
engine is OFF before and dur-
ing refueling. Once refueling
is complete, check to makesure the fuel filler cap and
door are securely closed,
before starting the engine.
(Continued)
Page 103 of 315
Knowing your vehicle
92
3
1 23456789
Rear (if equipped)
You can open the rear ashtray by
pulling it out by its top edge. To
remove the ashtray to empty or cleanit, push the tab (
➀) inside and pull it
all the way out. Cup holder
WARNING
- Ashtray use
Do not use the vehicle’s ash- trays as waste receptacles.
Putting lit cigarettes or match- es in an ashtray with other
combustible materials may
cause a fire.
WARNING - Hot liquids
Do not place uncovered cups of hot liquid in the cup holder
while the vehicle is in motion.
If the hot liquid spills, you
could be burned. Such a burnto the driver could cause a
loss of control of the vehicle.
To reduce the risk of personal injury in the event of sudden
stop or collision, do not place
uncovered or insecure bot-
tles, glasses, cans, etc., in the
cup holder while the vehicle isin motion.
1LDA2154
Page 105 of 315
Knowing your vehicle
94
3
1 23456789
✽✽
NOTICE
Close the vanity mirror cover
securely and return the sunvisor to
its original position after use.
Power socket (if equipped)
The power outlets are designed to
provide power for mobile telephones
or other devices designed to operate
with vehicle electrical systems. The
devices should draw less than 10
amps with the engine running.
✽✽ NOTICE
Page 129 of 315

417
1 23456789
Driving your vehicle
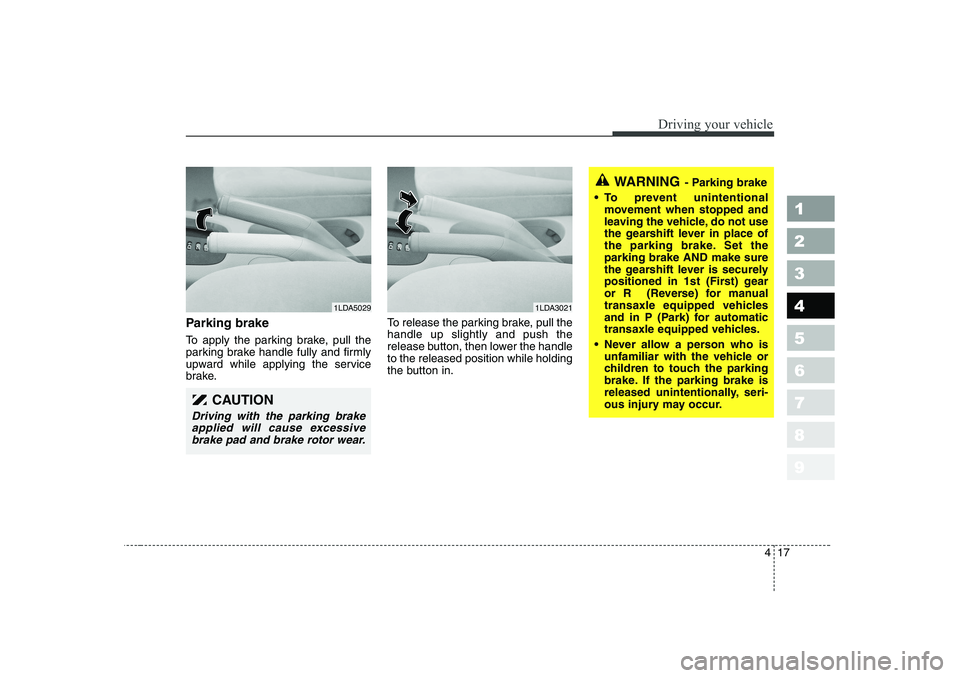
Parking brake
To apply the parking brake, pull the
parking brake handle fully and firmly
upward while applying the service
brake.To release the parking brake, pull thehandle up slightly and push the
release button, then lower the handleto the released position while holding
the button in.
CAUTION
Driving with the parking brake
applied will cause excessive brake pad and brake rotor wear.
1LDA50291LDA3021
WARNING - Parking brake
To prevent unintentional
movement when stopped and
leaving the vehicle, do not use
the gearshift lever in place of
the parking brake. Set theparking brake AND make sure
the gearshift lever is securely
positioned in 1st (First) gear
or R (Reverse) for manual
transaxle equipped vehicles
and in P (Park) for automatic
transaxle equipped vehicles.
Never allow a person who is
unfamiliar with the vehicle or
children to touch the parking
brake. If the parking brake is
released unintentionally, seri-
ous injury may occur.
Page 154 of 315

Driving your vehicle
42
4
1 23456789
Trunk lid open warning (if equipped)
This warning light activates when the
trunk is not closed securely.
Low fuel level warning
This warning light indicates the fuel
tank is nearly empty. The warning
light will come on when the fuel level
has dropped to about 8.5 liters.
Refuel as soon as possible. Door ajar warning
This warning light illuminates when a door is not closed securely with the
ignition in any position. Headlight high beam indicator This indicator illuminates when the headlights are on and in the high
beam position or when the turn sig-
nal lever is pulled into the Flash-to-
Pass position.
Front fog light indica- tor (if equipped) This light comes on when the front
fog lights are ON.
Malfunction indicator (if equipped)
This indicator light is part of the Engine Control System which moni-
tors various emission control system
components. If this light illuminates
while driving, it indicates that a
potential problem has been detected
somewhere in the emission controlsystem.
Generally, your vehicle will continue
to be drivable and will not need tow-
ing, but have the system checked by
an authorized Kia Dealer as soon as
possible.
Page 214 of 315

517
Driving tips
1 23456789
Safety chains
You should always attach chains
between your vehicle and your trail-
er. Cross the safety chains under the
tongue of the trailer so that thetongue will not drop to the road if it
becomes separated from the hitch.
Instructions about safety chains may
be provided by the hitch manufactur-
er or by the trailer manufacturer.
Follow the manufacturer’s recom-
mendation for attaching safety
chains. Always leave just enough
slack so you can turn with your trail-
er. And, never allow safety chains to
drag on the ground.
Trailer brakes
If your trailer weighs more than the
maximum trailer weight without trailer
brakes loaded, then it needs its own
brakes and they must be adequate.
Be sure to read and follow the
instructions for the trailer brakes so
you’ll be able to install, adjust and
maintain them properly.
Don’t tap into your vehicle's brake system.
Driving with a trailer
Towing a trailer requires a certain
amount of experience. Before setting
out for the open road, you must get
to know your trailer. Acquaint your-
self with the feel of handling and
braking with the added weight of the
trailer. And always keep in mind that
the vehicle you are driving is now a
good deal longer and not nearly so
responsive as your vehicle is by
itself.
Before you start, check the trailer
hitch and platform, safety chains,
electrical connector(s), lights, tires
and mirror adjustment. If the trailer
has electric brakes, start your vehicle
and trailer moving and then apply the
trailer brake controller by hand to be
sure the brakes are working. This lets
you check your electrical connection
at the same time.
During your trip, check occasionally
to be sure that the load is secure,
and that the lights and any trailer
brakes are still working.
WARNING
Do not use a trailer with its own
brakes unless you are absolute-
ly certain that you have properly
set up the brake system. This is
not a task for amateurs. Use an
experienced, competent trailer
shop for this work.
Page 229 of 315
69
In case of an emergency
Engine compartment
1. Turn the ignition switch and allother switches off.
2. Remove the fuse box cover by pressing the taps on both ends
and pulling up.
3. Check the removed fuse; replace it if it is blown.
4. Push in a new fuse of the same rating, and make sure it fits tightly
in the clips.
If it fits loosely, consult an Authorized
Kia Dealer.✽✽ NOTICE
After checking the fuse box in the
engine compartment, securely
install the fuse box cover. If not,
electrical failures may occur from
water leaking in.Main fuse
If the ALT (120A-Gasoline Engine,
140A-Diesel Engine) fuse is blown, it
must be removed as follows:
1. Disconnect the negative battery cable.
2. Remove the screws shown in the picture above.
3. Replace the fuse with a new one of the same rating.
4. Reinstall in the reverse order of removal.
1 23456789
1LDA40051LDE40051LDA4006
Diesel only
Page 231 of 315

611
In case of an emergency
1 23456789
Description Fuse rating Protected component
ATM 20A Automatic transaxle control
ECU1 10A Engine control unit
STOP 15A Stop light
F/WIPER 20A Front wiper
R/FOG 10A Rear fog light
F/FOG 15A Front fog light
LO HDLP 15A Headlight (low)
HI HDLP 15A Headlight (high)
A/CON 10A Air conditioner
F/PUMP 15A Fuel pump
T/OPEN 10A Trunk lid opener
FOLD 10A Outside rearview mirror folding
HORN 10A Horn
DEICE 15A Deicer
INJ 15A Injection
SNSR 10A O2 sensor
ECU2 30A Engine control unit
SPARE 10A spare fuse
SPARE 15A spare fuse
SPARE 20A spare fuse
SPARE 30A spare fuse
ABS2 30A Anti-lock brake system
ABS1 30A Anti-lock brake system
IP B+ 50A In panel B+
BLOWER 30A Blower
IGN2 30A Ignition
IGN1 30A IgnitionDescription Fuse rating Protected component
RAD 30A Radiator fan
COND 20A Condenser fan
ALT
120A (Gasoline)Alternator
140A (Diesel)
ATM - Automatic transaxle control relay
WIPER - Wiper relay
F/FOG - Front fog light relay
LO HDLP - Headlight relay (low)
HI HDLP - Headlight relay (high)
A/CON - Air conditioner relay
F/PUMP - Fuel pump relay
DRL - Daytime running light relay
COND2 - Condenser fan relay
HORN - Horn relay
MAIN - Main relay
START - Start motor relay
RAD - Radiator fan relay
COND - Condenser fan relay
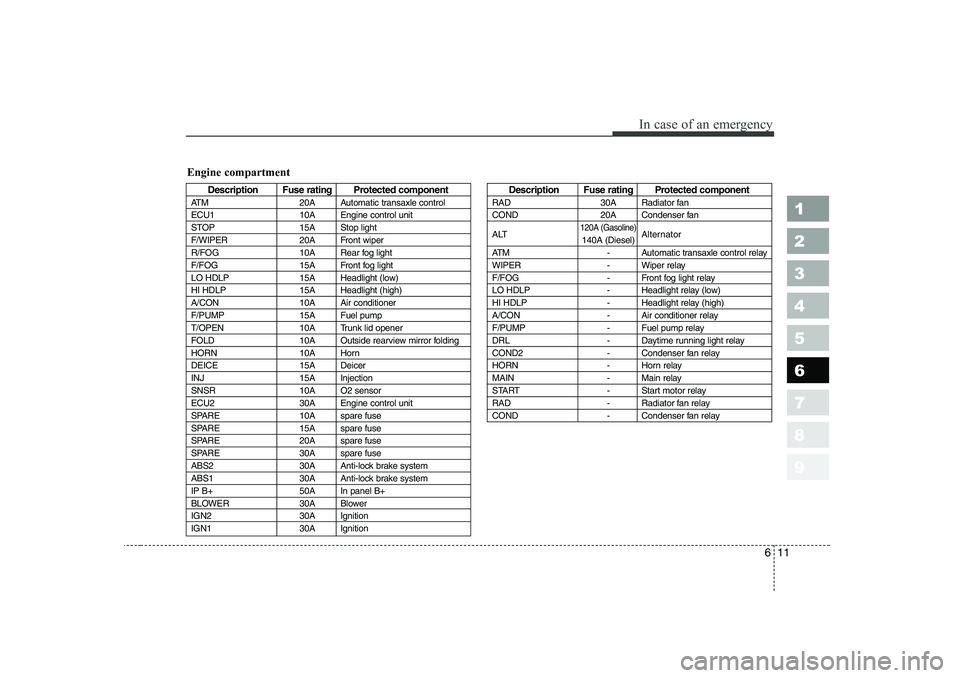
Engine compartment