2006 INFINITI M35 fuel cap
[x] Cancel search: fuel capPage 3260 of 5621
![INFINITI M35 2006 Factory Service Manual FUEL INJECTOR AND FUEL TUBE
EM-197
[VK45DE]
C
D
E
F
G
H
I
J
K
L
MA
EM
Revision: 2006 January2006 M35/M45
Tighten mounting bolts in two steps in numerical order as
shown in the figure.
6. Conn INFINITI M35 2006 Factory Service Manual FUEL INJECTOR AND FUEL TUBE
EM-197
[VK45DE]
C
D
E
F
G
H
I
J
K
L
MA
EM
Revision: 2006 January2006 M35/M45
Tighten mounting bolts in two steps in numerical order as
shown in the figure.
6. Conn](/manual-img/42/57023/w960_57023-3259.png)
FUEL INJECTOR AND FUEL TUBE
EM-197
[VK45DE]
C
D
E
F
G
H
I
J
K
L
MA
EM
Revision: 2006 January2006 M35/M45
Tighten mounting bolts in two steps in numerical order as
shown in the figure.
6. Connect fuel feed hose on engine side as follows: (Unless otherwise indicated, the installation to the
engine side and centralized under-floor piping side is exactly alike.)
a. Make sure no foreign substances are deposited in and around fuel tube and quick connector, and no dam-
age on them.
b. Thinly apply new engine oil around fuel tube from tip end to spool end.
c. Align center to insert quick connector straightly into fuel tube.
Engine side:
Insert fuel tube into quick connector until top spool is com-
pletely inside quick connector, and 2nd level spool exposes
right below quick connector.
CAUTION:
Hold “A” position as shown in the figure when inserting
fuel tube into quick connector.
Carefully align center to avoid inclined insertion to pre-
vent damage to O-ring inside quick connector.
Insert until you hear a “click” sound and actually feel the
engagement.
To avoid misidentification of engagement with a similar sound, be sure to perform the next step.
Centralized under-floor piping side:
Visually confirm that the two retainer tabs are connected to the connector.
CAUTION:
Carefully align center to avoid inclined insertion to prevent damage to O-ring inside quick con-
nector.
Insert until you hear a “click” sound and actually feel the engagement.
To avoid misidentification of engagement with a similar sound, be sure to perform the next step.
d. Pull quick connector by hand holding position. Make sure it is completely engaged (connected) so that it
does not come out from fuel tube.
e. Install quick connector cap on quick connector connection.
CAUTION:
If cap cannot be installed smoothly, quick connector may
have not been installed correctly. Check connection again.
f. Install fuel feed hose to hose clamps.
7. Install in the reverse order of removal after this step.
INSPECTION AFTER INSTALLATION
Check on Fuel Leakage
1. Turn ignition switch “ON” (with engine stopped). With fuel pressure applied to fuel piping, check for fuel
leakage at connection points.
A : Right bank
B : Left bank
: Engine front
1st step : 10.1 Nꞏm (1.0 kg-m, 7 ft-lb)
2nd step : 23.5 Nꞏm (2.4 kg-m, 17 ft-lb)
PBIC3303E
KBIA0272E
SBIA0354E
Page 3314 of 5621
![INFINITI M35 2006 Factory Service Manual CYLINDER BLOCK
EM-251
[VK45DE]
C
D
E
F
G
H
I
J
K
L
MA
EM
Revision: 2006 January2006 M35/M45
–Fuel tube and fuel injector assembly; Refer to EM-193, "FUEL INJECTOR AND FUEL TUBE" .
–Ignitio INFINITI M35 2006 Factory Service Manual CYLINDER BLOCK
EM-251
[VK45DE]
C
D
E
F
G
H
I
J
K
L
MA
EM
Revision: 2006 January2006 M35/M45
–Fuel tube and fuel injector assembly; Refer to EM-193, "FUEL INJECTOR AND FUEL TUBE" .
–Ignitio](/manual-img/42/57023/w960_57023-3313.png)
CYLINDER BLOCK
EM-251
[VK45DE]
C
D
E
F
G
H
I
J
K
L
MA
EM
Revision: 2006 January2006 M35/M45
–Fuel tube and fuel injector assembly; Refer to EM-193, "FUEL INJECTOR AND FUEL TUBE" .
–Ignition coil; Refer to EM-190, "IGNITION COIL" .
–Rocker cover; Refer to EM-199, "ROCKER COVER" .
–Other removable brackets
NOTE:
The figure shows an example of widely use engine stand that
can hold mating surface of transmission with drive plate and rear
plate removed.
CAUTION:
Before removing the hanging chains, make sure the engine
stand is stable and there is no risk of overturning.
4. Drain engine oil. Refer to LU-28, "
Changing Engine Oil" .
5. Drain engine coolant from inside engine by removing water
drain plugs “B” as shown in the figure.
6. Remove oil pan and oil strainer; Refer to EM-187, "
OIL PAN AND OIL STRAINER" .
7. Remove crankshaft pulley as follows:
a. Lock crankshaft with a hammer handle or similar tool to loosen
crankshaft bolt.
b. Pull crankshaft pulley with both hands to remove it.
CAUTION:
Do not remove crankshaft pulley bolt. Keep loosened
crankshaft pulley bolt in place to protect removed crank-
shaft pulley from dropping.
Do not remove balance weight (inner hexagon bolt) at the
front of crankshaft pulley.
8. Remove the following parts and related parts (The parts listed in step 3 are not included here.)
Front cover and timing chain; Refer to EM-203, "TIMING CHAIN" .
Camshaft; Refer to EM-215, "CAMSHAFT" .
Cylinder head; Refer to EM-233, "CYLINDER HEAD" .
9. Remove knock sensor.
CAUTION:
Carefully handle sensor, avoiding shocks.
10. Remove piston and connecting rod assembly as follows:
Before removing piston and connecting rod assembly, check the connecting rod side clearance. Refer
to EM-266, "
CONNECTING ROD SIDE CLEARANCE" .
a. Position crankshaft pin corresponding to connecting rod to be removed onto the bottom dead center.
b. Remove connecting rod bearing cap.
PBIC0085E
PBIC1265E
PBIC0053E
Page 3416 of 5621

FUEL SYSTEM
FL-3
C
D
E
F
G
H
I
J
K
L
MA
FL
Revision: 2006 January2006 M35/M45
FUEL SYSTEMPFP:17503
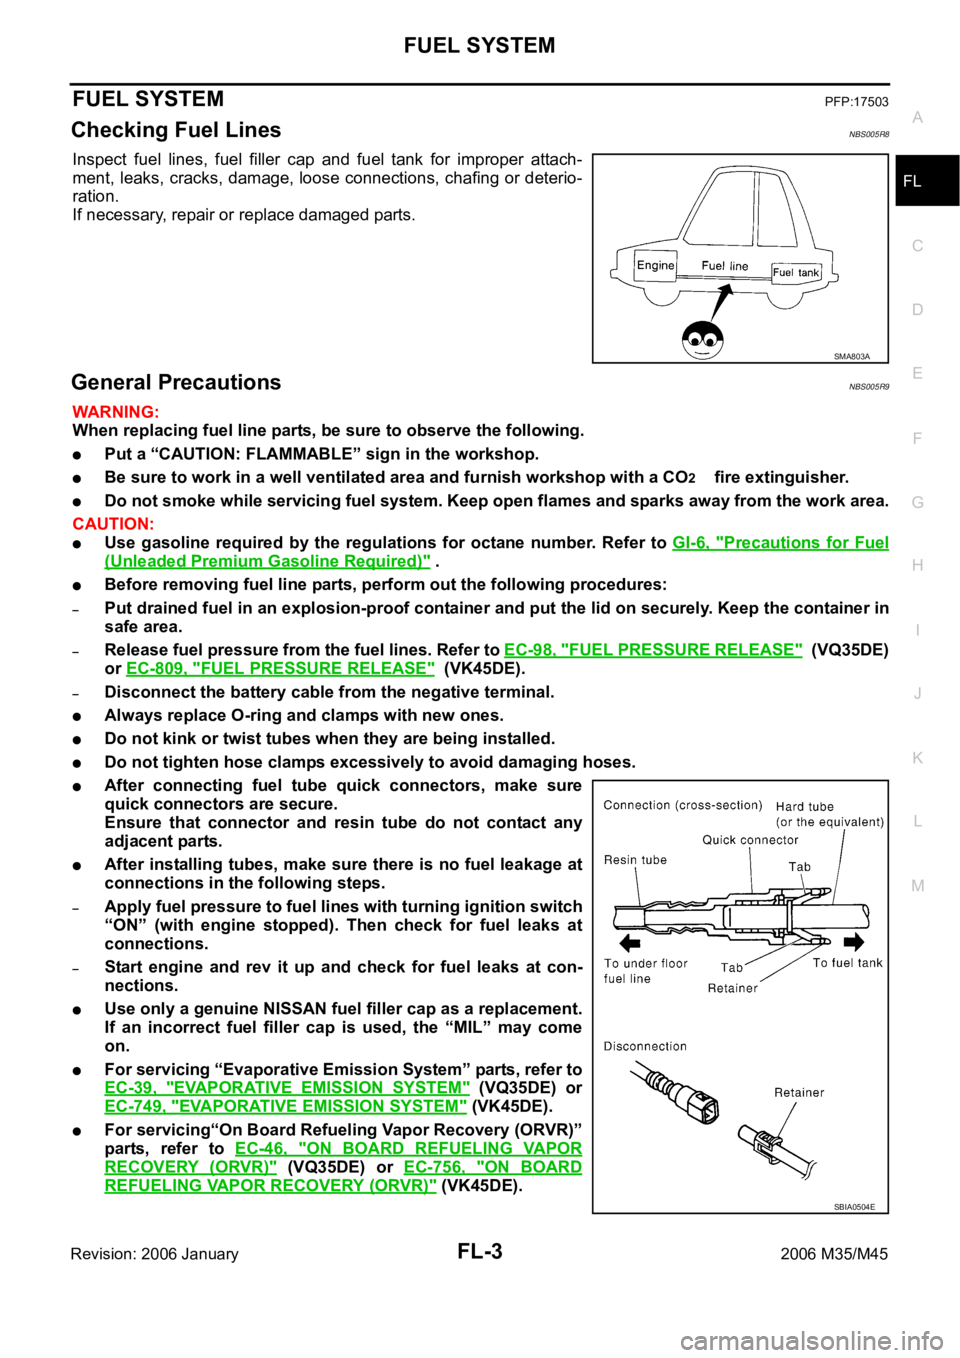
Checking Fuel LinesNBS005R8
Inspect fuel lines, fuel filler cap and fuel tank for improper attach-
ment, leaks, cracks, damage, loose connections, chafing or deterio-
ration.
If necessary, repair or replace damaged parts.
General PrecautionsNBS005R9
WAR NING :
When replacing fuel line parts, be sure to observe the following.
Put a “CAUTION: FLAMMABLE” sign in the workshop.
Be sure to work in a well ventilated area and furnish workshop with a CO2 fire extinguisher.
Do not smoke while servicing fuel system. Keep open flames and sparks away from the work area.
CAUTION:
Use gasoline required by the regulations for octane number. Refer to GI-6, "Precautions for Fuel
(Unleaded Premium Gasoline Required)" .
Before removing fuel line parts, perform out the following procedures:
–Put drained fuel in an explosion-proof container and put the lid on securely. Keep the container in
safe area.
–Release fuel pressure from the fuel lines. Refer to EC-98, "FUEL PRESSURE RELEASE" (VQ35DE)
or EC-809, "
FUEL PRESSURE RELEASE" (VK45DE).
–Disconnect the battery cable from the negative terminal.
Always replace O-ring and clamps with new ones.
Do not kink or twist tubes when they are being installed.
Do not tighten hose clamps excessively to avoid damaging hoses.
After connecting fuel tube quick connectors, make sure
quick connectors are secure.
Ensure that connector and resin tube do not contact any
adjacent parts.
After installing tubes, make sure there is no fuel leakage at
connections in the following steps.
–Apply fuel pressure to fuel lines with turning ignition switch
“ON” (with engine stopped). Then check for fuel leaks at
connections.
–Start engine and rev it up and check for fuel leaks at con-
nections.
Use only a genuine NISSAN fuel filler cap as a replacement.
If an incorrect fuel filler cap is used, the “MIL” may come
on.
For servicing “Evaporative Emission System” parts, refer to
EC-39, "
EVAPORATIVE EMISSION SYSTEM" (VQ35DE) or
EC-749, "
EVAPORATIVE EMISSION SYSTEM" (VK45DE).
For servicing“On Board Refueling Vapor Recovery (ORVR)”
parts, refer to EC-46, "
ON BOARD REFUELING VAPOR
RECOVERY (ORVR)" (VQ35DE) or EC-756, "ON BOARD
REFUELING VAPOR RECOVERY (ORVR)" (VK45DE).
SMA803A
SBIA0504E
Page 3418 of 5621

FUEL LEVEL SENSOR UNIT, FUEL FILTER AND FUEL PUMP ASSEMBLY
FL-5
C
D
E
F
G
H
I
J
K
L
MA
FL
Revision: 2006 January2006 M35/M45
3. Open fuel filler lid.
4. Open filler cap and release the pressure inside fuel tank.
5. Remove rear seat cushion. Refer to SE-172, "
REAR SEAT" .
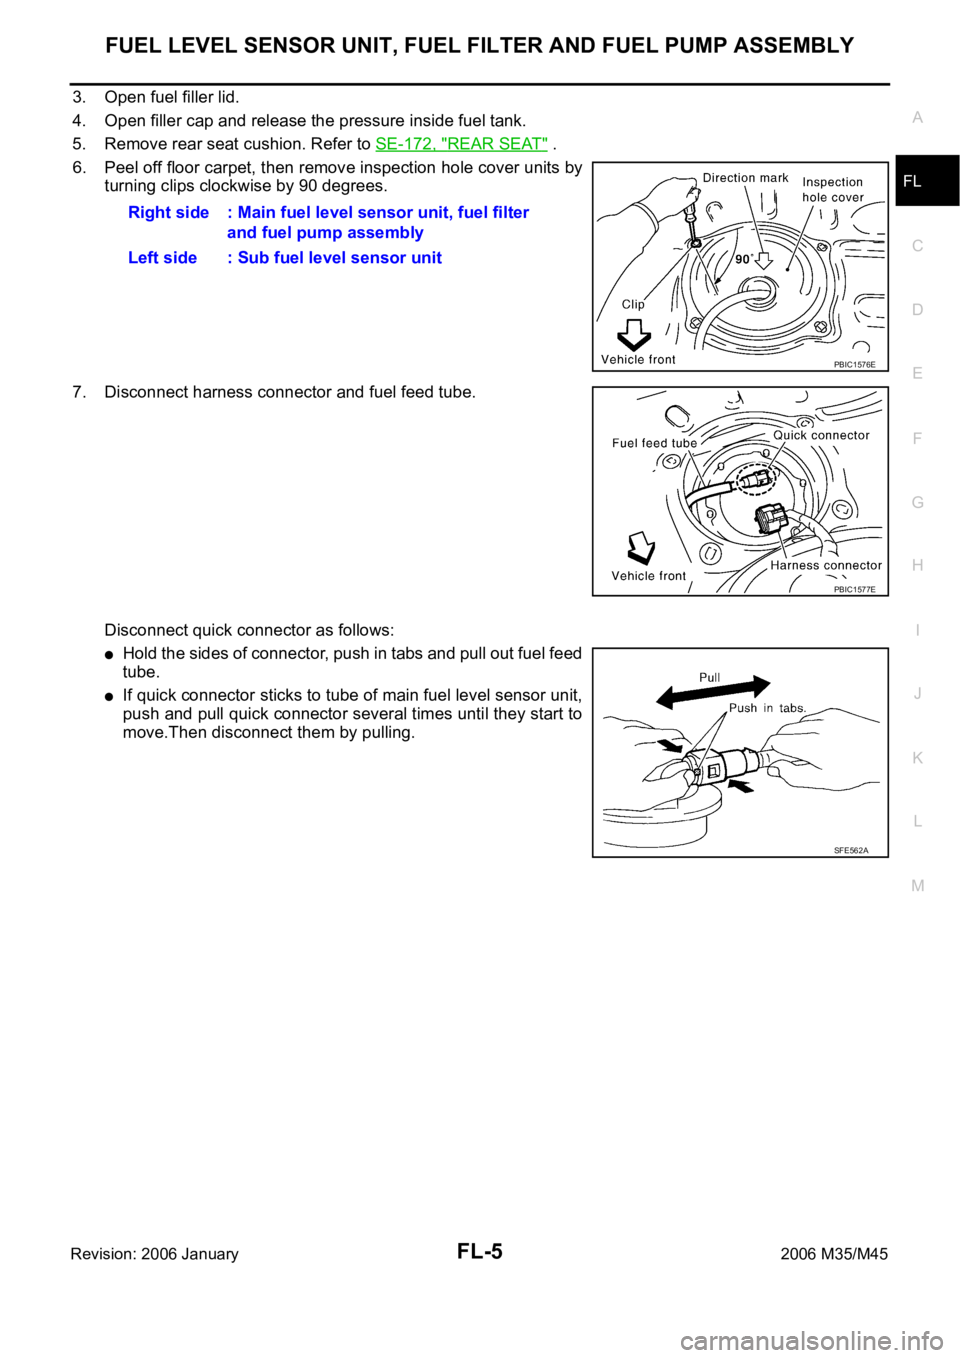
6. Peel off floor carpet, then remove inspection hole cover units by
turning clips clockwise by 90 degrees.
7. Disconnect harness connector and fuel feed tube.
Disconnect quick connector as follows:
Hold the sides of connector, push in tabs and pull out fuel feed
tube.
If quick connector sticks to tube of main fuel level sensor unit,
push and pull quick connector several times until they start to
move.Then disconnect them by pulling.Right side : Main fuel level sensor unit, fuel filter
and fuel pump assembly
Left side : Sub fuel level sensor unit
PBIC1576E
PBIC1577E
SFE562A
Page 3423 of 5621

FL-10
FUEL TANK
Revision: 2006 January2006 M35/M45
FUEL TANKPFP:17202
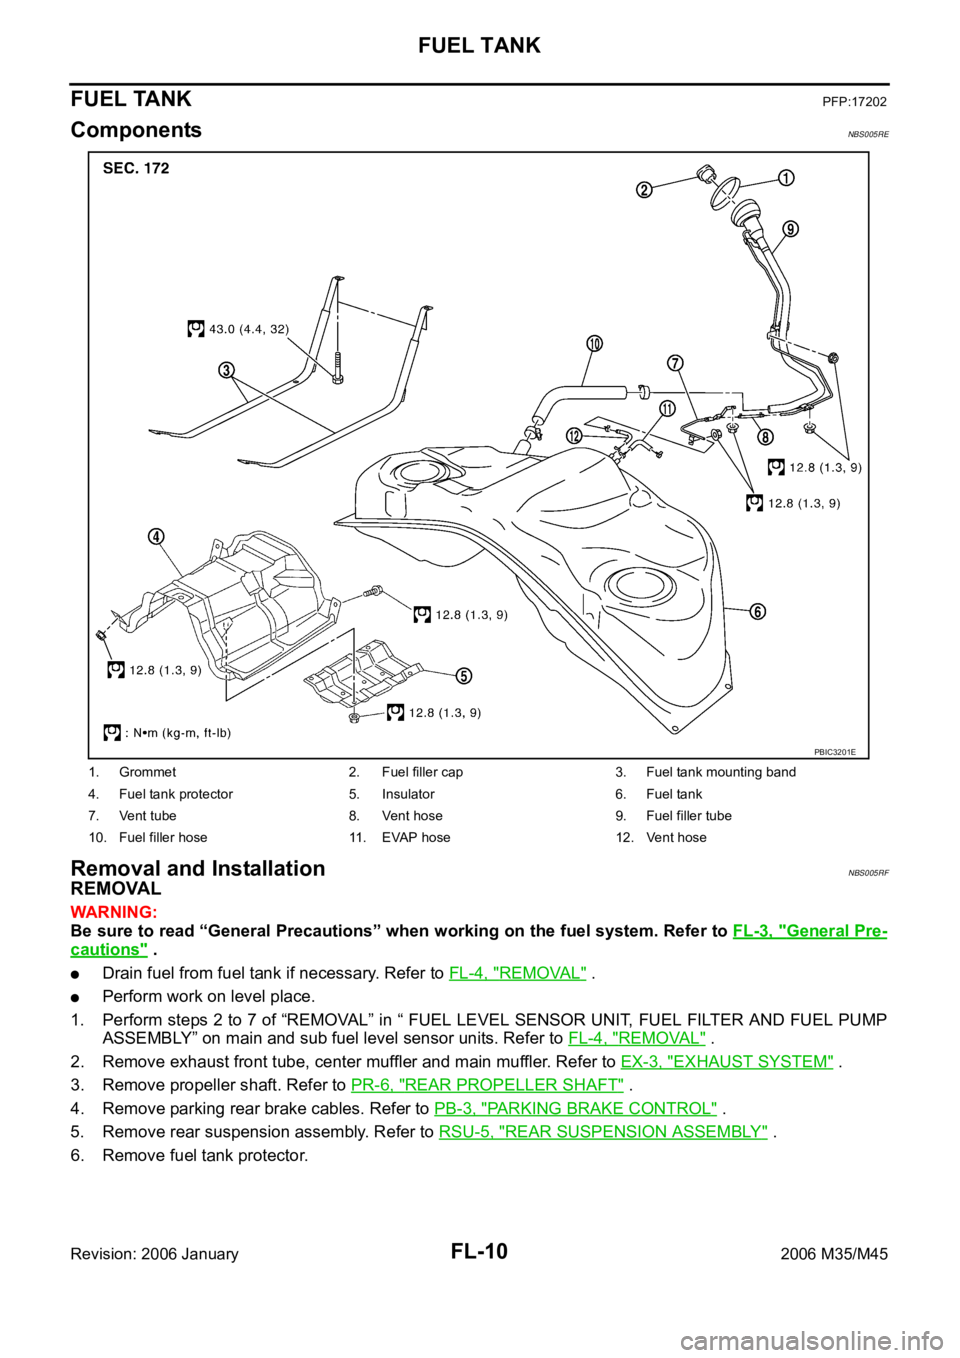
ComponentsNBS005RE
Removal and InstallationNBS005RF
REMOVAL
WAR NING :
Be sure to read “General Precautions” when working on the fuel system. Refer to FL-3, "
General Pre-
cautions" .
Drain fuel from fuel tank if necessary. Refer to FL-4, "REMOVAL" .
Perform work on level place.
1. Perform steps 2 to 7 of “REMOVAL” in “ FUEL LEVEL SENSOR UNIT, FUEL FILTER AND FUEL PUMP
ASSEMBLY” on main and sub fuel level sensor units. Refer to FL-4, "
REMOVAL" .
2. Remove exhaust front tube, center muffler and main muffler. Refer to EX-3, "
EXHAUST SYSTEM" .
3. Remove propeller shaft. Refer to PR-6, "
REAR PROPELLER SHAFT" .
4. Remove parking rear brake cables. Refer to PB-3, "
PARKING BRAKE CONTROL" .
5. Remove rear suspension assembly. Refer to RSU-5, "
REAR SUSPENSION ASSEMBLY" .
6. Remove fuel tank protector.
1. Grommet 2. Fuel filler cap 3. Fuel tank mounting band
4. Fuel tank protector 5. Insulator 6. Fuel tank
7. Vent tube 8. Vent hose 9. Fuel filler tube
10. Fuel filler hose 11. EVAP hose 12. Vent hose
PBIC3201E
Page 3426 of 5621

SERVICE DATA AND SPECIFICATIONS (SDS)
FL-13
C
D
E
F
G
H
I
J
K
L
MA
FL
Revision: 2006 January2006 M35/M45
SERVICE DATA AND SPECIFICATIONS (SDS)PFP:00030
Standard and LimitNBS005RG
FUEL TANK
Fuel tank capacity
Approx. 76 (20 US gal, 16-5/8 Imp gal)
Fuel recommendation Refer to GI-6
Page 3433 of 5621
![INFINITI M35 2006 Factory Service Manual FSU-6
[2WD]
FRONT SUSPENSION ASSEMBLY
Revision: 2006 January2006 M35/M45
FRONT SUSPENSION ASSEMBLYPFP:54010
On-Vehicle Inspection and ServiceNES000IA
Make sure the mounting conditions (looseness, INFINITI M35 2006 Factory Service Manual FSU-6
[2WD]
FRONT SUSPENSION ASSEMBLY
Revision: 2006 January2006 M35/M45
FRONT SUSPENSION ASSEMBLYPFP:54010
On-Vehicle Inspection and ServiceNES000IA
Make sure the mounting conditions (looseness,](/manual-img/42/57023/w960_57023-3432.png)
FSU-6
[2WD]
FRONT SUSPENSION ASSEMBLY
Revision: 2006 January2006 M35/M45
FRONT SUSPENSION ASSEMBLYPFP:54010
On-Vehicle Inspection and ServiceNES000IA
Make sure the mounting conditions (looseness, back lash) of each component and component conditions
(wear, damage) are normal.
INSPECTION OF LOWER BALL JOINT END PLAY
1. Set front wheels in a straight-ahead position. Do not depress brake pedal.
2. Place an iron bar or similar tool between transverse link and steering knuckle.
3. Measure axial end play by prying it up and down.
CAUTION:
Be careful not to damage ball joint boot. Do not damage the installation position by applying
excessive force.
SHOCK ABSORBER INSPECTION
Check for oil leakage, damage and breakage of installation positions.
Wheel Alignment InspectionNES000IB
DESCRIPTION
Measure wheel alignment under unladen conditions.
NOTE:
“Unladen conditions” means that fuel, engine coolant, and lubricant are full. Spare tire, jack, hand tools and
mats are in designated positions.
PRELIMINARY CHECK
Check the following:
1. Tires for improper air pressure and wear.
2. Road wheels for runout. Refer to WT-6, "
ROAD WHEEL" .
3. Wheel bearing axial end play. Refer to FAX-5, "
WHEEL BEARING INSPECTION" .
4. Transverse link ball joint axial end play. Refer to FSU-14, "
INSPECTION AFTER REMOVAL" .
5. Shock absorber operation.
6. Each mounting part of axle and suspension for looseness and deformation.
7. Each of suspension member, shock absorber, upper link and transverse link for cracks, deformation and
other damage.
8. Vehicle height (posture).
GENERAL INFORMATION AND RECOMMENDATIONS
A four-wheel thrust alignment should be performed.
–This type of alignment is recommended for any NISSAN/INFINITI vehicle.
–The four-wheel “thrust” process helps ensure that the vehicle is properly aligned and the steering wheel is
centered.
–The alignment rack itself should be capable of accepting any NISSAN/INFINITI vehicle.
–The rack should be checked to ensure that it is level.
Make sure the machine is properly calibrated.
–Your alignment equipment should be regularly calibrated in order to give correct information.
–Check with the manufacturer of your specific equipment for their recommended Service/Calibration
Schedule.Axial end play : 0 mm (0 in)
Page 3450 of 5621
![INFINITI M35 2006 Factory Service Manual FRONT SUSPENSION ASSEMBLY
FSU-23
[AWD]
C
D
F
G
H
I
J
K
L
MA
B
FSU
Revision: 2006 January2006 M35/M45
FRONT SUSPENSION ASSEMBLYPFP:54010
On-Vehicle Inspection and ServiceNES000IQ
Make sure the mount INFINITI M35 2006 Factory Service Manual FRONT SUSPENSION ASSEMBLY
FSU-23
[AWD]
C
D
F
G
H
I
J
K
L
MA
B
FSU
Revision: 2006 January2006 M35/M45
FRONT SUSPENSION ASSEMBLYPFP:54010
On-Vehicle Inspection and ServiceNES000IQ
Make sure the mount](/manual-img/42/57023/w960_57023-3449.png)
FRONT SUSPENSION ASSEMBLY
FSU-23
[AWD]
C
D
F
G
H
I
J
K
L
MA
B
FSU
Revision: 2006 January2006 M35/M45
FRONT SUSPENSION ASSEMBLYPFP:54010
On-Vehicle Inspection and ServiceNES000IQ
Make sure the mounting conditions (looseness, back lash) of each component and component conditions
(wear, damage) are normal.
INSPECTION OF LOWER BALL JOINT END PLAY
1. Set front wheels in a straight-ahead position. Do not depress brake pedal.
2. Place an iron bar or similar tool between transverse link and steering knuckle.
3. Measure axial end play by prying it up and down.
CAUTION:
Be careful not to damage ball joint boot. Do not damage the installation position by applying
excessive force.
SHOCK ABSORBER INSPECTION
Check for oil leakage, damage and breakage of installation positions.
Wheel Alignment InspectionNES000IR
DESCRIPTION
Measure wheel alignment under unladen conditions.
NOTE:
“Unladen conditions” means that fuel, engine coolant, and lubricant are full. Spare tire, jack, hand tools and
mats are in designated positions.
PRELIMINARY CHECK
Check the following:
1. Tires for improper air pressure and wear.
2. Road wheels for runout. Refer to WT-6, "
ROAD WHEEL" .
3. Wheel bearing axial end play. Refer to FAX-5, "
WHEEL BEARING INSPECTION" .
4. Transverse link ball joint axial end play. Refer to FSU-31, "
INSPECTION AFTER REMOVAL" .
5. Shock absorber operation.
6. Each mounting part of axle and suspension for looseness and deformation.
7. Each of suspension member, shock absorber, upper link and transverse link for cracks, deformation and
other damage.
8. Vehicle height (posture).
GENERAL INFORMATION AND RECOMMENDATIONS
A four-wheel thrust alignment should be performed.
–This type of alignment is recommended for any NISSAN/INFINITI vehicle.
–The four-wheel “thrust” process helps ensure that the vehicle is properly aligned and the steering wheel is
centered.
–The alignment rack itself should be capable of accepting any NISSAN/INFINITI vehicle.
–The rack should be checked to ensure that it is level.
Make sure the machine is properly calibrated.
–Your alignment equipment should be regularly calibrated in order to give correct information.
–Check with the manufacturer of your specific equipment for their recommended Service/Calibration
Schedule.Axial end play : 0 mm (0 in)