2006 INFINITI M35 check
[x] Cancel search: checkPage 1429 of 5621
![INFINITI M35 2006 Factory Service Manual CO-54
[VK45DE]
WATER PUMP
Revision: 2006 January2006 M35/M45
INSPECTION AFTER REMOVAL
Visually check that there is no significant dirt or rusting on water
pump body and vane.
Make sure there is no loo INFINITI M35 2006 Factory Service Manual CO-54
[VK45DE]
WATER PUMP
Revision: 2006 January2006 M35/M45
INSPECTION AFTER REMOVAL
Visually check that there is no significant dirt or rusting on water
pump body and vane.
Make sure there is no loo](/manual-img/42/57023/w960_57023-1428.png)
CO-54
[VK45DE]
WATER PUMP
Revision: 2006 January2006 M35/M45
INSPECTION AFTER REMOVAL
Visually check that there is no significant dirt or rusting on water
pump body and vane.
Make sure there is no looseness in vane shaft, and that it turns
smoothly when rotated by hand.
If anything is found, replace water pump.
INSTALLATION
Installation is the reverse order of removal.
INSPECTION AFTER INSTALLATION
Check for leaks of engine coolant using radiator cap tester adapter [SST: EG17650301 (J–33984-A)] and
radiator cap tester (commercial service tool). Refer to CO-40, "
LEAK CHECK" .
Start and warm up engine. Visually check if there is no leaks of engine coolant.
PBIC1539E
Page 1431 of 5621
![INFINITI M35 2006 Factory Service Manual CO-56
[VK45DE]
THERMOSTAT AND WATER CONTROL VALVE
Revision: 2006 January2006 M35/M45
5. Disconnect water suction hose from water inlet.
6. Remove water inlet and thermostat.
CAUTION:
Do not disassembl INFINITI M35 2006 Factory Service Manual CO-56
[VK45DE]
THERMOSTAT AND WATER CONTROL VALVE
Revision: 2006 January2006 M35/M45
5. Disconnect water suction hose from water inlet.
6. Remove water inlet and thermostat.
CAUTION:
Do not disassembl](/manual-img/42/57023/w960_57023-1430.png)
CO-56
[VK45DE]
THERMOSTAT AND WATER CONTROL VALVE
Revision: 2006 January2006 M35/M45
5. Disconnect water suction hose from water inlet.
6. Remove water inlet and thermostat.
CAUTION:
Do not disassemble thermostat.
7. Remove intake manifolds (upper and lower). Refer to EM-179, "
INTAKE MANIFOLD" .
8. Disconnect radiator hose (upper) from thermostat housing.
9. Disconnect heater hoses from water outlet and heater pipe.
10. Remove thermostat housing, water outlet pipe, water connector, water control valve, water outlet and
heater pipe.
CAUTION:
Do not disassemble water control valve.
INSPECTION AFTER REMOVAL
Make sure that valves both in thermostat and water control valve are completely closing at normal tempar-
ature.
Place a thread so that it is caught in the valves of the thermostat
and water control valve. Immerse fully in a container filled with
water. Heat while stirring. (The example in the figure shows ther-
mostat.)
The valve opening temperature is the temperature at which the
valve opens and falls from the thread.
Continue heating. Check the maximum valve lift.
NOTE:
The maximum valve lift standard temperature for water control
valve is the reference value.
After checking the maximum valve lift, lower the water tempera-
ture and check the valve closing temperature.
Standard values:
If the malfunctioning condition, when closing valve at normal temperature, or measured values are out of
the standard, replace thermostat and/or water control valve.
INSTALLATION
Note the following, and install in the reverse order of removal.
CAUTION:
Be careful not to spill engine coolant over engine room. Use rag to absorb engine coolant.
Thermostat and Water Control Valve
Install thermostat and water control valve with the whole circum-
ference of each flange part fit securely inside rubber ring. (The
example in the figure shows thermostat.)
SLC252B
Thermostat Water control valve
Valve opening temperature 80 - 84
C (176 - 183F) 93.5 - 96.5C (200 - 206F)
Maximum valve liftMore than 10 mm/ 95
C
(0.39 in/ 203
F)More than 8 mm/ 108
C
(0.315 in/ 226
F)
Valve closing temperature 77
C (171F) 90C (194F)
PBIC0157E
Page 1432 of 5621
![INFINITI M35 2006 Factory Service Manual THERMOSTAT AND WATER CONTROL VALVE
CO-57
[VK45DE]
C
D
E
F
G
H
I
J
K
L
MA
CO
Revision: 2006 January2006 M35/M45
Install thermostat with jiggle valve facing upwards. (The position
deviation may be withi INFINITI M35 2006 Factory Service Manual THERMOSTAT AND WATER CONTROL VALVE
CO-57
[VK45DE]
C
D
E
F
G
H
I
J
K
L
MA
CO
Revision: 2006 January2006 M35/M45
Install thermostat with jiggle valve facing upwards. (The position
deviation may be withi](/manual-img/42/57023/w960_57023-1431.png)
THERMOSTAT AND WATER CONTROL VALVE
CO-57
[VK45DE]
C
D
E
F
G
H
I
J
K
L
MA
CO
Revision: 2006 January2006 M35/M45
Install thermostat with jiggle valve facing upwards. (The position
deviation may be within the range of
10 degrees)
Install water control valve with the up-mark facing up and the
frame center part facing upwards. (The position deviation may
be within the range of
10 degrees)
Water Outlet Pipe and Heater Pipe
First apply a neutral detergent to O-rings, then quickly insert the insertion parts of the water outlet pipe and
heater pipe into the installation holes.
INSPECTION AFTER INSTALLATION
Check for leaks of engine coolant using radiator cap tester adapter [SST: EG17650301 (J33984-A)] and
radiator cap tester (commercial service tool). Refer to CO-40, "
LEAK CHECK" .
Start and warm up engine. Visually check if there is no leaks of engine coolant.
PBIC0158E
Page 1434 of 5621

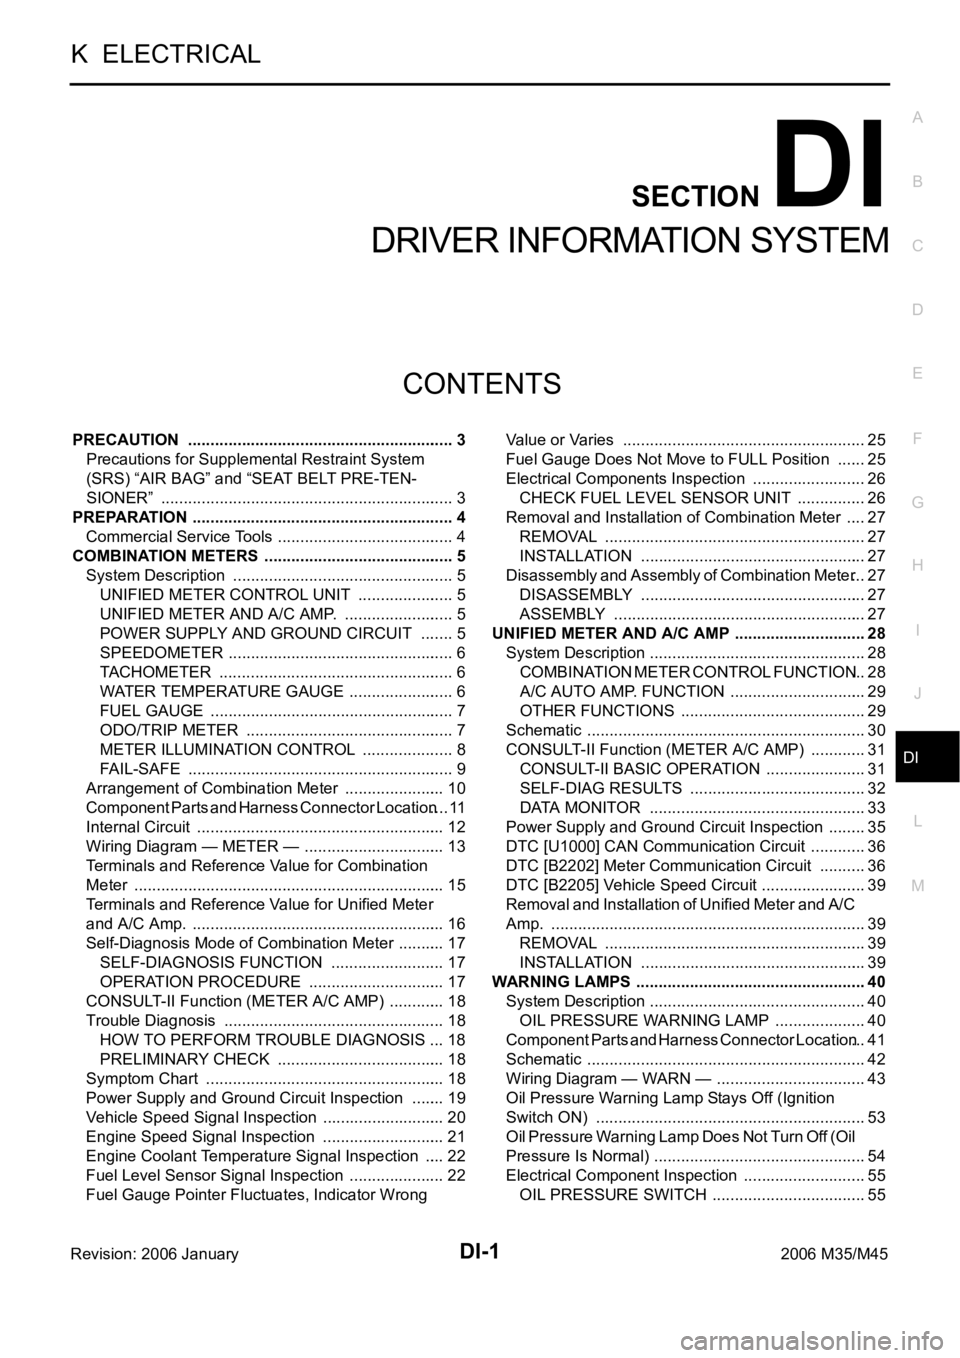
DI-1
DRIVER INFORMATION SYSTEM
K ELECTRICAL
CONTENTS
C
D
E
F
G
H
I
J
L
M
SECTION DI
A
B
DI
Revision: 2006 January2006 M35/M45
DRIVER INFORMATION SYSTEM
PRECAUTION ............................................................ 3
Precautions for Supplemental Restraint System
(SRS) “AIR BAG” and “SEAT BELT PRE-TEN-
SIONER” .................................................................. 3
PREPARATION ........................................................... 4
Commercial Service Tools ........................................ 4
COMBINATION METERS ........................................... 5
System Description .................................................. 5
UNIFIED METER CONTROL UNIT ...................... 5
UNIFIED METER AND A/C AMP. ......................... 5
POWER SUPPLY AND GROUND CIRCUIT ........ 5
SPEEDOMETER ................................................... 6
TACHOMETER ..................................................... 6
WATER TEMPERATURE GAUGE ........................ 6
FUEL GAUGE ....................................................... 7
ODO/TRIP METER ............................................... 7
METER ILLUMINATION CONTROL ..................... 8
FAIL-SAFE ............................................................ 9
Arrangement of Combination Meter ....................... 10
Component Parts and Harness Connector Location .... 11
Internal Circuit ........................................................ 12
Wiring Diagram — METER — ................................ 13
Terminals and Reference Value for Combination
Meter ...................................................................... 15
Terminals and Reference Value for Unified Meter
and A/C Amp. ......................................................... 16
Self-Diagnosis Mode of Combination Meter ........... 17
SELF-DIAGNOSIS FUNCTION .......................... 17
OPERATION PROCEDURE ............................... 17
CONSULT-II Function (METER A/C AMP) ............. 18
Trouble Diagnosis .................................................. 18
HOW TO PERFORM TROUBLE DIAGNOSIS ... 18
PRELIMINARY CHECK ...................................... 18
Symptom Chart ...................................................... 18
Power Supply and Ground Circuit Inspection ........ 19
Vehicle Speed Signal Inspection ............................ 20
Engine Speed Signal Inspection ............................ 21
Engine Coolant Temperature Signal Inspection ..... 22
Fuel Level Sensor Signal Inspection ...................... 22
Fuel Gauge Pointer Fluctuates, Indicator Wrong Value or Varies ....................................................... 25
Fuel Gauge Does Not Move to FULL Position ....... 25
Electrical Components Inspection .......................... 26
CHECK FUEL LEVEL SENSOR UNIT ................ 26
Removal and Installation of Combination Meter ..... 27
REMOVAL ........................................................
... 27
INSTALLATION ................................................... 27
Disassembly and Assembly of Combination Meter ... 27
DISASSEMBLY ................................................... 27
ASSEMBLY ......................................................... 27
UNIFIED METER AND A/C AMP ...........................
... 28
System Description ................................................. 28
COMBINATION METER CONTROL FUNCTION ... 28
A/C AUTO AMP. FUNCTION ............................... 29
OTHER FUNCTIONS .......................................... 29
Schematic ............................................................... 30
CONSULT-II Function (METER A/C AMP) ............. 31
CONSULT-II BASIC OPERATION ....................... 31
SELF-DIAG RESULTS ........................................ 32
DATA MONITOR ................................................. 33
Power Supply and Ground Circuit Inspection ......... 35
DTC [U1000] CAN Communication Circuit ............. 36
DTC [B2202] Meter Communication Circuit ........... 36
DTC [B2205] Vehicle Speed Circuit ........................ 39
Removal and Installation of Unified Meter and A/C
Amp. ....................................................................... 39
REMOVAL ........................................................
... 39
INSTALLATION ................................................... 39
WARNING LAMPS .................................................... 40
System Description ................................................. 40
OIL PRESSURE WARNING LAMP ..................... 40
Component Parts and Harness Connector Location ... 41
Schematic ............................................................... 42
Wiring Diagram — WARN — .................................. 43
Oil Pressure Warning Lamp Stays Off (Ignition
Switch ON) ............................................................. 53
Oil Pressure Warning Lamp Does Not Turn Off (Oil
Pressure Is Normal) ................................................ 54
Electrical Component Inspection ............................ 55
OIL PRESSURE SWITCH ................................... 55
Page 1435 of 5621

DI-2Revision: 2006 January2006 M35/M45 A/T INDICATOR ........................................................ 56
System Description ................................................. 56
MANUAL MODE .................................................. 56
NOT MANUAL MODE ......................................... 56
Wiring Diagram — AT/IND — ................................. 57
A/T Indicator Is Malfunction .................................... 59
WARNING CHIME .................................................. ... 60
System Description ................................................. 60
POWER SUPPLY AND GROUND CIRCUIT ....... 60
IGNITION KEY WARNING CHIME (WITH INTEL-
LIGENT KEY) ...................................................... 61
LIGHT WARNING CHIME ................................... 61
SEAT BELT WARNING CHIME ........................... 61
Component Parts and Harness Connector Location ... 62
Schematic ............................................................... 63
Wiring Diagram — CHIME — ................................. 64
Terminals and Reference Value for Combination
Meter ...................................................................... 67
Terminals and Reference Value for Unified Meter
and A/C Amp. ......................................................... 67
Terminals and Reference Value for BCM ................ 68
CONSULT-II Function (BCM) .................................. 69
CONSULT-II BASIC OPERATION ....................... 69
DATA MONITOR .................................................. 70
ACTIVE TEST ..................................................... 71
SELF-DIAG RESULTS ........................................ 71
CONSULT-II Function (METER A/C AMP) ............. 71
Trouble Diagnosis ................................................... 71
HOW TO PERFORM TROUBLE DIAGNOSIS .... 71
PRELIMINARY INSPECTION ............................. 71
SYMPTOM CHART ............................................. 72
Meter Buzzer Circuit Inspection .............................. 72
Lighting Switch Signal Inspection ........................... 73
Front Door Switch (Driver Side) Signal Inspection ... 73
Seat Belt Buckle Switch Signal Inspection ............. 74
Electrical Component Inspection ............................ 76
FRONT DOOR SWITCH (DRIVER SIDE) ........... 76
SEAT BELT BUCKLE SWITCH (DRIVER SIDE) ... 76
CAN COMMUNICATION ........................................... 77
System Description ................................................. 77
CAN Communication Unit ....................................... 77
LANE DEPARTURE WARNING SYSTEM ................ 78
Precautions for Lane Departure Warning (LDW)
system .................................................................... 78
System Description ................................................. 78
LDW SYSTEM OPERATION ............................... 78
POWER SUPPLY AND GROUND CIRCUIT ....... 80
Action Test ...........................................................
... 80
LDW SYSTEM RUNNING TEST ......................... 80
Camera Aiming Adjustment .................................... 81
OUTLINE ............................................................. 81
PREPARATION ................................................... 81TARGET SETTING .............................................. 81
VEHICLE HEIGHT CHECK ................................. 84
AIMING ADJUSTMENT ....................................... 84
Component Parts and Harness Connector Location ... 88
Wiring Diagram — LDW — ..................................... 89
Terminals and Reference Value for LDW Camera
Unit .......................................................................... 91
CONSULT-II Function (LDW) .................................. 91
DESCRIPTION .................................................... 91
CONSULT-II BASIC OPERATION ....................... 91
WORK SUPPORT ............................................... 92
SELF-DIAG RESULTS ......................................... 92
DATA MONITOR .................................................. 93
ACTIVE TEST ...................................................... 94
Trouble Diagnosis ................................................... 95
HOW TO PERFORM TROUBLE DIAGNOSIS .... 95
PRELIMINARY INSPECTION .............................. 95
SYMPTOM CHART .............................................. 96
Power Supply and Ground Circuit Inspection ......... 96
DTC [C1B00] CAMERA UNIT MALF ...................... 97
DTC [C1B01] CAM AIMING INCMP ....................... 97
DTC [C1B02] VHCL SPD DATA MALF ................... 97
DTC [C1B03] ABNRML TEMP DETECT ................ 97
DTC [U1000] CAN COMM CIRCUIT ...................... 98
DTC [U1010] CONTROL UNIT (CAN) .................... 98
LDW Chime Circuit Inspection ................................ 98
LDW Switch Circuit Inspection ................................ 99
LDW Indicator Lamp Circuit Inspection .................102
Turn Signal Input Inspection .................................103
Electrical Component Inspection ..........................103
LDW SWITCH ....................................................103
Removal and Installation for LDW Camera Unit ...103
REMOVAL ..........................................................103
INSTALLATION ..................................................103
Removal and Installation for LDW Chime .............104
REMOVAL ..........................................................104
INSTALLATION ..................................................104
Removal and Installation for LDW Switch .............104
COMPASS ...............................................................105
System Description ...............................................105
DIRECTION DISPLAY .......................................105
Zone Variation Change Procedure ........................105
Correction Functions of the Compass Display ......105
AUTOMATIC CORRECTION .............................105
MANUAL CORRECTION PROCEDURE ...........105
Wiring Diagram – COMPAS – ...............................106
Removal and Installation of Compass ...................107
CLOCK ....................................................................108
Wiring Diagram — CLOCK — ...............................108
Removal and Installation of Clock .........................109
REMOVAL ..........................................................109
INSTALLATION ..................................................109
Page 1438 of 5621

COMBINATION METERS
DI-5
C
D
E
F
G
H
I
J
L
MA
B
DI
Revision: 2006 January2006 M35/M45
COMBINATION METERSPFP:24814
System DescriptionNKS003TV
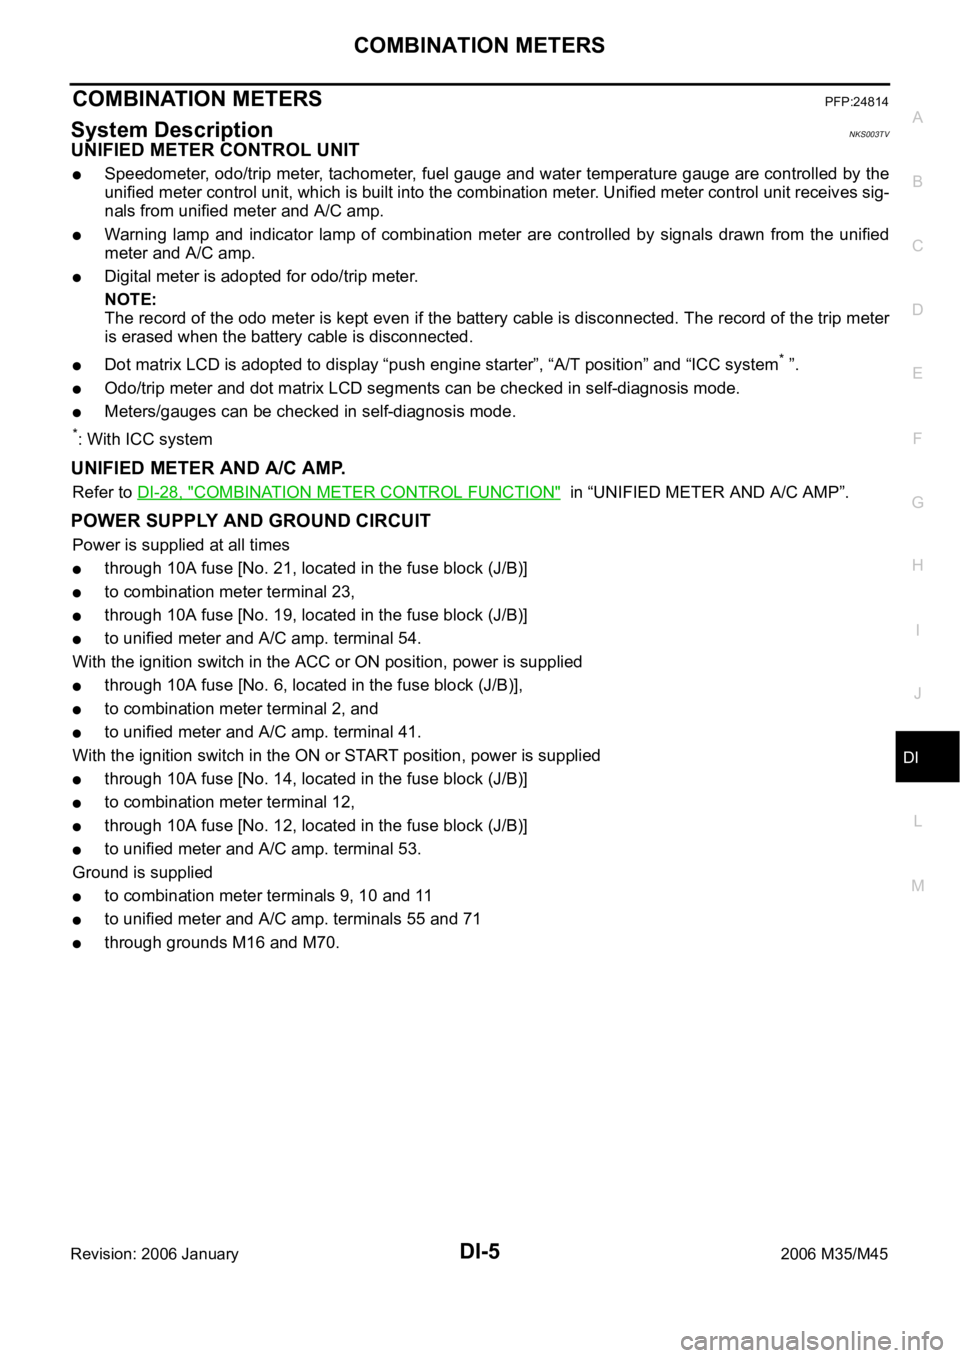
UNIFIED METER CONTROL UNIT
Speedometer, odo/trip meter, tachometer, fuel gauge and water temperature gauge are controlled by the
unified meter control unit, which is built into the combination meter. Unified meter control unit receives sig-
nals from unified meter and A/C amp.
Warning lamp and indicator lamp of combination meter are controlled by signals drawn from the unified
meter and A/C amp.
Digital meter is adopted for odo/trip meter.
NOTE:
The record of the odo meter is kept even if the battery cable is disconnected. The record of the trip meter
is erased when the battery cable is disconnected.
Dot matrix LCD is adopted to display “push engine starter”, “A/T position” and “ICC system* ”.
Odo/trip meter and dot matrix LCD segments can be checked in self-diagnosis mode.
Meters/gauges can be checked in self-diagnosis mode.
*: With ICC system
UNIFIED METER AND A/C AMP.
Refer to DI-28, "COMBINATION METER CONTROL FUNCTION" in “UNIFIED METER AND A/C AMP”.
POWER SUPPLY AND GROUND CIRCUIT
Power is supplied at all times
through 10A fuse [No. 21, located in the fuse block (J/B)]
to combination meter terminal 23,
through 10A fuse [No. 19, located in the fuse block (J/B)]
to unified meter and A/C amp. terminal 54.
With the ignition switch in the ACC or ON position, power is supplied
through 10A fuse [No. 6, located in the fuse block (J/B)],
to combination meter terminal 2, and
to unified meter and A/C amp. terminal 41.
With the ignition switch in the ON or START position, power is supplied
through 10A fuse [No. 14, located in the fuse block (J/B)]
to combination meter terminal 12,
through 10A fuse [No. 12, located in the fuse block (J/B)]
to unified meter and A/C amp. terminal 53.
Ground is supplied
to combination meter terminals 9, 10 and 11
to unified meter and A/C amp. terminals 55 and 71
through grounds M16 and M70.
Page 1442 of 5621

COMBINATION METERS
DI-9
C
D
E
F
G
H
I
J
L
MA
B
DI
Revision: 2006 January2006 M35/M45
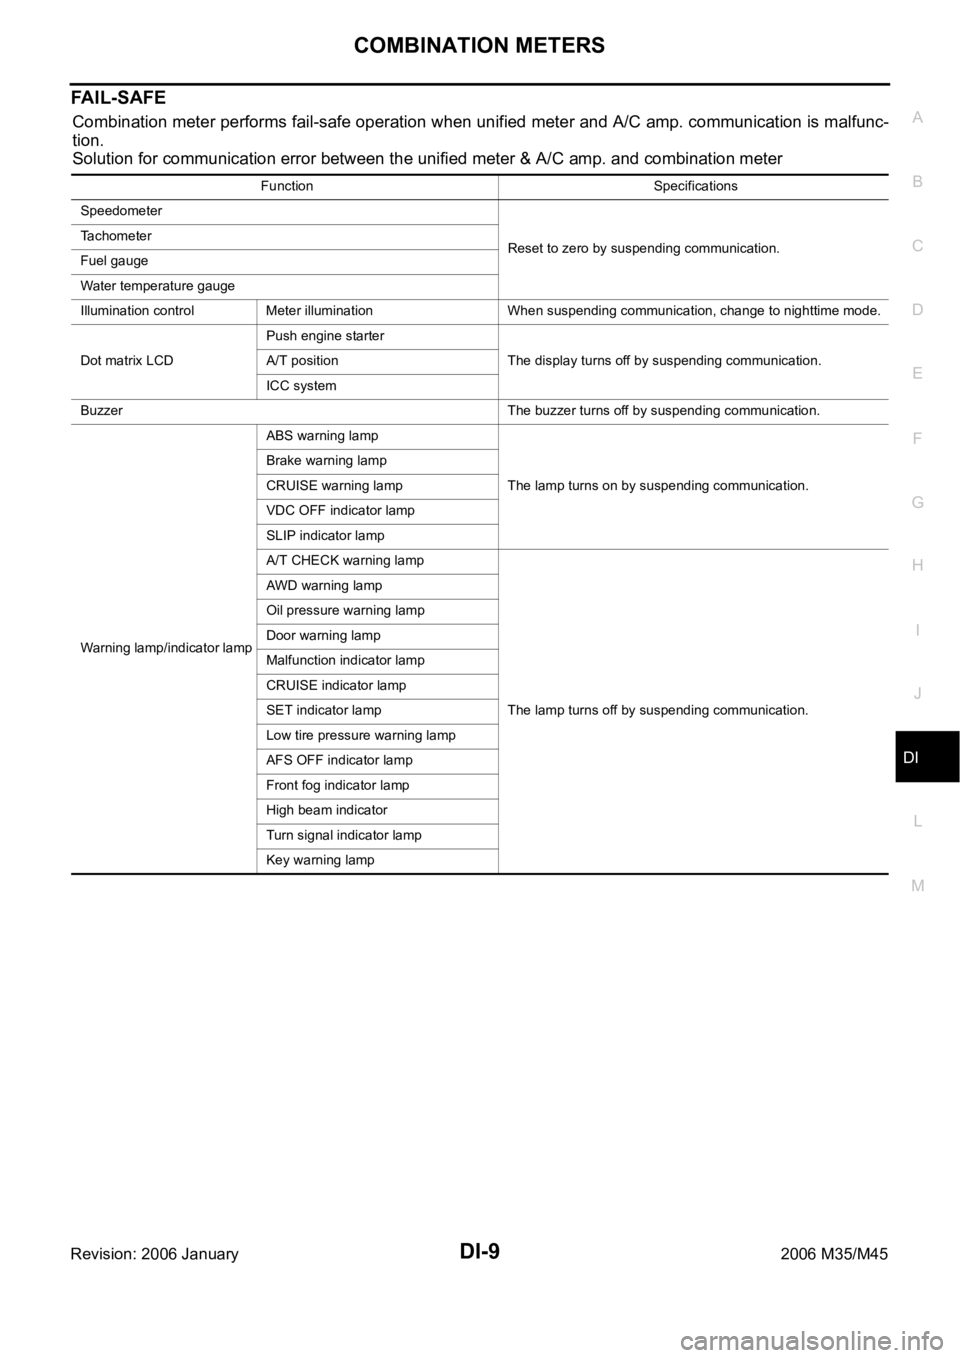
FA I L - S A F E
Combination meter performs fail-safe operation when unified meter and A/C amp. communication is malfunc-
tion.
Solution for communication error between the unified meter & A/C amp. and combination meter
Function Specifications
Speedometer
Reset to zero by suspending communication. Tachometer
Fuel gauge
Water temperature gauge
Illumination control Meter illumination When suspending communication, change to nighttime mode.
Dot matrix LCDPush engine starter
The display turns off by suspending communication. A/T position
ICC system
Buzzer The buzzer turns off by suspending communication.
Warning lamp/indicator lampABS warning lamp
The lamp turns on by suspending communication. Brake warning lamp
CRUISE warning lamp
VDC OFF indicator lamp
SLIP indicator lamp
A/T CHECK warning lamp
The lamp turns off by suspending communication. AWD warning lamp
Oil pressure warning lamp
Door warning lamp
Malfunction indicator lamp
CRUISE indicator lamp
SET indicator lamp
Low tire pressure warning lamp
AFS OFF indicator lamp
Front fog indicator lamp
High beam indicator
Turn signal indicator lamp
Key warning lamp
Page 1449 of 5621

DI-16
COMBINATION METERS
Revision: 2006 January2006 M35/M45
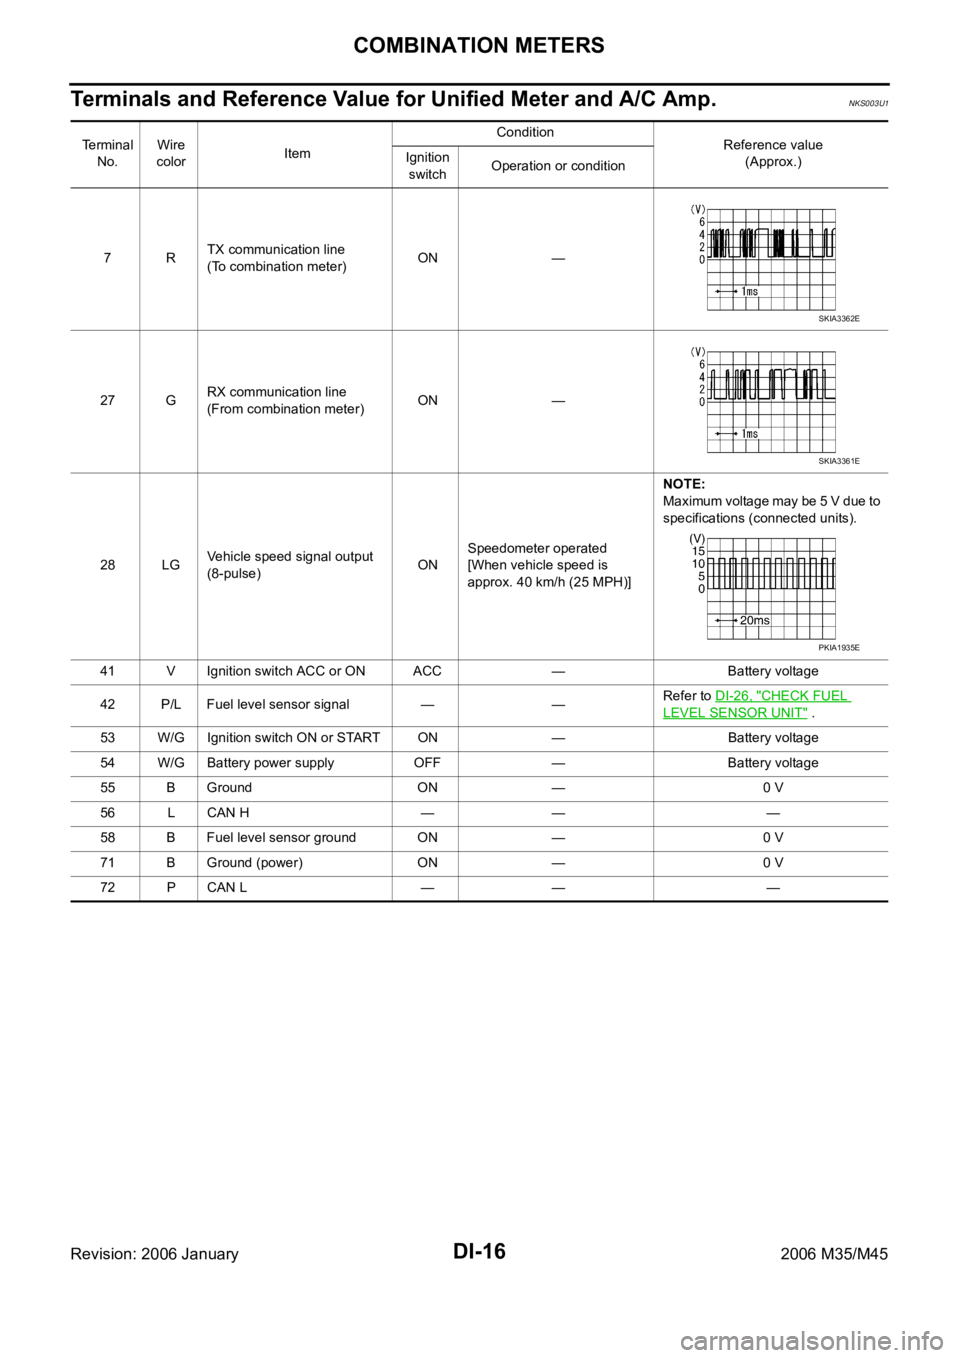
Terminals and Reference Value for Unified Meter and A/C Amp.NKS003U1
Te r m i n a l
No.Wire
colorItemCondition
Reference value
(Approx.) Ignition
switchOperation or condition
7RTX communication line
(To combination meter)ON —
27 GRX communication line
(From combination meter)ON —
28 LGVehicle speed signal output
(8-pulse)ONSpeedometer operated
[When vehicle speed is
approx. 40 km/h (25 MPH)]NOTE:
Maximum voltage may be 5 V due to
specifications (connected units).
41 V Ignition switch ACC or ON ACC — Battery voltage
42 P/L Fuel level sensor signal — —Refer to DI-26, "
CHECK FUEL
LEVEL SENSOR UNIT" .
53 W/G Ignition switch ON or START ON — Battery voltage
54 W/G Battery power supply OFF — Battery voltage
55 B Ground ON — 0 V
56 L CAN H — — —
58 B Fuel level sensor ground ON — 0 V
71 B Ground (power) ON — 0 V
72 P CAN L — — —
SKIA3362E
SKIA3361E
PKIA1935E