Page 18 of 344
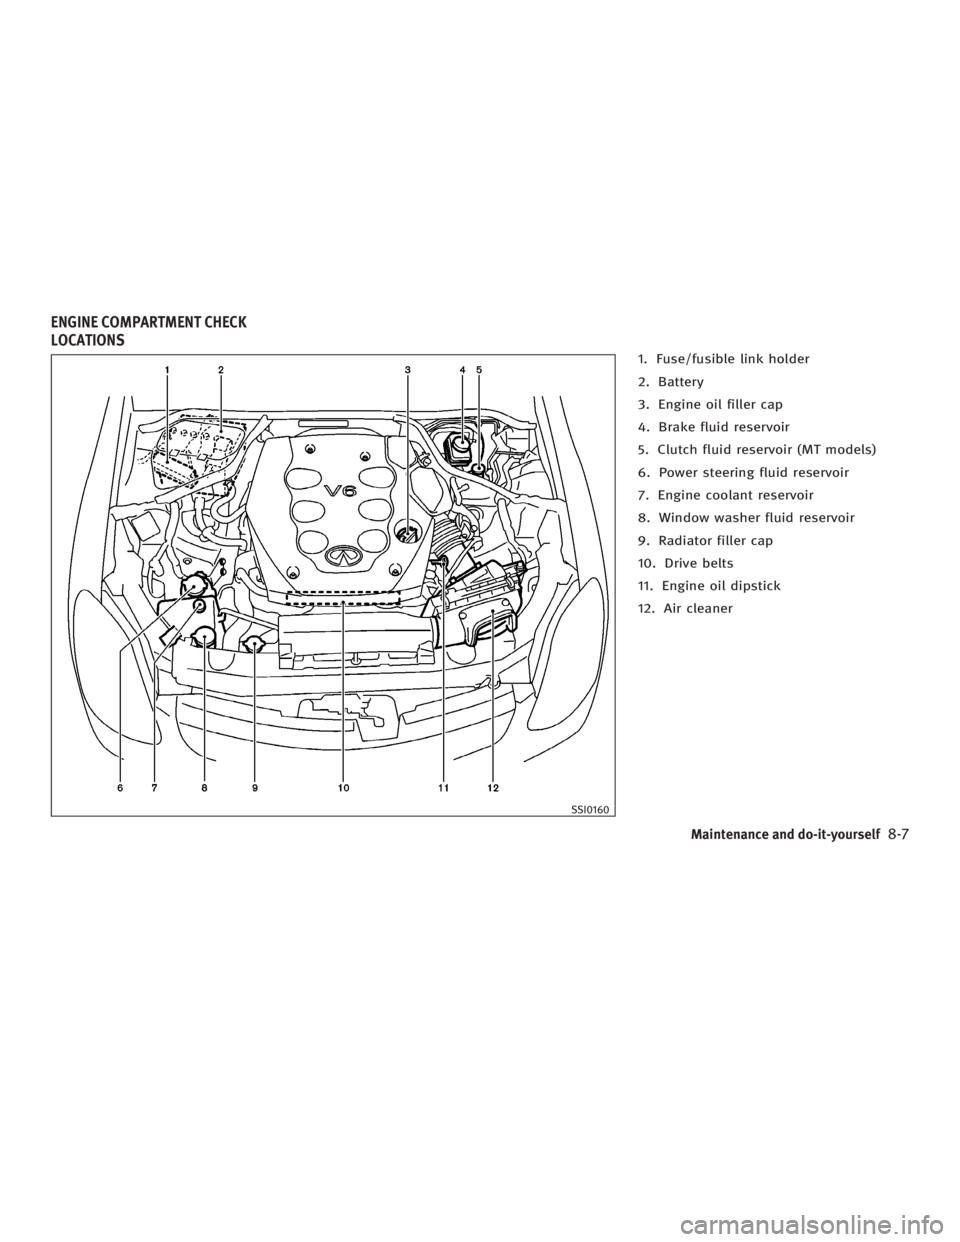
VQ35DE
1. Fuse/fusible link holder (P.8-25)
2. Battery (P.8-16)
3. Engine oil filler cap (P.8-10)
4. Brake fluid reservoir (P.8-14)
5. Clutch fluid reservoir (MT models)
(P.8-15)
6. Power steering fluid reservoir (P.8-13)
7. Engine coolant reservoir (P.8-8)
8. Window washer fluid reservoir
(P.8-15)
9. Radiator filler cap (P.8-9)
10. Drive belts (P.8-19)
11. Engine oil dipstick (P.8-10)
12. Air cleaner (P.8-20)
SSI0160ENGINE COMPARTMENT
0-12 Illustrated table of contents
w 06.1.4/V35-D/V5.0
X
Page 83 of 344

Low brake fluid warning light:
The light warns of a low brake fluid level.
If the light comes on while the engine is
running with the parking brake not ap-
plied, stop the vehicle and perform the
following:
1. Check the brake fluid level. Add brake
fluid as necessary. See ªBrake fluidº
in the ª8. Maintenance and do-it-
yourselfº section.
2. If the brake fluid level is correct, have
the warning system checked by an
INFINITI dealer.
Anti-lock Brake System (ABS) warning
indicator:
When the parking brake is released and
the brake fluid level is sufficient, if both
the brake warning light and the anti-lock
brake system warning light illuminate, it
may indicate the anti-lock brake system is
not functioning properly. Have the brake
system checked by an INFINITI dealer. See
ªAnti-lock brake warning lightº earlier in
this section. WARNING O Your brake system may not be working
properly if the warning light is on.
Driving could be dangerous. If you judge
it to be safe, drive carefully to the
nearest service station for repairs. Oth-
erwise, have your vehicle towed because
driving it could be dangerous.
O Pressing the brake pedal with the engine
stopped and/or a low brake fluid level
may increase your stopping distance
and braking will require greater pedal ef-
fort as well as pedal travel.
O If the brake fluid level is below the MINI-
MUM or MIN mark on the brake fluid res-
ervoir, do not drive until the brake
system has been checked by an INFINITI
dealer.
Charge warning light If the light comes on while the engine is
running, it may indicate that the charging
system is not functioning properly. Turn
the engine off and check the alternator belt. If the belt is loose, broken, missing
or if the light remains on, see an INFINITI
dealer immediately.
CAUTION Do not continue driving if the generator belt
is loose, broken or missing.
Door open warning light This light comes on when any of the
doors are not closed securely while the
ignition switch is in the ON position.
Engine oil pressure warning
light This light warns of low engine oil pres-
sure. If the light flickers or comes on dur-
ing normal driving, pull off the road in a
safe area, stop the engine immediately
and call an INFINITI dealer or other autho-
rized repair shop.
The engine oil pressure warning light is
not designed to indicate a low oil level.
Use the dipstick to check the oil level. See
ªEngine oilº in the ª8. Maintenance and
do-it-yourselfº section.
Instruments and controls
2-11
w 06.1.4/V35-D/V5.0
X
Page 265 of 344
1. Fuse/fusible link holder
2. Battery
3. Engine oil filler cap
4. Brake fluid reservoir
5. Clutch fluid reservoir (MT models)
6. Power steering fluid reservoir
7. Engine coolant reservoir
8. Window washer fluid reservoir
9. Radiator filler cap
10. Drive belts
11. Engine oil dipstick
12. Air cleaner
SSI0160ENGINE COMPARTMENT CHECK
LOCATIONS
Maintenance and do-it-yourself
8-7
w 06.1.4/V35-D/V5.0
X
Page 268 of 344

2. Close the radiator drain plug securely
after the coolant is drained.
3. Fill the radiator slowly with the proper
mixture of antifreeze solution and
demineralized water/distilled water.
Fill the reservoir tank up to the MAX
level. Then install the radiator filler
cap.
4. Start the engine and warm it up until
it reaches normal operating tempera-
ture. Then race the engine 2 or 3 times
under no load. Watch the engine cool-
ant temperature gauge for signs of
overheating.
5. Stop the engine. After it completely
cools down, refill the radiator up to
the filler opening. Fill the reservoir
tank up to the MAX level. Check the
drain plug for any sign of leakage.
6. Check the coolant level again after
driving the vehicle.
CHECKING ENGINE OIL LEVEL 1. Park the vehicle on a level surface and
apply the parking brake.
2. Run the engine until it reaches operat-
ing temperature.
3. Turn off the engine. Wait more than 10
minutes for the oil to drain back into
the oil pan.
4. Remove the dipstick
q A
and wipe it
clean. Reinsert it all the way. 5. Remove the dipstick again and check
the oil level. It should be between the
H and L marks
q B
. If the oil level is
below the L mark
q A
, remove the oil
filler cap and pour recommended oil
through the opening. Do not overfill
q C
.
6. Recheck oil level with dipstick.
It is normal to add some oil between oil
maintenance intervals or during the break-
in period, depending on the severity of op-
erating conditions. SDI1386D SDI1781
ENGINE OIL
8-10 Maintenance and do-it-yourself
w 06.1.4/V35-D/V5.0
X
Page 270 of 344
O Waste oil must be disposed of prop-
erly.
O Check your local regulations.
4. Loosen the oil filter with an oil filter
wrench
q B
. Remove the oil filter by
turning it by hand.
5. Wipe the engine oil filter mounting
surface with a clean rag.
Be sure to remove any old rubber
gasket remaining on the mounting sur-
face of the engine.
6. Coat the gasket on the new filter with
clean engine oil.
7. Screw in the oil filter clockwise until a
slight resistance is felt, then tighten
additionally more than 2/3 turn.
Oil filter tightening torque:
11 to 15 ft-lb
(14.7 to 20.5 N z m)
8. Clean and re-install the drain plug
with a new washer. Securely tighten
the drain plug with a wrench.
Drain plug tightening torque:
22 to 29 ft-lb
(29 to 39 N z m)
Do not use excessive force. 9. Refill engine with recommended oil
and install the cap securely.
CAUTION The dipstick must be inserted in place to pre-
vent oil spillage from the dipstick hole while
filling the engine with oil.
See ªCapacities and recommended
fuel/lubricantsº in the ª9. Technical
and consumer informationº section for
drain and refill capacity. The drain and
refill capacity depends on the oil tem-
perature and drain time. Use these
specifications for reference only. Al-
ways use the dipstick to determine the
proper amount of oil in the engine.
CAUTION When filling oil, do not pull out the dipstick.
10. Start the engine and check for
leakage around the drain plug and
the oil filter. Correct as required. 11. Turn the engine off and wait more
than 10 minutes. Check the oil level
with the dipstick. Add engine oil if
necessary.
After the operation 1. Install the engine undercover into po-
sition as the following steps.
a. Pull the center of the small plastic
clip out.
b. Hold the engine undercover into
position.
c. Insert the clip through the under-
cover into the hole in the frame,
then push the center of the clip in
to lock the clip in place.
d. Install the other bolts that hold the
undercover in place. Be careful not
to strip the bolts or over-tighten
them.
2. Lower the vehicle carefully to the
ground.
3. Dispose of waste oil and filter prop-
erly.
8-12 Maintenance and do-it-yourself
w 06.1.4/V35-D/V5.0
X