2006 INFINITI G35 belt
[x] Cancel search: beltPage 37 of 344

Motor Vehicle Safety Standard 213 or
Canadian Motor Vehicle Safety Stan-
dard 213.
O Check the child restraint in your ve-
hicle to be sure it is compatible with
the vehicle's seat and seat belt
system.
O If the child restraint is compatible with
your vehicle, place your child in the
child restraint and check the various
adjustments to be sure the child re-
straint is compatible with your child.
Choose a child restraint that is de-
signed for your child's height and
weight. Always follow all recom-
mended procedures.
All US states and Canadian provinces re-
quire that infants and small children be re-
strained in approved child restraints at all
times while the vehicle is being operated.
WARNINGO Improper use of a child restraint can in-
crease the risk or severity of injury for
both the child and other occupants of
the vehicle. O Follow all of the child restraint manufac-
turer's instructions for installation and
use. When purchasing a child restraint,
be sure to select one which will fit your
child and vehicle. It may not be possible
to properly install some types of child re-
straints in your vehicle.
O If the child restraint is not anchored
properly, the risk of a child being injured
in a collision or a sudden stop greatly in-
creases.
O Adjustable seatbacks should be posi-
tioned to fit the child restraint, but as
upright as possible.
O After attaching the child restraint, test it
before you place the child in it. Push it
from side to side. Try to tug it forward
and check to see if the belt holds the re-
straint in place. The child restraint
should not move more than 1 in (25 mm).
If the restraint is not secure, tighten the
belt as necessary, or put the restraint in
another seat and test it again. You may
need to try a different child restraint. Not
all child restraints fit in all types
ofvehicles. O If you must install a front-facing child re-
straint in the front seat, see ªChild re-
straint installation on front passenger
seatº later in this section.
O When your child restraint is not in use,
keep it secured with a seat belt to pre-
vent it from being thrown around in case
of a sudden stop or accident.
CAUTION Remember that a child restraint left in a
closed vehicle can become very hot. Check
the seating surface and buckles before
placing your child in the child restraint.
Safety Ð Seats, seat belts and supplemental restraint system
1-19
w 06.1.4/V35-D/V5.0
X
Page 38 of 344
CHILD RESTRAINT INSTALLATION
ON REAR SEAT OUTBOARD OR
CENTER POSITIONS
WARNINGO The three-point seat belt in your vehicle
is equipped with an automatic locking
mode retractor which must be used
when installing a child restraint.
O Failure to use the automatic locking
mode will result in the child restraint not
being properly secured. The restraint
could tip over or otherwise be unsecured
and cause injury to the child in a sudden
stop or collision.
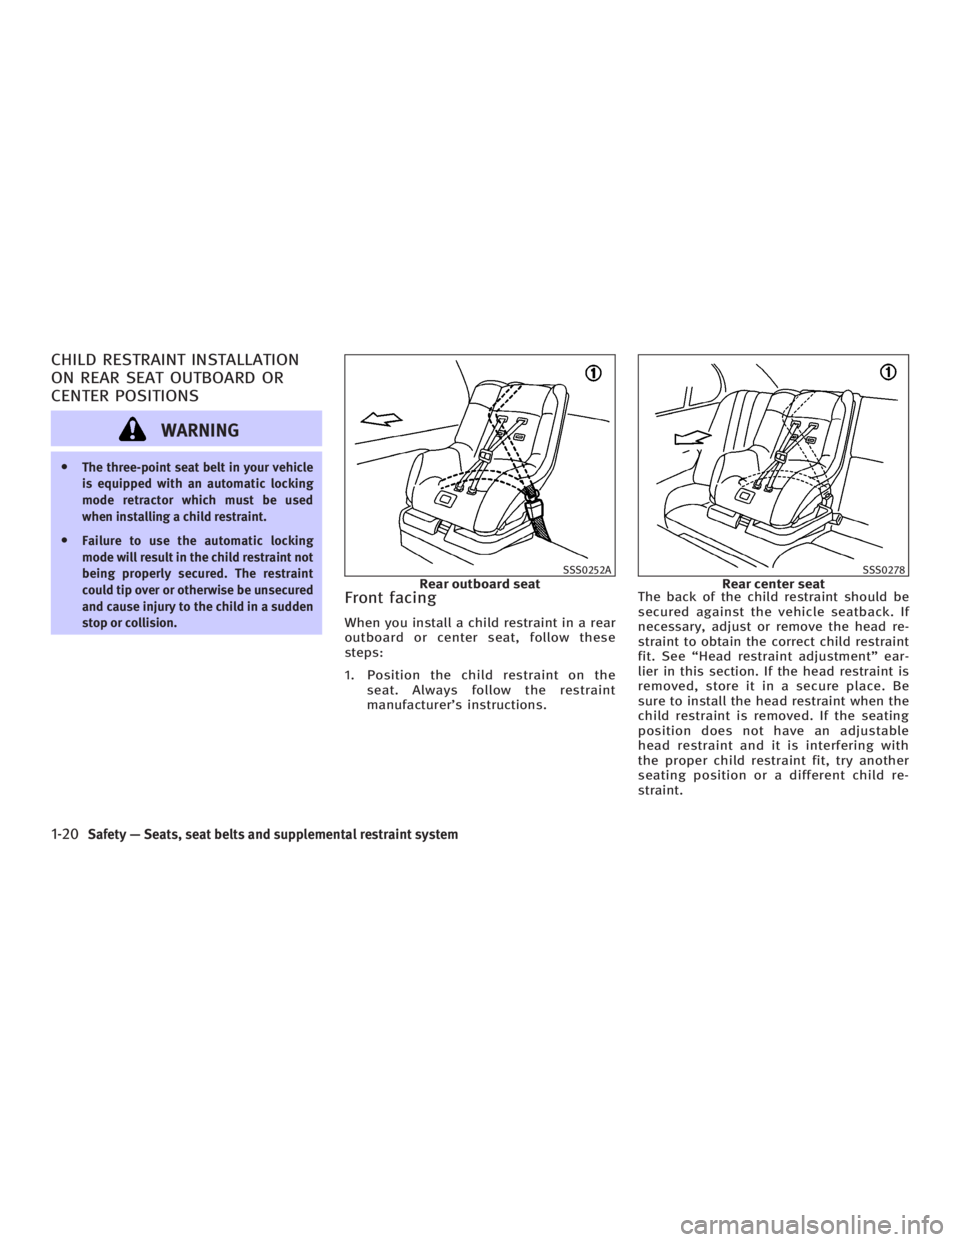
Front facing When you install a child restraint in a rear
outboard or center seat, follow these
steps:
1. Position the child restraint on the
seat. Always follow the restraint
manufacturer's instructions. The back of the child restraint should be
secured against the vehicle seatback. If
necessary, adjust or remove the head re-
straint to obtain the correct child restraint
fit. See ªHead restraint adjustmentº ear-
lier in this section. If the head restraint is
removed, store it in a secure place. Be
sure to install the head restraint when the
child restraint is removed. If the seating
position does not have an adjustable
head restraint and it is interfering with
the proper child restraint fit, try another
seating position or a different child re-
straint. SSS0252A
Rear outboard seat SSS0278
Rear center seat
1-20 Safety Ð Seats, seat belts and supplemental restraint system
w 06.1.4/V35-D/V5.0
X
Page 39 of 344
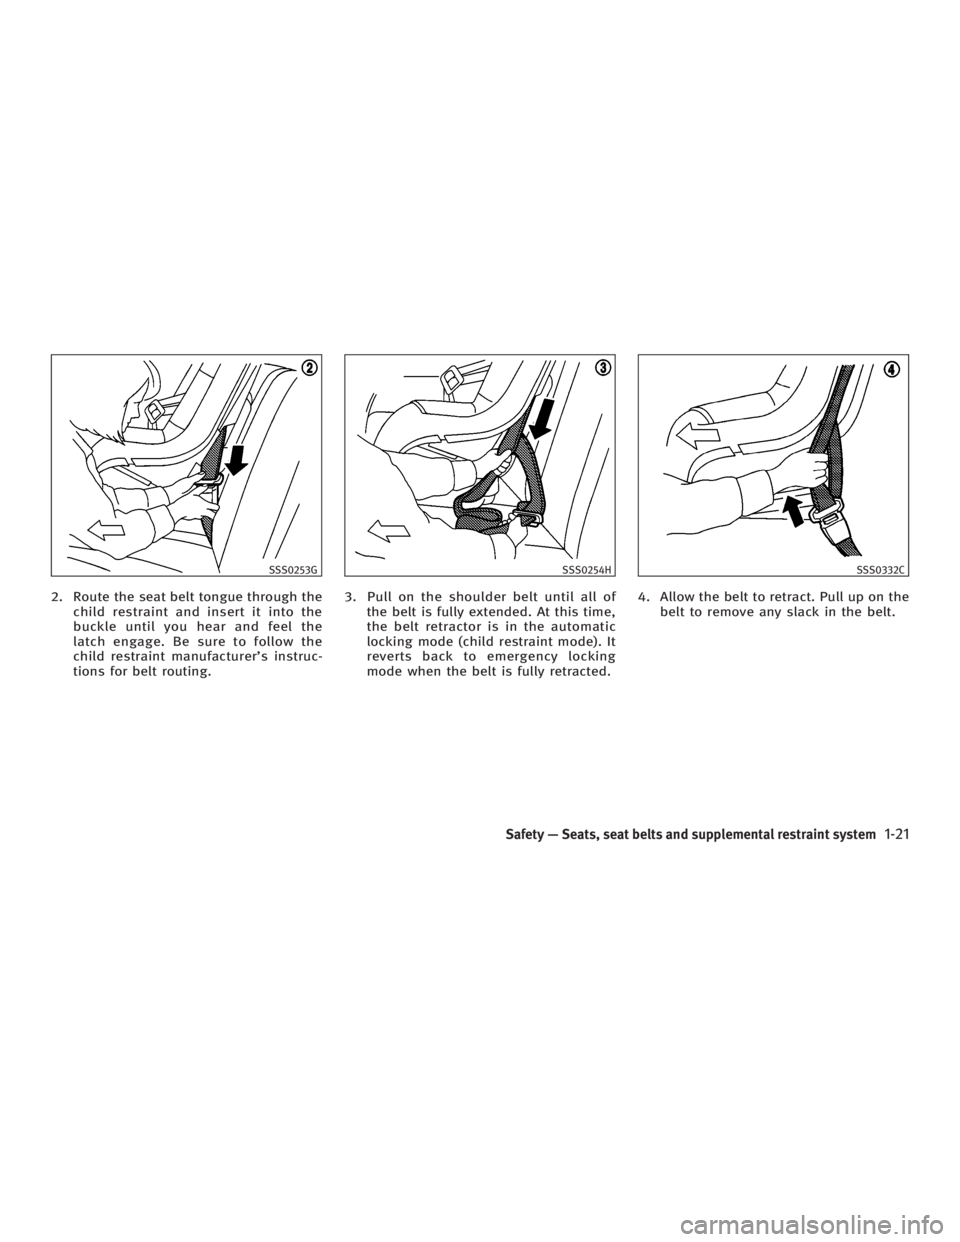
2. Route the seat belt tongue through the
child restraint and insert it into the
buckle until you hear and feel the
latch engage. Be sure to follow the
child restraint manufacturer's instruc-
tions for belt routing. 3. Pull on the shoulder belt until all of
the belt is fully extended. At this time,
the belt retractor is in the automatic
locking mode (child restraint mode). It
reverts back to emergency locking
mode when the belt is fully retracted. 4. Allow the belt to retract. Pull up on the
belt to remove any slack in the belt.SSS0253G SSS0254H SSS0332C
Safety Ð Seats, seat belts and supplemental restraint system
1-21
w 06.1.4/V35-D/V5.0
X
Page 40 of 344
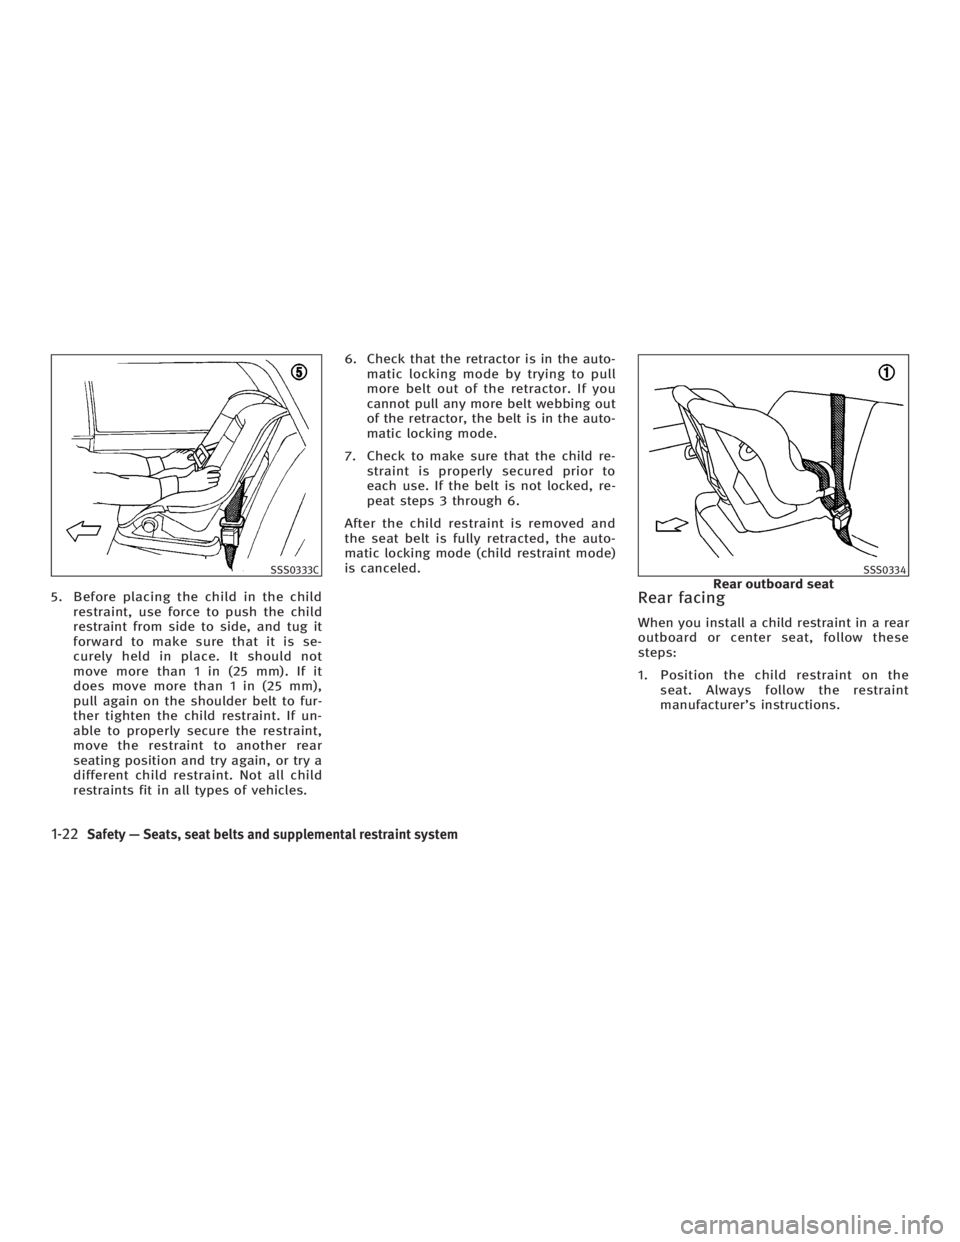
5. Before placing the child in the child
restraint, use force to push the child
restraint from side to side, and tug it
forward to make sure that it is se-
curely held in place. It should not
move more than 1 in (25 mm). If it
does move more than 1 in (25 mm),
pull again on the shoulder belt to fur-
ther tighten the child restraint. If un-
able to properly secure the restraint,
move the restraint to another rear
seating position and try again, or try a
different child restraint. Not all child
restraints fit in all types of vehicles. 6. Check that the retractor is in the auto-
matic locking mode by trying to pull
more belt out of the retractor. If you
cannot pull any more belt webbing out
of the retractor, the belt is in the auto-
matic locking mode.
7. Check to make sure that the child re-
straint is properly secured prior to
each use. If the belt is not locked, re-
peat steps 3 through 6.
After the child restraint is removed and
the seat belt is fully retracted, the auto-
matic locking mode (child restraint mode)
is canceled.
Rear facing When you install a child restraint in a rear
outboard or center seat, follow these
steps:
1. Position the child restraint on the
seat. Always follow the restraint
manufacturer's instructions.SSS0333C SSS0334
Rear outboard seat
1-22 Safety Ð Seats, seat belts and supplemental restraint system
w 06.1.4/V35-D/V5.0
X
Page 41 of 344
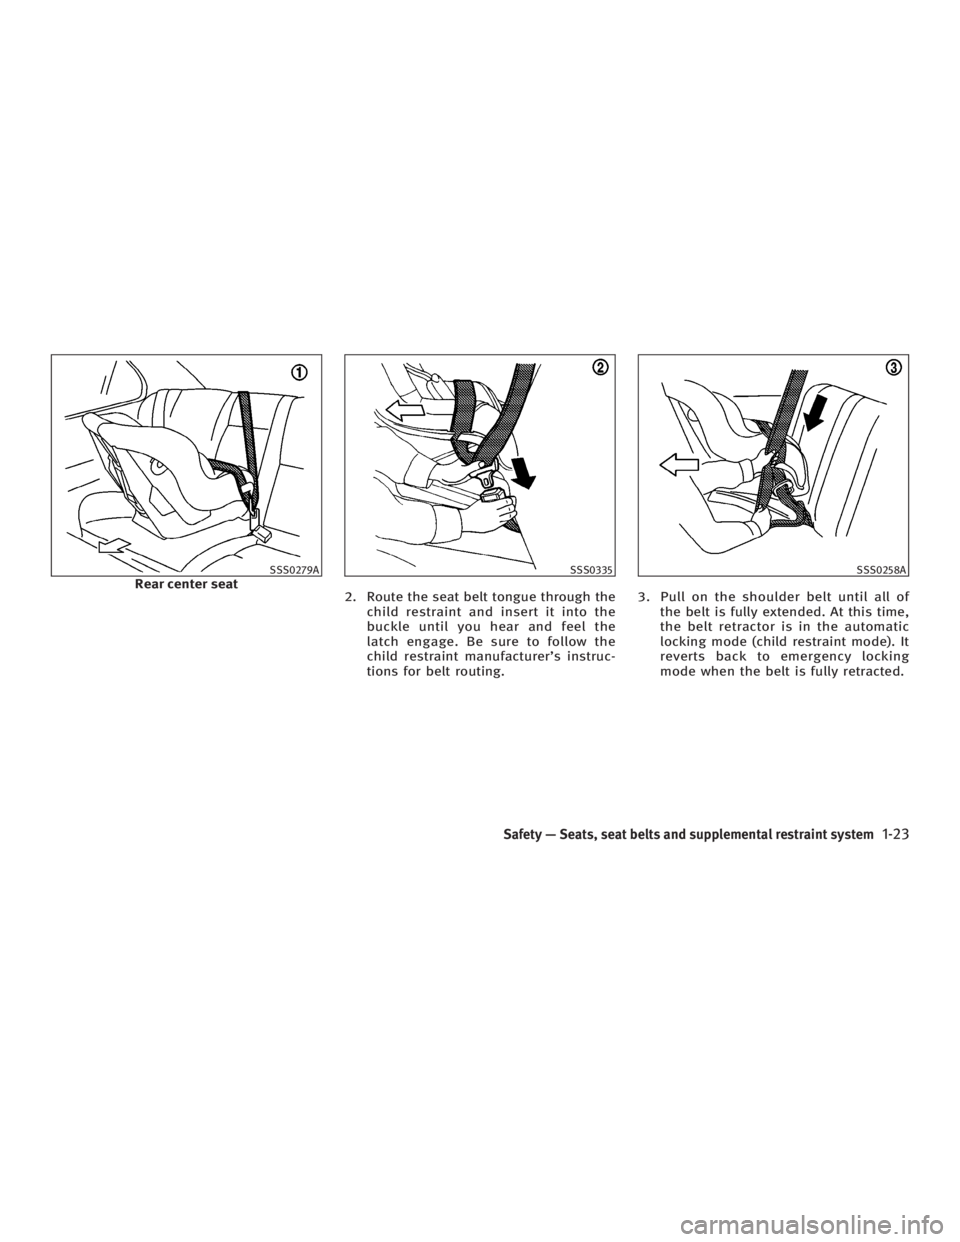
2. Route the seat belt tongue through the
child restraint and insert it into the
buckle until you hear and feel the
latch engage. Be sure to follow the
child restraint manufacturer's instruc-
tions for belt routing. 3. Pull on the shoulder belt until all of
the belt is fully extended. At this time,
the belt retractor is in the automatic
locking mode (child restraint mode). It
reverts back to emergency locking
mode when the belt is fully retracted.SSS0279A
Rear center seat SSS0335 SSS0258A
Safety Ð Seats, seat belts and supplemental restraint system
1-23
w 06.1.4/V35-D/V5.0
X
Page 42 of 344
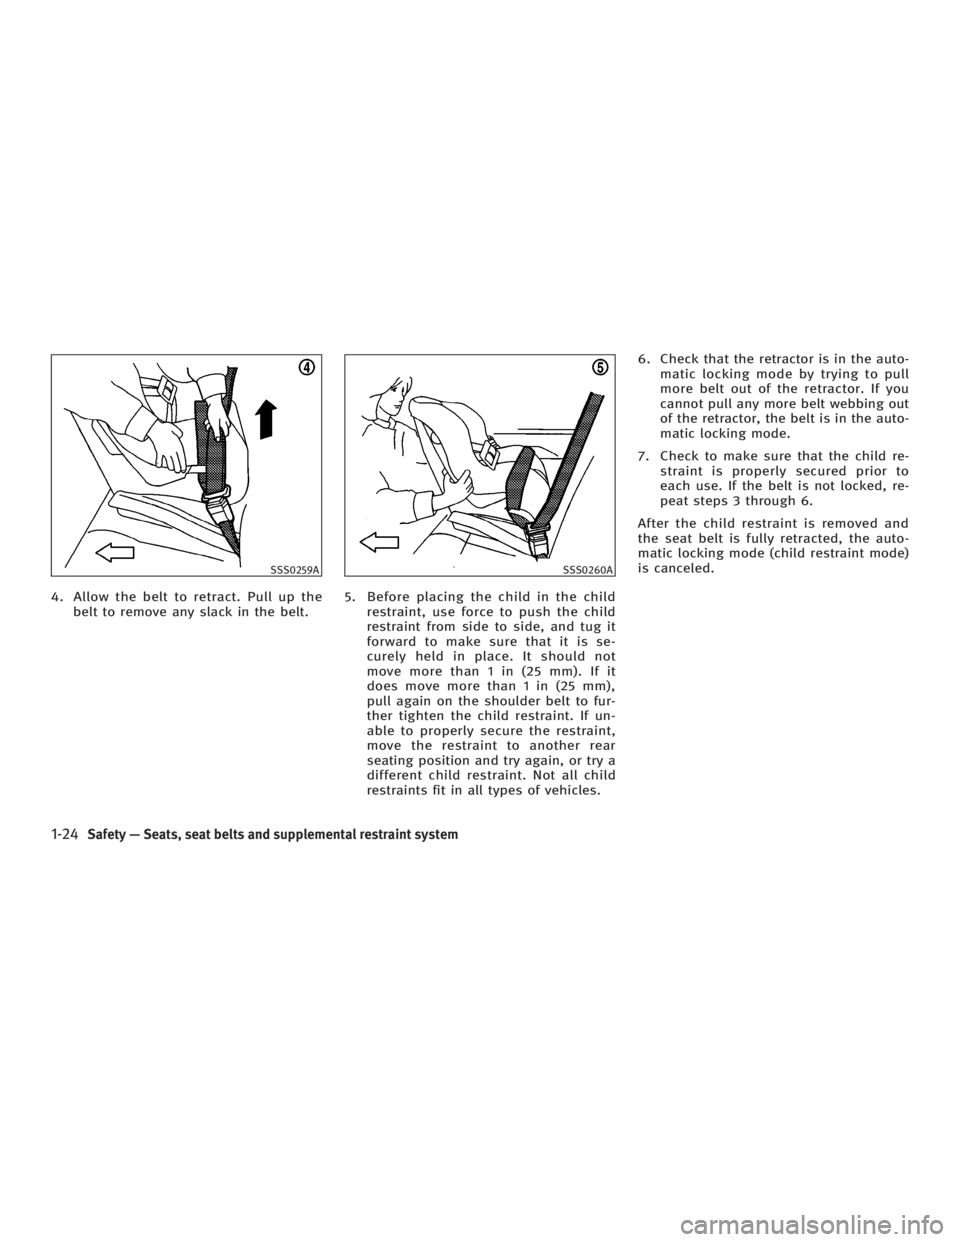
4. Allow the belt to retract. Pull up the
belt to remove any slack in the belt. 5. Before placing the child in the child
restraint, use force to push the child
restraint from side to side, and tug it
forward to make sure that it is se-
curely held in place. It should not
move more than 1 in (25 mm). If it
does move more than 1 in (25 mm),
pull again on the shoulder belt to fur-
ther tighten the child restraint. If un-
able to properly secure the restraint,
move the restraint to another rear
seating position and try again, or try a
different child restraint. Not all child
restraints fit in all types of vehicles. 6. Check that the retractor is in the auto-
matic locking mode by trying to pull
more belt out of the retractor. If you
cannot pull any more belt webbing out
of the retractor, the belt is in the auto-
matic locking mode.
7. Check to make sure that the child re-
straint is properly secured prior to
each use. If the belt is not locked, re-
peat steps 3 through 6.
After the child restraint is removed and
the seat belt is fully retracted, the auto-
matic locking mode (child restraint mode)
is canceled.SSS0259A SSS0260A
1-24 Safety Ð Seats, seat belts and supplemental restraint system
w 06.1.4/V35-D/V5.0
X
Page 43 of 344
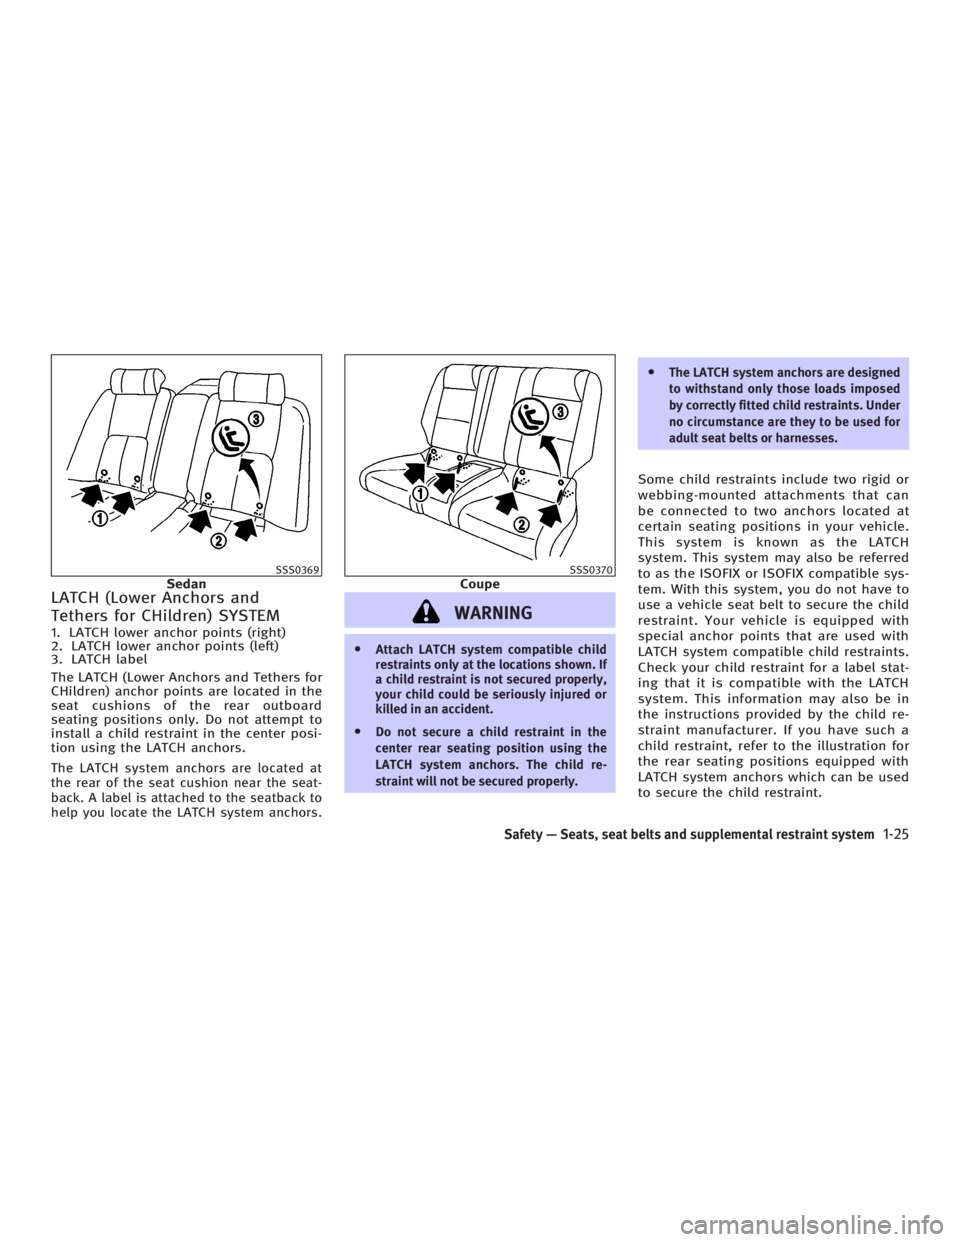
LATCH (Lower Anchors and
Tethers for CHildren) SYSTEM 1. LATCH lower anchor points (right)
2. LATCH lower anchor points (left)
3. LATCH label
The LATCH (Lower Anchors and Tethers for
CHildren) anchor points are located in the
seat cushions of the rear outboard
seating positions only. Do not attempt to
install a child restraint in the center posi-
tion using the LATCH anchors.
The LATCH system anchors are located at
the rear of the seat cushion near the seat-
back. A label is attached to the seatback to
help you locate the LATCH system anchors. WARNING O Attach LATCH system compatible child
restraints only at the locations shown. If
a child restraint is not secured properly,
your child could be seriously injured or
killed in an accident.
O Do not secure a child restraint in the
center rear seating position using the
LATCH system anchors. The child re-
straint will not be secured properly. O The LATCH system anchors are designed
to withstand only those loads imposed
by correctly fitted child restraints. Under
no circumstance are they to be used for
adult seat belts or harnesses.
Some child restraints include two rigid or
webbing-mounted attachments that can
be connected to two anchors located at
certain seating positions in your vehicle.
This system is known as the LATCH
system. This system may also be referred
to as the ISOFIX or ISOFIX compatible sys-
tem. With this system, you do not have to
use a vehicle seat belt to secure the child
restraint. Your vehicle is equipped with
special anchor points that are used with
LATCH system compatible child restraints.
Check your child restraint for a label stat-
ing that it is compatible with the LATCH
system. This information may also be in
the instructions provided by the child re-
straint manufacturer. If you have such a
child restraint, refer to the illustration for
the rear seating positions equipped with
LATCH system anchors which can be used
to secure the child restraint.SSS0369
Sedan SSS0370
Coupe
Safety Ð Seats, seat belts and supplemental restraint system
1-25
w 06.1.4/V35-D/V5.0
X
Page 44 of 344
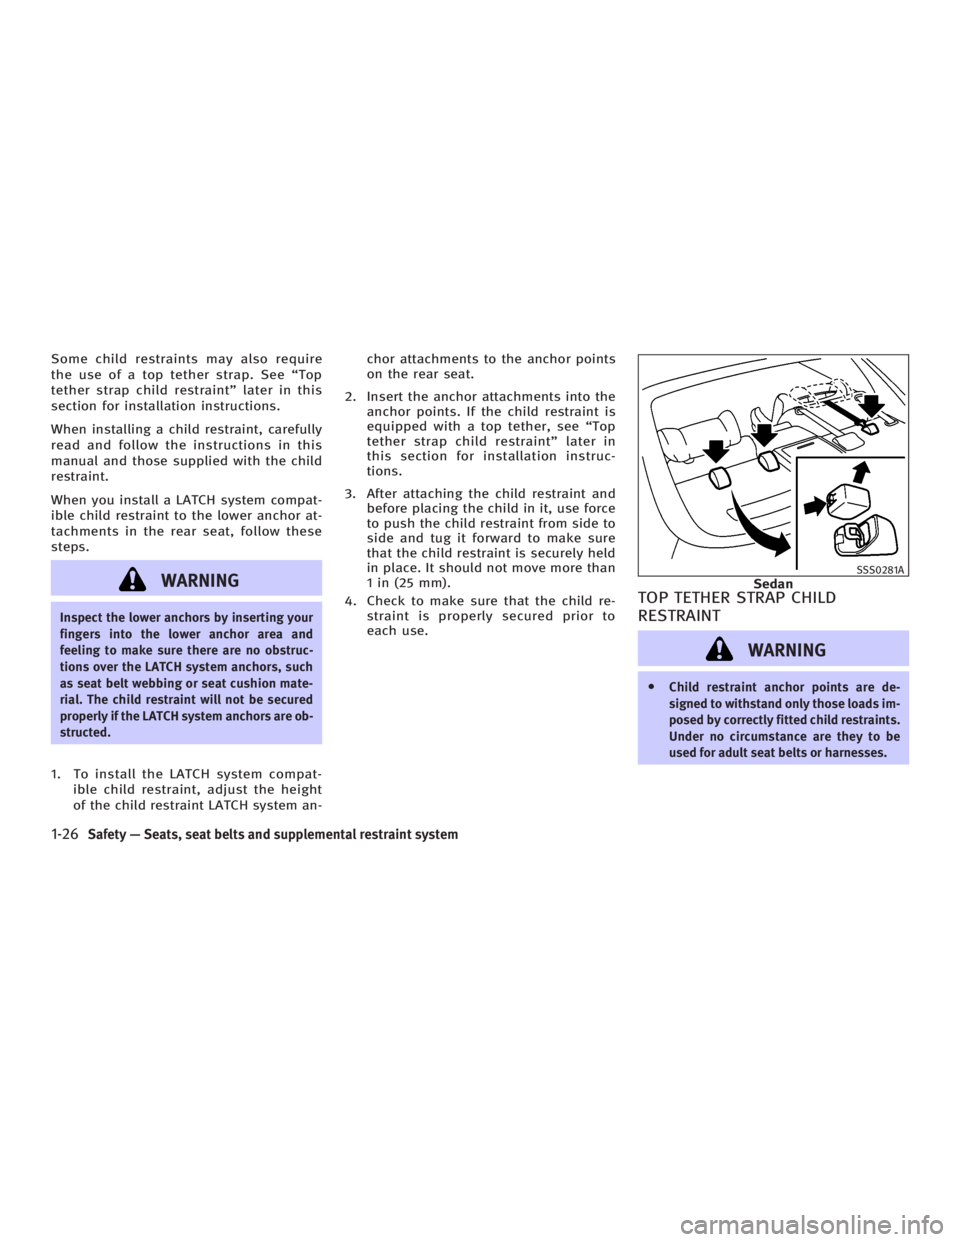
Some child restraints may also require
the use of a top tether strap. See ªTop
tether strap child restraintº later in this
section for installation instructions.
When installing a child restraint, carefully
read and follow the instructions in this
manual and those supplied with the child
restraint.
When you install a LATCH system compat-
ible child restraint to the lower anchor at-
tachments in the rear seat, follow these
steps.
WARNINGInspect the lower anchors by inserting your
fingers into the lower anchor area and
feeling to make sure there are no obstruc-
tions over the LATCH system anchors, such
as seat belt webbing or seat cushion mate-
rial. The child restraint will not be secured
properly if the LATCH system anchors are ob-
structed.
1. To install the LATCH system compat-
ible child restraint, adjust the height
of the child restraint LATCH system an- chor attachments to the anchor points
on the rear seat.
2. Insert the anchor attachments into the
anchor points. If the child restraint is
equipped with a top tether, see ªTop
tether strap child restraintº later in
this section for installation instruc-
tions.
3. After attaching the child restraint and
before placing the child in it, use force
to push the child restraint from side to
side and tug it forward to make sure
that the child restraint is securely held
in place. It should not move more than
1 in (25 mm).
4. Check to make sure that the child re-
straint is properly secured prior to
each use.
TOP TETHER STRAP CHILD
RESTRAINT
WARNING O Child restraint anchor points are de-
signed to withstand only those loads im-
posed by correctly fitted child restraints.
Under no circumstance are they to be
used for adult seat belts or harnesses. SSS0281A
Sedan
1-26 Safety Ð Seats, seat belts and supplemental restraint system
w 06.1.4/V35-D/V5.0
X