2006 INFINITI G35 turn signal
[x] Cancel search: turn signalPage 182 of 344

It may take some time to receive the acti-
vation signal after subscribing to the XM
or SIRIUS TM
satellite radio provider. After
receiving the activation signal, an avail-
able channel list will be automatically up-
dated in the radio. For XM , turn the igni-
tion switch from the LOCK to ACC position
to update the channel list.
Satellite radio is not available in Alaska
and Hawaii.
FM-AM-SATELLITE RADIO WITH
COMPACT DISC (CD) CHANGER
Audio main operation Head unit:
The radio has an FM diversity reception
system, which employs two antennas
printed on the rear window. This system
automatically switches to the antenna
which is receiving less interference.
The auto loudness circuit enhances the
low frequency range automatically in both
radio reception and CD playback.
POWER on/off:
Turn the ignition switch to the ACC or ON
position, and then push the POWER
on/off button while the system is off to call up the mode (radio, tape or CD) which
was playing immediately before the
system was turned off. When no CD or
tape is loaded, the radio will come on.
While the system is on, pushing the
POWER on/off button turns the system
off.
Volume control:
Turn the volume control knob to adjust
the volume.
This vehicle has Speed Sensitive control
Volume (SSV) for audio . The audio volume
changes as the driving speed changes.
AUDIO button (BASS, TREBLE, FADER,
BALANCE, SSV (Type A only)):
Push the AUDIO button to change the se-
lecting mode as follows.
BASS ! TREBLE ! FADER ! BALANCE !
SSV (Type A only) ! (Normal) ! BASS
To adjust Bass, Treble, Fader and Bal-
ance, push the AUDIO button until the de-
sired mode BASS, TREBLE, FADER or BAL-
ANCE appears in the display. Push the
TUNE
( or ) button to adjust Bass and
Treble to the desired level. Use the
or button also to adjust Fader or Balance modes. Fader adjusts the
sound level between the front and rear
speakers and Balance adjusts the sound
between the right and left speakers.
To change the SSV mode to OFF, LOW,
MID or HIGH, push the or (TUNE)
button (Type A) or push the SSV button
(Type B).
After 10 seconds, the radio, or CD display
reappears. Once the sound quality is set
to the desired level, push the AUDIO but-
ton repeatedly until the radio, or CD dis-
play appears.
DISPLAY CHANGE:
This button will work during FM radio, sat-
ellite radio (if so equipped) and CD opera-
tion. Find the detailed function in the de-
scription of each item.
FM-AM-SAT radio operation RADIO (FM/AM/SAT) band select:
Pushing the band select button will
change the band as follows:
(Without satellite radio)
AM ! FM1 ! FM2 ! AM
4-22 Display screen, heater, air conditioner and audio systems
w 06.1.4/V35-D/V5.0
X
Page 183 of 344

(With satellite radio)
AM ! FM1 ! FM2 ! SAT1 ! SAT2 ! AM
No satellite radio reception is available
unless optional satellite receiver and an-
tenna are installed and an XM or SIRI-
US TM
satellite radio service subscription
is active.
Satellite radio is not available in Alaska
and Hawaii.
When the RADIO band select button is
pushed while the ignition switch is in the
ACC or ON position, the radio will come
on at the station last played.
The last station/channel played will also
come on when the ON z OFF/VOL control
knob is pushed to ON.
If another audio source is playing when
the RADIO button is turned to ON, the
other audio source will automatically be
turned off and the last radio station
played will come on.
The FM stereo indicator ST will glow
during FM stereo reception. When the ste-
reo broadcast signal is weak, the radio
will automatically change from stereo to
monaural reception. TUNE (Tuning):
WARNING The radio should not be tuned while driving
so full attention may be given to vehicle op-
eration.
Push these buttons for manual tuning. To
move quickly through the channels, push
and hold either of the TUNE buttons down
for more than 0.5 second.
SEEK tuning:
For AM and FM radio:
Push the SEEK button or ,to
tune from high to low or low to high fre-
quencies and stops at the next broadcast-
ing station.
For satellite radio:
Push the SEEK button or to
seek channels of the next or previous cat-
egory. SCAN tuning:
Push the SCAN tuning button to tune from
low to high frequencies and stops at each
broadcasting station for 5 seconds. Push-
ing the button again during this 5 sec-
onds period will stop SCAN tuning and
the radio will remain tuned to that sta-
tion.
If the SCAN tuning button is not pushed
within 5 seconds, SCAN tuning moves to
the next station.
DISPLAY:
O By pushing the DISP button for more
than 1.5 seconds while receiving FM
radio waves, ªPS NAMEº switches be-
tween ON and OFF (Type A only).
O Pushing the DISP button will display
additional information about the satel-
lite radio broadcast (for example:
Artist name, Title).
Keep pushing the DISP button, and it
will change the information of the sat-
ellite radio broadcast to be displayed
as follows:
CH Number ! CH Name ! Artist
Name ! Song Title ! CH Number
Display screen, heater, air conditioner and audio systems
4-23
w 06.1.4/V35-D/V5.0
X
Page 208 of 344

Your vehicle has also been equipped with a
TPMS malfunction indicator to indicate
when the system is not operating properly.
The TPMS malfunction indicator is com-
bined with the low tire pressure telltale.
When the system detects a malfunction, the
telltale will flash for approximately one
minute and then remain continuously illu-
minated. This sequence will continue upon
subsequent vehicle start-ups as long as the
malfunction exists. When the malfunction
indicator is illuminated, the system may not
be able to detect or signal low tire pressure
as intended. TPMS malfunctions may occur
for a variety of reasons, including the in-
stallation of replacement or alternate tires
or wheels on the vehicle that prevent the
TPMS from functioning properly. Always
check the TPMS malfunction telltale after
replacing one or more tires or wheels on
your vehicle to ensure that the replacement
or alternate tires and wheels allow the
TPMS to continue to function properly.
Additional information
O The TPMS does not monitor the tire
pressure of the spare tire.
O The TPMS will activate only when the ve-
hicle is driven at speeds above 16 MPH
(25 km/h). Also, this system may not de- tect a sudden drop in tire pressure (for
example a flat tire while driving).
O Tire pressure rises and falls de-
pending on the heat caused by the ve-
hicle's operation and the outside tem-
perature. Low outside temperature can
lower the temperature of the air inside
the tire which can cause a lower tire
inflation pressure. This may cause the
low tire pressure warning light to illu-
minate. If the warning light illuminates
in low ambient temperature, check the
tire pressure for all four tires.
For additional information, see ªLow tire
pressure warning lightº in the ª2. Instru-
ments and controlsº section and ªTire
pressure monitoring system (TPMS)º in
the ª6. In case of emergencyº section.
WARNING O If the low tire pressure warning light illumi-
nates while driving, avoid sudden steering
maneuvers or abrupt braking, reduce ve-
hicle speed, pull off the road to a safe loca-
tion and stop the vehicle as soon as pos-
sible. Serious vehicle damage could occur and may lead to an accident and could re-
sult in serious personal injury. Check the
tire pressure for all four tires. Adjust the
tire pressure to the recommended COLD
tire pressure shown on the Tire and
Loading Information label to turn the low
tire pressure warning light OFF. If you have
a flat tire, replace it with a spare tire as
soon as possible. (See ªFlat tireº in the ª6.
In case of emergencyº section for changing
a flat tire.)
O When a spare tire is mounted or a wheel
is replaced, tire pressure will not be indi-
cated, the TPMS will not function and the
low tire pressure warning light will flash.
Contact your INFINITI dealer as soon as
possible for tire replacement and/or sys-
tem resetting.
O Replacing tires with those not originally
specified by INFINITI could affect the
proper operation of the TPMS.
O Do not inject any tire liquid or aerosol
tire sealant into the tires, as this may
cause a malfunction of the tire pressure
sensors.
5-4 Starting and driving
w 06.1.5/V35-D/V5.0
X
Page 239 of 344
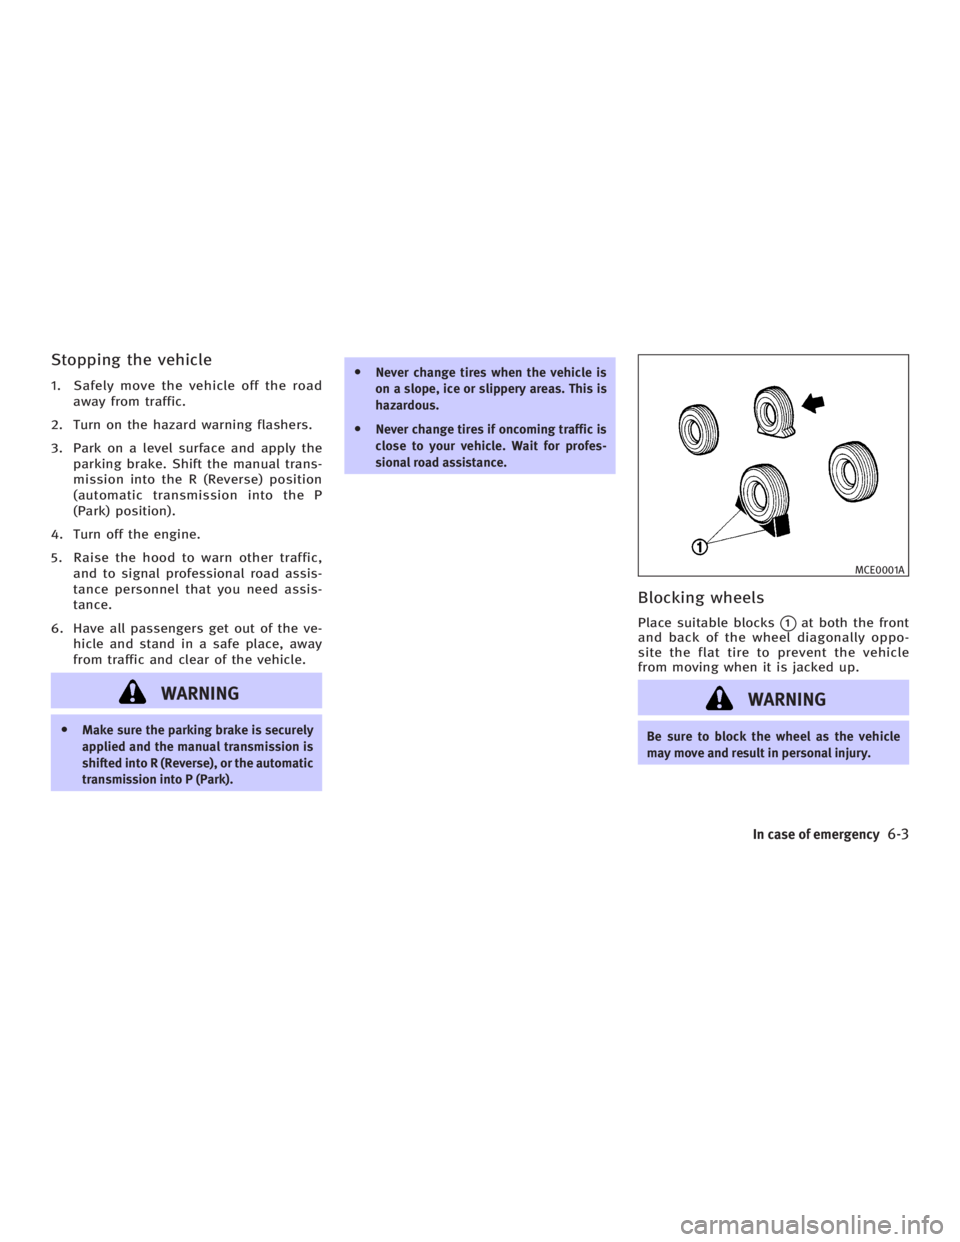
Stopping the vehicle 1. Safely move the vehicle off the road
away from traffic.
2. Turn on the hazard warning flashers.
3. Park on a level surface and apply the
parking brake. Shift the manual trans-
mission into the R (Reverse) position
(automatic transmission into the P
(Park) position).
4. Turn off the engine.
5. Raise the hood to warn other traffic,
and to signal professional road assis-
tance personnel that you need assis-
tance.
6. Have all passengers get out of the ve-
hicle and stand in a safe place, away
from traffic and clear of the vehicle.
WARNINGO Make sure the parking brake is securely
applied and the manual transmission is
shifted into R (Reverse), or the automatic
transmission into P (Park). O Never change tires when the vehicle is
on a slope, ice or slippery areas. This is
hazardous.
O Never change tires if oncoming traffic is
close to your vehicle. Wait for profes-
sional road assistance.
Blocking wheels Place suitable blocks
q 1
at both the front
and back of the wheel diagonally oppo-
site the flat tire to prevent the vehicle
from moving when it is jacked up.
WARNING Be sure to block the wheel as the vehicle
may move and result in personal injury. MCE0001A
In case of emergency
6-3
w 06.1.4/V35-D/V5.0
X
Page 261 of 344

EXPLANATION OF GENERAL
MAINTENANCE ITEMS Additional information on the following
items with ª*º is found later in this sec-
tion.
Outside the vehicle The maintenance items listed here should
be performed from time to time, unless
otherwise specified.
Doors and engine hood: Check that all
doors and the engine hood operate prop-
erly. Also ensure that all latches lock se-
curely. Lubricate hinges and latches if
necessary. Make sure that the secondary
latch keeps the hood from opening when
the primary latch is released.
When driving in areas using road salt or
other corrosive materials, check lubrica-
tion frequently.
Lights*: Clean the headlights on a regular
basis. Make sure that the headlights,
stop lights, tail lights, turn signal lights,
and other lights are all operating properly
and installed securely. Also check head-
light aim.
Road wheel nuts (lug nuts): When
checking the tires, make sure no wheel nuts are missing, and check for any loose
wheel nuts. Tighten if necessary.
Tires*: Check the pressure with a gauge
often and always prior to long distance
trips. If necessary, adjust the pressure in
all tires, including the spare, to the speci-
fied pressure. Check carefully for damage,
cuts or excessive wear.
Tire rotation*:
Sedan: The tires should be rotated every
7,500 miles (12,000 km) to minimize tire
wear variation.
Coupe: The tires cannot be rotated.
Tire, wheel alignment and balance: If the
vehicle should pull to either side while
driving on a straight and level road, or if
you detect uneven or abnormal tire wear,
there may be a need for wheel alignment.
If the steering wheel or seat vibrates at
normal highway speeds, wheel balancing
may be needed.
O For additional information regarding
tires, refer to ªImportant Tire Safety
Informationº (US) or ªTire Safety Infor-
mationº (Canada) in the Warranty In-
formation Booklet. Windshield: Clean the windshield on a
regular basis. Check the windshield at
least every six months for cracks or other
damage. Have a damaged windshield re-
paired by a qualified repair facility.
Windshield wiper blades*: Check for
cracks or wear if they do not wipe prop-
erly.
Maintenance and do-it-yourself
8-3
w 06.1.4/V35-D/V5.0
X
Page 289 of 344
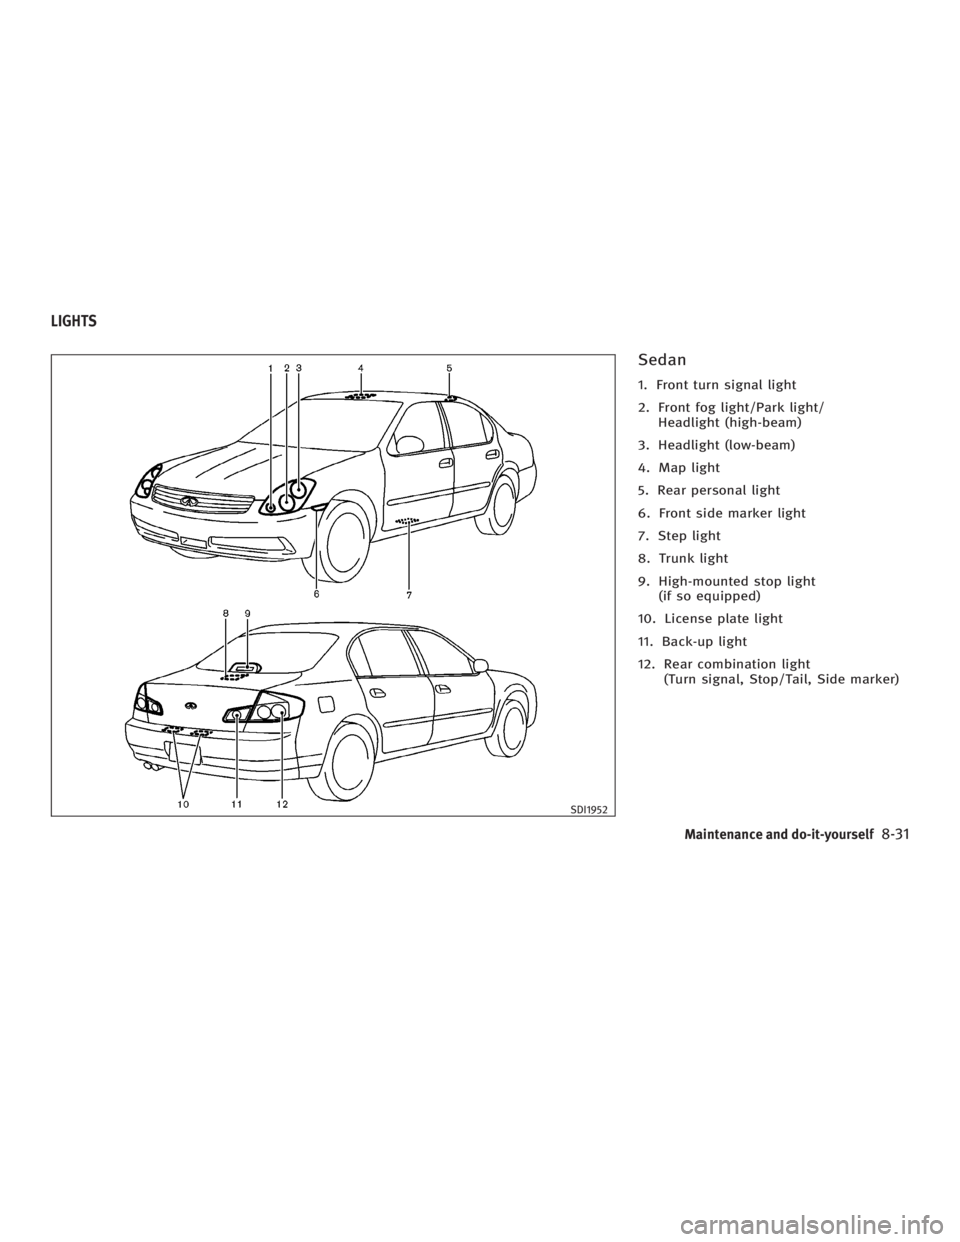
Sedan 1. Front turn signal light
2. Front fog light/Park light/
Headlight (high-beam)
3. Headlight (low-beam)
4. Map light
5. Rear personal light
6. Front side marker light
7. Step light
8. Trunk light
9. High-mounted stop light
(if so equipped)
10. License plate light
11. Back-up light
12. Rear combination light
(Turn signal, Stop/Tail, Side marker)
SDI1952LIGHTS
Maintenance and do-it-yourself
8-31
w 06.1.4/V35-D/V5.0
X
Page 290 of 344
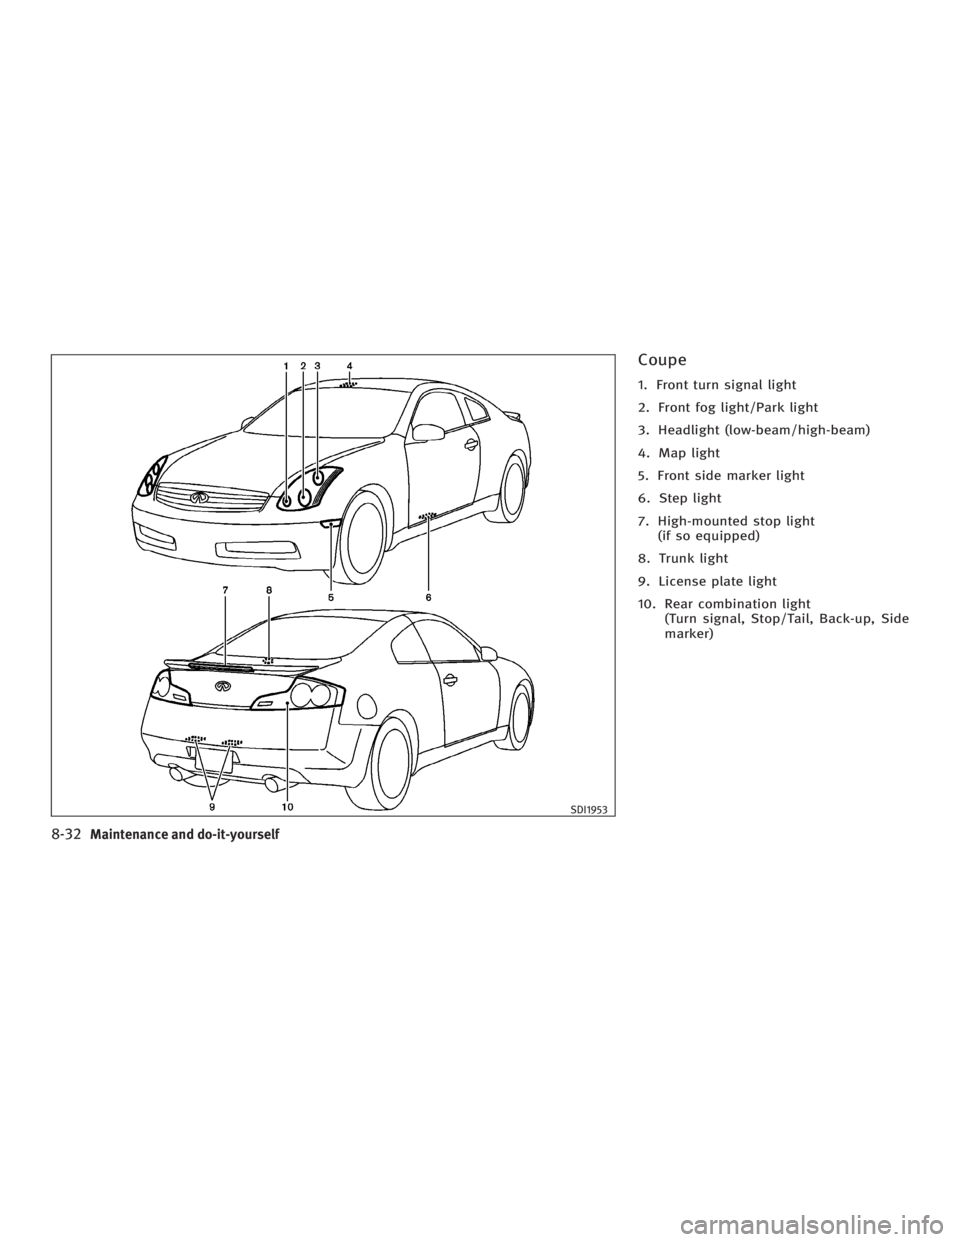
Coupe 1. Front turn signal light
2. Front fog light/Park light
3. Headlight (low-beam/high-beam)
4. Map light
5. Front side marker light
6. Step light
7. High-mounted stop light
(if so equipped)
8. Trunk light
9. License plate light
10. Rear combination light
(Turn signal, Stop/Tail, Back-up, Side
marker)
SDI1953
8-32 Maintenance and do-it-yourself
w 06.1.4/V35-D/V5.0
X
Page 291 of 344

HEADLIGHTS
Replacing the xenon headlight
bulb Xenon headlight bulb:
WARNING HIGH VOLTAGE
When xenon headlights are on, they produce
a high voltage. To prevent an electric shock,
never attempt to modify or disassemble. Al-
ways have your xenon headlights replaced
at an INFINITI dealer. For additional informa-
tion, see ªHeadlight and turn signal switchº
in the ª2. Instruments and controlsº section.
If replacement is required, see an INFINITI
dealer. EXTERIOR AND INTERIOR LIGHTS Item Wattage (W) Bulb No.
Front turn signal light* 21 T20
Front park light* 5 T10
Front side marker light 3.8 T10
Front fog light Sedan: 60/55
Coupe: 55 Sedan: H4
Coupe: H1
Rear combination light
Turn signal 21 T20
Stop/Tail* (LED) Ð
Side marker light* Sedan: (LED)/Coupe: 3.8 Sedan: Ð/Coupe: T10
Back-up light 18 T16
License plate light 5 T10
High-mounted stop light* (LED) Ð
Map light 8 Ð
Rear personal light (Sedan) 8 Ð
Step light 5 Ð
Trunk light 3.4 158
Vanity mirror light 1.32 Ð
*: See an INFINITI dealer for replacement.
Maintenance and do-it-yourself
8-33
w 06.1.4/V35-D/V5.0
X