Page 184 of 289

2
DRIVING YOUR HYUNDAI
33
!
WARNING:
o Do not load your vehicle any
heavier than the GVWR, either the
maximum front or rear GAWR and
vehicle capacity weight. If you do,
parts, including tires on your ve-
hicle can break, and it can change
the way your vehicle handles and
braking ability. This could cause
you to lose control and crash.
Also, overloading can shorten the
life of your vehicle.
!
NOTE:
o Overloading your vehicle may
cause damage. Repairs would not
be covered by your warranty. Do
not overload your vehicle.
o Using heavier suspension com-
ponents to get added durability
might not change your weight rat-
ings. Ask your dealer to help you
load your vehicle the right way.
The label will help you decide how much
cargo and installed equipment your
vehicle can carry.
If you carry items inside your vehicle –
like suitcases, tools, packages, or any-
thing else – they more as fast as the
vehicle goes. If you have to stop or turn
quickly, or if there is a crash, the items
will keep going and can cause an injury
if they strikes the driver or a passenger. WARNING:
o Overloading your vehicle can
cause heat buildup in your
vehicle's tires and possible tire
failure that could lead to a crash.
o Overloading your vehicle can
cause increased stopping dis-
tances that could lead to a crash.
o A crash resulting from poor han-
dling vehicle damage, tire failure,
or increased stopping distances
could result in serious injury or
death.
Page 202 of 289

3
WHAT TO DO IN AN EMERGENCY
17
1) If the vehicle is being towed with the rear
wheels on the ground, be sure the parking
brake is released.
NOTE:Before towing, check the level of the auto-
matic transaxle fluid. If it is below the "HOT"
range on the dipstick, add fluid. If you
cannot add fluid, a towing dolly must be
used.
2) If any of the loaded wheels or suspension
components are damaged or the vehicle is
being towed with the front wheels on the
ground, use a towing dolly under the front
wheels.
o Manual Transaxle:
If you do not use a towing dolly, place the
ignition key in the "ACC" position and put the
transaxle in "N (Neutral)".
CAUTION:
Do not tow with the key removed or in the
"LOCK" position when towing from the
rear without a towing dolly.
o Automatic Transaxle:
Be sure to use a towing dolly under the front
wheels.
!
!
D080A01JM
CAUTION:
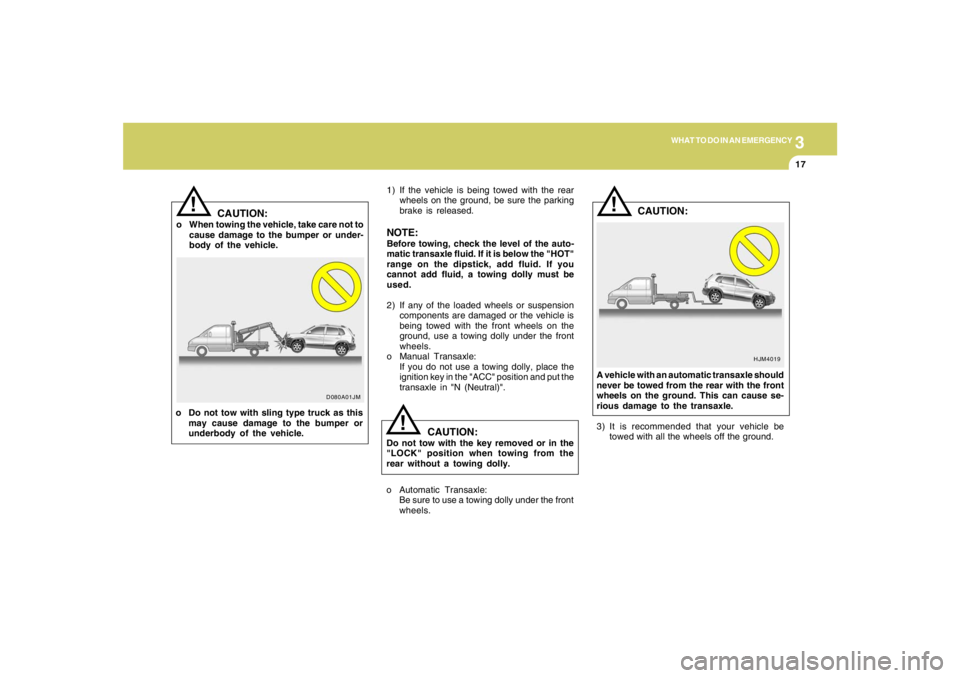
o When towing the vehicle, take care not to
cause damage to the bumper or under-
body of the vehicle.
o Do not tow with sling type truck as this
may cause damage to the bumper or
underbody of the vehicle.
!
HJM4019
CAUTION:
A vehicle with an automatic transaxle should
never be towed from the rear with the front
wheels on the ground. This can cause se-
rious damage to the transaxle.
3) It is recommended that your vehicle be
towed with all the wheels off the ground.
Page 215 of 289

5
VEHICLE MAINTENANCE REQUIREMENTS
5
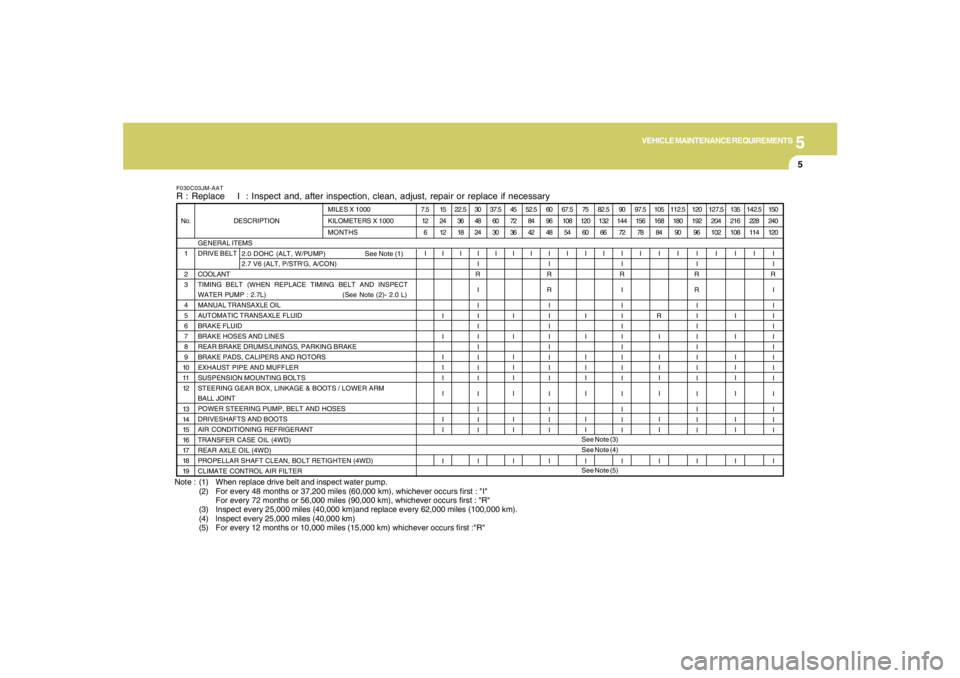
Note : (1) When replace drive belt and inspect water pump.
(2) For every 48 months or 37,200 miles (60,000 km), whichever occurs first : "I"
For every 72 months or 56,000 miles (90,000 km), whichever occurs first : "R"
(3) Inspect every 25,000 miles (40,000 km)and replace every 62,000 miles (100,000 km).
(4) lnspect every 25,000 miles (40,000 km)
(5) For every 12 months or 10,000 miles (15,000 km) whichever occurs first :"R"F030C03JM-AATR : Replace I : Inspect and, after inspection, clean, adjust, repair or replace if necessary
GENERAL ITEMS
DRIVE BELT
COOLANT
TIMING BELT (WHEN REPLACE TIMING BELT AND INSPECT
WATER PUMP : 2.7L) (See Note (2)- 2.0 L)
MANUAL TRANSAXLE OIL
AUTOMATIC TRANSAXLE FLUID
BRAKE FLUID
BRAKE HOSES AND LINES
REAR BRAKE DRUMS/LININGS, PARKING BRAKE
BRAKE PADS, CALIPERS AND ROTORS
EXHAUST PIPE AND MUFFLER
SUSPENSION MOUNTING BOLTS
STEERING GEAR BOX, LINKAGE & BOOTS / LOWER ARM
BALL JOINT
POWER STEERING PUMP, BELT AND HOSES
DRIVESHAFTS AND BOOTS
AIR CONDITIONING REFRIGERANT
TRANSFER CASE OIL (4WD)
REAR AXLE OIL (4WD)
PROPELLAR SHAFT CLEAN, BOLT RETIGHTEN (4WD)
CLIMATE CONTROL AIR FILTER 1
2
3
4
5
6
7
8
9
10
11
12
13
14
15
16
17
18
19 No. DESCRIPTIONMILES X 1000
KILOMETERS X 1000
MONTHS
2.0 DOHC (ALT, W/PUMP) See Note (1)
2.7 V6 (ALT, P/STR'G, A/CON)7.5
12
6
I15
24
12
I
I
I
I
I
I
I
I
I
I22.5
36
18
I30
48
24
I
I
R
I
I
I
I
I
I
I
I
I
I
I
I
I
I37.5
60
30
I45
72
36
I
I
I
I
I
I
I
I
I
I52.5
84
42
I60
96
48
I
I
R
R
I
I
I
I
I
I
I
I
I
I
I
I
I67.5
108
54
I75
120
60
I
I
I
I
I
I
I
I
I
I82.5
132
66
I90
144
72
I
I
R
I
I
I
I
I
I
I
I
I
I
I
I
I
I97.5
156
78
I105
168
84
I
R
I
I
I
I
I
I
I
I112.5
180
90
I120
192
96
I
I
R
R
I
I
I
I
I
I
I
I
I
I
I
I
I127.5
204
102
I135
216
108
I
I
I
I
I
I
I
I
I
I142.5
228
114
I150
240
120
I
I
R
I
I
I
I
I
I
I
I
I
I
I
I
I
I See Note (3)
See Note (4)
See Note (5)
Page 219 of 289

5
VEHICLE MAINTENANCE REQUIREMENTS
9
F070L01A-AATo Suspension Mounting BoltsCheck the suspension connections for loose-
ness or damage. Retighten to the specified
torque.
F070G02A-AATo Brake FluidCheck brake fluid level in the brake fluid reser-
voir. The level should be between "MIN" and
"MAX" marks on the side of the reservoir. Use
only hydraulic brake fluid conforming to DOT 3
or DOT 4.
F070K01A-AATo Exhaust Pipe and MufflerVisually inspect the exhaust pipes, muffler and
hangers for cracks, deterioration, or damage.
Start the engine and listen carefully for any
exhaust gas leakage. Tighten connections or
replace parts as necessary.
F070J01A-AATo Brake Pads, Calipers and RotorsCheck the pads for excessive wear, discs for
run out and wear, and calipers for fluid leakage.F070H01O-AATo Rear Brake Discs and Linings/
Parking BrakeCheck the rear brake discs and linings for
scoring, burning, leaking fluid, broken parts,
and excessive wear. Inspect the parking brake
system including the parking brake lever and
cables. For detailed service procedures, refer
to the Shop Manual.
F070M01A-AATo Steering Gear Box, Linkage & Boots/
Lower Arm Ball JointWith the vehicle stopped and engine off, check
for excessive free-play in the steering wheel.
Check the linkage for bends or damage. Check
the dust boots and ball joints for deterioration,
cracks, or damage. Replace any damaged
parts.
F070Q01A-AATo Air Conditioning RefrigerantCheck the air conditioning lines and connec-
tions for leakage and damage. Check air con-
ditioning performance according to the relevant
shop manual if necessary.F070P01A-AATo Driveshafts and BootsCheck the drive shafts, boots and clamps for
cracks, deterioration, or damage. Replace any
damaged parts and, if necessary, repack the
grease.F070N01A-AATo Power Steering Pump, Belt and HosesCheck the power steering pump and hoses for
leakage and damage. Replace any damaged or
leaking parts immediately. Inspect the power
steering belt for evidence of cuts, cracks, ex-
cessive wear, oiliness and proper tension.
Replace or adjust it if necessary.