2006 HYUNDAI TUCSON air conditioning
[x] Cancel search: air conditioningPage 123 of 289

1
FEATURES OF YOUR HYUNDAI
111111111111111
B260D02O-AAT1. Playing CDo Insert the CD with the label facing upward.
o Insert the CD to start CD playback, during
radio operation.
o When a disc is in the CD deck, if you press
the play button, the CD player will begin
playing even if the radio is being used.
o The CD player can be used when the ignition
switch is in either the "ON" or "ACC" position.2. TRACK UP/DOWNo The desired track on the disc currently being
played can be selected using the track
number.
o Press once to skip forward to the beginning
of the next track. Press
once to skip back to the beginning of the
track.3. FF/REW ( / )If you want to fast forward or reverse through
the compact disc track, push and hold the FF
( ) or REW ( ) button. When you release
the button, the compact disc player will resume
playing.
4. REPEAT Buttono To repeat the track you are currently listen-
ing to, press the RPT button. To cancel ,
press again.
o If you do not release RPT operation when the
track ends, it will automatically be replayed.
This process will be continued until you push
the button again.5. SCAN Buttono Press the SCAN button to playback the first
10 seconds of each track.
o Press the SCAN button again within 10 sec.
when you have reached the desired track.6. EJECT ButtonWhen the EJECT button is pressed with
a CD loaded, the CD will eject.
NOTE:
o If the CD does not operate properly or if
the ER2 fault code is displayed, use one
of two methods to reset the CD deck
function.
- Remove the audio fuse for 5 minutes.
Then, reinstall the audio fuse.
- Diconnect the negative terminal of the
battery and wait 5 minutes. Then re-
connect the negative battery terminal.o To assure proper operation of the unit,
keep the vehicle interior temperature
within a normal range by using the
vehicle's air conditioning or heating
system.
o When replacing the fuse, replace it with
a fuse having the correct capacity.
o The preset station frequencies are all
erased when the car battery is discon-
nected. Therefore, all data will have to be
set again if this should occur.
o Do not add any oil to the rotating parts.
Keep magnets, screwdrivers and other
metallic objects away from the tape
mechanism and head.
o This equipment is designed to be used
only in a 12 volt DC battery system with
negative ground.
o This unit is made of precision parts. Do
not attempt to disassemble or adjust
any parts.
o When driving your vehicle, be sure to
keep the volume of the unit set low
enough to allow you to hear sounds
coming from the outside.
o Do not expose this equipment (includ-
ing the speakers) to water or excessive
moisture.
Page 129 of 289
1
FEATURES OF YOUR HYUNDAI
117117117117117
H290D01O-GAT1. FF/REWo Fast forward tape winding starts when the
FF ( ) button is pressed during PLAY or
REW mode.
o Tape PLAY starts when the FF ( ) button
is pressed again during FF mode.
o Tape rewinding starts when the REW ( )
button is pressed during PLAY or FF mode.
o Tape PLAY starts when the REW ( ) button
pressed again during REW mode.2. AUTO MUSIC SelectPress the button to find the starting point of each
song in a prerecorded music tape. The quiet
space between songs (must have at least 4
sec. gap) can be accepted by the AUTO MUSIC
Select button.
o Pressing the button will play the beginning
of the next music segment.
o Pressing the button will start replay at
the beginning of the music just listened to.
3. TAPE PROGRAM Buttono This allows you to play the reverse side of the
tape by merely depressing the program
button. An arrow will appear in the display to
show tape direction.
o Push the TAPE button to turn on that function
without pushing power ON
ˆOFF control knob.
4. REPEATo To repeat the track you are currently listen-
ing to, press the RPT button. To cancel,
press again.
o If you do not release RPT operation when the
track ends, it will automatically be replayed.
This process will be continued until you push
the button again.5. Equalizer (EQ)Press the EQ button to select the CLASSIC,
JAZZ, ROCK and DEFEAT MODE for the
desired tone quality. Each press of the button
changes the display as follows;
6. DOLBYIf you get background noise during tape PLAY,
you can reduce this considerably by merely
pressing the DOLBY button. If you want to
cancel the DOLBY feature, press the button
again.7. TAPE EJECTo When the button is pressed with a cassette
loaded, the cassette will eject.
o When the button is pressed during FF/
REW mode, the cassette will eject.NOTE:o To assure proper operation of the unit,
keep the vehicle interior temperature
within a normal range by using the
vehicle's air conditioning or heating
system.
o When replacing the fuse, replace it with
a fuse having the correct capacity.
o The preset station frequencies are all
erased when the car battery is discon-
nected. Therefore, all data will have to be
set again if this should occur.
o Do not add any oil to the rotating parts.
Keep magnets, screwdrivers and other
metallic objects away from the tape
mechanism and head.
CLASSIC → JAZZ → ROCK → DEFEAT
Page 133 of 289

1
FEATURES OF YOUR HYUNDAI
121121121121121
8. SCANo Press the SCAN button to playback the first
10 seconds of each track.
o To playback the first 10 seconds of each
track in the selected folder, press the SCAN
button for 2 seconds or longer. (MP3 CD
only)
o Press the SCAN button again within 10 sec.
When you have reached the desired track.9. BOOKMARK (MARK)When the CD player unit is operating, the de-
sired track on the disc can be bookmarked by
using the MARK button.
o Press the MARK button to bookmark the
desired track for more than 2 seconds.
This will display the "
√ " symbol on the LCD
with beep sound.
To play the bookmarked tracks, press the
MARK button within a second.
o Press the MARK button to erase the
bookmarked tracks for more than 2 sec-
onds.
This will erase the bookmark and "
√" symbol
on the LCD with beep sound.
10. JOY STICK (ENT)o You can skip the track by pushing the JOY
STICK to the left or right.
After selecting the desired track, press the
JOY STICK to playback the track.
If you do not press the JOY STICK within 5
seconds, the previous track will playback
again.
o You can move through the folder by pushing
the JOYSTICK to up and down.
After moving the desired folder, press the
JOYSTICK to playback the selected track.
If you do not press the JOYSTICK within 5
seconds, the previous track will playback
again. (MP3 CD only)NOTE:o To assure proper operation of the unit,
keep the vehicle interior temperature
within a normal range by using the
vehicle's air conditioning or heating
system.
o When replacing the fuse, replace it with
a fuse having the correct capacity.
o The bookmarks are all erased when the
car battery is disconnected or power off.
Therefore, all data will have to be set
again if this should occur.o This equipment is designed to be used
only in a 12 volt DC battery system with
negative ground.
o This unit is made of precision parts. Do
not attempt to disassemble or adjust
any parts.
o When driving your vehicle, be sure to
keep the volume of the unit set low
enough to allow you to hear sounds
coming from the outside.
o Do not expose this equipment (includ-
ing the speakers and tape) to water or
excessive moisture.
Page 146 of 289
1FEATURES OF YOUR HYUNDAI
134
5. RANDOM ButtonWith random, you can listen to the tracks in
random, rather than sequential order, on all of
the discs or on one disc.
To use random, do the following:
o Press and release the RDM button to play
the tracks on all of the discs or on one disc
that are loaded, in random order. RDM will
appear in the display. Press RDM to turn if
off.6. REPEAT Buttono To repeat the track you are currently listen-
ing to, press the RPT button. To cancel,
press again.
o If you do not release RPT operation after all
the tracks are played back, the unit will play
back again from the first track.7. TRACK UP/DOWNo The desired track on the disc currently being
played can be selected using the track
number.
o Press once to skip forward to the begin-
ning of the next track.
o Press once to skip back to the beginning
of the track.
8. FF/REW ButtonWhile the disc is playing, if you hold down the FF
button continuously, the selected track is ad-
vanced. Holding down the REW button continu-
ously moves the selected track back.9. SCAN Buttono Press the SCAN button to playback the first
10 seconds of each track.
o Press the SCAN button again within 10 sec.
when you have reached the desired track.10. EQ ButtonPress the EQ button to select the CLASSIC,
JAZZ, ROCK and DEFEAT MODE for the
desired tone quality. Each press of the button
changes the display as follows;
CLASSIC → JAZZ → ROCK → DEFEAT
NOTE:o To assure proper operation of the unit,
keep the vehicle interior temperature
within a normal range by using the
vehicle's air conditioning or heating sys-
tem.
o When replacing the fuse, replace it with
a fuse having the correct capacity.
o The preset station frequencies are all
erased when the car battery is discon-
nected. Therefore, all data will have to be
set again if this should occur.
o Do not add any oil to the rotating parts.
Keep magnets, screwdrivers and other
metallic objects away from the tape
mechanism and head.
o This equipment is designed to be used
only in a 12 volt DC battery system with
negative ground.
o This unit is made of precision parts. Do
not attempt to disassemble or adjust
any parts.
o When driving your vehicle, be sure to
keep the volume of the unit set low
enough to allow you to hear sounds
coming from the outside.
o Do not expose this equipment (includ-
ing the speakers and tape) to water or
excessive moisture.
Page 173 of 289
2
DRIVING YOUR HYUNDAI
22
o Be sure that the wheels are aligned cor-
rectly. Improper alignment can result from
hitting curbs or driving too fast over irregular
surfaces. Poor alignment causes faster tire
wear and may also result in other problems
as well as greater fuel consumption.
o Keep your car in good condition. For better
fuel economy and reduced maintenance
costs, maintain your car in accordance with
the maintenance schedule in Section 5. If
you drive your car in severe conditions,
more frequent maintenance is required (see
Section 5 for details).
o Keep your car clean. For maximum service,
your Hyundai should be kept clean and free
of corrosive materials. It is especially impor-
tant that mud, dirt, ice, etc. not be allowed to
accumulate on the underside of the car. This
extra weight can result in increased fuel
consumption and also contribute to corro-
sion.
o Travel lightly. Don't carry unnecessary
weight in your car. Weight reduces fuel
economy.
o Don't let the engine idle longer than neces-
sary. If you are waiting (and not in traffic),
turn off your engine and restart only when
you're ready to go.o Remember, your Hyundai does not require
extended warm-up. After the engine has
started, allow the engine to run for 10 to 20
seconds prior to placing the vehicle in gear.
In very cold weather, however, give your
engine a slightly longer warm-up period.
o Don't "lug" or "over-rev" the engine. Lugging
is driving too slowly in too high a gear result-
ing in the engine bucking. If this happens,
shift to a lower gear. Over-revving is racing
the engine beyond its safe limit. This can be
avoided by shifting at the recommended
speeds.
o Use your air conditioning sparingly. The air
conditioning system is operated by engine
power so your fuel economy is reduced
when you use it.
DRIVING FOR ECONOMYC140A02A-AATYou can save fuel and get more miles from your
car if you follow these suggestions:
o Drive smoothly. Accelerate at a moderate
rate. Don't make "jack-rabbit" starts or full-
throttle shifts and maintain a steady cruising
speed. Don't race between stoplights. Try to
adjust your speed to that of the other traffic
so you don't have to change speeds unnec-
essarily. Avoid heavy traffic whenever pos-
sible. Always maintain a safe distance from
other vehicles so you can avoid unneces-
sary braking. This also reduces brake wear.
o Drive at a moderate speed. The faster you
drive, the more fuel your car uses. Driving at
a moderate speed, especially on the high-
way, is one of the most effective ways to
reduce fuel consumption.
o Don't "ride" the brake or clutch pedal. This
can increase fuel consumption and also
increase wear on these components. In
addition, driving with your foot resting on the
brake pedal may cause the brakes to over-
heat, which reduces their effectiveness and
may lead to more serious consequences.
o Take care of your tires. Keep them inflated
to the recommended pressure. Incorrect
inflation, either too much or too little, results
in unnecessary tire wear. Check the tire
pressures at least once a month.
Page 189 of 289
34WHAT TO DO IN AN EMERGENCY
IF THE ENGINE OVERHEATS
!!
!
WARNING:
While the engine is running, keep hair,
hands and clothing away from moving parts
such as the fan and drive belts to prevent
injury.
5. If the water pump drive belt is broken or
engine coolant is leaking out, stop the engine
immediately and call the nearest Hyundai
dealer for assistance.
WARNING:
Do not remove the radiator cap when the
engine is hot. This can allow coolant to be
blown out of the opening and cause seri-
ous burns.6. If you cannot find the cause of the overheat-
ing, wait until the engine temperature has
returned to normal. Then, if coolant has been
lost, carefully add coolant to the reservoir
(page 6-9) to bring the fluid level in the
reservoir up to the halfway mark.
7. Proceed with caution, keeping alert for fur-
ther signs of overheating. If overheating
happens again, call a Hyundai dealer for
assistance.
CAUTION:
Serious loss of coolant indicates there is a
leak in the cooling system and this should
be checked as soon as possible by a Hyundai
dealer.
D030A02A-AATIf your temperature gauge indicates overheat-
ing, you experience a loss of power, or hear loud
pinging or knocking, the engine is probably too
hot. If this happens, you should:
1. Pull off the road and stop as soon as it is safe
to do so.
2. Place the gear selector lever in "P" (auto-
matic), or neutral (manual transaxle) and set
the parking brake. If the air conditioning is on,
turn it off.
3. If engine coolant is running out under the car
or steam is coming out from the hood, stop
the engine. Do not open the hood until the
coolant has stopped running or the steaming
has stopped. If there is no visible loss of
engine coolant and no steam, leave the
engine running and check to be sure the
engine cooling fan is operating. If the fan is
not running, turn the engine off.
4. Check to see if the water pump drive belt is
missing. If it is not missing, check to see that
it is tight. If the drive belt seems to be
satisfactory, check for coolant leaking from
the radiator, hoses or under the car. (If the
air conditioning had been in use, it is normal
for cold water to be draining from it when you
stop).
Page 215 of 289
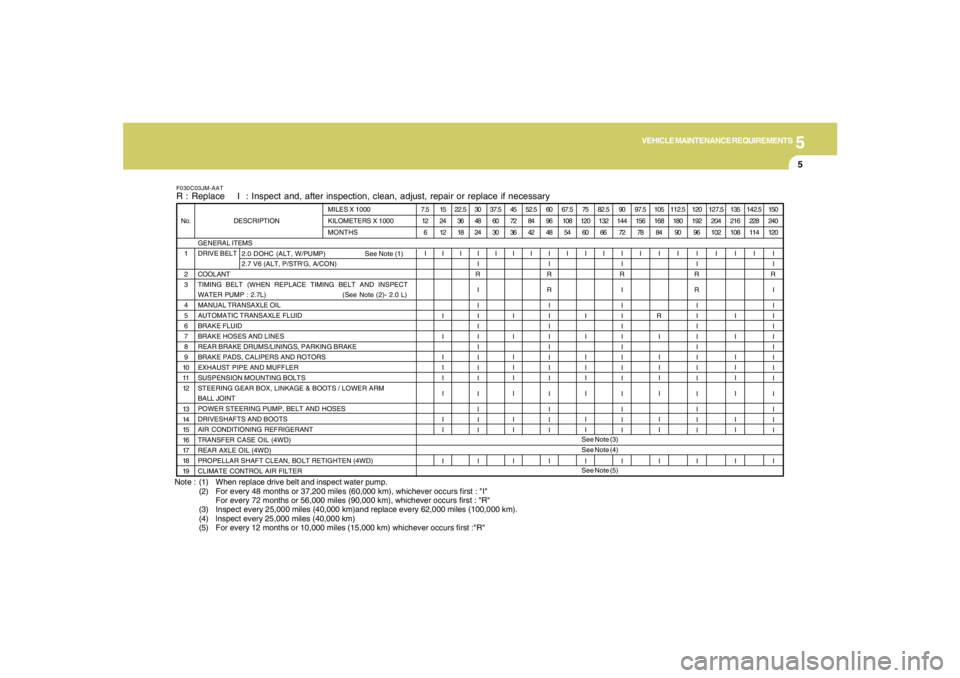
5
VEHICLE MAINTENANCE REQUIREMENTS
5
Note : (1) When replace drive belt and inspect water pump.
(2) For every 48 months or 37,200 miles (60,000 km), whichever occurs first : "I"
For every 72 months or 56,000 miles (90,000 km), whichever occurs first : "R"
(3) Inspect every 25,000 miles (40,000 km)and replace every 62,000 miles (100,000 km).
(4) lnspect every 25,000 miles (40,000 km)
(5) For every 12 months or 10,000 miles (15,000 km) whichever occurs first :"R"F030C03JM-AATR : Replace I : Inspect and, after inspection, clean, adjust, repair or replace if necessary
GENERAL ITEMS
DRIVE BELT
COOLANT
TIMING BELT (WHEN REPLACE TIMING BELT AND INSPECT
WATER PUMP : 2.7L) (See Note (2)- 2.0 L)
MANUAL TRANSAXLE OIL
AUTOMATIC TRANSAXLE FLUID
BRAKE FLUID
BRAKE HOSES AND LINES
REAR BRAKE DRUMS/LININGS, PARKING BRAKE
BRAKE PADS, CALIPERS AND ROTORS
EXHAUST PIPE AND MUFFLER
SUSPENSION MOUNTING BOLTS
STEERING GEAR BOX, LINKAGE & BOOTS / LOWER ARM
BALL JOINT
POWER STEERING PUMP, BELT AND HOSES
DRIVESHAFTS AND BOOTS
AIR CONDITIONING REFRIGERANT
TRANSFER CASE OIL (4WD)
REAR AXLE OIL (4WD)
PROPELLAR SHAFT CLEAN, BOLT RETIGHTEN (4WD)
CLIMATE CONTROL AIR FILTER 1
2
3
4
5
6
7
8
9
10
11
12
13
14
15
16
17
18
19 No. DESCRIPTIONMILES X 1000
KILOMETERS X 1000
MONTHS
2.0 DOHC (ALT, W/PUMP) See Note (1)
2.7 V6 (ALT, P/STR'G, A/CON)7.5
12
6
I15
24
12
I
I
I
I
I
I
I
I
I
I22.5
36
18
I30
48
24
I
I
R
I
I
I
I
I
I
I
I
I
I
I
I
I
I37.5
60
30
I45
72
36
I
I
I
I
I
I
I
I
I
I52.5
84
42
I60
96
48
I
I
R
R
I
I
I
I
I
I
I
I
I
I
I
I
I67.5
108
54
I75
120
60
I
I
I
I
I
I
I
I
I
I82.5
132
66
I90
144
72
I
I
R
I
I
I
I
I
I
I
I
I
I
I
I
I
I97.5
156
78
I105
168
84
I
R
I
I
I
I
I
I
I
I112.5
180
90
I120
192
96
I
I
R
R
I
I
I
I
I
I
I
I
I
I
I
I
I127.5
204
102
I135
216
108
I
I
I
I
I
I
I
I
I
I142.5
228
114
I150
240
120
I
I
R
I
I
I
I
I
I
I
I
I
I
I
I
I
I See Note (3)
See Note (4)
See Note (5)
Page 219 of 289
5
VEHICLE MAINTENANCE REQUIREMENTS
9
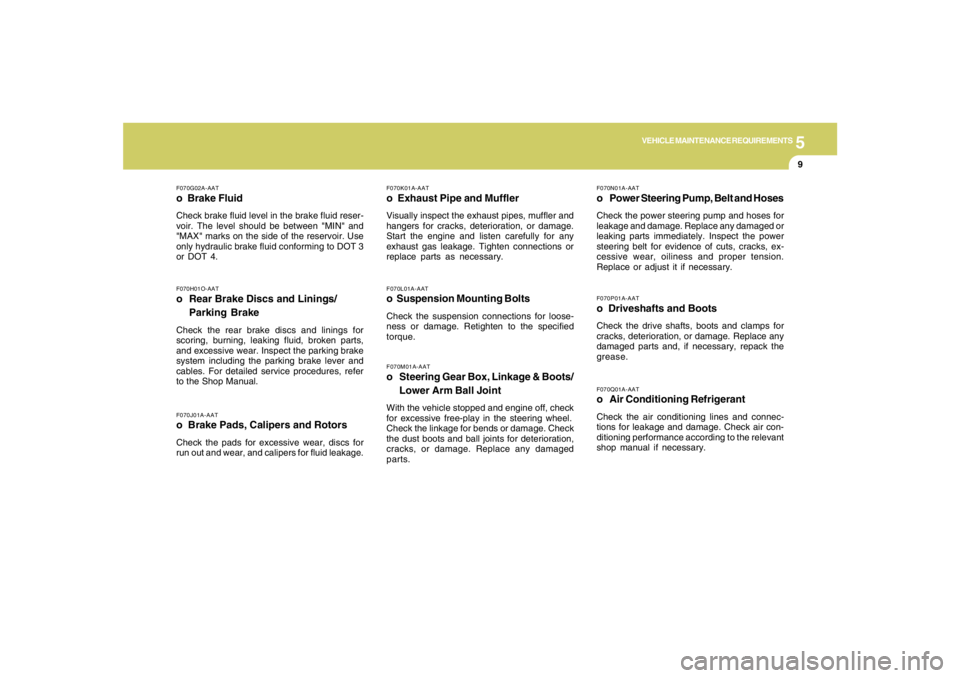
F070L01A-AATo Suspension Mounting BoltsCheck the suspension connections for loose-
ness or damage. Retighten to the specified
torque.
F070G02A-AATo Brake FluidCheck brake fluid level in the brake fluid reser-
voir. The level should be between "MIN" and
"MAX" marks on the side of the reservoir. Use
only hydraulic brake fluid conforming to DOT 3
or DOT 4.
F070K01A-AATo Exhaust Pipe and MufflerVisually inspect the exhaust pipes, muffler and
hangers for cracks, deterioration, or damage.
Start the engine and listen carefully for any
exhaust gas leakage. Tighten connections or
replace parts as necessary.
F070J01A-AATo Brake Pads, Calipers and RotorsCheck the pads for excessive wear, discs for
run out and wear, and calipers for fluid leakage.F070H01O-AATo Rear Brake Discs and Linings/
Parking BrakeCheck the rear brake discs and linings for
scoring, burning, leaking fluid, broken parts,
and excessive wear. Inspect the parking brake
system including the parking brake lever and
cables. For detailed service procedures, refer
to the Shop Manual.
F070M01A-AATo Steering Gear Box, Linkage & Boots/
Lower Arm Ball JointWith the vehicle stopped and engine off, check
for excessive free-play in the steering wheel.
Check the linkage for bends or damage. Check
the dust boots and ball joints for deterioration,
cracks, or damage. Replace any damaged
parts.
F070Q01A-AATo Air Conditioning RefrigerantCheck the air conditioning lines and connec-
tions for leakage and damage. Check air con-
ditioning performance according to the relevant
shop manual if necessary.F070P01A-AATo Driveshafts and BootsCheck the drive shafts, boots and clamps for
cracks, deterioration, or damage. Replace any
damaged parts and, if necessary, repack the
grease.F070N01A-AATo Power Steering Pump, Belt and HosesCheck the power steering pump and hoses for
leakage and damage. Replace any damaged or
leaking parts immediately. Inspect the power
steering belt for evidence of cuts, cracks, ex-
cessive wear, oiliness and proper tension.
Replace or adjust it if necessary.