2006 Hyundai Tiburon tires
[x] Cancel search: tiresPage 170 of 266

3
WHAT TO DO IN AN EMERGENCY
5
SPARE TIRE
!
6. If you cannot find the cause of the overheat-
ing, wait until the engine temperature has
returned to normal. Then, if the engine cool-
ant has been lost, carefully add water to the
reservoir (Page 6-8) to bring the fluid level in
the reservoir up to the halfway mark.
7. Proceed with caution, keeping alert for fur-
ther signs of overheating. If overheating
happens again, call a Hyundai dealer for
assistance.
CAUTION:
Serious loss of engine coolant indicates
there is a leak in the cooling system and this
should be checked as soon as possible by
a Hyundai dealer.
D040A03GK-AATTEMPORARY SPARE TIRE
The following instructions for the tem-
porary spare tire should be observed:
1. Check inflation pressure as soon as
practical after installing the spare
tire, and adjust to the specified pres-
sure. The tire pressure should be
periodically checked and maintained
at the specified pressure while the
tire is stored.Tire Size
Inflation Pressure
T125/70 R16
420 kPa(60 psi)
4. As the temporary spare tire is spe-
cifically designed for your car, it
should not be used on any other
vehicle.
5. The temporary spare tire should not
be used on any other wheels, nor
should standard tires, snow tires,
wheel covers or trim rings be used
with the temporary spare wheel. If
such use is attempted, damage to
these items or other car components
may occur.
6. The temporary spare tire pressure
should be checked once a month
while the tire is stored.
2. The spare tire should only be used
temporarily and should be returned
to the luggage compartment as soon
as the original tire can be repaired or
replaced.
3. Continuous use at speeds of over 50
mph (80 km/h) is not recommended. Spare Tire Pressure
CAUTION:
o Do not use snow chains with your
temporary spare tire.
o Do not use more than one tempo-
rary spare tire at a time.
o Do not tow a trailer while the tem-
porary spare tire is installed.
!
Page 172 of 266

3
WHAT TO DO IN AN EMERGENCY
7
CHANGING A FLAT TIRED060A02A-AATThe procedure described on the follow-
ing pages can be used to rotate tires as
well as to change a flat tire. When
preparing to change a flat tire, check to
be sure the gear selector lever is in "P"
(automatic transaxle) or reverse gear
(manual transaxle) and that the parking
brake is set, then:
D060A01GKD060B02GK-AAT
1. Obtain Spare Tire and Tool
Remove the spare tire and remove the
jack and tool bag from the trunk.
HGK4008
The jack is located behind the right side
of luggage trim. Remove the jack cover
by unscrewing the bolts. Turn the jack
end counterclockwise to lower the jack
height by using a screw driver or wrench
bar and remove it from the bracket.
HGK4009
Page 183 of 266

4
CORROSION PREVENTION AND APPEARANCE CARE4
E030D01A-AATWhen to Wax AgainYou should polish and wax the car again when
water no longer beads on a clean surface but
spreads out over a larger area.E030C01A-AATPolishing and WaxingAlways wash and dry the car before polishing
or waxing or using a combination cleaner and
wax. Use a good quality commercial product
and follow the manufacturer’s directions on the
container. Polish and wax the bright trim pieces
as well as the paint.E030B01A-AATSpot CleaningDon’t use gasoline, strong solvents or corro-
sive cleaning agents. These can damage the
finish of the car. To remove road tar, use
turpentine on a clean, soft cloth or commercially
available bug and tar remover. Be gentle.
To remove dead insects or tree sap, use warm
water and mild soap or car-washing solution.
Soak the spot and rub gently. If the paint has lost
its luster, use a commercial car-cleaning polish. If you find any nicks or scratches in the paint,
use touch-up paint to cover them to prevent
corrosion. To protect the paintwork of the car
against corrosion, you must clean your Hyundai
(at least once a month). Give special attention
to the removal of salt, mud and other sub-
stances on the underside of the splashboards
of the car. Make sure that the outlets and the
underside of the doors are open. Paint damage
can be caused by small accumulation of tar,
industrial precipitation, tree resin, insects and
bird droppings, when not removed immediately.
If water alone is not strong enough to remove the
accumulated dirt, use a mild car washing solu-
tion. Be sure to rinse the surface after washing
to remove the solution. Never allow the solution
to dry on the painted surfaces. To clean whitewall tires, use a stiff brush or
soapy steel-wool scouring pad.
To clean plastic wheel covers, use a clean
sponge or soft cloth and water.
To clean cast aluminum alloy wheels, use a mild
soap or neutral detergent. Do not use abrasive
cleaners. Protect the bare-metal surfaces by
cleaning, polishing and waxing. Because alumi-
num is subject to corrosion, be sure to give
aluminum alloy wheels special attention in win-
ter. If you drive on salted roads, clean the
wheels thoroughly afterwards.
After washing, be sure to rinse thoroughly. If
soapy water dries on the finish, streaking will
result.
When the weather is warm and the humidity low,
you may find it necessary to rinse each section
immediately after washing to avoid streaking.
After rinsing, dry the car using a damp chamois
or soft, absorbent cloth. The reason for drying
the car is to remove water from the car so it will
dry without water spots. Don't rub, this can
damage the finish.
Page 221 of 266

6
DO-IT-YOURSELF MAINTENANCE
27
G290B01GK-AATAdjustment After Headlight Assembly
ReplacementIf the vehicle has had front body repair and the
headlight assembly has been replaced, the
headlight aiming should be checked using an
aiming screen as shown in the illustration. Turn
on the headlight switch.
1. Adjust headlights so that main axis of light is
parallel to center line of the body and is
aligned with point "P" shown in the illustration.
2. Dotted lines in the illustration show the center
of headlights.
G290B01GK
L
W
H
H
Cut-off line
Ground line
"P"
Horizontal line
Vertical line
0.827 in. (21 mm)
!
1. Keep all tires inflated to the correct pressure.
2. Place the vehicle on level ground and press
the front bumper & rear bumper down sev-
eral times. Place vehicle at a distance of 118
in. (3m) from the test wall.
3. See that the vehicle is unloaded (except for
full levels of coolant, engine oil and fuel, and
spare tire, jack, and tools).
4. Clean the head light lenses and turn on the
headlights.
5. Open the hood.
6. Draw the vertical line (through the center of
each headlight beam pattern) and the hori-
zontal line (through the center of each head-
light beam pattern) on the aiming screen.
And then, draw the parallel line at 0.827 in. (21
mm) under the horizontal line.
7. Adjust each cut-off line of the low beam to the
parallel line with a phillips screwdriver -
VERTICAL AIMING.
WARNING:
Never attempt to adjust the horizontal align-
ment of your headlights. Horizontal aiming
must be adjusted by an authorized Hyundai
dealer to avoid incorrect alignment that will
reduce the effectiveness of your headlights.
SPECIFICATION:"H"
Horizontal center line of headlights from ground:
Low Beam: 26.7 in. (679mm)
High Beam: 26.5 in. (672mm)
"W"
Distance between each headlight center :
Low Beam: 47.3 in. (1,202mm)
High Beam: 38.0 in. (966mm)
"L"
Distance between the headlights and the wall
that the lights are tested against : 118 in. (3,000
mm)
Page 239 of 266

Vehicle Identification Number (VIN) .............................. 8-2
Engine Number ............................................................. 8-2
Recommended Inflation Pressures ............................... 8-3
Tire Sidewall Labeling ................................................... 8-5
Tire Terminology and Definitions ................................... 8-7
Snow Tires .................................................................... 8-9
Tire Chains ..................................................................8-10
Tire Rotation................................................................8-10
Tire Balancing.............................................................8-11
Tire Traction................................................................8-11
When to Replace Tires ...............................................8-12
Spare Tire and Tools ...................................................8-13
Warranties for Your Hyundai Vehicle..........................8-13
Consumer Information.................................................8-13
Reporting Safety Defects............................................8-16
Binding Arbitration of Warranty Claims.......................8-16
CONSUMER INFORMATION, REPORTING
SAFETY DEFECTS & BINDING
ARBITRATION OF WARRANTY CLAIMS
8
8
Page 240 of 266

8
CONSUMER INFORMATION, REPORTING SAFETY DEFECTS & BINDING ARBITRATION OF WARRANTY CLAIMS2
ENGINE NUMBER
VEHICLE IDENTIFICATION
NUMBER (VIN)
I010B01A-AAT I010A01A-AAT
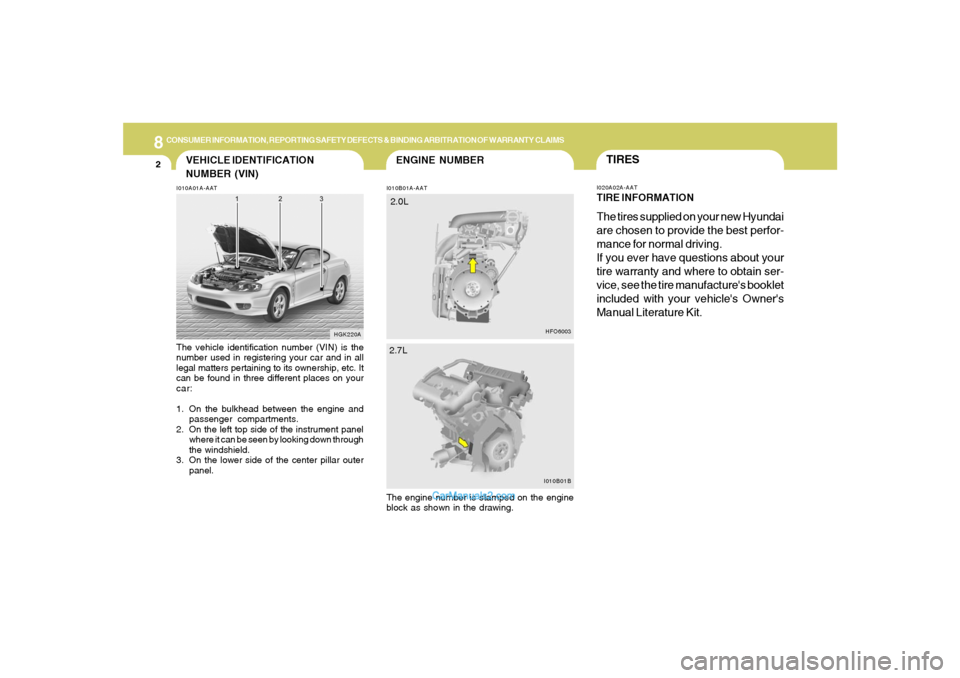
The vehicle identification number (VIN) is the
number used in registering your car and in all
legal matters pertaining to its ownership, etc. It
can be found in three different places on your
car:
1. On the bulkhead between the engine and
passenger compartments.
2. On the left top side of the instrument panel
where it can be seen by looking down through
the windshield.
3. On the lower side of the center pillar outer
panel.
The engine number is stamped on the engine
block as shown in the drawing.
HGK220A
TIRESI020A02A-AATTIRE INFORMATIONThe tires supplied on your new Hyundai
are chosen to provide the best perfor-
mance for normal driving.
If you ever have questions about your
tire warranty and where to obtain ser-
vice, see the tire manufacture's booklet
included with your vehicle's Owner's
Manual Literature Kit.
I010B01B
2.7L
HFO6003
2.0L
Page 241 of 266

8
CONSUMER INFORMATION, REPORTING SAFETY DEFECTS & BINDING ARBITRATION OF WARRANTY CLAIMS
3
I030A03JM-AATRECOMMENDED COLD TIRE INFLA-
TION PRESSURES
Tire label located on the driver's side of
the center pillar outer panel gives the
cold tire pressures recommended for
your vehicle with the original tire size,
the number of people that can be in your
vehicle and vehicle capacity weight.These pressures were chosen to pro-
vide the most satisfactory combination
of ride comfort, tire wear and stability
under normal conditions. Tire pressures
should be checked at least monthly.
Proper tire inflation pressures should
be maintained for these reasons:
I030B01GK
HGK6003
!
WARNING:
o Inspect your tires frequently for
proper inflation as well as wear
and damage. Always use a tire
pressure gauge.
o Tires with too much or too little
pressure wear unevenly causing
poor handling, loss of vehicle
control, and sudden tire failure
leading to accidents, injuries, and
even death. The recommended
cold tire pressure for your vehicle
can be found in this manual and
on the tire label located on the
driver's side of the center pillar.
o Worn tires can cause accidents.
Replace tires that are worn, show
uneven wear, or are damaged.
o Remember to check the pressure
of your spare tire. Hyundai recom-
mends that you check the spare
every time you check the pressure
of the other tires on your vehicle.
Page 242 of 266

8
CONSUMER INFORMATION, REPORTING SAFETY DEFECTS & BINDING ARBITRATION OF WARRANTY CLAIMS4
!
NOTE:
o Underinflation also results in ex-
cessive wear, poor handling and
reduced fuel economy. Wheel de-
formation also is possible. Keep
your tire pressures at the proper
levels. If a tire frequently needs
refilling, have it checked by your
Hyundai Dealer.
o Overinflation produces a harsh
ride, excessive wear at the center
of the tire tread, and a greater
possibility of damage from road
hazards.WARNING:
Overinflation or underinflation can
reduce the tire life, adversely affect
vehicle handling, and lead to sud-
den tire failure. This could rusult in
loss of vehicle control and potential
injury.CAUTION:
Always observe the following:
o Check pressures when the tires
are cold. (After the vehicle has
been parked for at least three hours
or hasn't been driven more than 1
mile (1.6 km) since starting up.)
o Check the pressure of your spare
tire each time you check the pres-
sure of other tires.
o Worn, old tires can cause acci-
dents. If your tread is badly worn,
or if your tires have been dam-
aged, replace them.
!