2006 Hyundai Terracan change time
[x] Cancel search: change timePage 254 of 539
6
DO-IT-YOURSELF MAINTENANCE
27CHECKING DRIVE BELTSCHECKING BRAKE PEDAL CLEARANCE
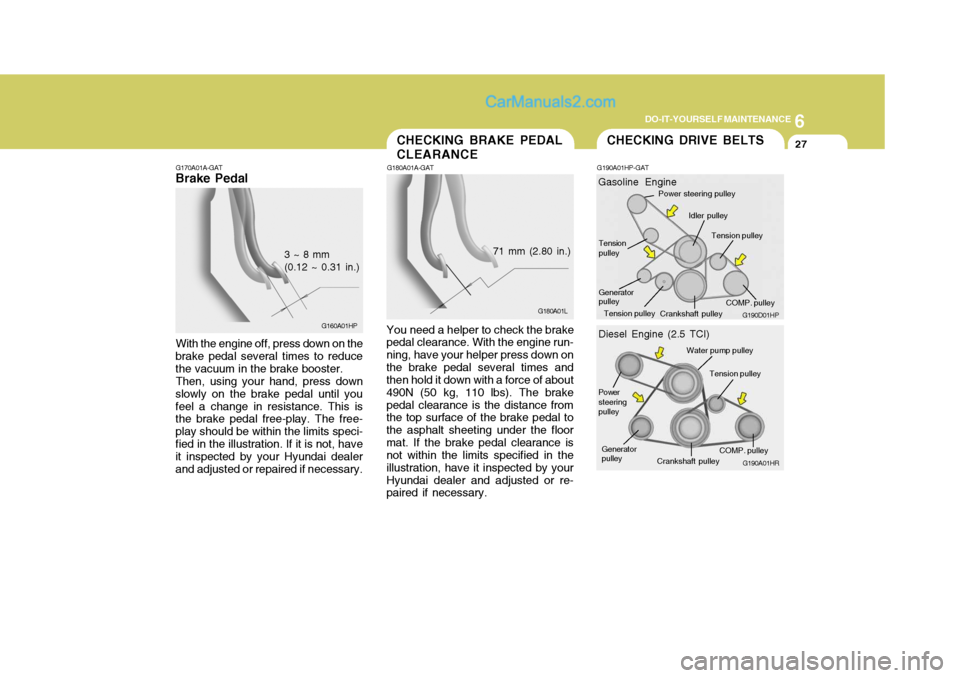
G170A01A-GAT
Brake Pedal
With the engine off, press down on the
brake pedal several times to reduce the vacuum in the brake booster. Then, using your hand, press down
slowly on the brake pedal until youfeel a change in resistance. This is the brake pedal free-play. The free- play should be within the limits speci-fied in the illustration. If it is not, have it inspected by your Hyundai dealer and adjusted or repaired if necessary. 3 ~ 8 mm (0.12 ~ 0.31 in.)
G160A01HP G180A01A-GAT
You need a helper to check the brake
pedal clearance. With the engine run- ning, have your helper press down onthe brake pedal several times and then hold it down with a force of about 490N (50 kg, 110 lbs). The brakepedal clearance is the distance from the top surface of the brake pedal to the asphalt sheeting under the floormat. If the brake pedal clearance is not within the limits specified in the illustration, have it inspected by yourHyundai dealer and adjusted or re- paired if necessary. 71 mm (2.80 in.)
G190A01HP-GAT
G180A01L
G190A01HR
G190D01HP
Diesel Engine (2.5 TCI)
Gasoline Engine
Water pump pulley
Power steering pulley
Crankshaft pulley
Generator pulley Tension pulley
COMP. pulley
Idler pulley
Power steering pulley
Crankshaft pulley
Generator pulley Tension pulley
COMP. pulleyTension pulley
Tension pulley
Page 293 of 539
10INDEX
2
A Air bag ....................................................................... 1-47
Air Cleaner Filter ........................................................ 6-14
Air Conditioning Care ........................................................................ 6-23
Filter ............................................................ 1-118, 6-24
Operation ..................................................... 1-110, 6-23
Switch ................................................................... 1-110
Antenna ................................................................... 1-140
Ashtray ...................................................................... 1-81
Audio Fault Code ..................................................... 1-137
Automatic Heating and Cooling Control System ...... 1-112
B Battery .............................................................. 2-26, 6-31
Bi-Level Heating ...................................................... 1-108
Brake
Anti-lock brake system (ABS) ................................ 2-21
Checking the brakes ............................................... 6-21
Fluid ........................................................................ 6-21
Pedal clearance ...................................................... 6-27
Pedal free-play ........................................................ 6-26
Practices ................................................................ 2-22
Breaking-In your New Hyundai .................................... 1-3 C
Care of Cassette Tapes ....................
..................... 1-139
Care of Discs .......................................................... 1-138
Cargo Security Screen .............................................. 1-93
Cassette Tape Player Operation (H240) .................. 1-124
Cassette Tape Player Operation (H280) .................. 1-129
Catalytic Converter ...................................................... 7-3
CD Auto changer (H280) ................................. 1-92, 1-134
Center Console Compartment ....................................1-87
Center console armrest .......................................... 1-87
Center console box ................................................. 1-87
Child Restraint System .............................................. 1-39
Child-Protector Rear Door Lock ................................. 1-12
Cigarette Lighter ........................................................ 1-79
Clock ......................................................................... 1-78
Clutch Checking fluid ......................................................... 6-22
Pedal free-play ........................................................ 6-26
Combination Light
Daytime running lights ............................................ 1-74
Headlight flasher ..................................................... 1-75
Headlight swi tch ..................................................... 1-73
High-beam switch ................................................... 1-74
Lane change si gnal ................................................. 1-73
Parking light auto cut ............................................. 1-74
Turn signal operation .............................................. 1-73
Compact Disc Player Operation (H280) ................... 1-131
Cooling Fans ............................................................. 6-33
Page 374 of 539
1CONTROLS AND EQUIPMENT
66DIGITAL CLOCK
4.MODE - Push "MODE" button to
display a 12- or 24-hour clock. When the 12-hour clock is in use, the letters AM or PM appear with the time.
5. - The time is displayed on the LCD by pushing in on the switchand is turned off by pushing in on theswitch again.
! CAUTION:
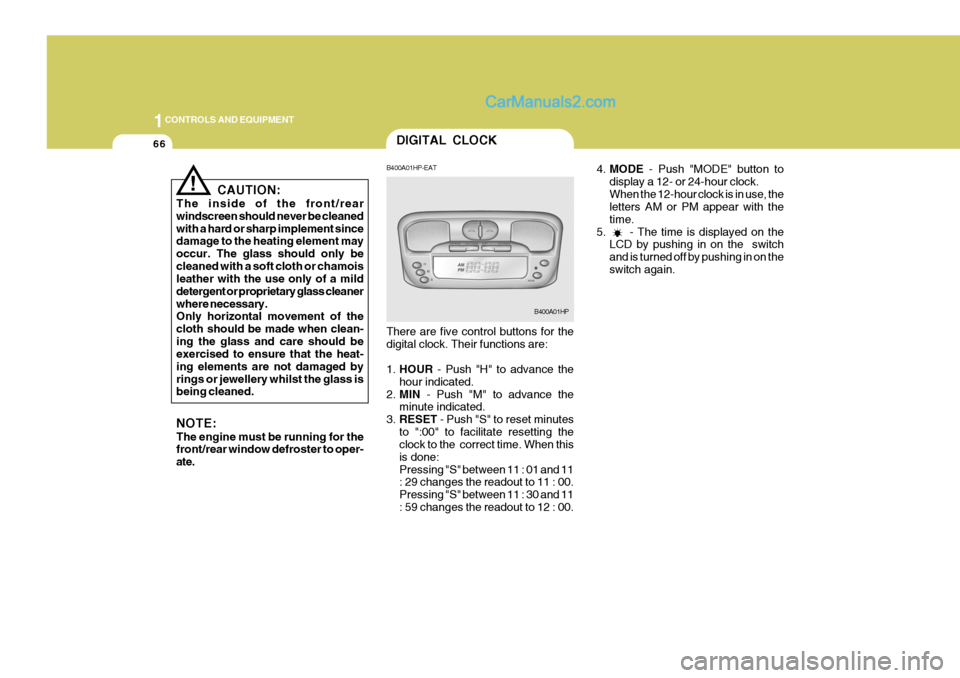
The inside of the front/rear windscreen should never be cleanedwith a hard or sharp implement since damage to the heating element may occur. The glass should only becleaned with a soft cloth or chamois leather with the use only of a mild detergent or proprietary glass cleanerwhere necessary. Only horizontal movement of the cloth should be made when clean-ing the glass and care should be exercised to ensure that the heat- ing elements are not damaged byrings or jewellery whilst the glass is being cleaned. NOTE: The engine must be running for the front/rear window defroster to oper- ate. B400A01HP-EAT There are five control buttons for the digital clock. Their functions are: 1.
HOUR - Push "H" to advance the
hour indicated.
2. MIN - Push "M" to advance the
minute indicated.
3. RESET - Push "S" to reset minutes
to ":00" to facilitate resetting the clock to the correct time. When this is done:Pressing "S" between 11 : 01 and 11 : 29 changes the readout to 11 : 00. Pressing "S" between 11 : 30 and 11: 59 changes the readout to 12 : 00.
B400A01HP
Page 430 of 539
2 DRIVING YOUR HYUNDAI
14FOUR-WHEEL DRIVE (4WD)
D090A01P-GAT You can send your engine power to all front and rear wheels for maximum power. 4WD is useful when you drive in snow, mud, ice, mountainous orsandy areas where good traction is required, or when your wheels lose traction using two-wheel drive.
The engine speed should be held atapproximately 1,000rpm by meansof the accelerator pedal and the se- lector lever moved between the "D" and "R" positions to induce a rockingmotion.
o Do not depress the accelerator pedal
with the brakes applied and the se-lector at the "R", "D", "2" or "L" position.
o Turn the overdrive switch on for good fuel economy and smooth driving.But if engine braking is needed in the "D" range or if repeated upshiftingand downshifting between the 3rd and 4th gear is needed when climb- ing a gentle slope, it is recommendedthat the overdrive switch be turned off. Turn the overdrive switch back on immediately afterward.
!WARNING:
o Avoid high cornering speeds.
o Do not make quick steering wheel movements, such as sharp lanechanges or fast, sharp turns. o Always wear your seat belts.
In a collision crash, an unbeltedperson is significantly more likelyto die than a person wearing a seatbelt.
o The risk of rollover is greatly in- creased if you lose control of yourvehicle at motorway speeds.
o Loss of control often occurs if two
or more wheels drop off the road-way and the driver oversteers to reenter the roadway.
o In the event your vehicle leaves the roadway, do not steer sharply.Instead, slow down before pullingback into the travel lanes.
o Never exceed posted speed limits.
o Excessive depressing of the
accelerater pedal under the tyre slip condition such as moving out of the mud or fresh snow etc, maycause severe damage to the trans- mission. At this time, take other way such as towing.
Page 446 of 539
2 DRIVING YOUR HYUNDAI
30
!
CAUTION:
If overheating should occur when towing, (temperature gauge reads near red zone), taking the following action may reduce or eliminate theproblem.
1. Turn off the air conditioner.
2. Reduce highway speed.
3. Select a lower gear when going uphill.
4. Whilst in stop and go traffic, place the gear selector in park or neu- tral and idle the engine at a higherspeed.
14. When going down a hill, shift into a
lower gear and use the engine brak-ing effect. When climbing a long grade, down- shift the transmission to a lowergear and reduce speed to reduce chances of engine overloading and/ or overheating.
15.If you have to stop whilst going uphill, do not hold the vehicle inplace by pressing on the accelera-tor. This can cause the automatic transmission to overheat. Use the parking brake or footbrake.
NOTE: When towing, check transmission fluid more frequently.
8. When parking your car and trailer,
especially on a hill, be sure to follow all the normal precautions. Turn your front wheels into the curb, set the parking brake firmly, and putthe transmission in 1st or Reverse (manual) or Park (automatic). In addition, we advise the use of wheelchocks at each of the trailer's tyres.
9. If the trailer has electric brakes,
start your vehicle and trailer mov-ing, and then apply the trailer brake controller by hand to be sure the brakes are working. This lets youcheck your electrical connection at the same time.
10.During your trip, check occasion- ally to be sure that the load issecure, and that the lights and any trailer brakes are still working.
11.Avoid jerky starts, sudden accel- eration or sudden stops.
12.Avoid sharp turns and rapid lane changes.
13.Avoid holding the brake pedal down
too long or too frequently. This couldcause the brakes to overheat, re- sulting in reduced braking efficiency.
Page 470 of 539
5VEHICLE MAINTENANCE REQUIREMENTS
2
NOTE:The inspection and testing of cer-
tain electronic fuel injection/engine management and automatic trans- mission control systems requirespecialised electronic equipment specifically designed for Hyundai vehicles. The use of general pur-pose electrical test equipment may result in damage to the control unit microprocessors.
DF020C2-E
Specified Scheduled Procedures
The specified scheduled procedures
are listed in the maintenance chartsbeginning at page 5-3. The operationsspecified must be performed at the time or mileage intervals shown irre- spective of whether the mileage inter-val has been reached before the speci- fied time interval.
Certain lubricants and components
degrade with both time and mileage(eg, engine oil and brake fluid) and therefore it is not permissable to basethe maintenance schedule upon mile- age alone. DF020F1-E
SERVICE HISTORY
It is important that all scheduled main-
tenance services are recorded in the warranty and service passport to en- sure that proof of maintenance is avail- able when warranty service is required. It is strongly recommended that the
maintenance operations are performedby a Hyundai authorised repairer be- cause of the need for specialised knowl- edge and tooling and to ensure that nopossibility of invalidating the manufac- turers warranty exists.
The maintenance schedules relate to
vehicles operated under normal condi-tions, vehicles which are operated under adverse conditions will requiremore frequent maintenance which is described at page 5-6. NOTE:
Service schedules may change de-
pending on individual country needs. Please ask your local Hyundai authorised repairer for a copy of the service schedule thatrelates to that country.MAINTENANCE AND SER- VICING REQUIREMENTS
DF020A1-E To ensure the continued reliability and safety of the vehicle, certain routine maintenance operations are requiredat specific mileage or time intervals.It is the responsibility of the vehicleowner to ensure that the maintenanceschedules shown in both this Owner's Manual and the Warranty and Service Passport are adhered to.The new vehicle warranty may beinvalidated if the routine maintenanceoperations are not performed in line with the recommendations outlined and the safety and durability of the vehicleadversely affected.It is recommended that all mainte-nance operations with the exception ofthe daily operating checks are en- trusted to a Hyundai authorised re- pairer to ensure that the latest repairand maintenance procedures and spe- cialized servicing tools are employed. In addition, the use of genuine Hyundaireplacement parts will ensure that the vehicle safety and performance will not be compromised.
Page 486 of 539
6 OWNER MAINTENANCE
8
!
The engine oil and filter must be changed at the time or mileage intervalspecified in the maintenance sched- ule. If the vehicle is operated under severe
or adverse conditions, the oil and filter must be replaced more frequently.
To replace the oil and filter, proceed as
follows:
1. Ensure that the engine is at normal
operating temperature and park the vehicle on level ground with the parking brake securely applied and the engine turned off.
2. Open the bonnet and remove the oil filler cap.
3. Prepare a suitable receptacle to collect the displaced oil and re-move the drain plug from the sump. 4. When the oil has drained from the
sump, replace the drain plug using anew gasket ensuring that the plug is not over tightened.
Tightening torque : 3.5 ~ 4.5 kgf.m
5. Remove the oil filter by rotating counterclockwise, using a propri- etary oil filter removal tool if neces- sary. Note that the oil filter will contain approximately 0.5 litres ofoil and this should be collected in a suitable receptacle.
6. Install a new oil filter having smeared the sealing ring with cleanoil and rotating clockwise until the filter contacts the mounting andthen a further one half turn. Do not over-tighten. Tightening torque: Petrol Engine - 1.2 ~ 1.6 kgf.m Diesel Engine - 2.3 ~ 2.5 kgf.m
7. Remove the engine oil level dipstick.
8. Pour the specified quantity of the recommended oil into the engine and replace the filler cap. Start the
CAUTION:
The oil being drained from the en-
gine will be hot. Care should be exercised to prevent scalding.
ENGINE OIL AND FILTER REPLACEMENT
G040A03HP-EAT
G040A01HP
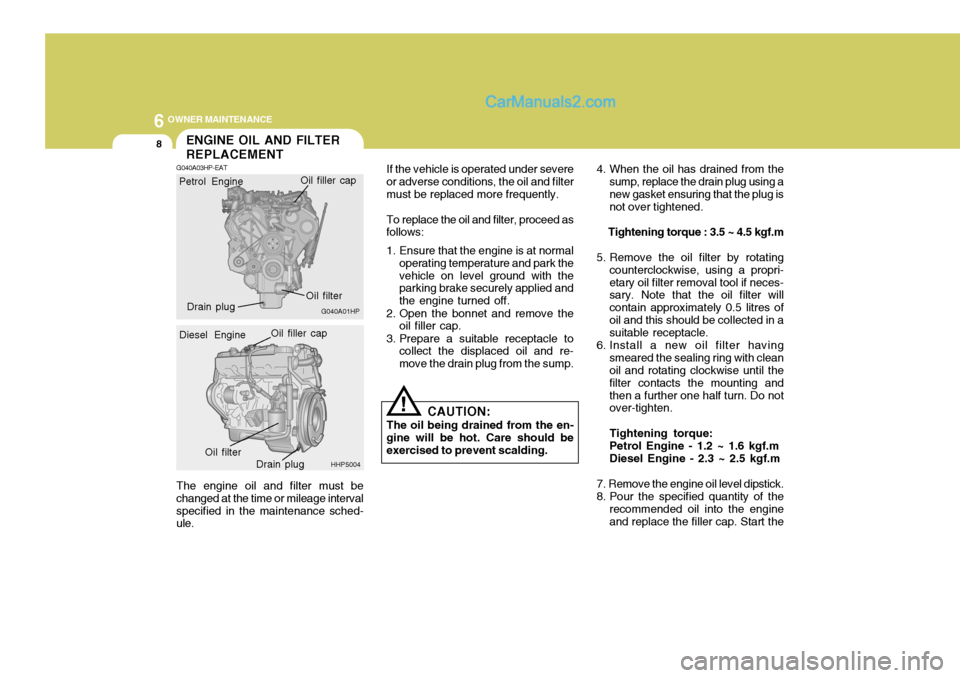
Petrol Engine
Oil filter
Drain plug Oil filler cap
HHP5004
Diesel Engine
Oil filler capOil filter
Drain plug
Page 494 of 539
6 OWNER MAINTENANCE
16AUTOMATIC TRANSMIS- SION LUBRICANT
G110A04HP-EAT Transmission lubricant should be changed at those intervals specified in the vehicle maintenance schedulein Section 5. NOTE: Basically automatic transmission fluid is red in colour. As driving distance increases, the fluid colourturns darkish red gradually. It is normal condition and you should not use fluid colour as a criterionfor replacing the transmission fluid.You must replace the automatictransmission fluid in accordancewith intervals specified in the ve- hicle maintenances schedule in section 5.
Recommended Lubricant Use only MOBIL DEXRON-II. Dam-age caused by a nonspecified fluid is not covered by your new vehicle lim- ited warranty.
! CAUTION:
The transmission lubricant level should only be checked when the engine is cold to prelude the possi- bility of personal injury by contactwith hot components.
1. To check the transmission lubricant level, the vehicle should be placedon level ground and the level plug removed with a suitable spanner.
2. If the level is correct, lubricant should begin to drip from the plug orifice. In this case the plug shouldbe replaced.If the level is incorrect, lubricantshould be added until it begins to drip from the plug orifice at which time the plug should be replaced.
!
Transmission Fluid Capacity The fluid capacity of the automatic transmission is 10.5 litres (Petrol En- gine)/ 11.8 litres (Diesel Engine).
CAUTION:
The transmission fluid level shouldbe checked when the engine is at normal operating temperature. Thismeans that the engine, radiator, exhaust system etc., are very hot so you should exercise great carenot to burn yourself during this procedure.