2006 Hyundai Terracan Jack
[x] Cancel search: JackPage 200 of 539
3
WHAT TO DO IN AN EMERGENCY
13
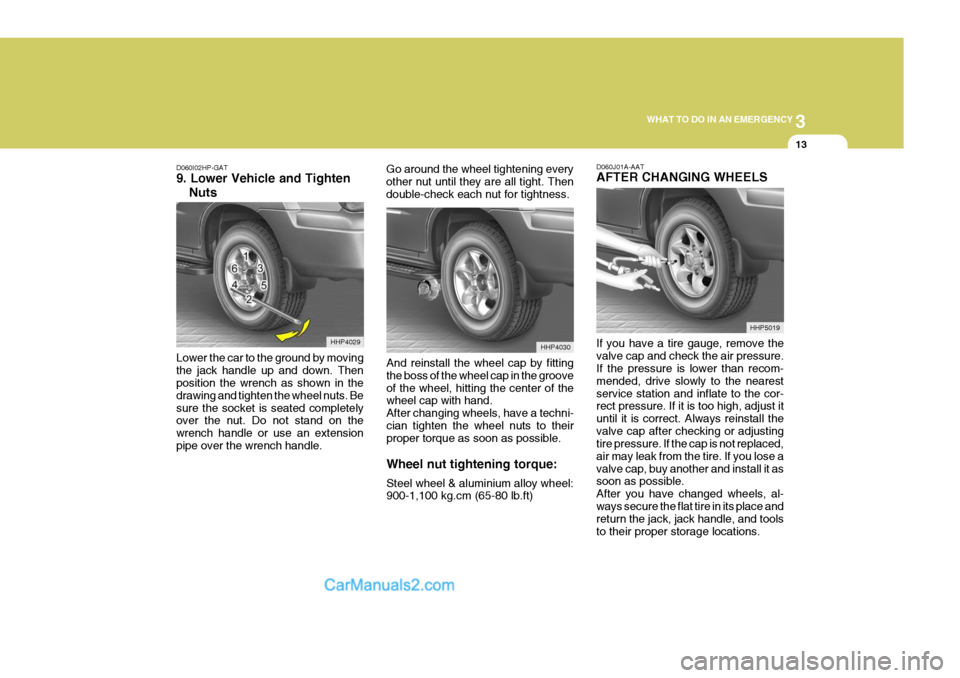
D060I02HP-GAT 9. Lower Vehicle and Tighten
Nuts
Lower the car to the ground by moving the jack handle up and down. Then position the wrench as shown in the drawing and tighten the wheel nuts. Besure the socket is seated completely over the nut. Do not stand on the wrench handle or use an extensionpipe over the wrench handle. Go around the wheel tightening everyother nut until they are all tight. Thendouble-check each nut for tightness.
D060J01A-AAT AFTER CHANGING WHEELS If you have a tire gauge, remove the valve cap and check the air pressure. If the pressure is lower than recom- mended, drive slowly to the nearestservice station and inflate to the cor- rect pressure. If it is too high, adjust it until it is correct. Always reinstall thevalve cap after checking or adjusting tire pressure. If the cap is not replaced, air may leak from the tire. If you lose avalve cap, buy another and install it as soon as possible. After you have changed wheels, al-ways secure the flat tire in its place and return the jack, jack handle, and tools to their proper storage locations.
HHP4029
HHP5019
And reinstall the wheel cap by fittingthe boss of the wheel cap in the grooveof the wheel, hitting the center of the wheel cap with hand. After changing wheels, have a techni-cian tighten the wheel nuts to their proper torque as soon as possible. Wheel nut tightening torque: Steel wheel & aluminium alloy wheel: 900-1,100 kg.cm (65-80 lb.ft) HHP4030
Page 267 of 539
6 DO-IT-YOURSELF MAINTENANCE
40
1. Keep all tires inflated to the correct
pressure.
2. Place the vehicle on level ground and press the front bumper & rear bumper down several times. Placevehicle at a distance of 3m (118.1 in.) from the test wall.
3. See that the vehicle is unloaded (except for full levels of coolant, engine oil and fuel, and spare tire,jack, and tools). Have the driver or equivalent weight placed in driver's seat.
4. Clean the headlight lens and turn on the headlight.
5. Open the hood.
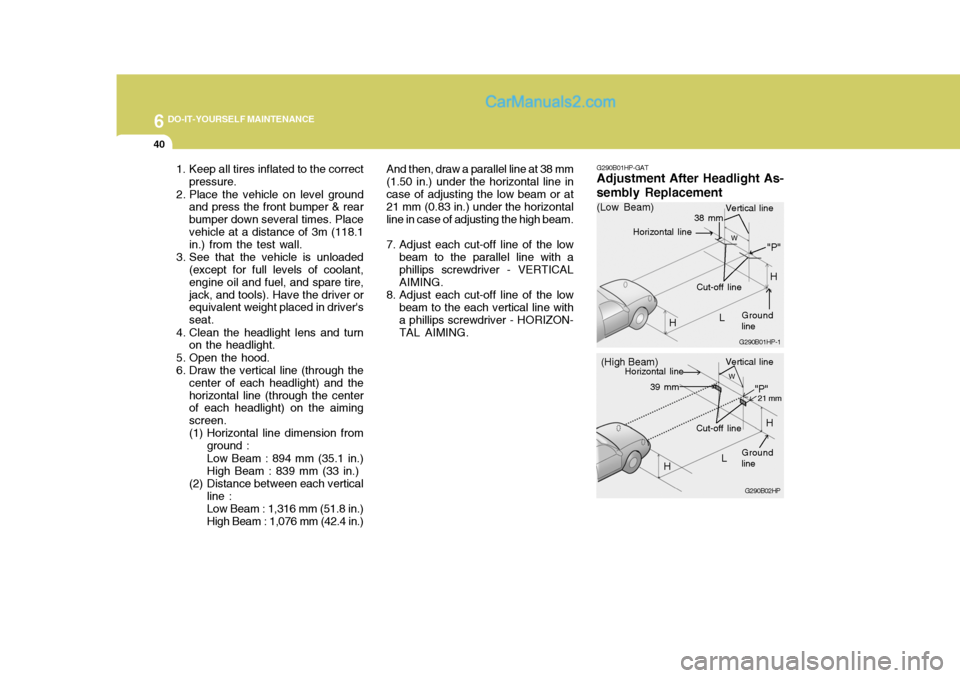
6. Draw the vertical line (through the center of each headlight) and thehorizontal line (through the center of each headlight) on the aiming screen.
(1) Horizontal line dimension from
ground : Low Beam : 894 mm (35.1 in.) High Beam : 839 mm (33 in.)
(2) Distance between each vertical line : Low Beam : 1,316 mm (51.8 in.) High Beam : 1,076 mm (42.4 in.) And then, draw a parallel line at 38 mm
(1.50 in.) under the horizontal line incase of adjusting the low beam or at 21 mm (0.83 in.) under the horizontal line in case of adjusting the high beam.
7. Adjust each cut-off line of the low beam to the parallel line with a phillips screwdriver - VERTICAL AIMING.
8. Adjust each cut-off line of the low beam to the each vertical line witha phillips screwdriver - HORIZON-TAL AIMING. G290B01HP-GAT
Adjustment After Headlight As- sembly Replacement
G290B02HP
LW
H Cut-off line
"P"
Vertical line
Horizontal line
Ground line
21 mm39 mm
(High Beam)
H
G290B01HP-1
LW
"P"
38 mm
H
H
(Low Beam)
Vertical line
Ground line
Cut-off line
Horizontal line
Page 286 of 539
8
CONSUMER INFORMATION
7SPARE TIRE AND TOOLS
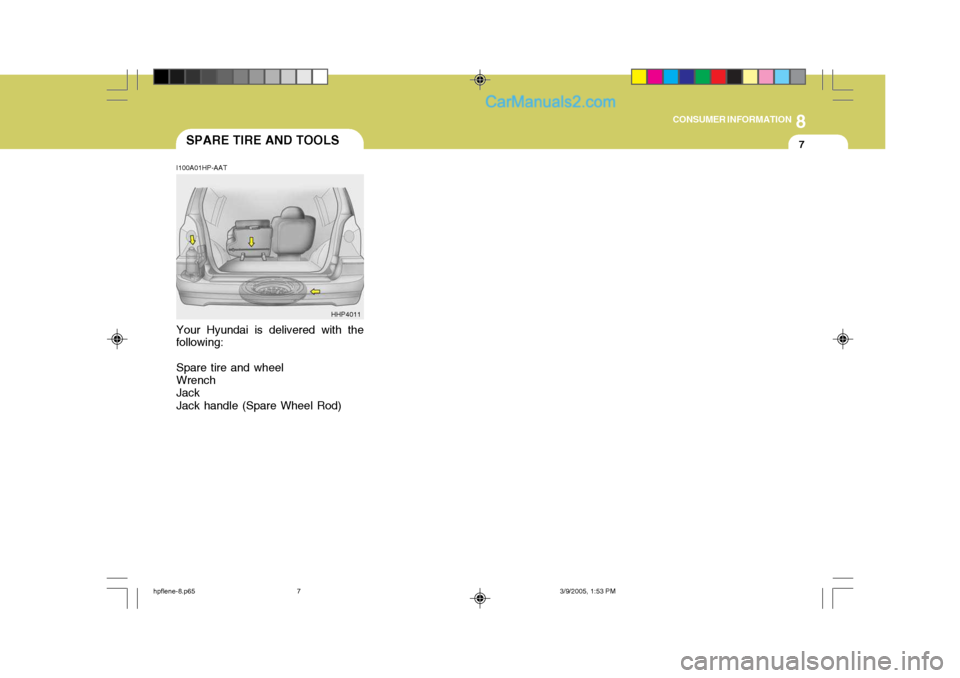
I100A01HP-AAT Your Hyundai is delivered with the
following:
Spare tire and wheel Wrench Jack Jack handle (Spare Wheel Rod) HHP4011
hpflene-8.p65
3/9/2005, 1:53 PM
7
Page 437 of 539
2
DRIVING YOUR HYUNDAI
21
!
Water entering the engine air intake will cause severe engine damage. Water can wash the grease from wheel bearings, causing rusting and prema-ture failure, and may also enter the axles, transmission and transfer case, reducing the gear oil's lubricating quali-ties. CAUTION:
o Whilst the full-time 4WD vehicle is
being raised on a jack, never start the engine or cause the tyres to rotate. There is the danger that rotating tyres touching the ground couldcause the vehicle to move off the jack and jump forward.
o If one of the front or rear wheels begins to spin in mud, snow, etc.,the vehicle can sometimes be driven out by depressing the ac-celerator pedal further; however, avoid running the engine continu- ously at high rpm because doingso could damage the 4WD system.
!WARNING:
o Avoid high cornering speeds.
o Do not make quick steering wheel movements, such as sharp lane charges or fast, sharp turns.
o The risk of rollover is greatly in-
creased if you lose control of yourvehicle at motorway speeds.
o In a collision crash, an unbelted
person is significantly more likelyto die than a person wearing a seatbelt.
o Loss of control often occurs if two or more wheels drop off the road- way and the driver oversteers tore-enter the roadway.
o In the event your vehicle leaves
the roadway, do not steer sharply.Instead, slow down before pulling back into the travel lanes.
ANTI-LOCK BRAKE SYSTEM
C120A02A-EAT The Anti-Lock Brake System (ABS) is designed to prevent wheel lock-up dur- ing sudden braking or on hazardous road surfaces. The ABS control modulemonitors the wheel speed and controls the pressure applied to each brake. Thus, in emergency situations or onslick roads, ABS will increase vehicle control during braking. NOTE: During ABS operation, a slight pul- sation may be felt in the brake pedal when the brakes are applied. Also, a noise may be heard in the enginecompartment while braking. These conditions are normal and indicate that the anti-lock brake system isfunctioning properly.
Page 438 of 539
2 DRIVING YOUR HYUNDAI
22
!
EFFECTIVE BRAKING
HPC141A1-E Braking system performance and fric- tion material life are greatly affected by the driving style adopted. The follow- ing suggestions are made to assist inachieving the best results from the braking system.
o Anticipate the road and conditions ahead in order that heavy braking may be avoided.
o When descending long gradients,
use the engine to assist in retardingthe vehicle to minimise the possibil- ity of brake fade occurring.
o When trailer towing, ensure that the trailer brakes function correctly anduse engine braking to assist the vehicle braking system.
o Use only genuine Hyundai replace- ment brake pads and shoes to en-sure consistent friction characteris-tics and wear rates.
o After driving through deep water (e.g.
fording), the brakes may becomewet and performance reduced. Al- ways check brake efficiency after emerging from the water and dry thebrakes by lightly depressing the brake pedal several times whilst driv- ing slowly.LIMITED-SLIP DIFFEREN- TIAL (LSD)
D190A01HP-EAT (Not all models) A limited-slip differential, if equipped, is for the rear wheel differential only.The features of this limited-slip differ- ential are described below: Just as with a conventional differential,the wheel on one side is allowed to turn at a different speed from the wheel on the other side when the vehicle iscornering. The difference between the limited-slip differential and a conven- tional differential is that if the wheel onone side of the vehicle loses traction, a greater amount of torque is applied to the rear wheel on the other side toimprove traction.
WARNING:
ABS will not prevent accidents dueto improper or dangerous drivingmanoeuvres. Even though vehicle control is improved during emer- gency braking, always maintain asafe distance between you and ob- jects ahead. Vehicle speeds should always be reduced during extremeroad conditions. The braking distance for cars equipped with an anti-lock braking system may be longer than for those without it, in the following road con-ditions. These roads should be driven at reduced speeds.
o Rough, gravel or snow-covered roads.
o With tyre chains installed.
o On roads where the road surface is pitted or has different surfaceheight.
The safety features of an ABSequipped vehicle should not be testedby high speed driving or cornering. This could endanger the safety of yourself or others.
! CAUTION:
o Never start the engine with the gearshift lever placed in the for- ward or reverse whilst one of therear wheels is jacked up and the other in contact with the ground; doing so may cause the vehicle tojump forward.
o Use only recommended oil for
LSD in the rear axle.See page 9-4 for the recommended oil descriptions.
Page 439 of 539
2
DRIVING YOUR HYUNDAI
23
o Apply the parking brake only when the vehicle is at rest.
o Since the power assistance pro- vided by the brake servo is derived from the engine, coasting with theengine turned off or towing of the vehicle with the engine turned off will result in greatly increased pedalpressures being required to stop the vehicle.
o Do not hold the vehicle on the up- grade with the accelerator pedal.This can cause the transmission to overheat. Always use the brakepedal or parking brake.
o Use caution when parking on a hill.
Engage the parking brake and placethe gear selector lever in "P" (auto- matic transaxle) or in first or reverse gear (manual transaxle). If your caris facing downhill, turn the front wheels into the curb to help keep the car from rolling. If your car is facinguphill, turn the front wheels away from the curb to help keep the car from rolling. If there is no curb or if itis required by other conditions to keep the car from rolling, block the wheels.DRIVING FOR ECONOMY
C140A02A-EAT You can save fuel and get more miles from your car if you follow these sug-gestions:
o Drive smoothly. Accelerate at a moderate rate. Don't make "jack- rabbit" starts or full-throttle shifts and maintain a steady cruising speed. Don't race between stoplights. Try to adjust your speed to that of the other traffic so you don't have to change speeds unnecessarily. Avoid heavy traffic whenever possible. Always maintain a safe distance from other vehicles so you can avoid unneces- sary braking. This also reduces brake wear.
o Drive at a moderate speed. The faster you drive, the more fuel your car uses. Driving at a moderate speed, especially on the motorway, is one of the most effective ways to reduce fuel consumption.
o Don't "ride" the brake or clutch pedal. This can increase fuel consumption and also increase wear on these com- ponents. In addition, driving with your foot resting on the brake pedal may cause the brakes to overheat, which reduces their effectiveness and may lead to more serious consequences. o Take care of your tyres. Keep them
inflated to the recommended pres- sure. Incorrect inflation, either too much or too little, results in unnec- essary tyre wear. Check the tyrepressures at least once a month.
o Be sure that the wheels are aligned
correctly. Improper alignment canresult from hitting curbs or driving too fast over irregular surfaces. Poor alignment causes faster tyre wearand may also result in other prob- lems as well as greater fuel con- sumption.
o Keep your car in good condition. For better fuel economy and reducedmaintenance costs, maintain yourcar in accordance with the mainte- nance schedule in Section 5. If you drive your car in severe conditions,more frequent maintenance is re- quired (see Section 5 for details).
o Keep your car clean. For maximum service, your Hyundai should bekept clean and free of corrosive materials. It is especially importantthat mud, dirt, ice, etc. not be al- lowed to accumulate on the under- side of the car. This extra weight canresult in increased fuel consumption and also contribute to corrosion.
Page 452 of 539
3 IN CASE OF EMERGENCY
6
D040B03HP-EAT Handling the Spare Tyre
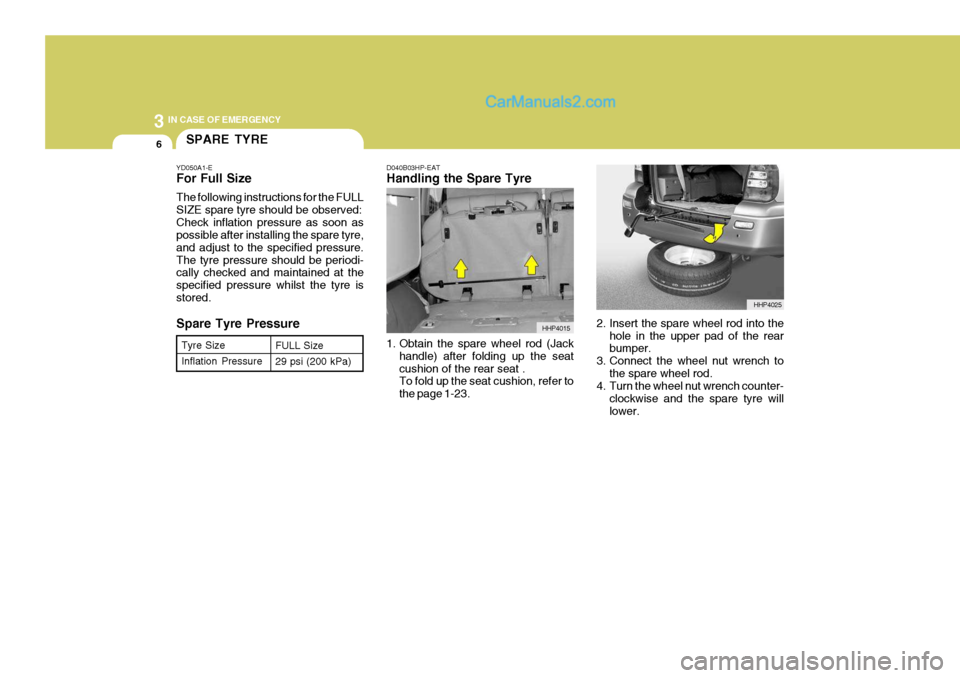
1. Obtain the spare wheel rod (Jackhandle) after folding up the seat cushion of the rear seat . To fold up the seat cushion, refer to the page 1-23. 2. Insert the spare wheel rod into the
hole in the upper pad of the rear bumper.
3. Connect the wheel nut wrench to the spare wheel rod.
4. Turn the wheel nut wrench counter-
clockwise and the spare tyre will lower.
Tyre Size Inflation Pressure
FULL Size 29 psi (200 kPa)SPARE TYRE
YD050A1-E For Full Size The following instructions for the FULL SIZE spare tyre should be observed:Check inflation pressure as soon as possible after installing the spare tyre, and adjust to the specified pressure.The tyre pressure should be periodi- cally checked and maintained at the specified pressure whilst the tyre isstored. Spare Tyre Pressure
HHP4015
HHP4025
Page 454 of 539
3 IN CASE OF EMERGENCY
8
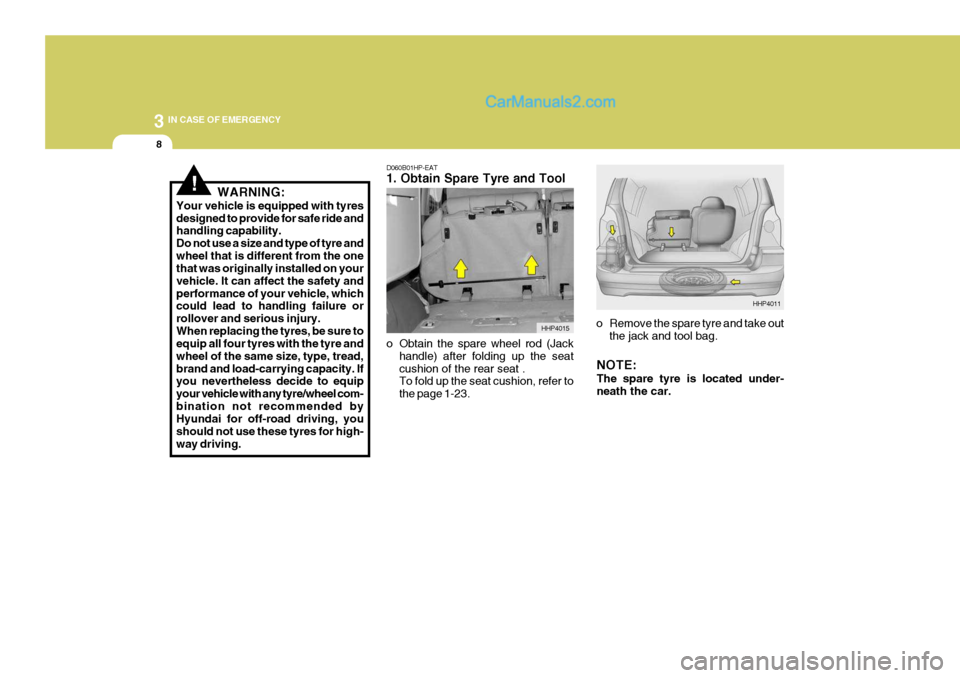
D060B01HP-EAT 1. Obtain Spare Tyre and Tool
o Obtain the spare wheel rod (Jackhandle) after folding up the seat cushion of the rear seat . To fold up the seat cushion, refer to the page 1-23. o Remove the spare tyre and take out
the jack and tool bag.
NOTE: The spare tyre is located under- neath the car.
!WARNING:
Your vehicle is equipped with tyres designed to provide for safe ride and handling capability. Do not use a size and type of tyre andwheel that is different from the one that was originally installed on your vehicle. It can affect the safety andperformance of your vehicle, which could lead to handling failure or rollover and serious injury.When replacing the tyres, be sure to equip all four tyres with the tyre and wheel of the same size, type, tread,brand and load-carrying capacity. If you nevertheless decide to equip your vehicle with any tyre/wheel com-bination not recommended by Hyundai for off-road driving, you should not use these tyres for high-way driving.
HHP4015
HHP4011