2006 Hyundai Azera spare tire
[x] Cancel search: spare tirePage 201 of 307
2
DRIVING YOUR HYUNDAI
21
!
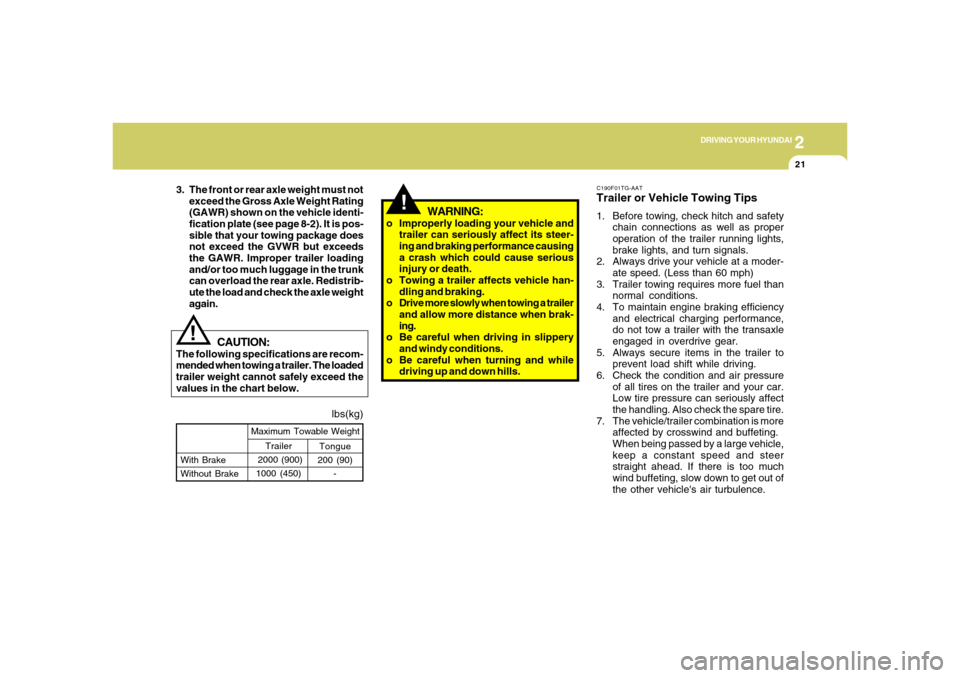
lbs(kg)
!
Tongue
200 (90)
- With Brake
Without BrakeMaximum Towable Weight
Trailer
2000 (900)
1000 (450)
CAUTION:
The following specifications are recom-
mended when towing a trailer. The loaded
trailer weight cannot safely exceed the
values in the chart below.
WARNING:
o Improperly loading your vehicle and
trailer can seriously affect its steer-
ing and braking performance causing
a crash which could cause serious
injury or death.
o Towing a trailer affects vehicle han-
dling and braking.
o Drive more slowly when towing a trailer
and allow more distance when brak-
ing.
o Be careful when driving in slippery
and windy conditions.
o Be careful when turning and while
driving up and down hills. 3. The front or rear axle weight must not
exceed the Gross Axle Weight Rating
(GAWR) shown on the vehicle identi-
fication plate (see page 8-2). It is pos-
sible that your towing package does
not exceed the GVWR but exceeds
the GAWR. Improper trailer loading
and/or too much luggage in the trunk
can overload the rear axle. Redistrib-
ute the load and check the axle weight
again.
C190F01TG-AATTrailer or Vehicle Towing Tips1. Before towing, check hitch and safety
chain connections as well as proper
operation of the trailer running lights,
brake lights, and turn signals.
2. Always drive your vehicle at a moder-
ate speed. (Less than 60 mph)
3. Trailer towing requires more fuel than
normal conditions.
4. To maintain engine braking efficiency
and electrical charging performance,
do not tow a trailer with the transaxle
engaged in overdrive gear.
5. Always secure items in the trailer to
prevent load shift while driving.
6. Check the condition and air pressure
of all tires on the trailer and your car.
Low tire pressure can seriously affect
the handling. Also check the spare tire.
7. The vehicle/trailer combination is more
affected by crosswind and buffeting.
When being passed by a large vehicle,
keep a constant speed and steer
straight ahead. If there is too much
wind buffeting, slow down to get out of
the other vehicle's air turbulence.
Page 208 of 307

If the Engine Will Not Start ............................................ 3-2
Jump Starting ................................................................ 3-3
If the Engine Overheats ................................................ 3-4
Spare Tire ..................................................................... 3-5
If You Have a Flat Tire .................................................. 3-6
Changing a Flat Tire ...................................................... 3-6
If Your Vehicle Must Be Towed...................................3-11
Emergency Towing.....................................................3-13
If You Lose Your Keys................................................3-14
3
WHAT TO DO IN AN EMERGENCY
3
Page 212 of 307

3
WHAT TO DO IN AN EMERGENCY
5
SPARE TIRED040A02GK-AATTEMPORARY SPARE TIRE
The following instructions for the TEM-
PORARY spare tire should be observed:
1. Check inflation pressure as soon as
practical after installing the spare
tire, and adjust to the specified pres-
sure. The tire pressure should be
periodically checked and maintained
at the specified pressure while the
tire is stored.Tire Size
Inflation Pressure
T125/80D16
420 kPa(60 psi)
4. As the temporary spare tire is spe-
cifically designed for your car, it
should not be used on any other
vehicle.
5. The temporary spare tire should not
be used on any other wheels, nor
should standard tires, snow tires,
wheel covers or trim rings be used
with the temporary spare wheel. If
such use is attempted, damage to
these items or other car components
may occur.
6. The temporary spare tire pressure
should be checked once a month
while the tire is stored.
2. The spare tire should only be used
temporarily and should be returned
to the luggage compartment as soon
as the original tire can be repaired or
replaced.
3. Continuous use at speeds of over 50
mph (80 km/h) is not recommended. Spare Tire Pressure
CAUTION:
o Do not use snow chains with your
temporary spare tire.
o Do not use more than one tempo-
rary spare tire at a time.
o Do not tow a trailer while the tem-
porary spare tire is installed.
!
Spare Tire PressureD040A01TG-AATFULL SIZE SPARE TIRE (If Installed)
The following instructions for the FULL
SIZE spare tire should be observed:
Check inflation pressure as soon as
practical after installing the spare tire,
and adjust to the specified pressure.
The tire pressure should be periodically
checked and maintained at the speci-
fied pressure while the tire is stored.Tire Size
Inflation Pressure
Full Size
210 kPa (30 psi)
Page 213 of 307

36WHAT TO DO IN AN EMERGENCY
CHANGING A FLAT TIRE
IF YOU HAVE A FLAT TIRE
D060A01TG-AATThe procedure described on the follow-
ing pages can be used to rotate tires as
well as to change a flat tire. When
preparing to change a flat tire, check to
be sure the gear selector lever is in "P"
and that the parking brake is set, then:
D050A01TG-AATIf a tire goes flat while you are driving:
1. Take your foot off the accelerator pedal
and let the car slow down while driving
straight ahead. Do not apply the brakes
immediately or attempt to pull off the
road as this may cause a loss of
control. When the car has slowed to
such a speed that it is safe to do so,
brake carefully and pull off the road.
Drive off the road as far as possible
and park on firm, level ground. If you
are on a divided highway, do not park
in the median area between the two
traffic lanes.
2. When the car is stopped, turn on your
emergency hazard flashers, set the
parking brake and put the transaxle in
"P".
3. Have all passengers get out of the car.
Be sure they all get out on the side of
the car that is away from traffic.
4. Change the tire according to the in-
structions provided as follows.
D060A01TG-A
D040B01TG-GATHandling the Spare Tire
1. Open the trunk lid.
2. Remove the luggage mat.
3. Take out the tool receptacle.
HNF4008
4. Turn the installation bolt counter-
clockwise to remove the spare tire.
5. After replacing the spare tire, install
and tighten the bolt firmly with your
fingers until there is no more play in
the spare tire.
Page 214 of 307

3
WHAT TO DO IN AN EMERGENCY
7
D060B01NF-GAT1. Obtain Spare Tire and Tool
D060B01NF-A
Take out the tool receptacle and turn
the installation bolt counterclockwise
to remove spare tire from the trunk.
D060C01A-AAT2. Block the Wheel
Block the wheel that is diagonally oppo-
site from the flat to keep the vehicle
from rolling when the car is raised on the
jack.
HTG4009
Flat tire
D060D01A-AAT3. Loosen Wheel Nuts
The wheel nuts should be loosened
slightly before raising the car. To loosen
the nuts, turn the wrench handle coun-
terclockwise. When doing this, be sure
that the socket is seated completely
over the nut so it cannot slip off. For
maximum leverage, position the wrench
so the handle is to the left as shown in
the drawing. Then, while holding the
wrench near the end of the handle, push
down on it with steady pressure. Do not
remove the nuts at this time. Just
loosen them about one-half turn.
D060D01TG-A
Page 215 of 307

38WHAT TO DO IN AN EMERGENCY
!
Raise the car high enough so that the
fully inflated spare tire can be installed.
To do this, you will need more ground
clearance than is required to remove
the flat tire.
D060F02E-AAT5. Raising the Car
After inserting a wrench bar into the
wheel nut wrench, install the wrench bar
into the jack as shown in the drawing.
To raise the vehicle, turn the wheel nut
wrench clockwise. As the jack begins
to raise the vehicle, double check that
it is properly positioned and will not slip.
If the jack is on soft ground or sand,
place a board, brick, flat stone or other
object under the base of the jack to
keep it from sinking.WARNING:
Do not get under the car when it is
supported by the jack! This is very
dangerous as the vehicle could fall
and cause serious injury or death.
No one should stay in the car while
the jack is being used.
D060F01TG-A
Wrench bar
D060E01A-AAT4. Put the Jack in Place
The base of the jack should be placed
on firm, level ground. The jack should
be positioned as shown in the drawing.
D060E01TG-A
Wheel nut
wrench
Page 216 of 307

3
WHAT TO DO IN AN EMERGENCY
9
D060G02Y-AAT6. Changing Wheels
Loosen the wheel nuts and remove
them with your fingers. Slide the wheel
off the studs and lay it flat so it cannot
roll away. To put the wheel on the hub,
pick up the spare tire, line up the holes
with the studs and slide the wheel onto
them. If this is difficult, tip the wheel
slightly and get the top hole in the wheel
lined up with the top stud. Then jiggle
the wheel back and forth until the wheel
can be slid over the other studs.
D060G01TG-A
!
WARNING:
Wheels and wheel covers may have
sharp edges. Handle them carefully
to avoid possible severe injury. Be-
fore putting the wheel into place, be
sure that there is nothing on the hub
or wheel (such as mud, tar, gravel,
etc.) that interferes with the wheel
from fitting solidly against the hub.
D060G02TG
!
If there is not good contact on the
mounting surface between the wheel
and hub, the wheel nuts could come
loose and cause the loss of a wheel.
Loss of a wheel may result in loss of
control of the vehicle. This may cause
serious injury or death.WARNING:
Page 240 of 307

6
DO-IT-YOURSELF MAINTENANCE
3
G020C01TG-AATVehicle InteriorThe following should be checked each
time when the vehicle is driven:
o Lights operation
o Windshield wiper operation
o Horn operation
o Defroster, heating system operation
(and air conditioning, if installed)
o Steering operation and condition
o Mirror condition and operation
o Turn signal operation
o Accelerator pedal operation
o Brake operation, including parking
brake
o Automatic transaxle operation, includ-
ing "Park" mechanism operation
o Seat control condition and operation
o Seat belt condition and operation
o Sun visor operation
If you notice anything that does not operate
correctly or appears to be functioning cor-
rectly, inspect it carefully and seek assis-
tance from your Hyundai dealer if service
is needed.
G020B01A-AATVehicle ExteriorThe following should be checked monthly:
o Overall appearance and condition
o Wheel condition and wheel nut torque
o Exhaust system condition
o Light condition and operation
o Windshield glass condition
o Wiper blade condition
o Paint condition and body corrosion
o Fluid leaks
o Door and hood lock condition
o Tire pressure and condition
(including spare tire)
GENERAL CHECKSG020A01NF-AATEngine CompartmentThe following should be checked regu-
larly:
o Engine oil level and condition
o Transaxle fluid level and condition
o Brake fluid level
o Engine coolant level
o Windshield washer fluid level
o Accessory drive belt condition
o Engine coolant hose condition
o Fluid leaks (on or below components)
o Power steering fluid level
o Battery condition
o Air filter condition
o Engine vibration