2006 Hyundai Accent fuses
[x] Cancel search: fusesPage 189 of 599

3 WHAT TO DO IN AN EMERGENCY
2
!
D010B02A-AAT If Engine Doesn't Turn Over or Turns Over Slowly 1. If your car has an automatic
transaxle, be sure the gear selector lever is in "N" or "P" and the emer- gency brake is set.
2. Check the battery connections to be
sure they are clean and tight.
3. Turn on the interior light. If the light
dims or goes out when you operate the starter, the battery is discharged.
4. Check the starter connections to be
sure they are securely tightened.
5. Do not push or pull the vehicle to start it. See instructions for "JumpStarting on the following pages".
D010C02A-GAT If Engine Turns Over Normally but Does Not Start 1. Check fuel level. 2. With the key in the "OFF" position,
check all connectors at ignition coils and spark plugs(For Gasoline En- gine) or check all connectors atglow plug and glow plug relay(For Diesel Engine). Reconnect any that may be disconnected or loose.
3. If you smell gasoline, the engine may be flooded. See starting in-structions in Section 2.(For Carbu-retor)
4. Check fuel line in the engine room.5. If engine still refuses to start, call a
Hyundai dealer or seek other quali- fied assistance.
D010D01A-AAT If the Engine Stalls While Driv- ing
1. Reduce your speed gradually, keep- ing a straight line. Move cautiously off the road to a safe place.
2. Turn on your emergency flashers.
3. Try to start the engine again. If your
vehicle will not start, contact a Hyundai dealer or seek other quali- fied assistance.
D010A01A-AAT
D010B01A
D010C01A
IF THE ENGINE WILL NOT START
WARNING:
If the engine will not start, do not push or pull the car to start it. This could result in a collision or cause other damage. In addition, push orpull starting may cause the cata- lytic converter to be overloaded and create a fire hazard.
Page 219 of 599

Engine Compartment .................................................... 6-2
General Checks ........................................................... 6-6
Checking the Engine Oil ............................................... 6-7
Changing the Oil and Filter ........................................... 6-9
Checking and Changing the Engine Coolant ...............6-13
Spark Plugs ....................... .......................................... 6-15
Changing the Air Cleaner Filte r ....................................6-17
Checking the Transaxle Oil (Manual ) ..........................6-19
Checking the Transaxle Fluid (Automatic)..................6-20
Checking the B rakes ................................................... 6-22
Checking the Clutch Fluid ............................................ 6-23
Air Conditioning Care ................................................... 6-24
Checking the Air Conditioner Filter
(For Evaporator and Blower U nit) .............................6-25
Checking Drive Belts................................................... 6-27
Checking and Replacing Fuses .................................. 6-28
Power Steering Fluid Level .......................................... 6-32
Removal of Water from the Fuel Filter .........................6-33
Replacement of Light Bulbs ......................................... 6-35
Fuse Panel Description ............................................... 6-42
Do-It-Yourself Maintenance
6
6
Page 246 of 599

6 DO-IT-YOURSELF MAINTENANCE
28CHECKING AND REPLACING FUSES
CAUTION:
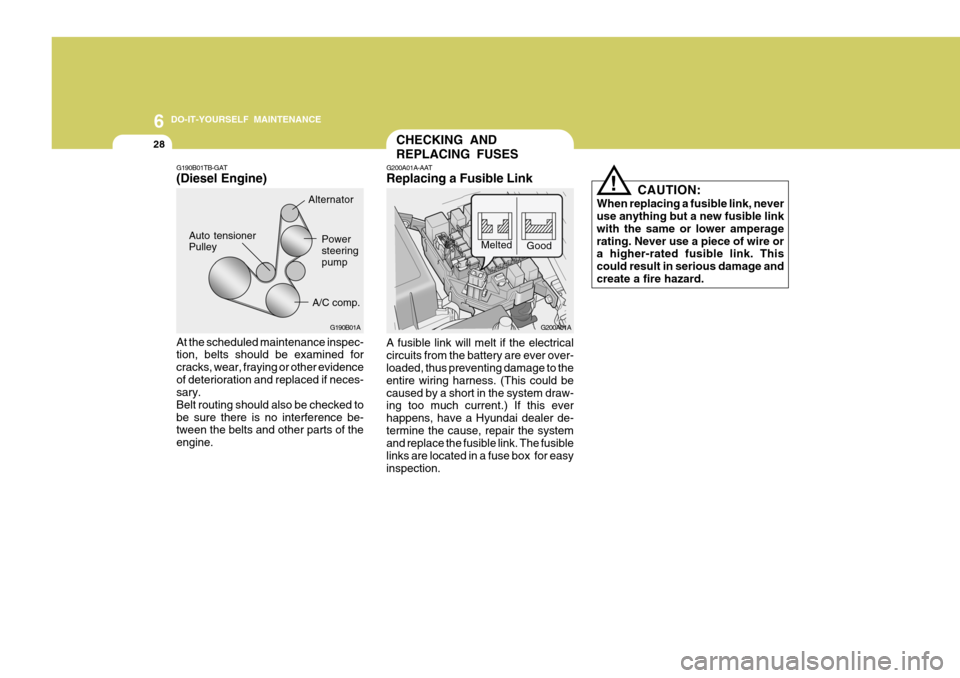
When replacing a fusible link, never use anything but a new fusible link with the same or lower amperagerating. Never use a piece of wire or a higher-rated fusible link. This could result in serious damage andcreate a fire hazard.!
G200A01A-AAT Replacing a Fusible Link
G200A01A
Melted
Good
G190B01TB-GAT(Diesel Engine)
A/C comp.
Auto tensioner Pulley
G190B01A
AlternatorPower steering pump
At the scheduled maintenance inspec- tion, belts should be examined for cracks, wear, fraying or other evidenceof deterioration and replaced if neces- sary. Belt routing should also be checked tobe sure there is no interference be- tween the belts and other parts of the engine. A fusible link will melt if the electricalcircuits from the battery are ever over- loaded, thus preventing damage to the entire wiring harness. (This could becaused by a short in the system draw- ing too much current.) If this ever happens, have a Hyundai dealer de-termine the cause, repair the system and replace the fusible link. The fusible links are located in a fuse box for easyinspection.
Page 247 of 599

6
DO-IT-YOURSELF MAINTENANCE
29
4. Replace the blown fuse by pressing
a new fuse of the same rating into place. The fuse should be a snug fit. If it is not, have the fuse clip repairedor replaced by a Hyundai dealer. If you do not have a spare fuse, you may be able to borrow a fuse of thesame or lower rating from an acces-
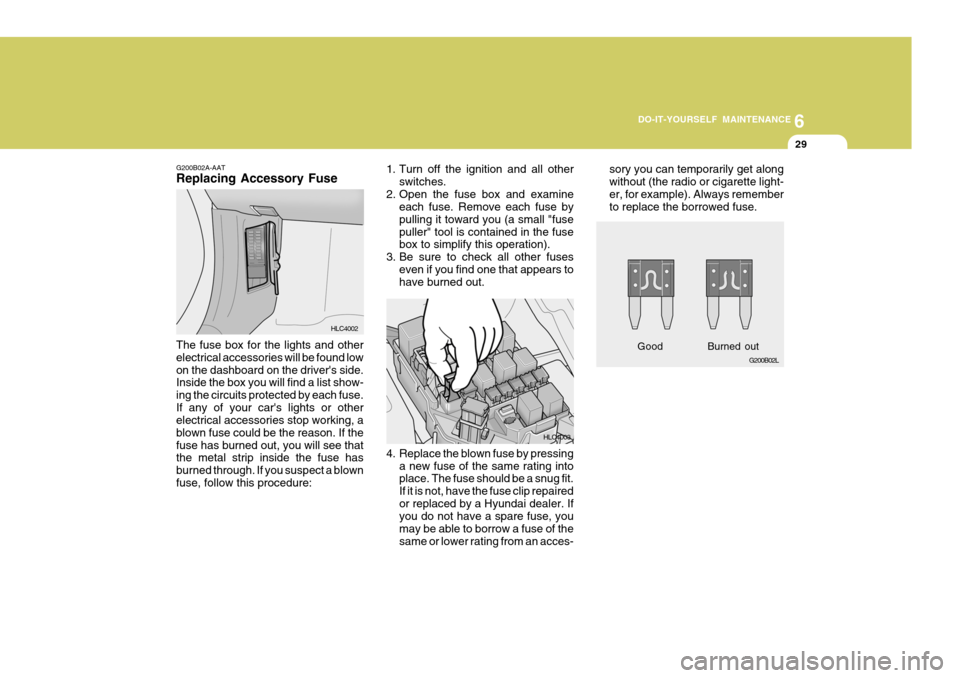
G200B02A-AAT Replacing Accessory Fuse The fuse box for the lights and other electrical accessories will be found lowon the dashboard on the driver's side. Inside the box you will find a list show- ing the circuits protected by each fuse.If any of your car's lights or other electrical accessories stop working, a blown fuse could be the reason. If thefuse has burned out, you will see that the metal strip inside the fuse has burned through. If you suspect a blownfuse, follow this procedure:
HLC40021. Turn off the ignition and all other
switches.
2. Open the fuse box and examine each fuse. Remove each fuse bypulling it toward you (a small "fusepuller" tool is contained in the fuse box to simplify this operation).
3. Be sure to check all other fuses even if you find one that appears tohave burned out.
HLC4003sory you can temporarily get along without (the radio or cigarette light-er, for example). Always remember to replace the borrowed fuse.
G200B02L
Good
Burned out
Page 279 of 599

10
INDEX
3
D Door Central door locks .................................................... 1-8
Door locks ................................................................ 1-7
Locking, unlocking front doors with a key ............... 1-7
Drink Holder .............................................................. 1-69
Drive Belts ................................................................ 6-27
Driving Economical driving ................................................. 2-17
Smooth cornering ................................................... 2-18
Winter driving ......................................................... 2-18
EEmission Control Syst em ........................................... 7-2
Engine
Before starting the engine ....................................... 2-3
Compartment ........................................................... 6-2
Coolant ................................................................... 6-13
Coolant temperature gauge ................................... 1-57
If the engine overheats ............................................ 3-4
Number .................................................................... 8-2
Oil ............................................................................. 6-7
Starting ..................................................................... 2-5
Engine Exhaust Can Be Dangerous ........................... 2-2F Fog Light
Front ....................................................................... 1-67
Rear ....................................................................... 1-67
Front Seats
Adjustable front seats ............................................ 1-14
Adjustable headrest s .............................................. 1-15
Adjusting seat forward and rear ward..................... 1-14
Adjusting seatback angle .......................................1-14
Lumbar support control .................. ........................ 1-16
Seat cushion height adjustment............................ 1-16
Seat warmer ........................................................... 1-17
Fuel
Capacity ................................................................... 9-2
Gauge .................................................................... 1-56
Recommendations ................................................... 1-2
Fuel Filler Lid
Remote release ...................................................... 1-80
Fuses ........................................................................ 6-28
Fuse Panel description ............................................. 6-42
G General Checks .......................................................... 6-6
Glove Box ................................................................. 1-74
Page 458 of 599

51
1
CONTROLS AND EQUIPMENT
MULTI FUNCTION SWITCH
SB220A1-E Turn Signal Operation To signal an intention to turn right, the switch lever should be pressed down.To signal an intention to turn left, the switch lever should be pushed upwards. In both instances, the turn signal lightson one side of the car will flash and the warning light located in the instrument cluster will flash in sympathy. Uponcompletion of the manoeuvre, the lever will, under normal circumstances, re- turn to the "Off" position. However, ifthe manoeuvre involved only a small movement of the steering wheel, the signal may need to be cancelled manu-ally. If either turn signal indicator flashes more rapidly than normal or refuses to flash at all, a malfunction of the turnsignal system may exist. SB220B1-E Lane Change Signal To indicate an intention to change lanes, moving the lever slightly towards thedirection of the relevant turn signal will cause the turn signal lights to flash. When the lever is released, it will returnto the "off" position.
HLC2072-D
HLC2069-D
B340C03FC-EAT LIGHTING SWITCH The vehicle sidelights and headlights are operated by rotating the end of theturn signal switch barrel. To operate the side lights, rotating the switch to the first detent with ignition switch at the"OFF" position will cause the lights to illuminate. To operate the headlights, the turn signal switch barrel should berotated to the second detent. The head- lights will only operate when the ignition switch is at the "On" position. If theignition switch is turned to the "Off" position, only the side lights will func- tion.
Page 515 of 599

3 IN CASE OF EMERGENCY
2IF THE ENGINE WILL NOT START
!
SD020B1-E If The Engine Cannot Be Cranked
1. If the vehicle is fitted with manual
transaxle, ensure that the clutch pedal is depressed whilst cranking the engine. If the vehicle is fittedwith automatic transaxle, ensure that the transaxle selector is at the "P" or"N" position.
2. Check the battery terminals and connections to ensure that theseare clean and also tight.
SD020A1-E Seek assistance from the nearest Hyundai dealer with regard to themethod of ignition and fuel system diagnosis.
WARNING:
If the engine refuses to start, no attempt should be made to push or tow start the vehicle. Vehicles with automatic transaxle or fuel injec-tion will not be able to be started in this manner since no drive is trans- mitted through the automatictransaxle whilst the engine is not running, and in the case of fuel injected derivatives, the fuel pumpwill not operate under tow start conditions. In addition, if the ve- hicle is equipped with an exhaustcatalyst, damage to the catalyst may result if the vehicle is tow started. 3. If the ignition warning lights dim
when the engine is cranked and the battery terminals have been checked, a discharged battery is indicated.
4. Do not attempt to push or tow start the vehicle, refer to "Jump Starting"for information regarding enginestarting when the battery is dis- charged.
D010B01A
Page 516 of 599

3
IN CASE OF EMERGENCY
3JUMP STARTING
D010C01A-EAT If Engine Turns Over Normally but Does Not Start
1. Check fuel Level. 2. Check all connectors at ignition coil and spark plugs(For Gasoline En-gine) or check all connectors atglow plug and glow plug relay (For Diesel Engine). Replace any that may be discon-nected or loose.
3. Check fuel line in the engine com-
partment.
4. If engine still refuses to start, call a Hyundai dealer or seek other quali-fied assistance. D010C01AD010D01A-EAT If the Engine Stalls Whilst Driving
1. Reduce your speed gradually, keep-
ing a straight line. Move cautiously off the road to a safe place.
2. Turn on your emergency flashers.
3. Try to start the engine again. If your
vehicle will not start, contact a Hyundai dealer or seek other quali- fied assistance.
CAUTION:
Personal injury and damage to the vehicle may occur if jump starting is not performed correctly. If anydoubt exists as to how this opera- tion should be performed, seek as- sistance from qualified personnel.
SD030A2-E
!
Discharged battery
Booster batteryHLC4001