2006 HUMMER H2 wiring
[x] Cancel search: wiringPage 87 of 502

Liftgate (SUV)
{CAUTION:
It can be dangerous to drive with the liftgate
open because carbon monoxide (CO) gas can
come into your vehicle. You can not see or
smell CO. It can cause unconsciousness and
even death. If you must drive with the liftgate
open or if electrical wiring or other cable
connections must pass through the seal
between the body and the liftgate:
Make sure all other windows are shut.
Turn the fan on your heating or cooling
system to its highest speed and select the
control setting that will force outside air
into your vehicle. SeeDual Automatic
Climate Control System on page 3-22.
If you have air outlets on or under the
instrument panel, open them all the way.
SeeEngine Exhaust on page 2-37.
To lock and unlock the liftgate, use any of the power
door lock switches or the remote keyless entry (RKE)
transmitter.To open the liftgate, do the following:
1. Move the spare tire carrier out of the way. See
“Opening the Spare Tire Carrier” under
Tailgate/Spare Tire Carrier on page 2-14.
2. Pull the handle located in the center of the door.
To close the liftgate, do the following:
1. Pull the liftgate down until it latches.
2. Move the spare tire carrier back into place. See
“Closing the Spare Tire Carrier” under
Tailgate/Spare Tire Carrier on page 2-14.
2-11
Page 88 of 502

Midgate®(SUT)
{CAUTION:
It can be dangerous to drive with the cargo
area covered and the tailgate and the midgate®
open because carbon monoxide (CO) gas can
come into your vehicle. You can not see or
smell CO. It can cause unconsciousness and
even death. If you must drive with the cargo
covers on and the tailgate and midgate
®open
or if electrical wiring or other cable
connections must pass through the seal
between the body and the midgate
®:
Make sure all windows are shut.Turn the fan on your heating or cooling
system to its highest speed on the setting
that brings in outside air. This will force
outside air into your vehicle. SeeDual
Automatic Climate Control System on
page 3-22.
If you have air outlets on or under the
instrument panel, open them all the way.
SeeEngine Exhaust on page 2-37.
The midgate
®allows you to extend the length of your
vehicle’s cargo area into the cab.
Lowering the Midgate®
The midgate®window must be completely lowered for
the midgate®to be lowered. See “Midgate®Window”
underPower Windows on page 2-18.
Both the midgate
®and the midgate®window can be
lowered while the ignition is in either RUN or
ACCESSORY, or while in Retained Accessory Power
(RAP) mode. SeeRetained Accessory Power (RAP) on
page 2-25for more information.
To lower the midgate
®, do the following:
1. Fold the rear seats forward. See60/40 Split Bench
Seat on page 1-6. The front seats may have to be
moved forward slightly.
2.
K(Midgate®Window):Press the bottom part of
this switch to lower the midgate®window. See
Instrument Panel Overview on page 3-4for
the location of this switch. The window can also be
operated using the global express-down button.
See “Global Glass Feature” underPower Windows
on page 2-18.
2-12
Page 172 of 502

Airbag Readiness Light
There is an airbag readiness light on the instrument
panel, which shows the airbag symbol. The system
checks the airbag’s electrical system for malfunctions.
The light tells you if there is an electrical problem.
The system check includes the airbag sensors, the
airbag modules, the wiring and the crash sensing and
diagnostic module. For more information on the
airbag system, seeAirbag System on page 1-58.
This light will come on
when you start your
vehicle, and it will �ash for
a few seconds. Then the
light should go out. This
means the system is ready.
If the airbag readiness light stays on after you start the
vehicle or comes on when you are driving, your airbag
system may not work properly. Have your vehicle
serviced right away.{CAUTION:
If the airbag readiness light stays on after you
start your vehicle, it means the airbag system
may not be working properly. The airbags in
your vehicle may not in�ate in a crash, or they
could even in�ate without a crash. To help avoid
injury to yourself or others, have your vehicle
serviced right away if the airbag readiness light
stays on after you start your vehicle.
The airbag readiness light should �ash for a few
seconds when you turn the ignition key to RUN. If the
light doesn’t come on then, have it �xed so it will
be ready to warn you if there is a problem.
Airbag Off Light
When you turn the right front passenger’s airbag off,
this light will come on and stay on to remind you that the
airbag has been turned off. This light will go off when
you turn the airbag back on again. SeeAirbag Off
Switch on page 1-65for more on this, including
important safety information.
3-32
Page 308 of 502

Power Winch Platform
You can use the power winch platform (if equipped) with
an aftermarket winch. Connect the winch to the
platform and wiring to the vehicle following the winch
manufacturer’s guidelines.
Notice:Do not use the winch platform to winch at
a tension of more than 9,000 lbs. (4 082 kg). This
would damage your vehicle’s frame. This damage
would not be covered by your vehicle’s warranty.
If you are using a winch to pull out another vehicle,
follow the winch manufacturer’s guidelines and observe
the following to prevent damage to your vehicle:
If possible, have your vehicle anchored from
the opposite side of the winch to a solid,
immovable object.
If winching from the front, use both of the rear
recovery loops. If winching from the rear, use both
of the front recovery loops.
Put your transmission in NEUTRAL (N).
Use your regular brakes to hold your vehicle in
place and block the wheels to keep the vehicle
from moving.Notice:Using a power winch with the transmission
in gear to pull out another vehicle may damage
the transmission. When operating a power winch,
always leave the transmission in NEUTRAL (N).
Notice:Driving your vehicle through an automatic
car wash with the winch installed, can cause
damage to your vehicle and the car wash. Always
remove the winch from your vehicle before using an
automatic car wash. SeeWashing Your Vehicle
on page 5-109for more information.
If you are using a winch to pull out your own vehicle,
follow the winch manufacturer’s guidelines for self
recovery and observe the following to prevent damage
to your vehicle:
Do not self recover your vehicle by wrapping the
winch cable around an object (such as a pulley
block or tree) and attaching it back to your vehicle’s
recovery loops.
Always attach the winch cable directly to a solid
anchor directly in front of your vehicle to achieve
a straight line pull.
4-54
Page 328 of 502

Trailer Wiring Harness
Heavy-Duty Trailer Wiring Package
Your vehicle is equipped with a trailer towing harness.
This harness with a seven-pin universal heavy-duty
trailer connector is attached to a bracket on the hitch
platform.The trailer towing harness contains the following trailer
circuits:
Yellow: Left Stop/Turn Signal
Dark Green: Right Stop/Turn Signal
Brown: Taillamps
White: Ground
Light Green: Back-up Lamps
Light Blue: Center High-Mounted
Stoplamp (CHMSL)
Red: Battery Feed
Dark Blue: Trailer Brake
A jumper harness for an electric trailer brake controller
and a trailer battery feed fuse may be included with
this trailering package. See “Instrument Panel Jumper
Wiring Harness” later in this section.
If you need to tow a light-duty trailer with a standard
four-way, round pin connector, an adapter may be
included. See “Four-Wire Harness Adapter” later in
this section.
4-74
Page 329 of 502

Instrument Panel Jumper Wiring Harness
Notice:If your vehicle has factory or
dealer-installed HUMMER off-road lamps, the place
where an electric trailer brake connection must
be made is already in use. Do not attempt to
double-up or “piggyback” the connection, because
this could cause a failure or damage to your
vehicle, the electric trailer brake system, or both. If
you want to connect a trailer with electric brakes
to your vehicle, see your dealer to disconnect
the off-road lamps. Also, readAdd-On Electrical
Equipment on page 5-114for more information.
This harness may be included with your vehicle as part
of the heavy-duty trailer wiring package.{CAUTION:
Be sure to use only the correct trailer brake
harness, the one intended for use on your
vehicle. If you use some other trailer brake
harness, even if it seems to �t, your trailer
brakes may not work at all. You could have a
crash in which you or others could be injured.
Use only the trailer brake harness intended
for your vehicle. If it is no longer available to
you, be sure to get a proper replacement from
your dealer.
This harness is for an electric brake controller and
includes a trailer battery feed fuse. It should be installed
by your dealer or a quali�ed service center.
4-75
Page 445 of 502

Windshield Wiper Fuses
The windshield wiper motor is protected by an internal
circuit breaker and a fuse. If the motor overheats due to
heavy snow, etc., the wiper will stop until the motor
cools. If the overload is caused by some electrical
problem and not snow, etc., be sure to get it �xed.
Power Windows and Other
Power Options
Circuit breakers protect the power windows and other
power accessories. When the current load is too heavy,
the circuit breaker opens and closes, protecting the
circuit until the problem is �xed or goes away.
Fuses and Circuit Breakers
The wiring circuits in your vehicle are protected from
short circuits by a combination of fuses, circuit breakers
and fusible thermal links. This greatly reduces the
chance of �res caused by electrical problems.
Look at the silver-colored band inside the fuse. If the
band is broken or melted, replace the fuse. Be sure you
replace a bad fuse with a new one of the identical
size and rating.
If you ever have a problem on the road and don’t have
a spare fuse, you can borrow one that has the same
amperage. Just pick some feature of your vehicle
that you can get along without – like the radio or
cigarette lighter – and use its fuse, if it is the correct
amperage. Replace it as soon as you can.
5-115
Page 448 of 502

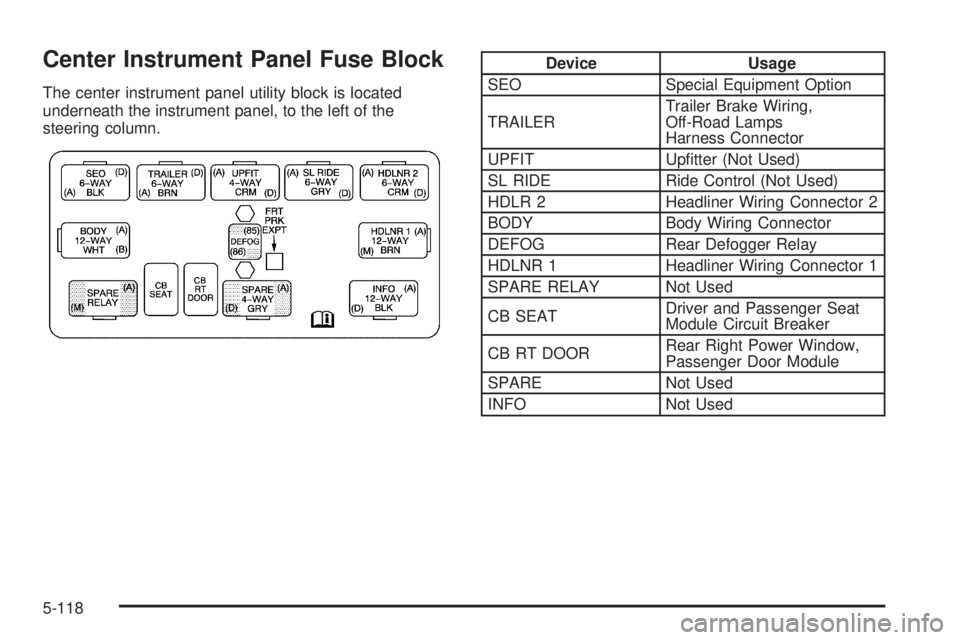
Center Instrument Panel Fuse Block
The center instrument panel utility block is located
underneath the instrument panel, to the left of the
steering column.
Device Usage
SEO Special Equipment Option
TRAILERTrailer Brake Wiring,
Off-Road Lamps
Harness Connector
UPFIT Up�tter (Not Used)
SL RIDE Ride Control (Not Used)
HDLR 2 Headliner Wiring Connector 2
BODY Body Wiring Connector
DEFOG Rear Defogger Relay
HDLNR 1 Headliner Wiring Connector 1
SPARE RELAY Not Used
CB SEATDriver and Passenger Seat
Module Circuit Breaker
CB RT DOORRear Right Power Window,
Passenger Door Module
SPARE Not Used
INFO Not Used
5-118