Page 115 of 320
Open the glove box by pulling the
handle. Close it with a f irm push.
Lock or unlock the glove box with
the master key.
The glove box light comes on when
the parking lights are on.Some larger styles of sunglasses
may not f it in the holder.
These hooks are not designed f or
large or heavy items.
To open the sunglasses holder, push
on the rear edge. Make sure the
holder is closed while you are driving.
Glove Box
Sunglasses Holder
Coat Hooks
Interior Convenience Items
112
SUNGLASSES HOLDER
An open glove box can cause
serious injury to your passenger
inacrash,evenifthe
passenger is wearing the seat
belt.
Always keep the glove box
closed while driving.
�����—�
���—�����y�
���������
�
�y���
�(�����������y���
�
���y
Page 118 of 320

When the interior light control switch isin the ON position: When the switch is in the OFF position:
When the switch is in the door position:
None of the lights come on when a
door is opened.
The map lights in the f ront can be
turned on and of f by pushing each
lens. The rear map lights cannot
be used.
All the individual map lights and
the rear console light come on and
stay on as long as the switch
remains in the ON position. The individual map lights and the
rear console light come on when
any door is opened, or when the
remote transmitter or the key is
used to unlock the doors. When
the doors are closed, each
individual map light can be turned
on and of f by pushing the lens.
The lights fade out about 30
seconds after all the doors are
closed.
With any door lef t open and the
key is removed f rom the ignition
switch, the lights stay on about 3
minutes, then go out.
Interior Lights
Interior L ight Control Switch
Inst rument s and Cont rols
115
ON
OFF
DOOR POSITION
�����—�
���—�����y�
�������������y���
�(�����������y���
�����y
Page 119 of 320

Turn on a f ront individual map light
by pushing the lens. Push the lens
again to turn it off. With the interior
light control switch in the door
position, a rear map light can be
turned on by pushing the lens. Push
the lens again to turn it off.The courtesy light in each door
comes on when you open that door.
The light around the ignition switch
only comes on when you open the
driver’s door. Af ter you close the
door, the ignition switch light f ades
out in about 30 seconds.
The courtesy light in the back of the
center console comes on when you
open any door with the interior light
control switch in the door position.
Af ter you close the doors, the light
f ades out.
The map lights stay on when the
interior light control switch is in the
door position and the map light
switch is on.
The courtesy light between the f ront
map lights comes on when you turn
the parking lights on. To adjust its
brightness, turn the instrument
panel brightness control dial on the
dashboard (see page ).75
If equipped
Interior Lights
Individual Map L ights Individual Interior L ights Courtesy L ight
116
�����—�
���—�����y�
�������������y���
�(�����������y���
���
�y
Page 120 of 320
If you turn the ignition switch to
ACCESSORY (I) or LOCK (0)
without turning of f the bed lights,
the lights and the indicator will
remain on, then go of f af ter 20
minutes (see page ).
Your vehicle has the bed lights in the
pickup bed: a light on each f ront
upper and rear bottom side. With the
shif t lever in the Park position, the
bed lights come on when you push
the bed light switch on the
dashboard, swing open the tailgate,
or open the In-Bed Trunk. The
indicator on the instrument panel
alsocomesontoremindyouthatthe
bed lights are on. To turn of f the lights, push the light
switch again, or close the tailgate
and the In-Bed Trunk.
When you move the shif t lever out of
the Park position, the bed lights go
of f and cannot be used. 66
Bed L ights
Inst rument s and Cont rols
117
BED LIGHT SWITCH
�����—�
���—�����y�
�������������y���
�(�����������y���
�����y
Page 140 of 320
�µ�µ
�µ�´
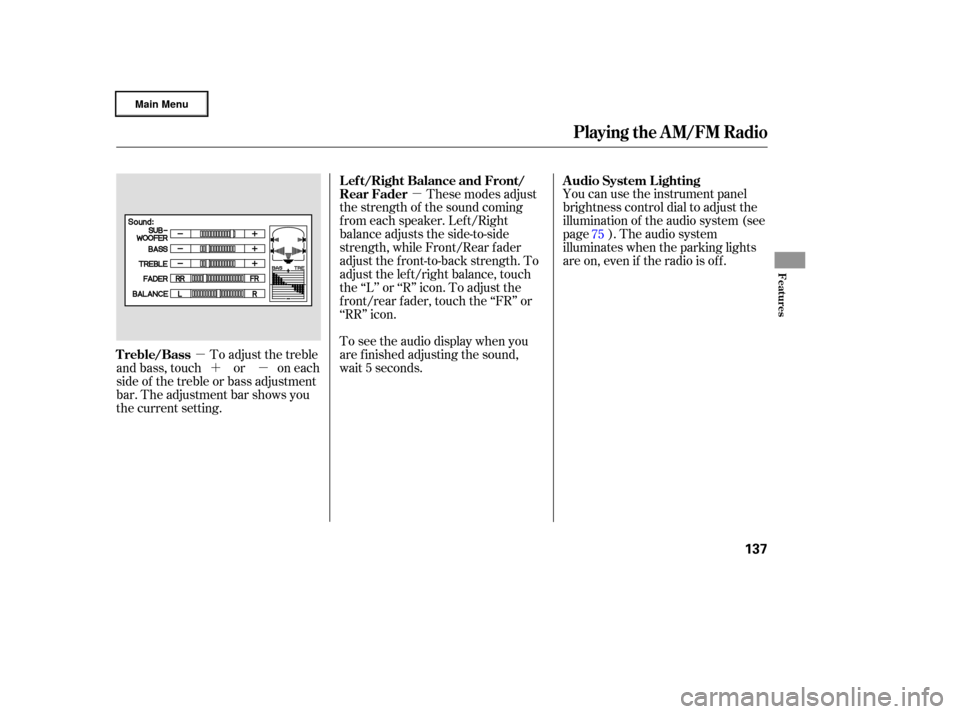
To adjust the treble
and bass, touch or on each
side of the treble or bass adjustment
bar. The adjustment bar shows you
the current setting. You can use the instrument panel
brightness control dial to adjust the
illumination of the audio system (see
page ). The audio system
illuminates when the parking lights
are on, even if the radio is of f .
These modes adjust
the strength of the sound coming
f rom each speaker. Lef t/Right
balance adjusts the side-to-side
strength, while Front/Rear f ader
adjust the f ront-to-back strength. To
adjust the left/right balance, touch
the ‘‘L’’ or ‘‘R’’ icon. To adjust the
front/rear fader, touch the ‘‘FR’’ or
‘‘RR’’ icon.
To see the audio display when you
are f inished adjusting the sound,
wait 5 seconds. 75
A udio System L ighting
Treble/Bass L ef t/Right Balance and Front/
Rear Fader
Playing the AM/FM Radio
Features
137
�����—�
���—�����y�
���������
���y���
�(�����������y���
�����y
Page 165 of 320

The security system automatically
sets 15 seconds after you lock the
doors, hood, and the In-Bed Trunk.
For the system to activate, you must
lock the doors f rom the outside with
the key, driver’s lock tab, door lock
switch, or remote transmitter. The
security system indicator above the
driver’s door lock tab starts blinking
immediately to show you the system
is setting itself .Once the security system is set,
opening any door (without using the
key or the remote transmitter), the
hood, or the In-Bed Trunk, will cause
it to alarm. It also alarms if the radio
and navigation components are
removed f rom the dashboard or the
wiring is cut.
The security system helps to protect
your vehicle and valuables f rom thef t.
The horn sounds and a combination
of headlights, parking lights, license
plate lights, and taillights f lash if
someone attempts to break into your
vehicleorremovetheradio.This
alarm continues f or 2 minutes, then
the system resets. To reset an
alarming system before the 2
minutes have elapsed, unlock the
driver’s door with the key or the
remote transmitter.
The security system will not set if
the hood, In-Bed Trunk, or any door
is not f ully closed. If the system will
not set, check the door and tailgate
open monitor and In-Bed Trunk open
indicator on the instrument panel
(see pages and ) to see if the
doors and In-Bed Trunk are f ully
closed. Since it is not part of the
monitor display, manually check the
hood.
Use the remote transmitter
to quickly check that the hood,
In-Bed Trunk, and all doors are
closed. Push the lock button twice
within 5 seconds. There should be an
audible conf irmation beep.
Do not attempt to alter this system
or add other devices to it. 61 66
If equipped
Security System
162
NOTE:
SECURITY SYSTEM INDICATOR
�����—�
���—�����y�
�����������
�y���
�(�����������y���
�����y
Page 183 of 320

Your dealer has Honda accessories
that allow you to personalize your
vehicle. These accessories have
been designed and approved f or your
vehicle, and are covered by warranty. Modif ying your vehicle, or installing
some non-Honda accessories, can
make it unsaf e. Bef ore you make any
modif ications or add any accessories,
be sure to read the f ollowing
inf ormation.
Although non-Honda accessories
may f it on your vehicle, they may not
meet f actory specif ications, and
could adversely af f ect your vehicle’s
handling and stability.When properly installed, cellular
phones, alarms, two-way radios, and
low-powered audio systems should
not interf ere with your vehicle’s
computer controlled systems, such
as your airbags and anti-lock brakes.
Bef ore installing any accessory:
Make sure the accessory does not
obscure any lights, or interf ere
with proper vehicle operation or
perf ormance.
Be sure electronic accessories do
not overload electrical circuits
(see page ) or interf ere with
the proper operation of your
vehicle.
If you install a truck cap, be sure it is
properly installed and does not
exceed your vehicle’s load limits (see
page ). 281
183
A ccessories
A ccessories and Modif ications
Your vehicle should not be used to
carry a slide-in camper.
180
Improper accessories or
modifications can affect your
vehicle’s handling, stability, and
performance, and cause a
crash in which you can be hurt
or killed.
Follow all instructions in this
owner’s manual regarding
accessories and modifications.
�����—�
���—�����y�
�����������
�y���
�(�����������y���
�����y
Page 194 of 320

Youshoulddothefollowingchecks
and adjustments bef ore you drive
your vehicle.Make sure all windows, mirrors,
and outside lights are clean and
unobstructed. Remove f rost, snow,
or ice.
Check that the hood is f ully closed.
Check that the tailgate is f ully
closed when it is not used as an
extended pickup bed.
Visually check the tires. If a tire
looks low, use a gauge to check its
pressure.
Check that any items you may be
carrying are stored properly or
f astened down securely. Check the adjustment of the
inside and outside mirrors (see
page ).
Check the steering wheel
adjustment (see page ).
Make sure the doors and In-Bed
Trunk are securely closed and
locked.
Fasten your seat belt. Check that
your passengers have f astened
their seat belts (see page ).
When you start the engine, check
the gauges and indicators in the
instrument panel (see page ).
Check the seat adjustment (see
pages and ).
1.
2.
3.
4.
5.
6.
8. 7.
9.
10.
11. 14
57
107
76
95 97
Preparing to Drive
Driving
191
�����—�
���—�����y�
���������
���y���
�(�����������y���
�����y

 or LOCK (0)
without turning of f the bed lights,
the lights and the indicator will
remain on, then go of f af ter 20
minutes (see page ).
Your vehicle")