Page 251 of 320
Install the new bulb into the
socket.
Push the socket into the light
assembly, and turn it clockwise
until it locks.
Turn on the lights to make sure
the new bulb is working.
Install the rear light assembly in
the rear pillar. Tighten the two
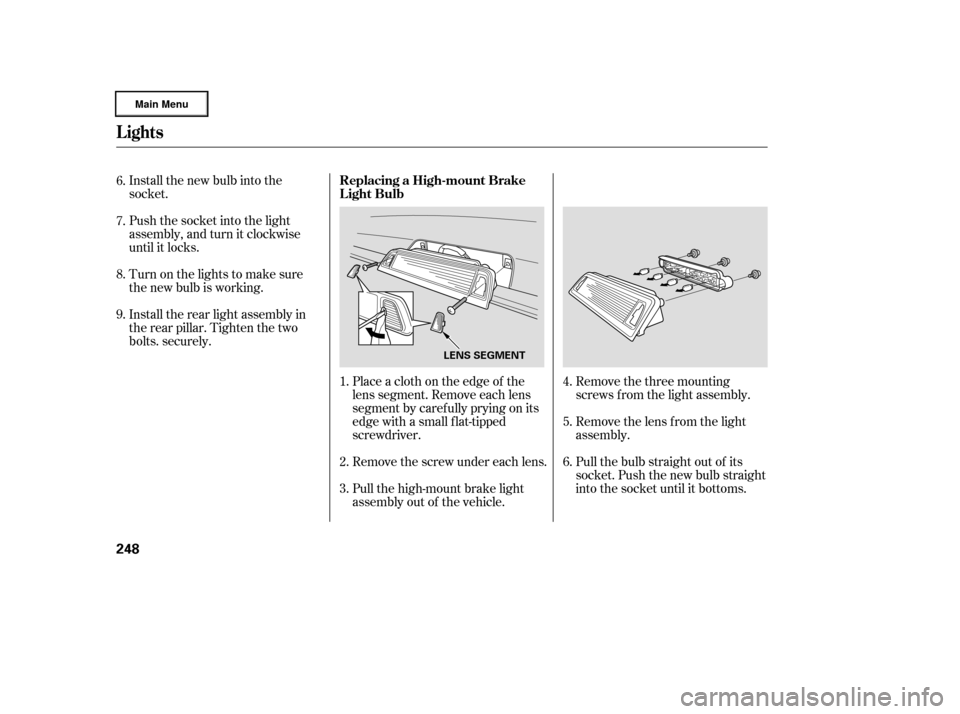
bolts. securely.Place a cloth on the edge of the
lens segment. Remove each lens
segment by caref ully prying on its
edge with a small f lat-tipped
screwdriver.Remove the three mounting
screws f rom the light assembly.
Remove the screw under each lens.
Pull the high-mount brake light
assembly out of the vehicle. Remove the lens f rom the light
assembly.
Pull the bulb straight out of its
socket. Push the new bulb straight
into the socket until it bottoms.
1.
2.
3. 4.
5.
6.
7.
8.
9.
6.
Lights
Replacing a High-mount Brake
Light Bulb
248
LENS SEGMENT
�����—�
���—�����y�
���������
���y���
�(�����������y���������y
Page 265 of 320
If you need to park your vehicle f or
an extended period (more than 1
month), there are several things you
should do to prepare it f or storage.
Proper preparation helps prevent
deterioration and makes it easier to
get your vehicle back on the road. If
possible, store your vehicle indoors.Fill the f uel tank.
Change the engine oil and f ilter.
Wash and dry the exterior
completely.
Cleantheinterior.Makesurethe
carpeting, floor mats, etc., are
completely dry.
Leave the parking brake off. Put
the transmission in Park. Block the rear wheels.
If the vehicle is to be stored f or a
longer period, it should be
supported on jackstands so the
tires are of f the ground.
Leave one window open slightly (if
the vehicle is being stored
indoors).
Disconnect the battery.
Cover the vehicle with a
‘‘breathable’’ cover, one made
f rom a porous material such as
cotton. Non-porous materials, such
as plastic sheeting, trap moisture,
which can damage the paint.
If possible, periodically run the
engine until it reaches f ull
operating temperature (the
cooling f ans cycle on and of f
twice). Pref erably, do this once a
month.
Support the f ront wiper blade
arms with a f olded towel or rag so
they do not touch the windshield.
To minimize sticking, apply a
silicone spray lubricant to all door,
In-Bed Trunk lid, and tailgate seals.
Also,applyavehiclebodywaxto
the painted surfaces that mate
with the door, In-Bed Trunk lid
and tailgate seals.
Vehicle Storage
262
�����—�
���—�����y�
�������������y���
�(�����������y���������y
Page 268 of 320

Turn on the hazard warning lights,
and turn the ignition switch to
LOCK (0). Have all passengers get
out of the vehicle while you
change the tire.
Park the vehicle on f irm, level, and
non-slippery ground. Put the
transmission in Park. Apply the
parking brake.
If you are towing a trailer, unhitch
it.
If you have a f lat tire while driving,
stop in a saf e place to change it.
Drive slowly along the shoulder until
you get to an exit or an area to stop
that is far away from the traffic lanes.
If you tow a trailer f requently, we
recommend that you use a regular
tire as a spare. You can store the
regular size spare tire on the tire tray,
but store the tool kit at the side of
the In-Bed Trunk (see page ),
and secure it.
2.
1.
271
CONT INUED
Changing a Flat Tire
T aking Care of t he Unexpect ed
265
TOOL BOX SPARE TIRE
The vehicle can easily roll off
the jack, seriously injuring
anyone underneath.
Follow the directions for
changing a tire exactly, and
never get under the vehicle
when it is supported only by the
jack.
�����—�
���—�����y�
�������������y���
�(�����������y���������y
Page 277 of 320

Are you using the proper starting
procedure? Ref er toon page .
There may be an electrical
problem, such as no power to the
f uel pump. Check all the f uses
(see page ).
If youfindnothingwrong,youwill
need a qualif ied technician to f ind
the problem. See on page . Although this seems like a simple
procedure, you should take several
precautions.
To jump start your vehicle:
You cannot start your vehicle by
pushing or pulling it.
Do you have f uel? Check the f uel
gauge; the low f uel indicator may
not be working.
Turn of f all electrical accessories:
heater, A/C, climate control, audio
system, lights, etc. Put the
transmission in Park, and set the
parking brake. Open the hood, and check the
physical condition of the battery.
In very cold weather, check the
condition of the electrolyte. If it
seems slushy or f rozen, do not try
jump starting until it thaws.
1.
2.
192
281 286 Starting the
Engine
Emergency
Towing Jump Starting
If the Engine Won’t Start, Jump Starting
274
A battery can explode if you do
not follow the correct procedure,
seriously injuring anyone
nearby.
Keep all sparks, open flames,
and smoking materials away
from the battery.
If a battery sits in extreme cold, the
electrolyte inside can f reeze.
Attempting to jump start with a f rozen
battery can cause it to rupture.
�����—�
���—�����y�
������
������y���
�(�����������y���������y
Page 283 of 320
However, if the brake pedal does not
f eel normal, you should take
immediate action. A problem in one
part of the system’s dual circuit
design will still give you braking at
two wheels. You will f eel the brake
pedal go down much f arther bef ore
the vehicle begins to slow down, and
you will have to press harder on the
pedal.
Slow down by shif ting to a lower
gear, and pull to the side of the road
when it is saf e. Because of the long
distance needed to stop, it is
hazardous to drive the vehicle. You
should have it towed, and repaired as
soon as possible. (Seeon page .)
If you must drive the vehicle a short
distance in this condition, drive
slowly and caref ully.
The brake system
indicator normally
comes on when
you turn the ignition switch to ON
(II), and as a reminder to check the
parking brake. It will stay on if you
do not f ully release the parking
brake.
If the brake system indicator comes
on while driving, the brake f luid level
is probably low. Press lightly on the
brake pedal to see if it f eels normal.
If it does, check the brake f luid level
thenexttimeyoustopataservice
station (see page ).
If the f luid level is low, take the
vehicle to your dealer and have the
brake system inspected f or leaks or
worn brake pads. If the ABS indicator and the VSA
system indicator come on with the
brake system indicator, have your
vehicle inspected by your dealer
immediately.
243 286Emergency
Towing
Brake System Indicator
280
Canada
U.S.
�����—�
���—�����y�
�������������y���
�(�����������y���������y
Page 284 of 320

The vehicle’s f uses are contained in
threefuseboxes.The primary under-hood f use box is
on the passenger’s side. The
secondary f use box is next to the
brake f luid reservoir. To open them,
pushthetabsasshown.If something electrical in your
vehicle stops working, the first thing
youshouldcheckforisablownfuse.
Determine f rom the chart on pages
and , or the diagram on the
f use box lid, which f use or f uses
control that device. Check those
f uses f irst, but check all the f uses
bef ore deciding that a blown f use is
the cause. Replace any blown f uses,
and check if the device works.
The interior f use box is on the
driver’s lower lef t side. To remove
the f use box lid, put your f inger in
the notch on the lid, and pull it
outward slightly, then pull it toward
you and take it out of its hinges.
284 285
CONT INUED
Checking and Replacing Fuses
Fuses
T aking Care of t he Unexpect ed
281
UNDER-HOOD (SECONDARY)
UNDER-HOOD (PRIMARY)
INTERIOR
NOTCH
�����—�
���—�����y�
�������������y���
�(�����������y���������y
Page 296 of 320

�µ
�µ
�µ
�µ
�µ
�µ
�µ
�µ
�µ
�µ
�µ
�µ
�µ
�µ
�µ
�µ
�µ
Specif ications
Technical Inf ormation
293
Fuses
Battery Engine
Alignment
Tires
Lights
60/55 W (HB2)
12 V
12 V 28/8 W
12 V 21 W
12 V 21/5 W
12 V 18 W
12 V 3 CP
12 V 3 CP
12 V
12 V 8W
5W
12 V 3 CP
12 V 1.4 W Interior
Under-hood
See page285or the fuse label
attached to the inside of the fuse
box lid under the dashboard.
See page284or the fuse box lid.
Capacity 12 V 12 V
3.8 W
2W
12 V 3.4 W Type
BorexStroke
Displacement
Compression ratio
Spark plugs
Toe-in
Camber
Caster
Size
Pressure3.50 x 3.66 in (89.0 x 93.0 mm)
211.8 cu-in (3,471 cm
)
10.0 : 1
IZFR5K-11
SKJ16DR-M11
0.00 in (0.0 mm)
0.00 in (0.0 mm) 0°50’
0°50’
1°53’
P245/65R17 105S
T165/90R17 105M
32 psi (220 kPa , 2.2 kgf/cm
)
60 psi (420 kPa , 4.2 kgf/cm)
Headlights
Front turn signal/Parking/
Hazard lights
Rear turn signal/hazard lights
Brake/Taillights
Back-up lights
License plate lights
High-mount brake lights
Individual map lights
Bed lights
Console compartment light
Glove box light
Vanity mirror light
Door courtesy lights
12 V 72 AH/20 HR
Front/Rear
Spare
Front/Rear
Spare Front
Rear
Front
Rear
Front
Front
Rear
NGK:
DENSO:
High/Low
(Amber)
Water cooled 4-stroke SOHC VTEC,V6 gasoline engine
�����—�
���—�����y�
�����������
�y���
�(�����������y���������y
Page 303 of 320
If you take your vehicle f or a state
emissions test shortly af ter the
battery has been disconnected or
gone dead, it may not pass the test.
This is because of certain ‘‘readiness
codes’’ that must be set in the on-
board diagnostics f or the emissions
systems. These codes are erased
when the battery is disconnected,
and set again only after several days
of driving under a variety of
conditions.
If the testing f acility determines that
the readiness codes are not set, you
will be requested to return at a later
date to complete the test. If you must
get the vehicle retested within the
next two or three days, you can
condition the vehicle f or retesting by
doing the f ollowing.Make sure the gas tank is nearly,
but not completely f ull (around
3/4). Without touching the accelerator
pedal, start the engine, and let it
idle f or 20 seconds.
Keep the vehicle in Park. Increase
the engine speed to 2,000 rpm, and
hold it there until the temperature
gauge rises to at least 1/4 of the
scale (about 3 minutes).
Select a nearby lightly traveled
major highway where you can
maintain a speed of 50 to 60 mph
(80to97km/h)foratleast20
minutes. Drive on the highway in
D. Do not use the cruise control.
When traffic allows, drive for 90
seconds without moving theaccelerator pedal. (Vehicle speed
may vary slightly; this is okay.) If
you cannot do this f or a
continuous 90 seconds because of
traf f ic conditions, drive f or at least
30 seconds, then repeat it two
more times (for a total of 90
seconds).
Then drive in city/suburban
traffic for at least 10 minutes.
When traffic conditions allow, let
the vehicle coast f or several
seconds without using the
accelerator pedal or the brake
pedal.
Stop the vehicle, turn of f the
ignition switch, and leave it of f f or
30 minutes.
If the testing f acility determines the
readiness codes are still not set, see
your dealer.
Make sure the vehicle has been
parked with the engine of f f or 6
hours or more.
Make sure the ambient
temperature is between 40° and
95°F.
State Emissions T esting
T esting of Readiness Codes
300
�����—�
���—�����y�
�������������y���
�(�����������y���������y