2006 HONDA PILOT ESP
[x] Cancel search: ESPPage 131 of 316
Depending on where you drive, you
may experience reception problems.
Interf erence can be caused by any of
these conditions:Driving on the north side of a
large commercial truck on an
east/west road.
Driving in tunnels.
Driving on a road beside a vertical
wall, steep clif f , or hill to the south
of you.
Driving on the lower level of a
multi-tiered road.
Driving on a single lane road
alongside dense trees taller than
50 ft. (15 m) to the south of you. After you’ve registered with XM
Radio, keep your audio system in the
satellite radio mode while you wait
f or activation. This should take about
30 minutes.
Driving on the north side of an
east/west mountain road.
Large items carried on a roof rack.
Theremaybeothergeographic
situations that could af f ect XM radio
reception. While waiting f or activation, make
sure your vehicle remains in an open
area with good reception. Once your
audio system is activated, you’ll be
able to listen to XM radio broadcasts.
XM Radio will continue to send an
activation signal to your vehicle f or
at least 12 hours from the activation
request. If the service has not been
activated after 36 hours, contact XM
Radio.
If your XM Radio service has expired
or you purchased your vehicle f rom
a previous owner, you can listen to a
sampling of the broadcasts
available
on XM satellite radio. With the
ignition switch in the ACCESSORY
(I) or the ON (II) position, push the
PWR/VOL knob to turn on the audio
system and press the XM RADIO
button. A variety of music types and
styles will play.
If you decide to purchase XM
satellite radio service, contact XM
Radio at , or at
1-800-852-9696. You will need to give
them your radio I.D. number and
your credit card number. To get your
radio I.D. number, turn the TUNE knob until ‘‘0’’ appears in the display.
Your I.D. will appear in the display.As required by the FCC:
Changes or modif ications not expresslyapproved by the party responsible f orcompliance could void the user’sauthority to operate the equipment.
www.xmradio.com
Receiving Satellite Radio Service
Playing the XMSatellite Radio
Features
129
Page 153 of 316
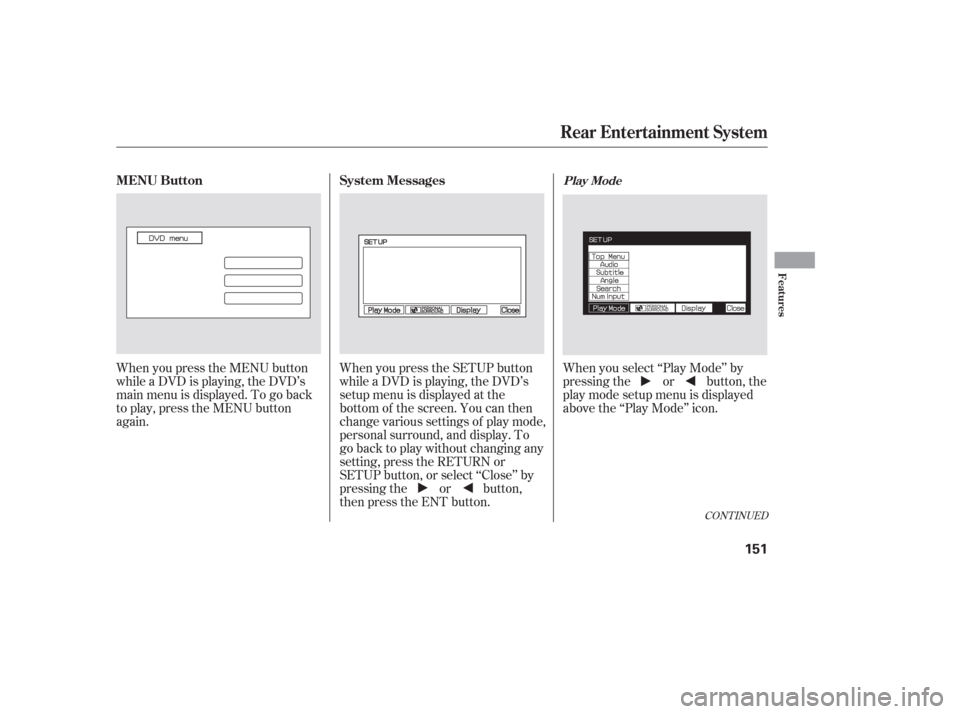
When you press the SETUP button
while a DVD is playing, the DVD’s
setup menu is displayed at the
bottom of the screen. You can then
change various settings of play mode,
personal surround, and display. To
go back to play without changing any
setting, press the RETURN or
SETUP button, or select ‘‘Close’’ by
pressing the or button,
then press the ENT button.When you select ‘‘Play Mode’’ by
pressing the or button, the
play mode setup menu is displayed
abovethe‘‘PlayMode’’icon.
When you press the MENU button
while a DVD is playing, the DVD’s
main menu is displayed. To go back
to play, press the MENU button
again.
CONT INUED
MENU Button
System MessagesPlay Mode
Rear Entertainment System
Features
151
Page 171 of 316
If it takes several pushes on the
button to operate the rear
entertainment system, have your
dealer replace the batteries as soon
as possible.
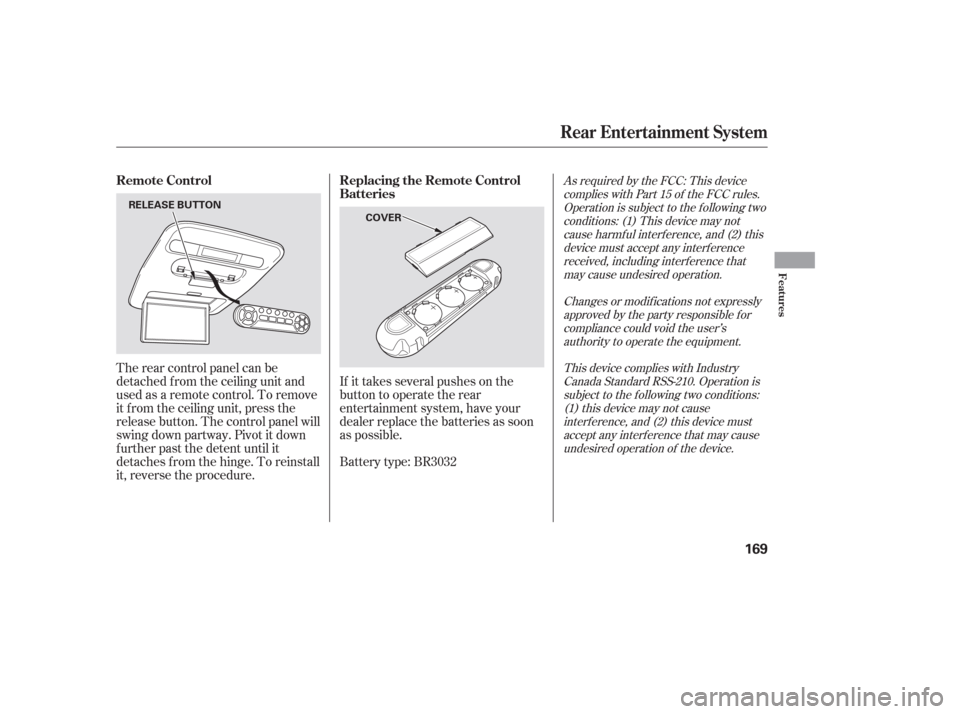
The rear control panel can be
detached f rom the ceiling unit and
used as a remote control. To remove
it f rom the ceiling unit, press the
release button. The control panel will
swing down partway. Pivot it down
f urther past the detent until it
detaches f rom the hinge. To reinstall
it, reverse the procedure.
Battery type: BR3032
As required by the FCC: This device
complies with Part 15 of the FCC rules.Operation is subject to the f ollowing twoconditions: (1) This device may notcause harmf ul interf erence, and (2) thisdevice must accept any interf erencereceived, including interf erence thatmay cause undesired operation.
Changes or modif ications not expresslyapproved by the party responsible f orcompliance could void the user’sauthority to operate the equipment.
This device complies with IndustryCanada Standard RSS-210. Operation issubject to the f ollowing two conditions:(1) this device may not causeinterf erence, and (2) this device mustaccept any interf erence that may causeundesired operation of the device.Remote Control Replacing the Remote Control
Batteries
Rear Entertainment System
Features
169
COVER
RELEASE BUTTON
Page 180 of 316
The compass may need to be
manually calibrated af ter exposure to
a strong magnetic field. If the
compassseemstocontinuallyshow
the wrong direction, do this.Drivethevehicleslowlyincircles
at less than 5 mph (8 km/h) until
the center icon turns blue. This
icon also turns blue by continuing
to drive the vehicle under normal
driving conditions. When you see
an actual heading on the compass,
calibration is completed.
In most areas, there is a variation
between magnetic north and true
north. Zone selection is required so
the compass can compensate f or this
variation. To check and select the
zone, do this: Find the zone f or your area on the
zone map (see page ). Each
zone number (1 through 15)
corresponds to a compass zone on
the table (see page ). Press and hold the compass
button f or about 3 seconds. When
all of the direction icons begins to
blink, release the button.
The blue direction icon(s) blink
and show the current zone.
If the zone is incorrect, press and
release the compass button
repeatedly to get to the correct
number.
The compass will return to the
normal display about 4 seconds
af ter you stop adjusting a zone
number.
Do this procedure in an open
area, away f rom buildings, power
lines, and other vehicles.
With the blue center icon
displayed, press and hold the
compass button for about 6
seconds. When the center icon
turns red, release the button. 2.
1. 2.
3.
4.
1. 5.
179 179
Compass Calibration
Compass Zone Selection
Compass
178
NOTE:
Page 185 of 316
As required by the FCC:This device complies with Part 15 of theFCC rules. Operation is subject to thef ollowing two conditions: (1) This devicemay not cause harmf ul interf erence, and(2) this device must accept anyinterf erence received, includinginterf erence that may cause undesiredoperation.
Changes or modif ications not expresslyapproved by the party responsible f orcompliance could void the user’sauthority to operate the equipment.
This device complies with IndustryCanada Standard RSS-210.Operation is subject to the f ollowing twoconditions: (1) this device may not causeinterf erence, and (2) this device mustaccept any interf erence that may causeundesired operation of the device.
Toerasethecodesstoredinallthree
buttons, press and hold the two
outside buttons until the red
indicator begins to f lash, then
release the buttons.
Youshoulderaseallthreecodes
bef ore selling the vehicle.
If you want to retrain a programmed
button f or a new device, you do not
have to erase all button memory.
You can replace the existing memory
code using this procedure:
If a rolling code transmitter was
previously programmed, the
indicator will f lash rapidly f or 2
seconds, and then stay on f or
about 23 seconds. If a standard transmitter was
programmed, the indicator will
stay on f or about 25 seconds.
PressandholdtheHomeLink
button to be trained until the
HomeLink indicator begins to
flash slowly. Once the HomeLink indicator
begins to f lash slowly, continue to
hold the HomeLink button, and
f ollow steps 3 thru 6 under
‘‘Training HomeLink’’ (see page
).
If you have problems with training
the HomeLink Universal Transceiver,
or would like inf ormation on home
products that can be operated by
HomeLink, call (800) 355-3515. On
the Internet, go to
www.homelink.com.
HomeLink
is a registered
trademark of Johnson Controls, Inc.
1. 2.
180
HomeL ink Universal Transceiver
Erasing Codes
Retraining a Button Customer Assistance
Features
183
Page 208 of 316

The appropriate tire indicator and
low tire pressure indicator comes on
if a tire becomes signif icantly
underinf lated. Seeon page .
This indicator comes on and stays on
if there is a problem with the tire
pressure monitoring system.
If you see this message, the system
is of f and is not monitoring the tire
pressures. Have the system checked
by your dealer as soon as possible.
If you have a f lat tire, the low tire
pressure and tire monitor indicators
will come on. Replace the indicated
flat tire with the compact spare tire
(see page ). Each wheel is equipped with a tire
pressure sensor mounted inside the
tire behind the valve stem. You must
use TPMS specif ic wheels. It is
recommended that you always have
your tires serviced by your dealer or
qualif ied technician.
After you replace the flat tire, the
low tire pressure indicator stays on.
This is normal; the system is not
monitoring the spare tire pressure.
Manually check the spare tire
pressure to be sure it is correct.
Never use a puncture-repairing agent
in a f lat tire. If used, you will have to
replace the tire pressure sensor.
Havetheflattirerepairedbyyour
dealer as soon as possible.
266 205
As required by the FCC:
This device complies with Part 15 of theFCC rules. Operation is subject to thef ollowing two conditions: (1) This devicemay not cause harmf ul interf erence, and(2) this device must accept anyinterf erence received, includinginterf erence that may cause undesiredoperation.
Changes or modif ications not expresslyapproved by the party responsible f orcompliance could void the user’sauthority to operate the equipment.
This device complies with IndustryCanada Standard RSS-210.Operation is subject to the f ollowing twoconditions: (1) this device may not causeinterf erence, and (2) this device mustaccept any interf erence that may causeundesired operation of the device.
Tire Pressure Monitoring System (TPMS)
Tire Pressure Monitor
Low Tire
Pressure Indicator
Changing a T ire with T PMS Tire Pressure Monitoring
System (T PMS) Indicator
206
Page 213 of 316
When VSA activates, you will see the
VSA activation indicator blink (see
page ).If this indicator comes on while
driving, pull to the side of the road
when it is saf e, and turn of f the
engine. Reset the system by
restarting the engine. If the VSA
system indicator stays on, or comes
back on while driving, have the VSA
system inspected by your dealer.
The vehicle stability assist (VSA)
system helps to stabilize the vehicle
during cornering if the vehicle turns
more or less than desired. It also
assists you in maintaining traction
while accelerating on loose or
slippery road surf aces. It does this
by regulating the engine’s output,
and by selectively applying the
brakes.
When VSA activates, you may notice
that the engine does not respond to
the accelerator in the same way it
does at other times.
The VSA system cannot enhance the
vehicle’s driving stability in all
situations and does not control your
vehicle’s entire braking system. It is
still your responsibility to drive and
corner at reasonable speeds and to
leave a sufficient margin of safety. 212
CONT INUED
VSA A ctivation Indicator
VSA System Indicator
Vehicle Stability Assist (VSA) System
Driving
211
Page 217 of 316
Number ofOccupants 2
3
4
5
6
7
8 Max. T railer Weight
Max. T ongue Load
Number of Occupants 2
3
4
5
6
7
8 Max. T railer Weight
Max. T ongue Load
Equipped with transmission cooler and power steering f luid cooler.
T owing is Not Recommended
Equipped with transmission cooler and power steering f luid cooler.
T owing is Not Recommended
Towing a Trailer
Driving
215
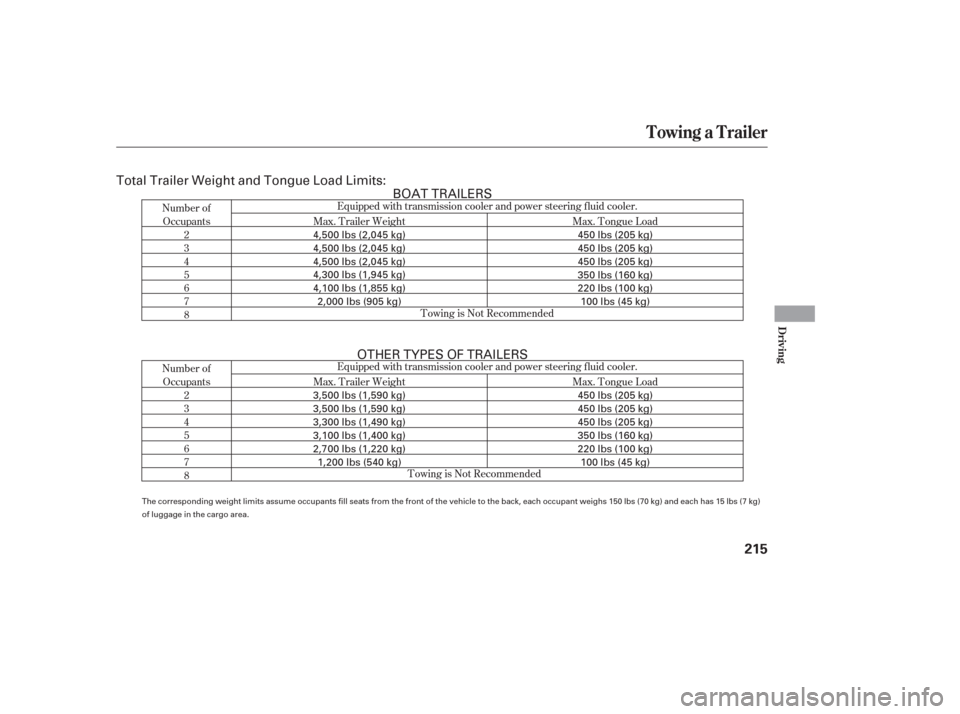
Total Trailer Weight and Tongue Load Limits: BOAT TRAILERS
OTHER TYPES OF TRAILERS
The corresponding weight limits assume occupants fill seats from the front of the vehicle to the back, each occupant weighs 150 lbs (70 kg) and each has 1 5 lbs (7 kg)
of luggage in the cargo area.
4,500 lbs (2,045 kg)
4,500 lbs (2,045 kg)
4,500 lbs (2,045 kg)
4,300 lbs (1,945 kg)
4,100 lbs (1,855 kg) 2,000 lbs (905 kg) 450 lbs (205 kg)
450 lbs (205 kg)
450 lbs (205 kg)
350 lbs (160 kg)
220 lbs (100 kg)
100 lbs (45 kg)
3,500 lbs (1,590 kg)
3,500 lbs (1,590 kg)
3,300 lbs (1,490 kg)
3,100 lbs (1,400 kg)
2,700 lbs (1,220 kg) 1,200 lbs (540 kg) 450 lbs (205 kg)
450 lbs (205 kg)
450 lbs (205 kg)
350 lbs (160 kg)
220 lbs (100 kg)
100 lbs (45 kg)