Page 187 of 420
There are three accessory power
sockets in your vehicle. Two
accessory power sockets are above
the center pocket for the front seat
passengers, and another is on the
cargo area sidewall on the driver’s
side.There is a 115 volt AC power outlet
in the rear compartment on the
driver’s side. To use the AC power
outlet, open the rear compartment
lid and open the outlet cover. Insert
the plug into the receptacle slightly,
turn it 90° clockwise, then push in
the plug all the way.
Always run the engine when you use
the AC Power Outlet.
Each socket is intended to supply
power f or 12 volt DC accessories
that are rated 120 watts or less (10
amps).
None of the sockets will power an
automotive type cigarette lighter
element.
A ccessory Power Sockets
A C Power Outlet
Interior Convenience Items
186
Page 189 of 420
Turn on the f ront and rear individual
map lights by pushing the lens of
each light. Push the lens again to
turn it of f . You can also operate
these lights with the light control
switch (see page ).
The lights go out about 30 seconds
after all the doors and the tailgate
are closed. They go out immediately
af ter all doors are locked.
With the light control switch in the
Door Activated position, all the
individual map lights come on when
you unlock the door with the remote
transmitter (see page ).
Withanydoororthetailgateleft
open, the lights stay on about 3
minutes, then go out.
ON
All the individual map lights come
onandstayonaslongasthe
switch remains in the ON position.
137
187
When the light control switch is in theposition: On EX, EX-L and Touring modelsIndividual Map L ights
Interior Lights
188
FRONT
Page 209 of 420
�µ
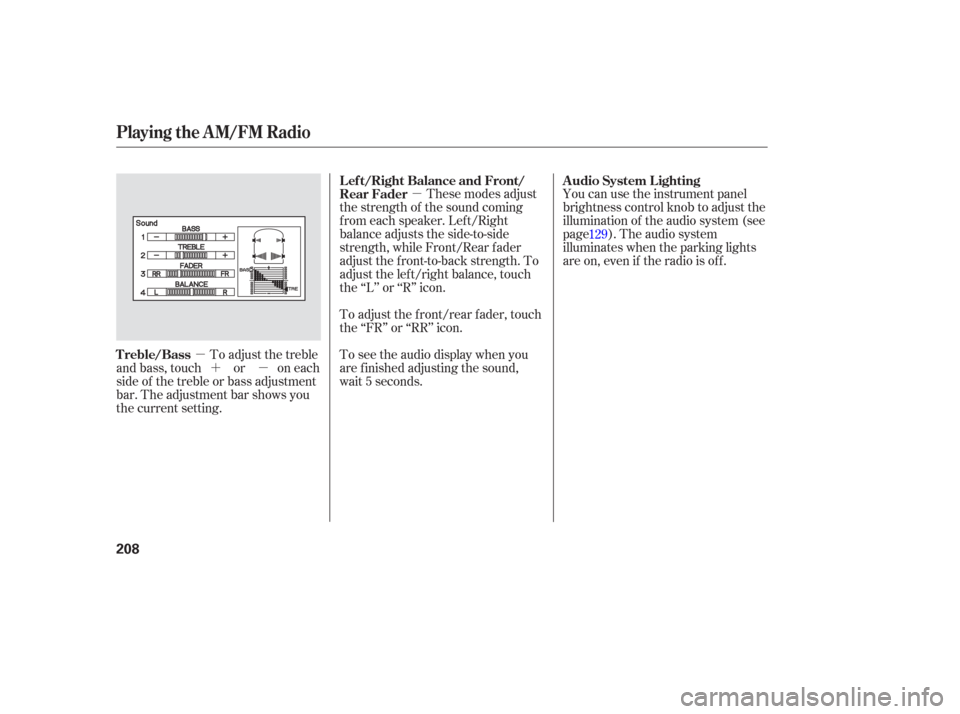
�µ �µ�´ You can use the instrument panel
brightness control knob to adjust the
illumination of the audio system (see
page ). The audio system
illuminates when the parking lights
are on, even if the radio is of f .
These modes adjust
the strength of the sound coming
f rom each speaker. Lef t/Right
balance adjusts the side-to-side
strength, while Front/Rear f ader
adjust the f ront-to-back strength. To
adjust the left/right balance, touch
the ‘‘L’’ or ‘‘R’’ icon.
To adjust the front/rear fader, touch
the ‘‘FR’’ or ‘‘RR’’ icon.
To adjust the treble
and bass, touch or on each
side of the treble or bass adjustment
bar. The adjustment bar shows you
the current setting. To see the audio display when you
are f inished adjusting the sound,
wait 5 seconds. 129
A udio System L ighting
L ef t/Right Balance and Front/
Rear Fader
Treble/Bass
Playing the AM/FM Radio
208
Page 305 of 420

Always use the parking brake when
you park your vehicle. Make sure
the parking brake is set f irmly, or
your vehicle may roll if it is parked
on an incline.
Set the parking brake bef ore you put
the transmission in Park. This keeps
the vehicle from moving and putting
pressure on the parking mechanism
in the transmission.If the vehicle is f acing uphill, turn
the front wheels away from the
curb.
If the vehicle is f acing downhill,
turn the front wheels toward the
curb.
Make sure the parking brake is
f ully released bef ore driving away.
Driving with the parking brake
partially set can overheat or
damage the rear brakes.
Make sure the moonroof and the
windows are closed.
Never park over dry leaves, tall
grass, or other f lammable
materials. The hot three way
catalytic converter could cause
these materials to catch on fire. Lock the doors and the tailgate. Place any packages, valuables, etc.
in the cargo area or take them
with you. Turn of f the lights.
Parking T ips
Parking
304
Page 345 of 420
Remove the electrical connector
f rom the bulb by pushing on the
tab and pulling the connector
down.
Remove the bulb by turning it one-
quarter turn counterclockwise.Open the hood. Remove the
socket f rom the headlight
assembly by turning it one-quarter
turn counterclockwise.
Pull the burned out bulb straight
out of its socket.
Push the new bulb straight into
the socket until it bottoms.
Push the electrical connector back
onto the bulb. Make sure it is on
all the way.
Turn on the headlights to test the
new bulb.
If you replaced the high beam
headlight bulb on the passenger’s
side, reinstall the power steering
f luid reservoir.
Insert the new bulb into the hole,
and turn it one-quarter turn clock-
wise to lock it in place. 5.
6.
7.
2.
3.
4. 2. 1.
Lights
Replacing a Front T urn Signal
Bulb
344
TAB
Page 346 of 420
Insert the socket back into the
headlight assembly. Turn it
clockwise to lock it in place.
Turn on the lights to make sure
the new bulb is working.Open the hood. Remove the
socket f rom the headlight
assembly by turning it one-quarter
turn counterclockwise.
Pull the bulb straight out of its
socket. Push the new bulb straight
into the socket until it bottoms.Insert the socket back into the
headlight assembly. Turn it
clockwise to lock it in place.
Turn on the lights to make sure
the new bulb is working.
3.
4.
1.
2.
3.
4.
Lights
Replacing a Front Parking/Side
Marker Bulb
Maint enance
345
Page 347 of 420
Use a wrench to remove the
mounting bolt f rom the underbody
through the hole in the splash
shield.
Remove the f og light assembly
f rom the bumper by pulling its
inner edge f irst, then the whole
assembly out of the bumper.Remove the electrical connector
f rom the bulb by pushing on the
tab and pulling the connector
down.
Remove the bulb f rom the f og
light assembly by turning it one-
quarter turn counterclockwise.Push the electrical connector onto
the new bulb.
Turn on the f og lights to test the
new bulb.
Reinstall the f og light assembly
into the bumper. Tighten the
mounting bolt. Insert the new bulb into the
assembly and turn it one-quarter
turn clockwise to lock it in place.
1.
2. 3.
4.5.
6.
7.
8.
Touring model only
Lights
Replacing a Front Fog L ight Bulb
346
Page 385 of 420
�µ
�µ�´
�´
�µ
�Î
�Î
�Î �Î
�Î �Î
�Î �Î
No. Amps. No.
No. Amps. Circuits Protected
Amps. Circuits Protected
No. Amps.
Circuits Protected Circuits Protected
1
2
3
4
5
6
7
8
9
10
11
12 10 A
30 A
10 A
15 A
10 A
10 A
7.5 A 15 A
30 A
30 A
7.5 A
If equipped
13
14
15
16
17
18
19
20
21
22
23
If equipped
1
2
3
4
5
6
40 A
40 A
40 A
20 A
20 A Left Headlight Low
Rear Defroster Coil
Left Headlight High
Small Lights
Right Headlight Low
Right Headlight High
Back Up
FI ECU
Condenser Fan
Not used
Cooling Fan
MG Clutch
20 A
30 A
40 A
15 A
30 A
30 A
30 A
40 A
40 A
70 A
120 A 50 A
40 A Horn, Stop
Defroster
Back Up
Hazard
VSA Motor
VSA
Option 1
Option 2
Heater Motor
BASF/B
Battery BIGIMain
Power Window
7
8
9
10
11 10 A
10 A
7.5 A
7.5 A
Not Used
Left Power Sliding Door
Right Power Sliding Door
Power Tailgate
Premium
AC Inverter Front Fog Light
ACM
TPMS
Not Used
Rear Entertainment System
:
:
Fuse Locations
384
PRIMARY UNDER-HOOD FUSE BOX
SECONDARY UNDER-HOOD FUSE BOX

.")