Page 226 of 420
 in
the display. T")
When you press the RDM button or
touch the TRACK RANDOM icon on
the upper display, the system plays
the tracks of the current disc in
random order. You will see
RANDOM (TRACK RANDOM) in
the display. To turn this feature off,
press the RDM button (touch
TRACK RANDOM) again.
Operation of TRACK SCAN, DISC
SCAN, TRACK REPEAT, DISC
REPEAT, and TRACK RANDOM on
the upper display is possible only
when the audio display is in the
upright position.
To take the system out of CD mode,
press the AM/FM button or SAT
RADIO button (U.S. models). Each
time you press the AM/FM button,
the system changes to the next
mode (AM, FM1, or FM2). When
you return to CD mode by pressing
the CD button, play will continuewhere it lef t of f .
To eject all discs, press and hold the
eject button until the indicators
above the disc buttons blink. To eject one disc, press and release
the eject button. You can also eject discs when the
ignition switch is on or of f : When you press the eject button
while listening to the radio, or with
the audio system turned of f , the disc
that was last selected is ejected.
Af ter that disc is ejected, pressing
the eject button again will eject the
next disc in numerical order. By
doing this six times, you can remove
all the discs f rom the changer. To remove the disc f rom the
changer,firstselectitbypressing
the appropriate disc button or
corresponding number on the preset
button. When that disc begins
playing, press the eject button.
If you do not remove the CD f rom
the slot, the system will reload the
CD af ter 15 seconds and put the CD
changer in pause mode. To begin
playing the CD, press the CD button. To remove the disc that is currently
playing, press the eject button. You
will see ‘‘EJECT’’ in the display.
When you remove the disc f rom the
slot, the system automatically begins
the load sequence so you can load
another disc in that position. If you
do not load another CD, within 15
seconds, the system selects the
previous mode [AM, FM1, FM2, or
XM Radio (U.S. models)]. If you turn the system of f while a CD
is playing, either with the PWR/VOL
knob or the ignition switch, play will
continue at the same point when you
turn it back on.
Random Play
To Stop Playing a Disc Removing CDs f rom the Changer
Playing a CD, CD Changer
Features
225
Page 227 of 420

When using CD-R discs, use only
high quality CDs labeled f or audio
use.
When recording a CD-R, the
recording must be closed f or it to
be used.
CD-RW discs will not work in this
unit.
Play only standard round CDs.
Odd-shaped CDs may jam in the
driveorcauseotherproblems.
Handle your CDs properly to
prevent damage and skipping.When a CD is not being played, store
it in its case to protect it f rom dust
and other contamination. To prevent
warpage, keep CDs out of direct
sunlight and extreme heat.
To clean a CD, use a clean sof t cloth.
Wipe across the CD f rom the center
to the outside edge.
AnewCDmayberoughonthe
inner and outer edges. The small
plastic pieces causing this roughness
can f lake of f and f all on the re-
cording surf ace of the CD, causing
skipping or other problems. Remove
these pieces by rubbing the inner
and outer edges with the side of a
pencil or pen.
Handle a CD by its edges; never
touch either surf ace. Do not place
stabilizer rings or labels on the CD.
These, along with contamination
f rom f ingerprints, liquids, and f elt-tip
pens, can cause the CD to not play
properly or possibly jam in the drive.
Never try to insert f oreign objects in
the CD player or the CD changer.
General Inf ormation
Protecting CDs
Protecting Your CDs
226
Page 234 of 420
, CD (if a
disc is loaded) or a tape (if the
optional tape p")
�´
�µ �´
�µ
�´ �µ
�Û�Ý
The MODE button changes the
mode. Pressing the button
repeatedly selects FM1, FM2, AM,
XM Radio (U.S. models), CD (if a
disc is loaded) or a tape (if the
optional tape player is installed and a
tape is loaded).
If you are listening to the radio, use
the CH button to change stations.
Each time you press the top ( ) of
the button, the system goes to the
next preset station on the band you
are listening to. Press the bottom
( ) to go back to the previous
station. If youareplayingaCD,thesystem
skips to the beginning of the next
track each time you press the top
( ) of the CH button. Press the
bottom ( ) to return to the
beginning of the current track. Press
it again to return to the previous
track. You will see the disc and track
numbers in the display.
Three controls f or the audio system
are mounted in the steering wheel
hub. They let you control basic
f unctions without removing your
hand f rom the steering wheel. If youareplayingatape,pressthe
top ( ) of the CH button to advance
to the next selection. Press the
bottom( )togobacktothe
previous selection. The system
senses a silent period, then goes
back to play mode.
The VOL button adjusts the volume
up ( ) or down ( ). Press the top
or bottom of the button and hold it
until the desired volume is reached,
then release it.
On EX, EX-L and Touring models
Steering Wheel Controls
Features
233
MODE BUTTON
VOL BUTTON
CH BUTTON
Page 235 of 420

Your vehicle’s audio system will
disable itself if it is disconnected
f rom electrical power f or any reason.
To make it work again, you must
enter a specif ic f ive-digit code with
the preset buttons. Because there
are hundreds of number
combinations possible f rom the f ive
digits, making the system work
without knowing the exact code is
nearly impossible.
Youshouldhavereceivedacardthat
lists your audio system code number
and serial number. It is best to store
this card in a saf e place at home. In
addition, you should write the audio
system’s serial number in this
Owner’s Manual.
If youshouldhappentolosethecard,
you must obtain the code number
f rom a Honda dealer. To do this, you
will need the system’s serial number.If your vehicle’s battery is discon-
nected or goes dead, or the radio
f use is removed, the audio system
will disable itself . If this happens,
youwillsee‘‘ ’’inthe
frequencydisplaythenexttimeyou
turn on the system. Use the preset
buttons to enter the five-digit code.
The code is located on the radio code
card included in your Owner’s
Manual kit. When it is entered
correctly, the radio will start playing.
If you make a mistake entering the
code, do not start over; complete the
f ive-digit sequence, then enter the
correct code. You have 10 tries to
enter the correct code. If you are
unsuccessf ul in 10 attempts, you
must then leave the system on for 1
hour bef ore trying again.
You will have to store your favorite
stations in the preset buttons after
the system begins working. Your
original settings were lost when the
power was disconnected.
On EX, EX-L and Touring models
Radio T hef t Protection
234
Page 237 of 420
, press the RR
CTRL knob. The system’s icon
shows in the upper display. Your
passengers can then operate the rea")
Press the REAR PWR button. To
turn on the rear controls (ceiling
panel/remote control), press the RR
CTRL knob. The system’s icon
shows in the upper display. Your
passengers can then operate the rear
system with the control panel in the
ceiling. The rear control panel can be
used as a remote control when it is
detached f rom the ceiling unit. Press
the RR CTRL knob again to turn the
rear controls of f . You will see the
RearControlsOff iconintheupper
display.
The rear system selects the source it
waslastsetto.Ifthatsourcehas
been removed (the DVD has been
ejected f rom the player, f or example),
you will see ‘‘DVD EJECT’’ in the
display. You must select another
source.Whenyouturnonthesystem,the
rear speakers are automatically
turned of f if the rear system selects
a dif f erent entertainment source
than the front system. You will see
the Rear Speakers Of f icon in the
upper display. The sound f or the rear
system is sent to the wireless
headphones.
If youwanttoturntherearspeakers
on again, press and hold the REAR
PWR button until the Rear Speakers
Of f icon goes of f .
The rear speakers are
connected to the f ront system, so
they will always play the source that
the f ront system is set to.
Your vehicle is equipped with a rear
entertainment system that includes a
DVD player f or the enjoyment of the
rear passengers.
With this system, the rear
passengers can enjoy a dif f erent
entertainment source (radio, CD
changer, DVD player, or optional
tape player) than the f ront seat
occupants. The audio is broadcast
through the supplied wireless
headphones.
The ignition switch must be in the
ACCESSORY (I) or ON (II) position
to operate the rear entertainment
system.
Available on EX-L and Touring modelsTo Turn On the System
Rear Speakers
Rear Entertainment System
236
NOTE:
Page 240 of 420

�µ
�´
�µ
�´ �µ�µ
Press and hold the
side to move forward; you will see
‘‘CUE’’ in the display. Press and hold
the sidetomovebackward;you
will see ‘‘REV’’ in the display.
Release the bar when the system
reaches the point you want.
Each time you press and release the side of the SEEK/SKIP bar, the
system skips f orward to the
beginning of the next track or
chapter. Press and release the
side of the bar to skip backward to
the beginning of the current track or
chapter. Press it again to skip to the
beginning of the previous track or
chapter. Press the eject button to
remove the DVD from the drive.
To return f ront panel control to the
front audio system, turn the REAR
CTRL knob counterclockwise. To turn on the rear entertainment
system f rom the rear control panel,
press the PWR button. Use the AM/
FM button, XM RADIO button (U.S.
models), CD button, DVD/AUX
button (U.S. models), or AUX button
(Canadian models) to select the
entertainment source. The selected
source will be shown in the display.
Make sure the rear control operation
has not been disabled with the REAR
CTRL knob on the f ront panel.
SEEK /SK IP
EJECT
To Return to Front Audio
Controls Using the Rear Control Panel
Rear Entertainment System
Features
239
Page 244 of 420
When you press the DISP button
while a DVD is playing, the title,
chapter, elapsed time, and personal
surround logo are displayed
(STATUS 1).When you press the DISP button
again, the subtitle, audio, angle,
sound characteristics, and personal
surround logo are displayed
(STATUS 2).To go back to play, press the DISP
button.
DISP Button
Rear Entertainment System
Features
243
Page 246 of 420
�Ý�Û�Ý�Û
�Ý�Û
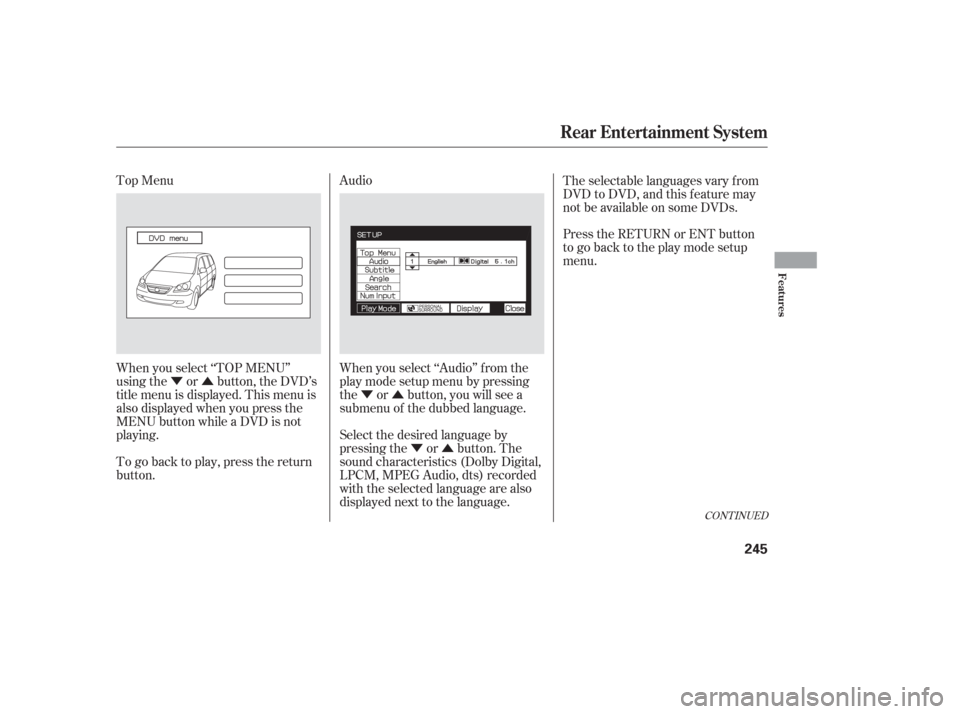
Top Menu
Audio
When you select ‘‘TOP MENU’’
using the or button, the DVD’s
title menu is displayed. This menu is
also displayed when you press the
MENU button while a DVD is not
playing. When you select ‘‘Audio’’ f rom the
play mode setup menu by pressing
the or button, you will see a
submenu of the dubbed language.The selectable languages vary f rom
DVD to DVD, and this feature may
notbeavailableonsomeDVDs.
Press the RETURN or ENT button
to go back to the play mode setup
menu.
Select the desired language by
pressing the or button. The
sound characteristics (Dolby Digital,
LPCM, MPEG Audio, dts) recorded
with the selected language are also
displayed next to the language.
To go back to play, press the return
button.
CONT INUED
Rear Entertainment System
Features
245
.When you press the DISP button
again, the subtitle, audio,")