Page 207 of 274
�à
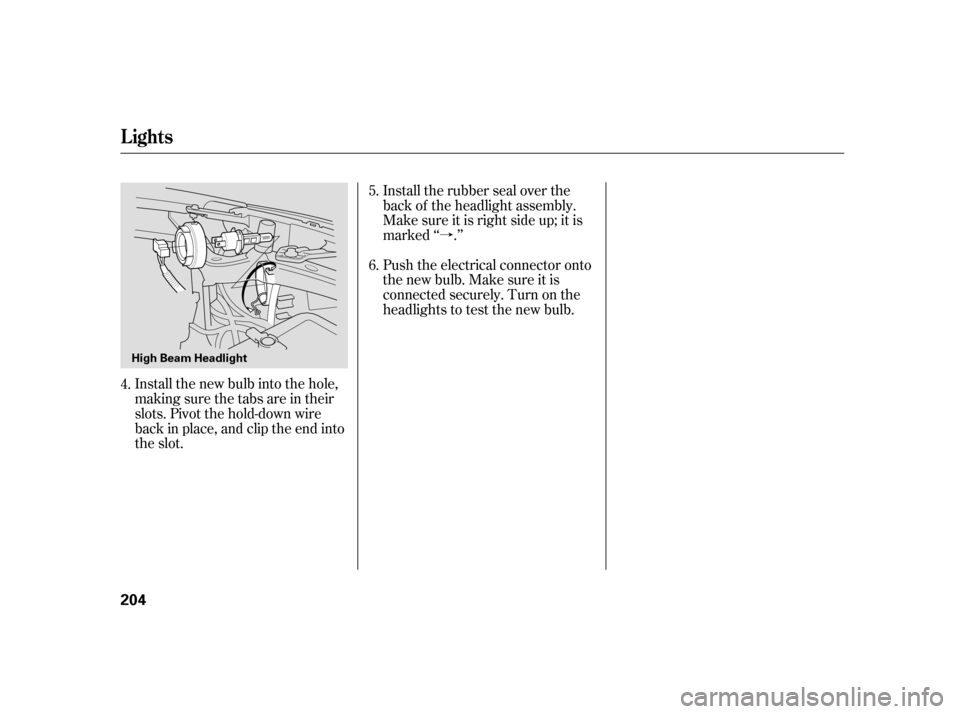
Install the new bulb into the hole,
making sure the tabs are in their
slots. Pivot the hold-down wire
back in place, and clip the end into
the slot. Install the rubber seal over the
back of the headlight assembly.
Make sure it is right side up; it is
marked ‘‘ .’’
Push the electrical connector onto
the new bulb. Make sure it is
connected securely. Turn on the
headlights to test the new bulb.
4. 5.
6.
Lights
204
High Beam Headlight
Page 210 of 274
Open the tailgate. Remove the
light assembly cover by pushing in
on the tabs on both sides and
pulling the cover of f .
Remove the socket f rom the light
assembly by turning it one-quarter
turn counterclockwise.Put the socket back into the light
assembly, and turn it clockwise to
lock it in place.
Pull the bulb straight out of its
socket. Push the new bulb straight
into the socket until it bottoms.
Press the brake pedal to make
sure the new bulb is working. Put the cover back on the light
assembly. Push it in until it locks
in place.
1.
2. 3.
4.5.
6.
Lights
Replacing a High-mount Brake
Light Bulb
Maint enance
207
COVER
BULB
Page 214 of 274

To saf ely operate your vehicle, your
tires must be the proper type and
size, in good condition with adequate
tread, and correctly inf lated.
The f ollowing pages give more
detailed inf ormation on how to take
care of your tires and what to do
when they need to be replaced.
Slide the wiper blade assembly
onto the wiper arm. Make sure it
locks in place.
Lower the wiper arm down against
the windshield or the hatch glass. Slide the new wiper blade into the
holder until the tabs lock.
Remove the blade f rom its holder
by grasping the tabbed end of the
blade. Pull f irmly until the tabs
come out of the holder.
Examine the new wiper blades. If
they have no plastic or metal
reinf orcement along the back
edge, remove the metal
reinf orcement strips f rom the old
wiper blade, and install them in
the slots along the edge of the new
blade. 5.
6.
7.
3.
4.
CONT INUED
Tires
Wiper Blades, Tires
Maint enance
211
REINFORCEMENT BLADE
BLADE
Using tires that are excessively
worn or improperly inflated can
cause a crash in which you can
be seriously hurt or killed.
Follow all instructions in this
owner’s manual regarding tire
inflation and maintenance.
Page 217 of 274

In addition to proper inf lation,
correct wheel alignment helps to
decrease tire wear. If you f ind a tire
is worn unevenly, have your dealer
check the wheel alignment.
Have your dealer check the tires if
you f eel a consistent vibration while
driving. A tire should always be
rebalanced if it is removed f rom the
wheel. When you have new tires
installed, make sure they are
balanced. This increases riding
comf ort and tire lif e. For best results,
have the installer perform a dynamic
balance.To help increase tire lif e and
distribute wear more evenly, rotate
the tires every 10,000 miles (16,000
km). Move the tires to the positions
showninthecharteachtimethey
are rotated. If you purchase
directional tires, rotate only f ront-to-
back.Replace your tires with radial tires of
the same size, load range, speed
rating, and maximum cold tire
pressure rating (as shown on the
tire’s sidewall).
It is best to replace all f our tires at
thesametime.If thatisnotpossible
or necessary, replace the two f ront
tires or two rear tires as a pair.
Replacing just one tire can seriously
af f ect your vehicle’s handling. Mixing radial and bias-ply tires on
your vehicle can reduce braking
ability, traction, and steering
accuracy. Using tires of a dif f erent
size or construction can cause the
ABS and vehicle stability assist
system (VSA) to work inconsistently.
For vehicles equipped with aluminum
wheels:
T ire Maintenance T ire RotationReplacing T ires and Wheels
Tires
214
Front Front
(For Non-directional
Tires and Wheels) (For Directional
Tires and Wheels)
Improper wheel weights can damage
your vehicle’s wheels. Use only Honda
wheel weights f or balancing.
Page 238 of 274

However, if the brake pedal does not
f eel normal, you should take
immediate action. A problem in one
part of the system’s dual circuit
design will still give you braking at
two wheels. You will f eel the brake
pedal go down much f arther bef ore
the vehicle begins to slow down, and
you will have to press harder on the
pedal.
If you must drive the vehicle a short
distance in this condition, drive
slowly and caref ully. Slow down by shif ting to a lower
gear, and pull to the side of the road
when it is saf e. Because of the long
distance needed to stop, it is
hazardous to drive the vehicle. You
should have it towed and repaired as
soon as possible (seeon page ). If the ABS indicator and the VSA
system indicator come on with the
brake system indicator, have your
vehicle inspected by your dealer
immediately.
The brake system indicator normally
comes on when you turn the ignition
switch to the ON (II) position, and as
a reminder to check the parking
brake. It will stay on if you do not
f ully release the parking brake.
If the brake system indicator comes
on while driving, the brake f luid level
is probably low. Press lightly on the
brake pedal to see if it f eels normal.
If it does, check the brake f luid level
thenexttimeyoustopataservice
station (see page ).
If the f luid level is low, take your
vehicle to a dealer, and have the
brake system inspected f or leaks or
worn brake pads. 201
242
Brake System Indicator
Emergency
Towing
T aking Care of t he Unexpect ed
235
Canada
U.S.
Page 239 of 274

To remove the round plug in the
center of the headliner, turn the
plug by using a screwdriver or
coin, then pry it out. Make sure to
align the tabs on the round plug to
the notches on the ceilling as
shown in the illustration.Insert the moonroof wrench into
the socket behind this plug. Turn
the wrench until the moonroof is
f ully closed.
Remove the wrench. Reinstall the
round plug.
Get the moonroof wrench out of
the tool kit in the cargo area. Try closing the moonroof . If the
new f use blows immediately or the
moonroof motor still does not
operate, you can close the
moonroof manually. Check the f use f or the moonroof
motor (see page ). If the f use
is blown, replace it with one of the
same or lower rating.
If the electric motor will not close
the moonroof , do the f ollowing:
If you need to close the moonroof
manually, it means the moonroof
opening/closing f unction is
developing a problem. Have your
vehicle checked by your dealer.
1.
2.
3.
4.
5.
6.
237
If equipped
Closing t he Moonroof
236
TAB NOTCH
ROUND PLUG SOCKET
MOONROOF WRENCH
Page 240 of 274
The vehicle’s f uses are contained in
threefuseboxes.
The interior f use box is underneath
the steering column. To remove the
f use box lid, pull it toward you and
take the lid out of its hinges.The primary under-hood f use box is
in the engine compartment on the
driver’s side. To open it, push the
tabs as shown.
The secondary f use box is next to
the primary f use box.
Fuses
T aking Care of t he Unexpect ed
237
TAB
INTERIOR UNDER-HOOD
(PRIMARY)UNDER-HOOD
(SECONDARY)
Page 244 of 274
�µ�µ
�Î
�ÎNo.
No.Circuits Protected
Amps. Circuits Protected Amps.
No. Amps. Circuits Protected : On Canadian models
1
2
3
4
5
6
7
8
9
10
11
12
13 14
15
16
17
18
19
20
Option
Left Headlight
Door Lock
Right Headlight
ABS F/S
Battery
Ignition 1
Spare Fuses
20 A
30 A
15 A
20 A
15 A
15 A
15 A
15 A
10 A
30 A
20 A
40 A
40 A Condenser Fan
Engine
Interior Light
Cooling Fan
Hazard
Small Light
Horn, Stop
DBW
Back Up
ABS Motor
Rear Defroster
Heater Motor
Power Window 40 A
20 A
20 A
20 A
30 A
100 A 50 A
1
2
3
4 20 A
7.5 A 15 A
15 A LAF Heater
Daytime running lights
FI ECU (ECM/PCM)
IG Coil
21 257.5A 30A
Fuse Locations
T aking Care of t he Unexpect ed
241
Primary Fuse Box
Secondary Fuse Box
PRIMARY
SECONDARY
UNDER-HOOD FUSE BOXES