Page 215 of 267

Fill the f uel tank.
Change the engine oil and f ilter.Block the rear wheels.
If the vehicle is to be stored f or a
longer period, it should be
supported on jackstands so the
tires are of f the ground.
Wash and dry the exterior
completely.
Cleantheinterior.Makesurethe
carpeting, floor mats, etc., are
completely dry.
If you need to park your vehicle f or
an extended period (more than 1
month), there are several things you
should do to prepare it f or storage.
Proper preparation helps prevent
deterioration and makes it easier to
get your vehicle back on the road. If
possible, store your vehicle indoors. Leave one window open slightly (if
the vehicle is being stored
indoors).Cover the vehicle with a
‘‘breathable’’ cover, one made
f rom a porous material such as
cotton. Non-porous materials, such
as plastic sheeting, trap moisture,
which can damage the paint.
To minimize sticking, apply a
silicone spray lubricant to all door
and trunk seals. Also, apply a
vehiclebodywaxtothepainted
surfaces that mate with the door
and trunk seals. Support the f ront wiper blade
arms with a f olded towel or rag so
they do not touch the windshield. Disconnect the 12 volt battery. Reconnect the 12 volt battery and
drive your vehicle every month f or
about 30 minutes. This will keep
the IMA battery charged and in
good condition.
Leave the parking brake off. Put
the transmission in Park. If possible, periodically run the
engine until it reaches f ull
operating temperature (the
cooling f an cycles twice).
Pref erably, do this once a month.
Vehicle Storage
Maint enance
213
�����—�����—�����y�
���������
���y���
�(�#���������y�����
���y
Page 219 of 267

CONT INUED
If you have a f lat tire while driving,
stop in a saf e place to change it.
Drive slowly along the shoulder until
you get to an exit or an area to stop
that is far away from the traffic lanes.Park the vehicle on f irm, level, and
non-slippery ground. Put the
transmission in Park. Apply the
parking brake.Open the trunk. Raise the trunk
f loor by lif ting up on the back edge.
Turn on the hazard warning lights,
and turn the ignition switch to the
LOCK (0) position. Have all
passengers get out of the vehicle
while you change the tire. Take the tool case out of the spare
tire.
Unscrew the wing bolt, and take
the spare tire out of its well.
5. 4.
3.
2. 1.
Changing a Flat Tire
T aking Care of t he Unexpect ed
217
JACK
SPARE TIRE
TRUNK FLOOR TOOL CASE
The vehicle can easily roll off
the jack, seriously injuring
anyone underneath.
Follow the directions for
changing a tire exactly, and
never get under the vehicle
when it is supported only by the
jack.
�����—�����—�
���y�
�������������y���
�(�#���������y���������y
Page 223 of 267

position:
If the headlights dim noticeably o")
Diagnosing why the engine won’t
start falls into two areas, depending
on what you hear when you turn the
ignition switch to the START (III)
position:
If the headlights dim noticeably or
go out when you try to start the
engine, either the battery is
discharged or the connections are
corroded. Check the condition of
the 12 volt battery and terminal
connections (see page ). You
canthentryjumpstartingthe
vehicle from a booster battery
(see page ).
You
hear nothing, or almost
nothing. The engine’s starter
motor does not operate at all, or
operates very slowly.
You can hear the starter motor
operating normally, or the starter
motor sounds like it is spinning
faster than normal, but the engine
does not start up and run. When
you turn the ignition switch to
the START (III) position, you do not
hear the normal noise of the engine
trying to start. You may hear a
clicking sound or series of clicks, or
nothing at all.
Check these things:
Check the transmission interlock.
The transmission must be in Park
or neutral or the starter will not
operate.
Turn the ignition switch to the ON
(II) position. Turn on the
headlights, and check their
brightness. If the headlights are
very dim or do not come on at all,
the battery is discharged. See
on page . Turn
the ignition switch to the
START (III) position. If the
headlights do not dim, check the
condition of the fuses. If the fuses
areOK,thereisprobably
something wrong with the
electrical circuit for the ignition
switch or starter motor. You will
need a qualified technician to
determine the problem (see on page ).
223 223212237
Nothing Happens or the Starter
Motor Operates Very Slowly
Jump Starting Emergency T owing
If theEngineWon’tStart
T aking Care of t he Unexpect ed
221
�����—�����—�����y�
�������������y���
�(�#���������y���������y
Page 225 of 267

�´�´
Although this seems like a simple
procedure, you should take several
precautions.
To jump start your vehicle:
The numbers in the illustration show
you the order to connect the jumper
cables.Connect one jumper cable to the
positive ( ) terminal on your
battery. Connect the other end to
the positive ( ) terminal on the
booster battery.
You cannot start your vehicle by
pushing or pulling it. Open the hood, and check the
physical condition of the 12 volt
battery.
Turn of f all electrical accessories:
heater, A/C, climate control, audio
system, lights, etc. Put the
transmission in Park, and set the
parking brake.
1.
2.
3.
CONT INUED
Jump Starting
T aking Care of t he Unexpect ed
223
BOOSTER BATTERY
A battery can explode if you do
not follow the correct procedure,
seriously injuring anyone
nearby.
Keep all sparks, open flames,
and smoking materials away
from the battery.If a battery sits in extreme cold, the
electrolyte inside can f reeze.
Attempting to jump start with a f rozen
battery can cause it to rupture.
�����—�����—�����y�
���������
���y���
�(�#���������y���������y
Page 232 of 267

If the ABS indicator comes on with
the brake system indicator, have
your vehicle inspected by your
dealer immediately.
However,
if the brake pedal does not
feel normal, you should take
immediate action. A problem in one
part of the system’s dual circuit
design will still give you braking at
two wheels. You will feel the brake
pedal go down much farther before
the vehicle begins to slow down, and
you will have to press harder on the
pedal.
Slow down by shifting to a lower
gear, and pull to the side of the road
when it is safe. Because of the long
distance needed to stop, it is
hazardous to drive the vehicle. You
should have it to wed and repaired as
soon as possible (see
on page ).
If you must drive the vehicle a short
distance in this condition, drive
slowly and carefully.
The
brake system
indicator normally
comes on when
you turn the ignition switch to the
ON (II) position and as a reminder to
check the parking brake. It will stay
on if you do not fully release the
parking brake.
If the brake system indicator comes
on while driving, the brake fluid level
is probably low. Press lightly on the
brake pedal to see if it feels normal.
If it does, check the brake fluid level
thenexttimeyoustopataservice
station (see page ).
If the f luid level is low, take your
vehicle to a dealer, and have the
brake system inspected f or leaks or
worn brake pads. If the brake system indicator
(amber) comes on with the parking
brake system indicator (red) with
the parking brake released, there
may be a malfunction with the
power-assist f eature. When the
power-assist f eature malf unctions,
the brake indicator (red) comes on
and a buzzer sounds f or a second.
The power-assist f eature may stop
when the brake ef f ect is weak. Stop
your vehicle immediately at a saf e
place and contact a dealer.
196
237Emergency
Towing
Brake System Indicator
230
Canada
U.S.
�����—�����—�����y�
�������������y���
�(�#���������y���������y
Page 234 of 267
Check each of the large fuses in
the primary under-hood fuse box
by looking through the top at the
wire inside. Removing these fuses
requires a Phillips-head
screwdriver.
Turn
the ignition switch to the
LOCK (0) position. Make sure the
headlights and all oth er
accessories are off.
Remove the cover from the fuse
box.
If
something electrical in your
vehicle stops working, the first thing
youshouldcheckforisablownfuse.
Determine f rom the chart on pages and or the diagram on the
fuse box lid, which fuses control that
device. Check those f uses f irst, but
check all the f uses bef ore deciding
that a blown f use is the cause.
Replace any blown f uses, and check
if the device works.
1.
2.3.
235 236
Checking and Replacing Fuses
Fuses
232
BLOWN
FUSE BLOWN
�����—�����—�����y�
�������������y���
�(�#���������y���������y
Page 237 of 267
�µ
�µ
�Î
�Î
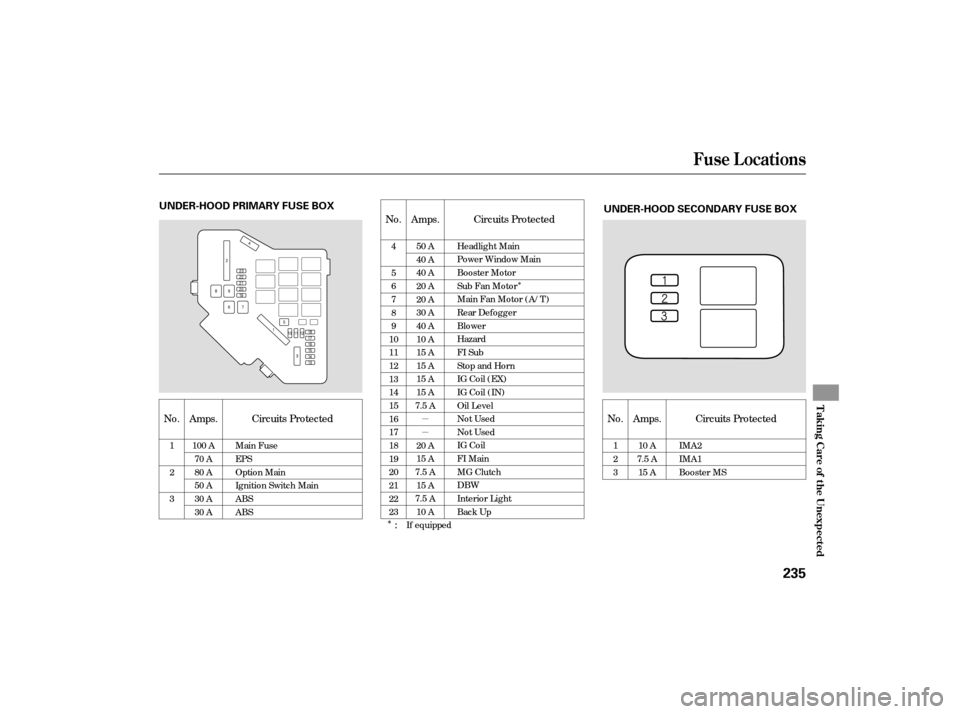
No.
Circuits Protected
Amps.
No. Amps. Circuits Protected
No. Amps. Circuits Protected
:
1
2
3
Main Fuse
EPS
Option Main
Ignition Switch Main
ABS
ABS
100 A
70 A
80 A
50 A
30 A
30 A
1
2
3
10 A
7.5 A 15 A IMA2
IMA1
Booster MS
4
5
6
7
8
9
10
11
12
13
14
15
16
17
18
19
20
21
22
23 50 A
40 A
40 A
20 A
20 A
30 A
40 A
10 A
15 A
15 A
15 A
15 A
7.5 A
20 A
15 A
7.5 A 15 A
7.5 A 10 A Headlight Main
Power Window Main
Booster Motor
Sub Fan Motor
Main Fan Motor (A/T)
Rear Defogger
Blower
Hazard
FI Sub
Stop and Horn
IG Coil (EX)
IG Coil (IN)
Oil Level
Not Used
Not Used
IG Coil
FI Main
MG Clutch
DBW
Interior Light
Back Up
If equipped
Fuse Locations
T aking Care of t he Unexpect ed
235
UNDER-HOOD PRIMARY FUSE BOX UNDER-HOOD SECONDARY FUSE BOX
�����—�����—�����y�
�����������
�y���
�(�#���������y���������y
Page 238 of 267
�µ
�µ
�µ
�µ�µ
�µ
�µ
�µ
�µ
�Î
�Î
�Î
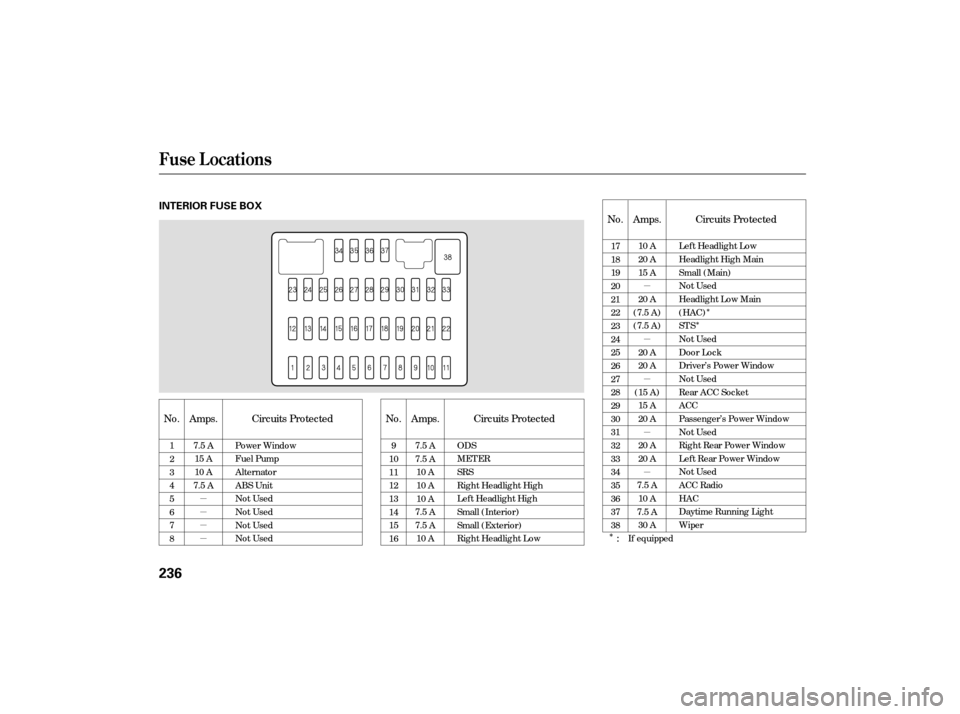
No. No.No.
Amps. Circuits Protected
Amps. Circuits Protected Amps. Circuits Protected
:
1
2
3
4
5
6
7
8 9
10
11
12
13
14
15
16 17
18
19
20
21
22
23
24
25
26
27
28
29
30
31
32
33
34
35
36
37
38
7.5 A
7.5 A
10 A
10 A
10 A
7.5 A
7.5 A 10 A ODS
MET ER
SRS
Right Headlight High
Left Headlight High
Small (Interior)
Small (Exterior)
Right Headlight Low
7.5 A
15 A
10 A
7.5 A Power Window
Fuel Pump
Alternator
ABS Unit
Not Used
Not Used
Not Used
Not Used 10 A
20 A
15 A
20 A
(7.5 A)
(7.5 A)
20 A
20 A
(15 A) 15 A
20 A
20 A
20 A
7.5 A 10 A
7.5 A 30 A Left Headlight Low
Headlight High Main
Small (Main)
Not Used
Headlight Low Main
(HAC)
STS
Not Used
Door Lock
Driver’s Power Window
Not Used
Rear ACC Socket
ACC
Passenger’s Power Window
Not Used
Right Rear Power Window
Left Rear Power Window
Not Used
ACC Radio
HAC
Daytime Running Light
Wiper
If equipped
Fuse Locations
236
INTERIOR FUSE BOX
�����—�����—�����y�
�������������y���
�(�#���������y���������y