Page 175 of 267

Your vehicle is equipped with f ront
disc brakes. The brakes on the rear
wheels are drum. A power assist
helps reduce the ef f ort needed on
thebrakepedal.TheABShelpsyou
retain steering control when braking
very hard.
Resting your f oot on the pedal keeps
the brakes applied lightly, builds up
heat, and reduces their ef f ectiveness.
It also keeps your brake lights on all
the time, conf using drivers behind
you.
Constant application of the brakes
when going down a long hill builds
up heat and reduces their ef f ective-
ness. Use the engine to assist the
brakes by taking your f oot of f the
accelerator and downshif ting to a
lower gear.Check the brakes after driving
through deep water. Apply the
brakes moderately to see if they f eel
normal. If not, apply them gently and
f requently until they do. Be extra
cautious in your driving.
Your vehicle is equipped with an
advanced hydraulic booster.
The advanced hydraulic booster has
some f eatures.
This f eature enables you to press the
brakepedalwithlessforcebythe
help of hydraulic pressure in the oil
pressure pump.
This f eature controls the braking
pressure appropriately, coordinating
with the regenerating brake of the
IMA motor.
When you release the brake pedal
while your vehicle idles, this f eature
keeps the braking pressure until the
engine starts, and prevents the
vehicle f rom dropping back.
This f eature helps you apply the
brakes with less f orce during an
emergency braking situation.
Power-Assist
Brake-Assist
Cooperative Control with Regenerative
Brake
Creep Aid System
Braking System
Driving
173
�����—�����—�����y�
����
��������y���
�(�#���������y���
�����y
Page 179 of 267

If you have the skills and tools to
perform more complex maintenance
tasks on your vehicle, you may want
to purchase the service manual. See
page f or inf ormation on how to
obtain a copy, or see your dealer. This section explains why it is
important to keep your vehicle well
maintained and how to f ollow basic
maintenance saf ety precautions.
This section also includes
instructions on how to read the
maintenance minder messages on
the information display, a
maintenance record, and instructions
for simple maintenance tasks you
may want to take care of yourself. ......................
Maintenance Saf ety .178
....................
Maintenance Minder .179
....................
Maintenance Record .186
..............................
Fluid Locations .188
........................
Adding Engine Oil .189
.........
Changing the Oil and Filter .190
..............................
Engine Coolant .192
....................
Windshield Washers .194
........................
Transmission Fluid .195
Continuously Variable ............
Transmission (CVT) .195
....................................
Brake Fluid .196
.............................................
Lights .197
................................
Roof Antenna .202
................
Cleaning the Seat Belts .203
.....................................
Floor Mats .203
..................
DustandPollenFilter .204
.................................
Wiper Blades .205
...............................................
Tires .207
......
Checking the 12 Volt Battery .212
.............................
Vehicle Storage .213
255
Maintenance
Maint enance
177
�����—�����—�����y�
���������
�
�y���
�(�#���������y���
�����y
Page 186 of 267

�Ì�µ
�µ�µ
�µ
�µ �µ
U.S. Vehicles:
According to state and federal
regulations, failure to perform
maintenance on the items marked
with will not void your emissions
warranties. However, all
maintenance services should be
performed in accordance with the
intervals indicated by the
information display. Youshouldcheckthefollowing
items
at the specified intervals. If
you are unsure of how to perform
any check, turn to the appropriate
page listed.
Engine oil level Check every
time you fill the fuel tank. See
page .
Engine coolant level Check the
radiator reserve tank every time
youfillthefueltank.Seepage .
Automatic transmission Check
the fluid level monthly. See page
.
Brakes Check the fluid level
monthly. See page .
Tires Check the tire pressure
monthly. Examine the tread for
wear and foreign objects. See page
. Lights
Check the operation of
the headlights, parking lights,
taillights, high-mount brake light,
and license plate lights monthly.
See page .
153 154
195 196
207 197
Maintenance Minder
Maintenance,
replacement, or repair of
emissions control devices and
systems may be done by any
automotive repair establishment
or individual using parts that are
‘‘certif ied’’ to EPA standards. Owner’s Maintenance Checks
184
�����—�����—�����y�
������
������y���
�(�#���������y���
�����y
Page 199 of 267
CONT INUED
Theheadlightswereproperlyaimed
when your vehicle was new. If you
regularly carry heavy items in the
trunk, readjustment may be required.
Adjustment should be done by your
dealer or other qualif ied mechanic.
Your vehicle has halogen headlight
bulbs. When replacing a bulb, handle
it by its base, and protect the glass
f rom contact with your skin or hard
objects. If you touch the glass, clean
it with denatured alcohol and a clean
cloth.Open the hood.
To change a bulb on the lef t side,
remove the coolant tube f rom the
two clips.Remove the reserve tank f rom its
holder by pulling it straight up.
1.
Headlight A iming
Replacing a Headlight Bulb
Lights
Maint enance
197
COOLANT TUBE
CLIP
CLIP HOLDER
Halogen headlight bulbs get very hot
when lit. Oil, perspiration, or a scratch
on the glass can cause the bulb to
overheat and shatter.
�����—�����—�
���y�
�������������y���
�(�#���������y���������y
Page 200 of 267

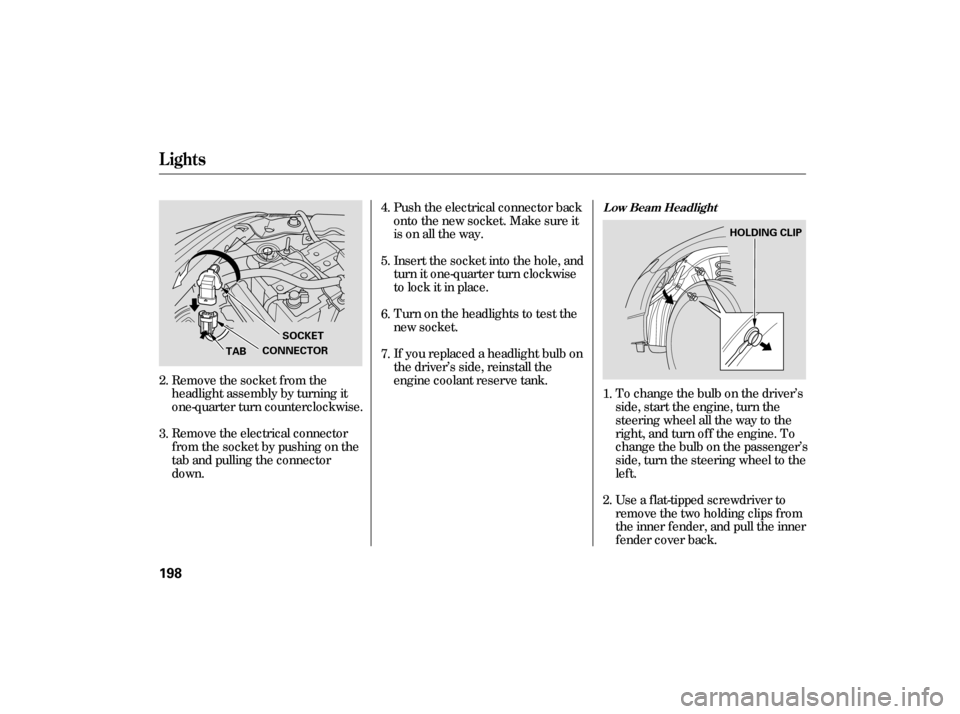
If youreplacedaheadlightbulbon
the driver’s side, reinstall the
engine coolant reserve tank. Insert the socket into the hole, and
turn it one-quarter turn clockwise
to lock it in place. Push the electrical connector back
ontothenewsocket.Makesureit
is on all the way.
Turn on the headlights to test the
new socket.
Remove the socket from the
headlight assembly by turning it
one-quarter turn counterclockwise.
Remove the electrical connector
f rom the socket by pushing on the
tab and pulling the connector
down. To change the bulb on the driver’s
side, start the engine, turn the
steering wheel all the way to the
right, and turn of f the engine. To
change the bulb on the passenger’s
side, turn the steering wheel to the
lef t.
Use a f lat-tipped screwdriver to
remove the two holding clips f rom
the inner f ender, and pull the inner
f ender cover back.
2.
3.
2.
4.
5.
6.
7.
1.
L ow Beam Headlight
Lights
198
TAB HOLDING CLIP
SOCKET
CONNECTOR
�����—�����—�����y�
�������������y���
�(�#���������y�������
�y
Page 201 of 267
To change the bulb on the driver’s
side, start the engine, turn the
steering wheel all the way to the
right, and turn of f the engine. To
change the bulb on the passenger’s
side, turn the steering wheel to the
lef t.
Reinstall the inner f ender cover.
Then reinstall the holding clips,
andlocktheminplacebypushing
on their centers.
Remove the socket from the
headlight assembly by turning it
one-quarter turn counterclockwise.
Remove the electrical connector
f rom the socket by pushing on the
tab and pulling the connector
down. Push the electrical connector back
ontothenewsocket.Makesureit
is on all the way.
Turn on the headlights to test the
new socket. Insert the new socket into the hole,
and turn it one-quarter turn
clockwise to lock it in place.
5.
6.
1.
7.
8.
3.
4.
CONT INUED
Replacing the Front Side Marker/
Parking/Turn Signal Light Bulb
Lights
Maint enance
199
TAB HOLDING CLIP
SOCKET
�����—�����—�����y�
�������������y���
�(�#���������y���������y
Page 202 of 267

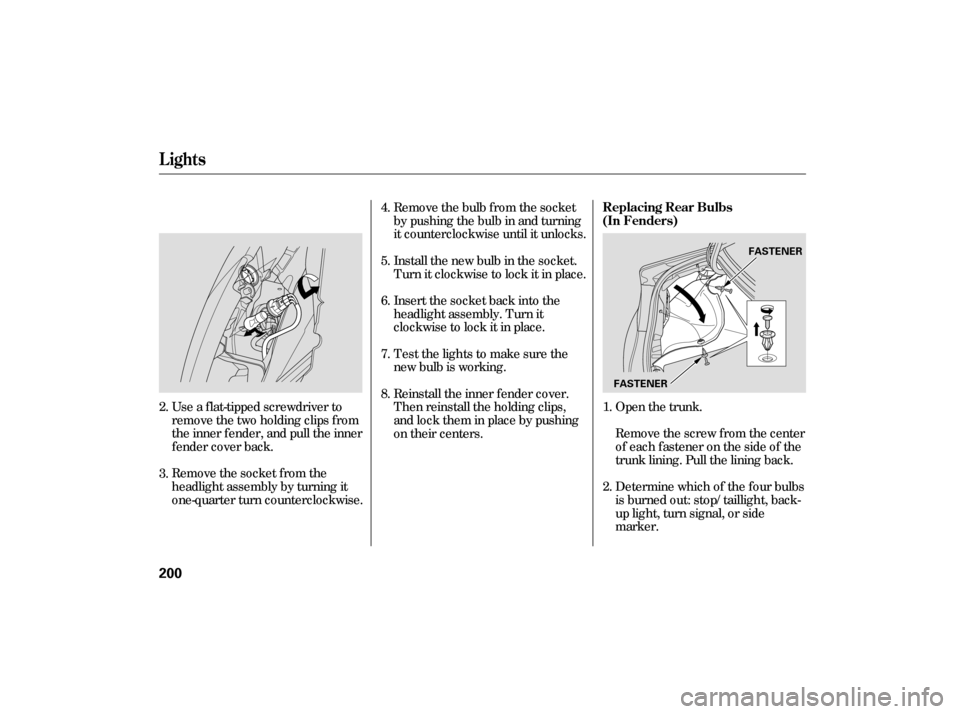
Open the trunk.
Remove the socket from the
headlight assembly by turning it
one-quarter turn counterclockwise. Use a f lat-tipped screwdriver to
remove the two holding clips f rom
the inner f ender, and pull the inner
f ender cover back. Remove the bulb f rom the socket
by pushing the bulb in and turning
it counterclockwise until it unlocks.
Remove the screw from the center
of each f astener on the side of the
trunk lining. Pull the lining back.
Determine which of the f our bulbs
is burned out: stop/taillight, back-
up light, turn signal, or side
marker.
Install the new bulb in the socket.
Turn it clockwise to lock it in place.
Insert the socket back into the
headlight assembly. Turn it
clockwise to lock it in place.
Testthelightstomakesurethe
new bulb is working.
Reinstall the inner f ender cover.
Then reinstall the holding clips,
andlocktheminplacebypushing
on their centers.
1.
4.
5.
6.
7.
8.
3. 2. 2. Replacing Rear Bulbs
(In Fenders)
Lights
200
FASTENERFASTENER
�����—�����—�
���y�
������
������y���
�(�#���������y���������y
Page 203 of 267
Open the trunk.
Remove the socket by turning it
one-quarter turn counterclockwise.
Pull the bulb straight out of its
socket. Push the new bulb straight
into the socket until it bottoms.
Reinstall the socket into the light
assembly by turning it clockwise
until it locks. Put the f asteners into the holes on
the side of the trunk lining.
Reinstall the screws. Reinstall the trunk lining. Make
sure it is installed under the edge
of the trunk seal. Testthelightstomakesurethe
new bulb is working.
Remove the screw from the center
of each f astener on the trunk lid
trim. Pull the trim back.
1.
2.
4.
5. 6.
7.
8.
3.
CONT INUED
Replacing Rear Bulbs
(in T runk L id)
Lights
Maint enance
201
BULBS
SOCKETS SOCKETS
BULB
BULB FASTENERS
�����—�����—�
���y�
������
������y���
�(�#���������y���������y