Page 90 of 307

�µ
�µ
If it takes several pushes on the
button to lock or unlock the doors,
replace the battery as soon as
possible.
Battery type: CR1616
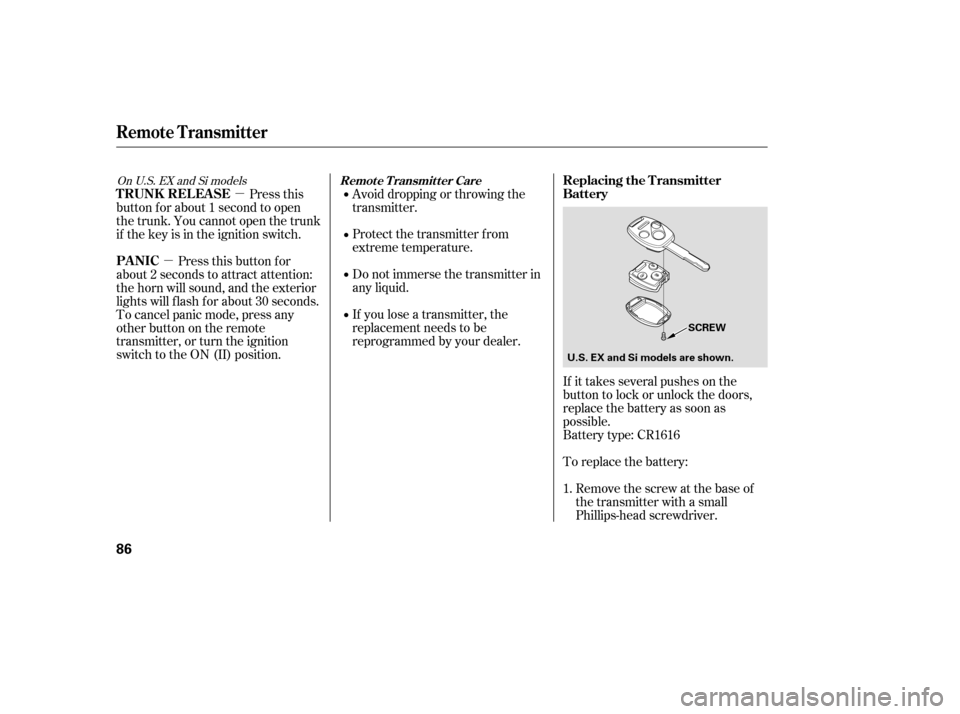
To replace the battery:Remove the screw at the base of
the transmitter with a small
Phillips-head screwdriver.
Avoid dropping or throwing the
transmitter.
Protect the transmitter from
extreme temperature.
Do not immerse the transmitter in
any liquid.
If you lose a transmitter, the
replacement needs to be
reprogrammed by your dealer.
Press this
button f or about 1 second to open
the trunk. You cannot open the trunk
if the key is in the ignition switch.
Pressthisbuttonfor
about 2 seconds to attract attention:
the horn will sound, and the exterior
lights will f lash f or about 30 seconds.
To cancel panic mode, press any
other button on the remote
transmitter, or turn the ignition
switch to the ON (II) position.
1.
OnU.S.EXandSimodels
Remote Transmitter
Replacing the Transmitter
Battery
T RUNK REL EA SE
PA NICRemote Transmitter Care
86
SCREW
U.S. EX and Si models are shown.
�����—�����—�����y�
�������������y���
�(�+���������y���������y
Page 100 of 307

�µ
If equipped
Turn the ignition switch to the ON
(II) position to raise or lower either
window. To open the window, push
the switch down and hold it. Release
the switch when you want the
window to stop. Pull back on the
switchandholdittoclosethe
window.
Thewindowsoperateforupto10
minutes after you turn off the
ignition switch. Opening either doorcancels this f unction.
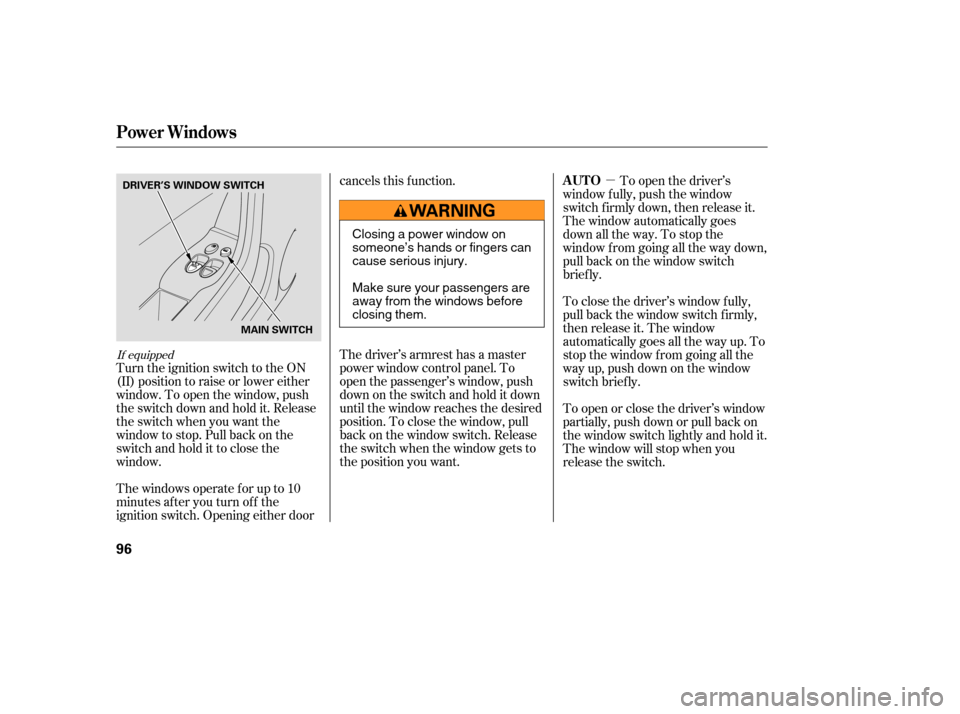
The driver’s armrest has a master
power window control panel. To
open the passenger’s window, push
down on the switch and hold it down
until the window reaches the desired
position. To close the window, pull
back on the window switch. Release
the switch when the window gets to
the position you want.
To open the driver’s
window f ully, push the window
switch f irmly down, then release it.
The window automatically goes
down all the way. To stop the
window f rom going all the way down,
pull back on the window switch
brief ly.
To close the driver’s window f ully,
pull back the window switch f irmly,
then release it. The window
automatically goes all the way up. To
stop the window f rom going all the
way up, push down on the window
switch brief ly.
To open or close the driver’s window
partially, push down or pull back on
the window switch lightly and hold it.
The window will stop when you
release the switch.
Power Windows
AUTO
96
MAIN SWITCH
DRIVER’S WINDOW SWITCH
Closing a power window on
someone’s hands or fingers can
cause serious injury.
Make sure your passengers are
away from the windows before
closing them.
�����—�����—�����y�
�������������y���
�(�+���������y���������y
Page 102 of 307

�µ
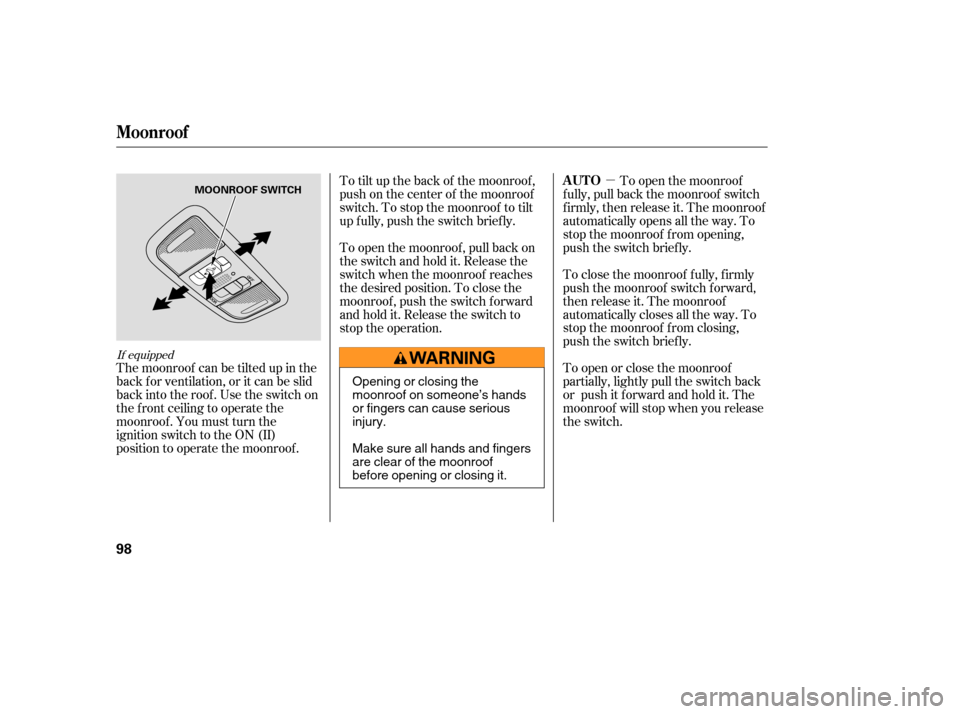
The moonroof can be tilted up in the
back f or ventilation, or it can be slid
back into the roof. Use the switch on
the f ront ceiling to operate the
moonroof . You must turn the
ignition switch to the ON (II)
position to operate the moonroof . To tilt up the back of the moonroof ,
push on the center of the moonroof
switch. To stop the moonroof to tilt
up f ully, push the switch brief ly.
To open the moonroof
f ully, pull back the moonroof switch
f irmly, then release it. The moonroof
automatically opens all the way. To
stop the moonroof f rom opening,
push the switch briefly.
To close the moonroof f ully, f irmly
push the moonroof switch f orward,
then release it. The moonroof
automatically closes all the way. To
stop the moonroof f rom closing,
push the switch briefly.
To open or close the moonroof
partially, lightly pull the switch back
or push it f orward and hold it. The
moonroof will stop when you release
the switch.
To open the moonroof , pull back on
the switch and hold it. Release the
switch when the moonroof reaches
the desired position. To close the
moonroof , push the switch f orward
andholdit.Releasetheswitchto
stop the operation.
If equipped
Moonroof
AUTO
98
MOONROOF SWITCH
Opening or closing the
moonroof on someone’s hands
or fingers can cause serious
injury.
Make sure all hands and fingers
are clear of the moonroof
before opening or closing it.
�����—�����—�����y�
���������
���y���
�(�+���������y���
���
�y
Page 104 of 307
Push the appropriate edge of the
adjustment switch to move the
mirrorright,left,up,ordown.
The inside mirror has day and night
positions. The night position reduces
glare f rom headlights behind you.
Flip the tab on the bottom edge of
the mirror to select the day or night
position. Keeptheinsideandoutsidemirrors
clean and adjusted f or best visibility.
Be sure to adjust the mirrors bef ore
you start driving. When you f inish, move the
selector switch to the center (off)
position. This turns the
adjustment switch of f to keep your
settings.
Turn the ignition switch to the ON
(II) position.
Move the selector switch to L
(driver’s side) or R (passenger’s
side).
1.
2. 3.
4.
If equipped
Adjusting the Power Mirrors
Mirrors
100
SELECTOR SWITCH
ADJUSTMENT SWITCH
TAB
�����—�����—�����y�
�������������y���
�(�+���������y���
�����y
Page 105 of 307
To apply the parking brake, pull the
lever up f ully. To release it, pull up
slightly, push the button, and lower
the lever. The parking brake
indicator on the instrument panel
should go out when the parking
brake is f ully released (see page ).
The outside mirrors are heated to
remove fog and frost. With the
ignition switch in the ON (II)
position, turn on the heaters by
pressing the rear window def ogger
button. The indicator in the button
comesonasareminder.Pressthe
button again to turn the heaters and
the def ogger of f .
58OnCanadianLX,EXandSimodels
Power Mirror Heaters
Parking Brake
Mirrors, Parking Brake
Inst rument s and Cont rols
101
PARKING BRAKE LEVER
REAR WINDOW DEFOGGER/
HEATED MIRRORS BUTTON
Driving the vehicle with the parking
brake applied can damage the rear
brakes and axles. A beeper will sound
if the vehicle is driven with the parking
brake on.
�����—�����—�����y�
�������������y���
�(�+���������y���
�����y
Page 109 of 307
Touseavanitymirroronthebackof
the sun visor, pull up the cover.
Another accessory power socket is in
the center console compartment.
None of the sockets will power an
automotive type cigarette lighter
element. When more than one
socket is being used, the combined
power rating of the accessories
should be 120 watts or less
(10 amps). To use the sun visor, pull it down.
Whenusingthesunvisorforthe
side window, remove the support rod
f rom the clip, and swing it out.
Make sure you put the sun visor
back in place when you are getting
into or out of the vehicle.OnEXandSimodels
Interior Convenience Items
Vanity Mirror
Sun Visor
Inst rument s and Cont rols
105
SUN VISOR
EX and Si
�����—�����—�����y�
�������������y���
�(�+���������y���
�����y
Page 110 of 307
Af ter both doors are closed tightly,
the light dims slightly, then f ades out
in about 30 seconds.
The ceiling light (with the switch in
the center position) comes on when
you remove the key f rom the ignition
switch. If you do not open a door, the
light stays on, then f ades out in
about 30 seconds.
If you leave either door open without
the key in the ignition switch, the
ceiling light goes of f af ter 3 minutes.
The ceiling light has a three-position
switch; ON, Door Activated, and
OFF. In the Door Activated (center)
position, the light comes on when
you:
Open either door.
Unlock the doors with the key or
the remote transmitter. Turn on a spotlight by pushing the
lens. Push the lens again to turn it
of f . You can use the spotlights at all
times.
On LX model
Interior Lights
Spotlights
Ceiling L ight
106
DOOR ACTIVATED
ON
OFF
�����—�����—�����y�
�������������y���
�(�+���������y���
�����y
Page 111 of 307
The spotlights have a two-position
switch. In the DOOR position, the
lights come on when you open either
door. In the OFF position, the lights
do not come on.
The spotlights (with the switch in
the DOOR position) also come on
when you unlock the door with the
key or the remote transmitter, and
when you remove the key f rom the
ignition switch.The courtesy light between the
spotlights comes on when you turn
the parking lights on. To adjust its
brightness, push the instrument
panel brightness control buttons
under the driver’s side vent.OnEXandSimodels
OnEXandSimodels
Interior Lights
Courtesy L ight
Inst rument s and Cont rols
107
DOOR ACTIVATED OFF POSITION
SPOTLIGHT
COURTESY LIGHT
�����—�����—�����y�
�������������y���
�(�+���������y���
�
���y