Page 75 of 307

�´�µ
With the headlight switch of f or in
the position, the high beam
headlights and the high beam
indicator come on with reduced
brightness when you turn the
ignition switch to the ON (II)
position and release the parking
brake. They remain on until you turn
the ignition switch of f , even if you
set the parking brake.
The headlights revert to normal
operation when you turn them on
with the switch.
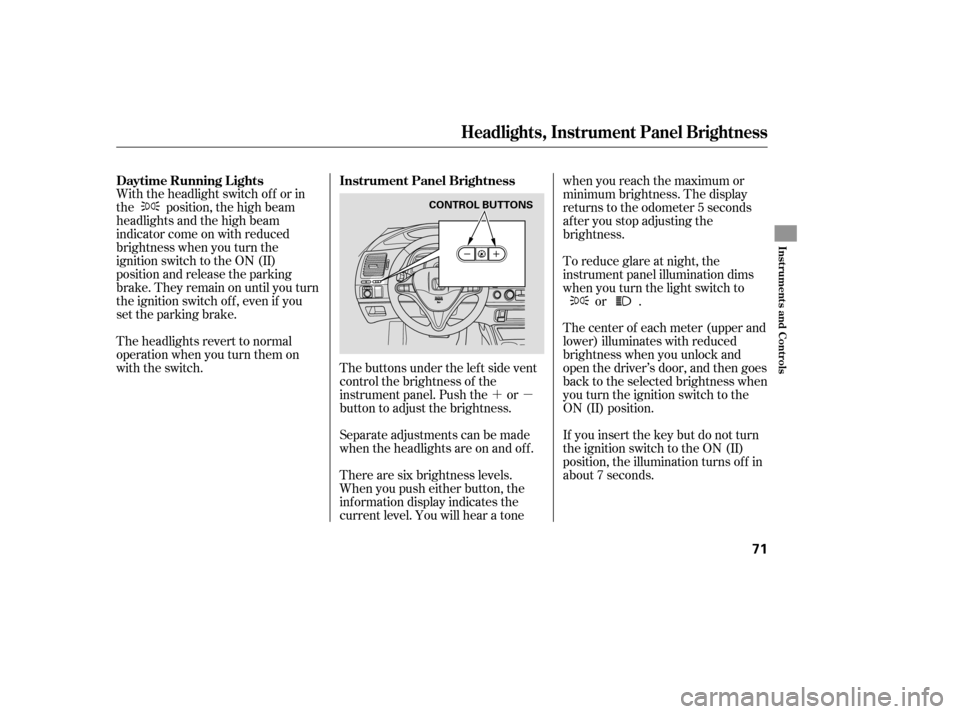
The buttons under the lef t side vent
control the brightness of the
instrument panel. Push the or
button to adjust the brightness.
Separate adjustments can be made
when the headlights are on and of f .
There are six brightness levels.
When you push either button, the
inf ormation display indicates the
current level. You will hear a tone when you reach the maximum or
minimum brightness. The display
returns to the odometer 5 seconds
af ter you stop adjusting the
brightness.
To reduce glare at night, the
instrument panel illumination dims
when you turn the light switch to
or .
The center of each meter (upper and
lower) illuminates with reduced
brightness when you unlock and
open the driver’s door, and then goes
back to the selected brightness when
you turn the ignition switch to the
ON (II) position.
If you insert the key but do not turn
the ignition switch to the ON (II)
position, the illumination turns of f in
about 7 seconds.
Daytime Running L ights
Instrument Panel Brightness
Headlights, Instrument Panel Brightness
Inst rument s and Cont rols
71
CONTROL BUTTONS
�����—�����—�����y�
������
������y���
�(�+���������y���������y
Page 76 of 307

Make sure the rear window is clear
and you have good visibility bef ore
starting to drive.
The rear window def ogger will clear
fog, frost, and thin ice from the
window. Push the def ogger button to
turn it on and off. The indicator in
the button comes on to show the
def ogger is on. If you do not turn it
of f , the def ogger will shut itself of f
af ter about 15 minutes. It also shuts
of f when you turn of f the ignition
switch. You have to turn the
def ogger on again when you restart
the vehicle.
Push the button next to the steering
wheel to turn on the hazard warning
lights (f our-way f lashers). This
causes all f our outside turn signals
and both turn indicators in the
instrument panel to f lash. Use the
hazard warning lights if you need to
park in a dangerous area near heavy
traf f ic, or if your vehicle is disabled. Pushing this button also turns the
mirror heaters on or of f . For more
inf ormation, see page . The def ogger and antenna wires on
the inside of the rear window can be
accidentally damaged. When
cleaning the glass, always wipe side-
to-side.
101
OnCanadianLX,EXandSimodels
Rear Window Def ogger
Hazard Warning Button
Hazard Warning Button, Rear Window Def ogger
72
Canadian LX, EX, Si
�����—�����—�����y�
������
������y���
�(�+���������y���������y
Page 89 of 307

�µ
�µ
CONT INUED
The ceiling light (if the ceiling light
switch is in the center position) and
the spotlights (if the switch is in the
Door position on EX and Si models)
will come on when you press the
UNLOCK button. If you do not open
either door within 30 seconds, the
lights f ade out. If you relock the
doors with the remote transmitter
bef ore 30 seconds have elapsed, the
lightsgoesoff immediately.
If you do not open either door within
30 seconds, the doors automatically
relock, and the security system sets
(onU.S.LX,EX,andSimodels).You
cannot unlock it if the key is in the
ignition switch.
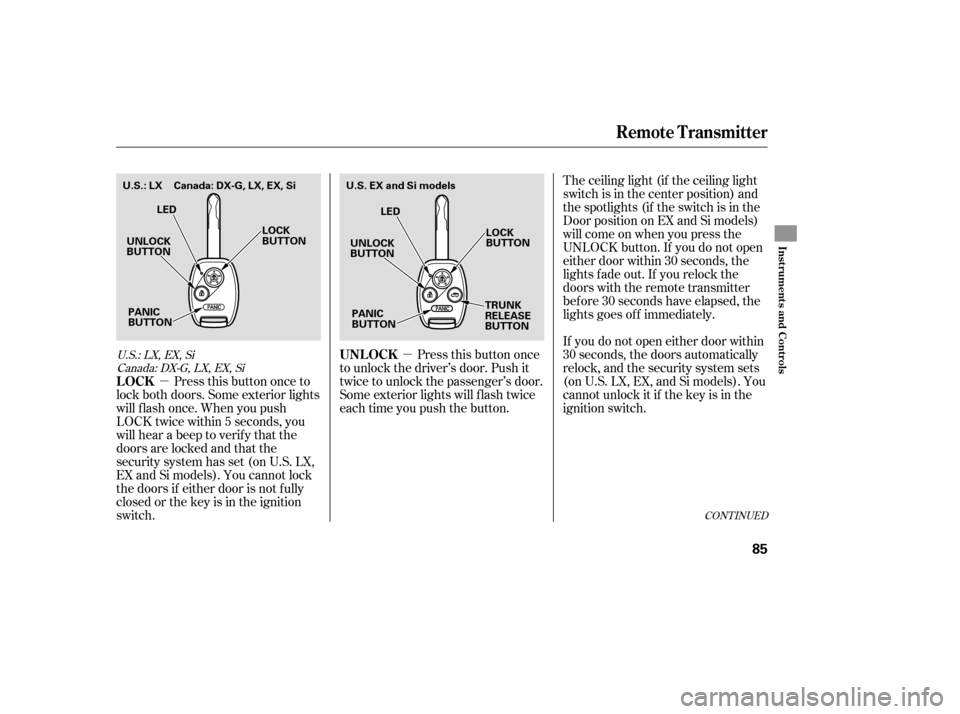
Press this button once
to unlock the driver’s door. Push it
twice to unlock the passenger’s door.
Some exterior lights will f lash twice
each time you push the button.
Press this button once to
lock both doors. Some exterior lights
will f lash once. When you push
LOCK twice within 5 seconds, you
will hear a beep to verify that the
doors are locked and that the
security system has set (on U.S. LX,
EX and Si models). You cannot lock
the doors if either door is not f ully
closed or the key is in the ignition
switch.
U.S.:LX,EX,Si
Canada: DX-G, LX, EX, Si
Remote Transmitter
UNL OCK
LOCK
Inst rument s and Cont rols
85
UNLOCK
BUTTON LOCK
BUTTON
TRUNK
RELEASE
BUTTON
PANIC
BUTTON LED
U.S. EX and Si models
UNLOCK
BUTTON LOCK
BUTTON
PANIC
BUTTON LED
U.S.: LX Canada: DX-G, LX, EX, Si
�����—�����—�����y�
�������������y���
�(�+���������y���������y
Page 90 of 307

�µ
�µ
If it takes several pushes on the
button to lock or unlock the doors,
replace the battery as soon as
possible.
Battery type: CR1616
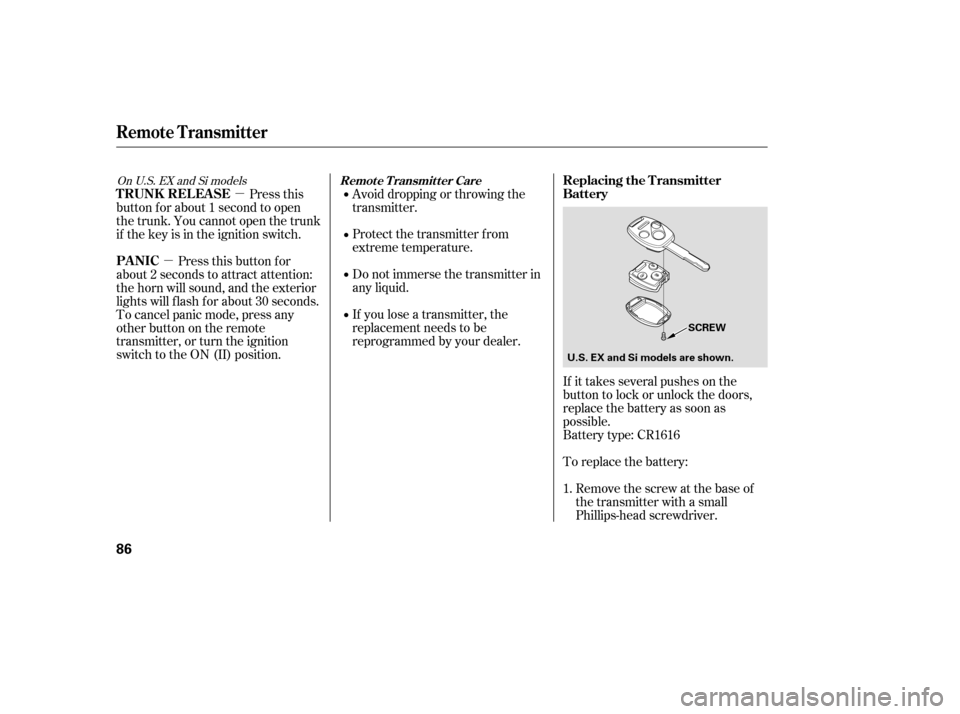
To replace the battery:Remove the screw at the base of
the transmitter with a small
Phillips-head screwdriver.
Avoid dropping or throwing the
transmitter.
Protect the transmitter from
extreme temperature.
Do not immerse the transmitter in
any liquid.
If you lose a transmitter, the
replacement needs to be
reprogrammed by your dealer.
Press this
button f or about 1 second to open
the trunk. You cannot open the trunk
if the key is in the ignition switch.
Pressthisbuttonfor
about 2 seconds to attract attention:
the horn will sound, and the exterior
lights will f lash f or about 30 seconds.
To cancel panic mode, press any
other button on the remote
transmitter, or turn the ignition
switch to the ON (II) position.
1.
OnU.S.EXandSimodels
Remote Transmitter
Replacing the Transmitter
Battery
T RUNK REL EA SE
PA NICRemote Transmitter Care
86
SCREW
U.S. EX and Si models are shown.
�����—�����—�����y�
�������������y���
�(�+���������y���������y
Page 104 of 307
Push the appropriate edge of the
adjustment switch to move the
mirrorright,left,up,ordown.
The inside mirror has day and night
positions. The night position reduces
glare f rom headlights behind you.
Flip the tab on the bottom edge of
the mirror to select the day or night
position. Keeptheinsideandoutsidemirrors
clean and adjusted f or best visibility.
Be sure to adjust the mirrors bef ore
you start driving. When you f inish, move the
selector switch to the center (off)
position. This turns the
adjustment switch of f to keep your
settings.
Turn the ignition switch to the ON
(II) position.
Move the selector switch to L
(driver’s side) or R (passenger’s
side).
1.
2. 3.
4.
If equipped
Adjusting the Power Mirrors
Mirrors
100
SELECTOR SWITCH
ADJUSTMENT SWITCH
TAB
�����—�����—�����y�
�������������y���
�(�+���������y���
�����y
Page 110 of 307
Af ter both doors are closed tightly,
the light dims slightly, then f ades out
in about 30 seconds.
The ceiling light (with the switch in
the center position) comes on when
you remove the key f rom the ignition
switch. If you do not open a door, the
light stays on, then f ades out in
about 30 seconds.
If you leave either door open without
the key in the ignition switch, the
ceiling light goes of f af ter 3 minutes.
The ceiling light has a three-position
switch; ON, Door Activated, and
OFF. In the Door Activated (center)
position, the light comes on when
you:
Open either door.
Unlock the doors with the key or
the remote transmitter. Turn on a spotlight by pushing the
lens. Push the lens again to turn it
of f . You can use the spotlights at all
times.
On LX model
Interior Lights
Spotlights
Ceiling L ight
106
DOOR ACTIVATED
ON
OFF
�����—�����—�����y�
�������������y���
�(�+���������y���
�����y
Page 111 of 307
The spotlights have a two-position
switch. In the DOOR position, the
lights come on when you open either
door. In the OFF position, the lights
do not come on.
The spotlights (with the switch in
the DOOR position) also come on
when you unlock the door with the
key or the remote transmitter, and
when you remove the key f rom the
ignition switch.The courtesy light between the
spotlights comes on when you turn
the parking lights on. To adjust its
brightness, push the instrument
panel brightness control buttons
under the driver’s side vent.OnEXandSimodels
OnEXandSimodels
Interior Lights
Courtesy L ight
Inst rument s and Cont rols
107
DOOR ACTIVATED OFF POSITION
SPOTLIGHT
COURTESY LIGHT
�����—�����—�����y�
�������������y���
�(�+���������y���
�
���y
Page 124 of 307

�µ�µ
�µ �µ
�µ �µ
Press the TUNE (SOUND) knob
repeatedly to display the BASS,
TREBLE, FADER, BALANCE,
SUBWOOFER (if equipped), and
SVC (speed-sensitive volume
compensation) settings.
Adjusts the bass.Adjusts the treble.
Adjusts the side-to-
side strength of the sound.
Adjusts the
strength of sound f rom the
subwoof er speaker. Adjusts the front-to-back
strength of the sound. The system will return to the audio
display about 5 seconds af ter you
stop adjusting a mode.
The SVC mode controls the volume
based on vehicle speed. The f aster
you go, the louder the audio volume
becomes. As you slow down, the
audio volume decreases.
The SVC has f our modes; SVC OFF,
SVC LOW, SVC MID, and SVC
HIGH. Turn the TUNE knob to
adjust the setting to your liking. If
you f eel the sound is too loud,choose low. If you f eel the sound is
too quiet, choose high.
Eachmodeisshowninthedisplayas
it changes. Turn the TUNE knob to
adjust the setting to your liking.
When the level reaches the center,
you will see ‘‘C’’ in the display. Adjusts the volume level
basedonthevehiclespeed.
This f unction is set to MID as the
def ault setting when the vehicle
leaves the factory.
You can use the instrument panel
brightness control buttons to adjust
the illumination of the audio system
(see page ). The audio system
illuminates when the parking lights
are on, even if the radio is of f .71
If equipped
Adjusting the Sound
BASS
TREBLE
BAL ANCE
SUBWOOFER FADER SVC
A udio System L ighting
Audio System (Models without navigation system)
Speed-sensit ive VolumeCompensat ion (SVC)
120
�����—�����—�����y�
���������
���y���
�(�+���������y���
�����y