Page 388 of 484

B0-5
Adjustment of front door
1. Adjust the car door in the front-back and vertical direction;
Adjust the car door under the condition that the bolts of body
side hinge are loosened.
2. Adjust the car door in left-right and vertical direction
Adjustment should be made after the bolts of side hinge of
body are loosened.
3. Adjust the clip of door lock:
(a) Check whether the car door assembly and the match of
door lock are adjusted correctly.
(b) Loosen the lock clip lightly to mount the screws and tap
the lock clip with hammer to adjust their positions.
(c) Screw off the fixing screws of lock clip.
Disassembly of front door
1. Tear down the elevator handle (Dr)
Pull out the snapping ring of spring with dishcloth and tear
down the elevator handle and the sleeve.
2. Tear down the indoor handle
3. Tear down the inner triangle trim panel;
Loosen the clip open with a screwdriver to tear down the inner
triangle trim panel.
Notice: before using the screwdriver, wrapping the
screwdriver head with adhesive strap.
4. Tear down the rear vision mirror;
Tear down the three screws and rear vision mirror. Vehicle Body�Front Door
Page 390 of 484

1. Tear down the glass bracket with screwdriver or similar
tool;
2. Coat the black glue on the inside of glass bracket liner;
3. Tap the glass bracket with rubber hamme")
B0-7
Change of Glass
(Dr SF)
1. Tear down the glass bracket with screwdriver or similar
tool;
2. Coat the black glue on the inside of glass bracket liner;
3. Tap the glass bracket with rubber hammer to encase it in.
(SL SK SY SJ)
1. Tear down the bolts on gear plate with pliers or similar
tool;
2. Tear down the bolts of glass bracket of car door to take
out the glass. Vehicle Body �Front Car Door170mm
Dr. SF
SL. SK. SY. SJ
9. Tear down t the lower rear glass guide track:
Tear down the bolts and guide track.
10. Tear down the lower front glass guide track;
Tear down the bolts and guide track.
11. Tear down the glass elevator:
(a) Tear down the two fixing bolts of small sliding track;
(b) Tear down the fixing bolts of three elevators (manually
operated)
Tear down the fixing bolts of four elevators. (electric)
(c) Tear down the elevator through the auxiliary hole.
12. Tear down the lock ring inside the vehicle;
Disconnect the control lever to tear down the lock ring inside
the vehicle.
13. Tear down the door lock and outdoor handle with lock
barrel;
(a) Disconnect the control lever from the outdoor handle
with lock barrel.
(b) Tear down the 3 bolts and door lock.
(c) Tear down the two bolts and outdoor handle with lock
barrel.
(d) Tear down the spring snapping ring and lock barrel.
Page 391 of 484
 Coat the MP lubricant on the sliding face and the gear of
glass elevator.
Notice: Do not plaster the MP lubricant")
B0-8
Assembly of Front Door
1. Coat the MP lubricant on the parts before mounting.
(a) Coat the MP lubricant on the sliding face and the gear of
glass elevator.
Notice: Do not plaster the MP lubricant on the spring of
glass elevator.
(b) Plaster the MP lubricant on the sliding face of door lock.
2. Mount the outdoor handle with lock barrel and the door
lock;
(a) Mount the lock barrel on the outdoor handle with spring
snapping ring;
(b) Use two bolts to mount the outdoor handle and the lock
barrel;
(c) Mount the door lock with three screws;
(d) Connect the outdoor handle to the control lever.
3. Mount the lock ring inside vehicle
Mount the lock ring inside of vehicle and connect the control
lever.
4. Mount the lower rear glass guide track,
5. Mount the lower front glass guide track;
6. Mount the glass elevator:
(a) Put in the elevator through the auxiliary hole;
(b) Mount on the three fixing bolts of elevator. (manually
operated)
Mount on the four fixing bolts of elevator (electric)
(c) Mount the small sliding track, and screw up the bolts of
small sliding track temporarily.
7. Mount the glass groove on car door;
8. Mount the car door and window glass;
Put the glass in the car door cavity, and then use two bolts to
fix the glass on the elevator. Vehicle Body�Front Door
Page 393 of 484
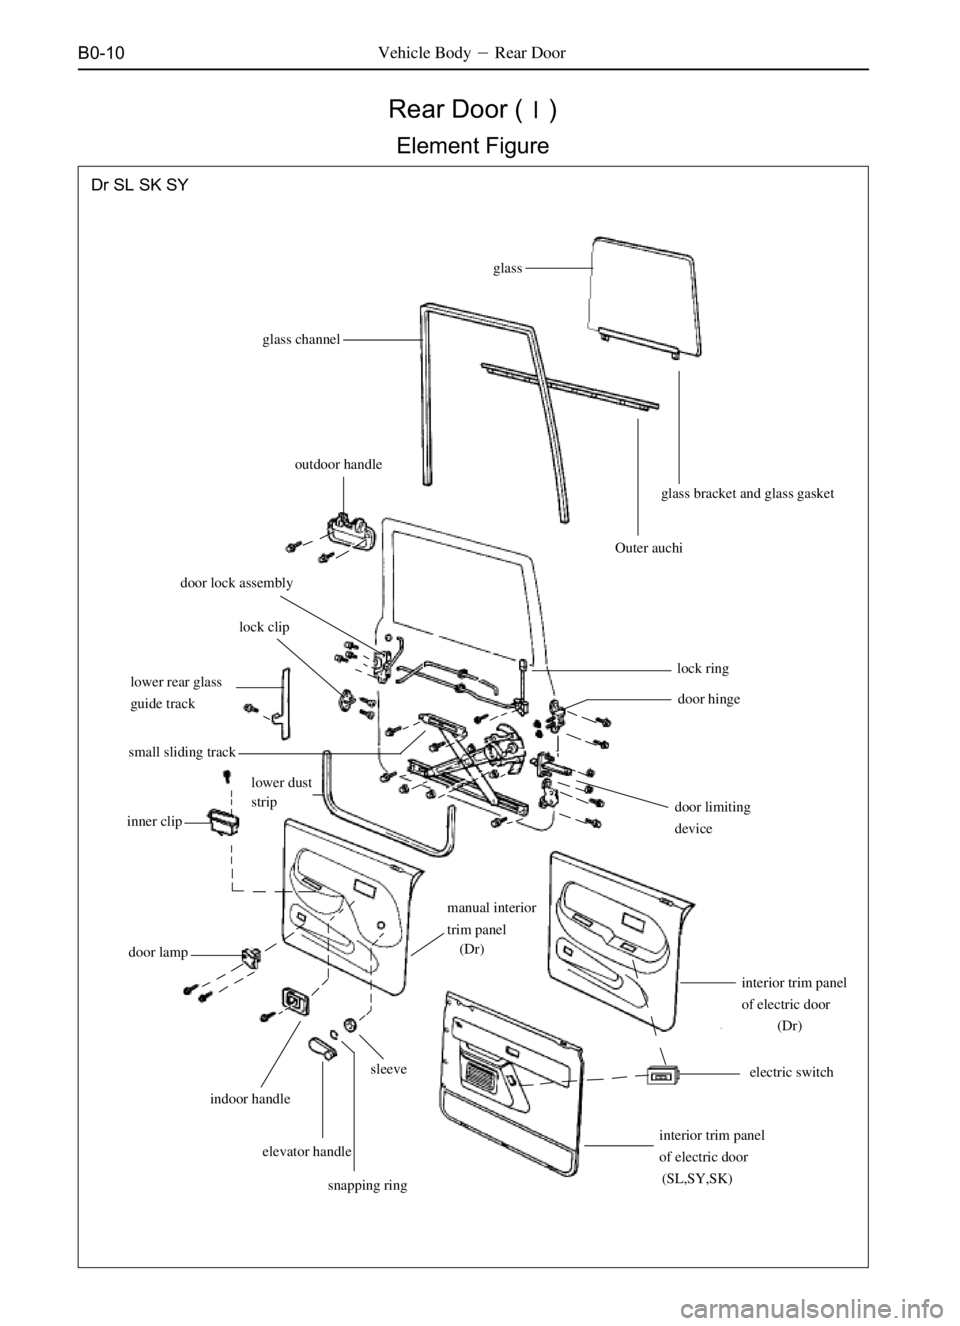
B0-10
Rear Door (�)
Element Figure
glass
glass channel
Outer auchiglass bracket and glass gasket
door limiting
devicedoor hinge
electric switch
interior trim panel
of electric door (Dr)
interior trim panel
of electric door manual interior
trim panel
sleeve
snapping ring elevator handle door lamp inner cliplower rear glass
guide track
small sliding trackdoor lock assembly
lock clipoutdoor handle
lower dust
strip
indoor handle(Dr) lock ring
Dr SL SK SYVehicle Body�Rear Door
(SL,SY,SK)
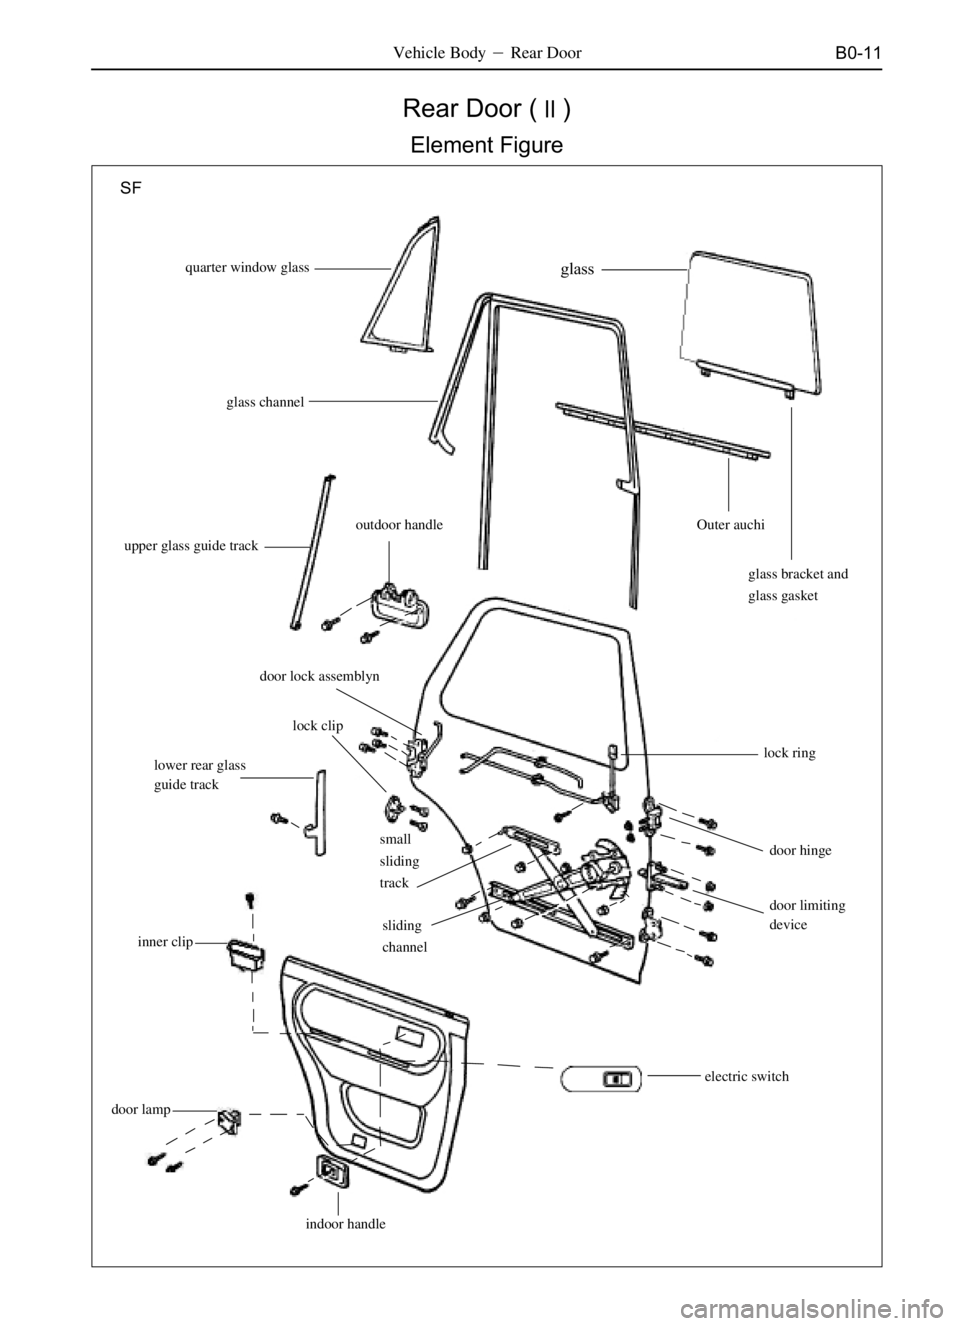
Page 394 of 484
B0-11Vehicle Body�Rear Door
Rear Door (�)
Element Figure
glass
glass channel
Outer auchi
glass bracket and
glass gasket
door limiting
device door hinge
electric switch
door lampinner cliplower rear glass
guide track
small
sliding
track door lock assemblyn
lock clipoutdoor handle
upper glass guide track
indoor handlelock ring quarter window glass
sliding
channel
SF
Page 395 of 484
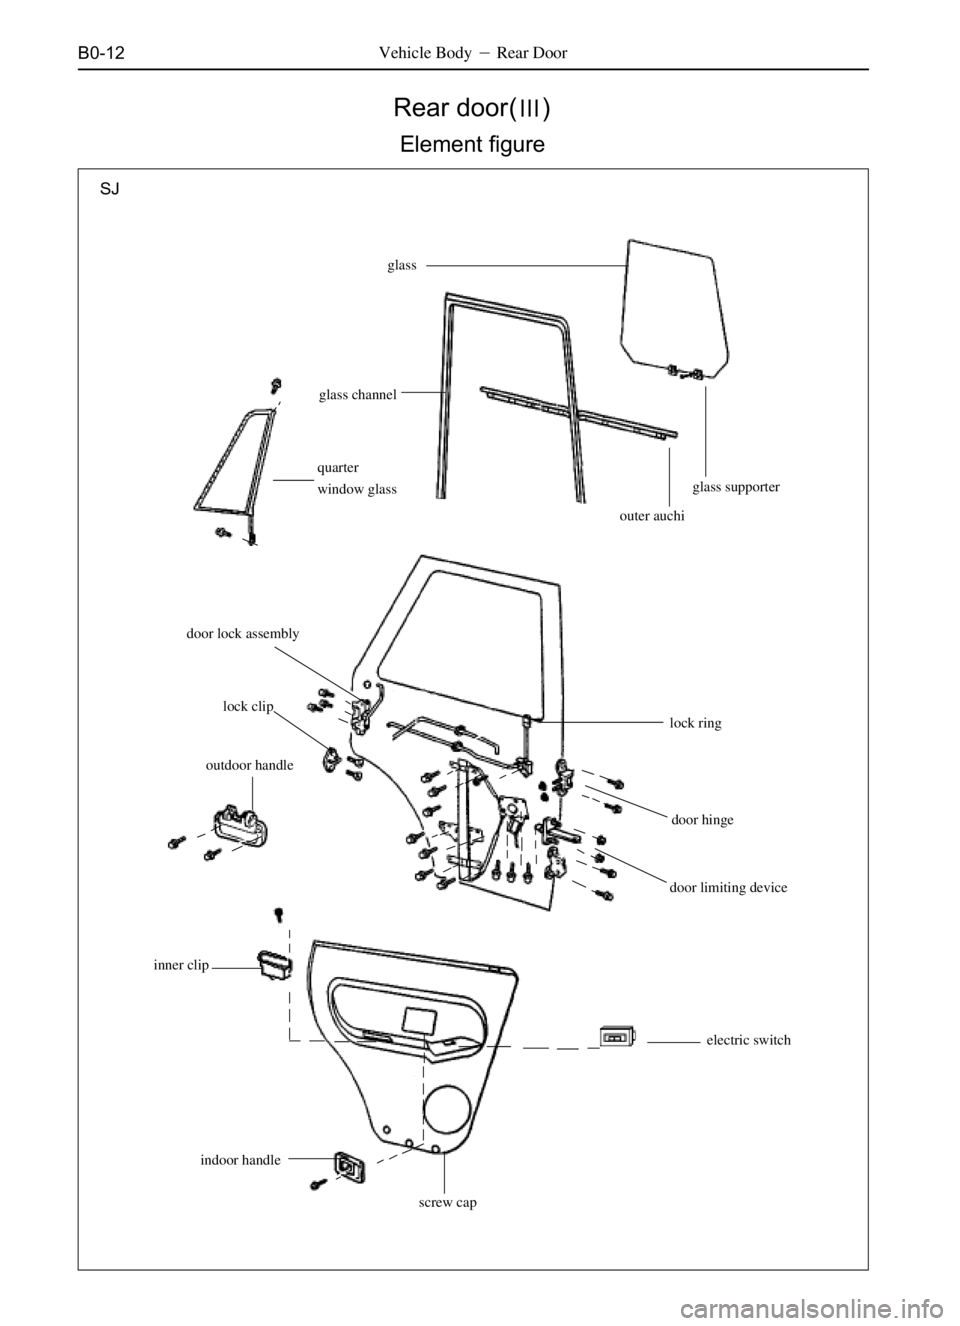
B0-12Vehicle Body�Rear Door
Rear door(�)
Element figure
glass
glass channel
outer auchi
door limiting devicedoor hinge
electric switch inner clipdoor lock assembly
lock clip
outdoor handlelock ring quarter
window glass
screw cap
glass supporter
indoor handle
SJ
Page 396 of 484
B0-13
Adjustment of Rear Door
(Dr SL SK SF SY SJ)
1. Adjust the door along the front-back and vertical direction;
(upper side)
Screw off the hinge nuts on the body side for the adjustment.
(lower side)
Screw off the hinge nuts on the side body for the adjustment.
2. Adjust the door along the left-right and vertical direction.
3. adjust the door lock clip
(a) Screw off the mounting bolts of lock clip and tap the lock
clip with hammer to adjust its position.
(b) Screw on the fixing nuts of lock clip.
Disassembly of Rear Door
1. Tear down the elevator handle (Dr)
Pull out the spring snapping ring with dishcloth and tear down
the elevator handle and sleeve.
2. Tear down the indoor handle;
(a) Take spart the screw and slide the handle forwardly.
(b) Take down the handle from the controlrod Vehicle Body�Rear Door
Page 399 of 484

(a) Tear down the four fixing bolts of elevator bracket;
(b) Tear down fixing bolts of three elevators;
(c) Disassemble the elevator through the auxiliary hole. Vehicle Body�Rear Door
11. T")
B0-16
(SJ)
(a) Tear down the four fixing bolts of elevator bracket;
(b) Tear down fixing bolts of three elevators;
(c) Disassemble the elevator through the auxiliary hole. Vehicle Body�Rear Door
11. Tear down the lock ring inside the vehicle;
Disconnect the connecting bar to tear down the lock ring inside
vehicle body.
12. Tear down door lock and the outdoor handle with lock
barrel:
(a) Disconnect the outdoor with lock barrel from the con-
necting bar.
(b) Tear down three screws and door lock.
(c) Tear down the two bolts and the outdoor handle with lock
barrel.
(d) Tear down the spring snapping ring and lock barrel.
Change of Glass
(Dr SF)
1. Tear down the glass bracket with screwdriver or similar
tool.
2. Coat the black glue on the inner side of glass bracket
liner.
3. Tap the glass bracket with rubber hammer to encase it.
Tear down the bolts on gear panel with the pliers or similar
tool.
4. Tear down the bolts of door window glass bracket to take the
glass out.
SJ
a
Dr
a:35mm
bb:80mm(manual)
65mm(electric)
SF

1. Adjust the door along the front-back and vertical direction;
(upper side)
Screw off the hinge nuts on the body side for the adjustment.
(lower si")