2006 GMC SIERRA torque
[x] Cancel search: torquePage 242 of 600

TRANS (Transmission) IN WARM UP
(Allison Transmission®Only)
When temperatures are very cold, the transmission
will prevent certain operations such as shifts to certain
ranges and engaging the torque converter clutch to
protect against damage. When active, the DIC will
display the message TRANS IN WARM UP.
TURN SIGNAL ON
If a turn signal is left on for 3/4 of a mile (1.2 km), this
message will appear on the display and you will hear a
chime. Move the turn signal/multifunction lever to the
off position. Pressing any of the four DIC buttons will
acknowledge the message and clear it from the DIC
display. If your vehicle does not have the four DIC
buttons, pressing the trip odometer reset stem will
acknowledge the message and clear it from the
DIC display.
DIC Vehicle Customization
Your vehicle may have customization capabilities that
allow you to program some features to one setting based
on your preference. All of the customizable options listed
may not be available on your vehicle. Only the options
available will be displayed on your Driver Information
Center (DIC).The default settings for the customization features were
set when your vehicle left the factory, but may have been
changed from their default state since then.
To change feature preferences, make sure the
ignition is on and the vehicle is in PARK (P). Press
the customization button to scroll through the available
customizable options.
After pressing the customization button, VEHICLE
SETTINGS will momentarily display before going to a
customization option.
Lock Doors (Automatic Transmission only)
If you have an automatic transmission vehicle, press the
customization button until LOCK DOORS appears in the
display. To select your preference for automatic locking,
press the select button while LOCK DOORS is displayed
on the DIC. Pressing the select button will scroll through
the following choices:
LOCK DOORS: IN GEAR (default):The doors will lock
when the vehicle is shifted out of PARK (P).
LOCK DOORS: WITH SPEED:The doors will lock
when the vehicle speed is above 8 mph (13 km/h) for
three seconds.
Choose one of the available options and press the
customization button while it is displayed on the DIC
to select it and move on to the next feature. For
more information on automatic door locks, see
Programmable Automatic Door Locks on page 2-10.
3-64
Page 409 of 600

Power Take-Off (PTO)
Before using a Power Take-Off (PTO), if equipped,
refer to the manufacturer’s or installer’s instructions.
To engage a PTO on a vehicle with a manual
transmission do the following:
1. Hold the clutch pedal down.
2. Set the parking brake.
3. Shift the transmission into NEUTRAL.
4. Engage the PTO. Refer to the manufacturer’s or
installer’s for instructions on electrically engaged
PTOs.
5. For mobile operations, shift the transmission into
the gear you want, apply the regular brakes and
release the parking brake. For stationary operations,
leave the parking brake applied.
6. Release the clutch and regular brakes as you
normally would. When the clutch is released,
the PTO will start.
7. Turn the PTO rotary switch to ON.To engage a PTO on a vehicle with an automatic
transmission do the following:
1. For stationary use shift the transmission into
PARK (P).
2. Turn the PTO rotary switch ON.
3. If the engine speed is below the PTO engage speed
limit, the PTO will start. The blinking LED on the PTO
control switch indicates PTO engage is requested.
When PTO engages the LED will switch from blinking
to a steady light.
To use PTO speed control in Preset Mode (Factory
Setting) do the following:
1. Engage the PTO.
2. Select PARK (P) or NEUTRAL (N) range. Apply
the parking brake if NEUTRAL (N) is selected.
Torque Converter Clutch (TCC) is not available in
NEUTRAL (N) and is available only in PARK (P)
when engine speed is above 1,100 rpm.
3. Make sure your foot is off the brake pedal (and
off the clutch on vehicles equipped with a manual
transmission).
4. Select the desired engine speed for PTO operation.
Read the following preset mode information
regarding operation.
4-97
Page 462 of 600

Brake Wear
Your vehicle has front disc brakes and may have rear
drum brakes or rear disc brakes.
Disc brake pads have built-in wear indicators that make a
high-pitched warning sound when the brake pads are
worn and new pads are needed. The sound may come
and go or be heard all the time your vehicle is moving,
except when you are pushing on the brake pedal �rmly.
{CAUTION:
The brake wear warning sound means that soon
your brakes will not work well. That could lead
to an accident. When you hear the brake wear
warning sound, have your vehicle serviced.
Notice:Continuing to drive with worn-out brake
pads could result in costly brake repair.Some driving conditions or climates may cause a brake
squeal when the brakes are �rst applied or lightly applied.
This does not mean something is wrong with your brakes.
Properly torqued wheel nuts are necessary to help
prevent brake pulsation. When tires are rotated, inspect
brake pads for wear and evenly tighten wheel nuts in
the proper sequence to GM torque speci�cations.
If you have rear drum brakes, they do not have wear
indicators, but if you ever hear a rear brake rubbing noise,
have the rear brake linings inspected immediately. Rear
brake drums should be removed and inspected each time
the tires are removed for rotation or changing. Drum
brakes have an inspection hole to inspect lining wear
during scheduled maintenance. When you have the front
brake pads replaced, have the rear brakes inspected, too.
Brake linings should always be replaced as complete
axle sets.
Brake Pedal Travel
See your dealer if the brake pedal does not return to
normal height, or if there is a rapid increase in pedal
travel. This could be a sign of brake trouble.
5-50
Page 492 of 600

How to Check
Use a good quality pocket-type gage to check tire
pressure. You cannot tell if your tires are properly
in�ated simply by looking at them. Radial tires may look
properly in�ated even when they’re underin�ated.
Check the tire’s in�ation pressure when the tires are
cold. Cold means your vehicle has been sitting
for at least three hours or driven no more than
1 mile (1.6 km).
Remove the valve cap from the tire valve stem. Press
the tire gage �rmly onto the valve to get a pressure
measurement. If the cold tire in�ation pressure matches
the recommended pressure on the Tire and Loading
Information label, no further adjustment is necessary.
If the in�ation pressure is low, add air until you reach the
recommended amount.
If you over�ll the tire, release air by pushing on the
metal stem in the center of the tire valve. Recheck the
tire pressure with the tire gage.
Be sure to put the valve caps back on the valve stems.
They help prevent leaks by keeping out dirt and moisture.
Dual Tire Operation
When the vehicle is new, or whenever a wheel, wheel
bolt or wheel nut is replaced, check the wheel nut torque
after 100, 1,000 and 6,000 miles (160, 1 600 and
10 000 km) of driving. For proper torque and wheel nut
tightening information, seeRemoving the Spare Tire
and Tools on page 5-92.
The outer tire on a dual wheel setup generally wears
faster than the inner tire. Your tires will wear more evenly
and last longer if you rotate the tires periodically,
seeTire Inspection and Rotation on page 5-81. Also see
Scheduled Maintenance (Gasoline Engine) on page 6-4.
{CAUTION:
If you operate your vehicle with a tire that is
badly underin�ated, the tire can overheat. An
overheated tire can lose air suddenly or catch
�re. You or others could be injured. Be sure all
tires (including the spare) are properly in�ated.
SeeIn�ation - Tire Pressure on page 5-79, for
information on proper tire in�ation.
5-80
Page 495 of 600

Make certain that all wheel nuts are properly tightened.
See “Wheel Nut Torque” underCapacities and
Speci�cations on page 5-133.
{CAUTION:
Rust or dirt on a wheel, or on the parts to
which it is fastened, can make wheel nuts
become loose after a time. The wheel could
come off and cause an accident. When you
change a wheel, remove any rust or dirt from
places where the wheel attaches to the vehicle.
In an emergency, you can use a cloth or a
paper towel to do this; but be sure to use a
scraper or wire brush later, if needed, to get all
the rust or dirt off. SeeChanging a Flat Tire on
page 5-91.
When It Is Time for New Tires
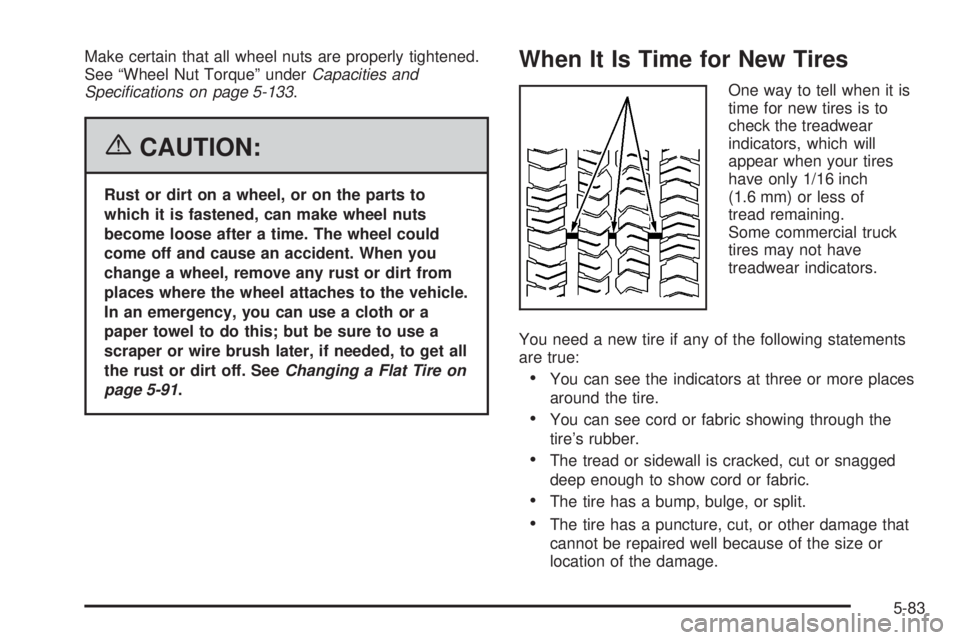
One way to tell when it is
time for new tires is to
check the treadwear
indicators, which will
appear when your tires
have only 1/16 inch
(1.6 mm) or less of
tread remaining.
Some commercial truck
tires may not have
treadwear indicators.
You need a new tire if any of the following statements
are true:
You can see the indicators at three or more places
around the tire.
You can see cord or fabric showing through the
tire’s rubber.
The tread or sidewall is cracked, cut or snagged
deep enough to show cord or fabric.
The tire has a bump, bulge, or split.
The tire has a puncture, cut, or other damage that
cannot be repaired well because of the size or
location of the damage.
5-83
Page 500 of 600

Each new wheel should have the same load-carrying
capacity, diameter, width, offset and be mounted
the same way as the one it replaces.
If you need to replace any of your wheels, wheel bolts
or wheel nuts, replace them only with new GM
original equipment parts. This way, you will be sure to
have the right wheel, wheel bolts and wheel nuts
for your vehicle.
{CAUTION:
Using the wrong replacement wheels, wheel
bolts, or wheel nuts on your vehicle can be
dangerous. It could affect the braking and
handling of your vehicle, make your tires lose
air and make you lose control. You could have
a collision in which you or others could be
injured. Always use the correct wheel, wheel
bolts and wheel nuts for replacement.
Notice:The wrong wheel can also cause problems
with bearing life, brake cooling, speedometer or
odometer calibration, headlamp aim, bumper height,
vehicle ground clearance, and tire or tire chain
clearance to the body and chassis.Whenever a wheel, wheel bolt or wheel nut is replaced
on a dual wheel setup, check the wheel nut torque
after 100, 1,000 and 6,000 miles (160, 1 600 and
10 000 km) of driving. For proper torque, see “Wheel
Nut Torque” underCapacities and Speci�cations
on page 5-133.
SeeChanging a Flat Tire on page 5-91for more
information.
Used Replacement Wheels
{CAUTION:
Putting a used wheel on your vehicle is
dangerous. You cannot know how it has been
used or how far it has been driven. It could fail
suddenly and cause a crash. If you have to
replace a wheel, use a new GM original
equipment wheel.
5-88
Page 516 of 600

{CAUTION:
Incorrect wheel nuts or improperly tightened
wheel nuts can cause the wheel to come loose
and even come off. This could lead to an
accident. Be sure to use the correct wheel
nuts. If you have to replace them, be sure to
get new GM original equipment wheel nuts.
Stop somewhere as soon as you can and have
the nuts tightened with a torque wrench to the
proper torque speci�cation. SeeCapacities
and Specifications on page 5-133for wheel nut
torque speci�cation.
Notice:Improperly tightened wheel nuts can lead
to brake pulsation and rotor damage. To avoid
expensive brake repairs, evenly tighten the wheel
nuts in the proper sequence and to the proper
torque speci�cation. SeeCapacities and
Specifications on page 5-133for the wheel nut
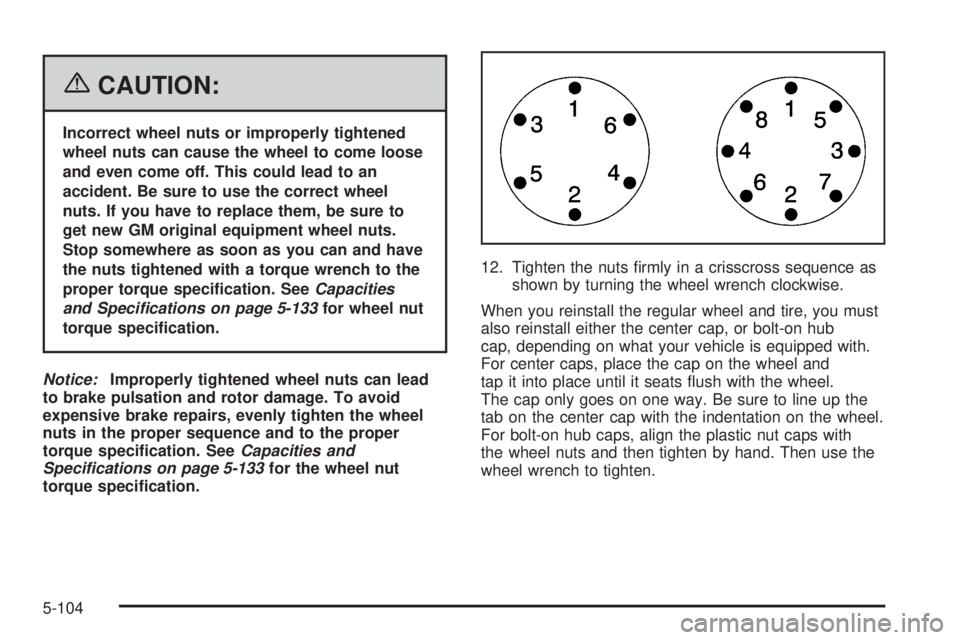
torque speci�cation.12. Tighten the nuts �rmly in a crisscross sequence as
shown by turning the wheel wrench clockwise.
When you reinstall the regular wheel and tire, you must
also reinstall either the center cap, or bolt-on hub
cap, depending on what your vehicle is equipped with.
For center caps, place the cap on the wheel and
tap it into place until it seats �ush with the wheel.
The cap only goes on one way. Be sure to line up the
tab on the center cap with the indentation on the wheel.
For bolt-on hub caps, align the plastic nut caps with
the wheel nuts and then tighten by hand. Then use the
wheel wrench to tighten.
5-104
Page 546 of 600

ApplicationCapacities
English Metric
8.1L V8 HD Automatic* 25.0 qt 23.7 L
8.1L V8 Automatic* 26.9 qt 25.5 L
8.1 V8 Manual* 27.1 qt 25.6 L
* Engine Fan Driven cooling system
** Electric Cooling Fan system
Engine Oil with Filter
4.3 V6 4.5 qt 4.3 L
4.8 V8; 5.3 V8; 6.0 V8 6.0 qt 5.7 L
8.1 V8 6.5 qt 6.1 L
Fuel Tank
Short Bed and 2500 LD 26.0 gal 98.0 L
Long Bed and Chassis Cab (Pickup Box Delete) 34.0 gal 128.7 L
Chassis Cab 3500 and 3500HD — front 27.0 gal 102.0 L
Chassis Cab 3500 and 3500HD — rear 23.0 gal 87.0 L
Transfer Case Fluid 2.0 qt 1.9 L
Wheel Nut Torque 140 ft lb 190Y
After re�ll, the level must be rechecked. Add enough engine coolant so that the �uid is within the proper operating
range.
5-134