2006 GMC SAVANA key battery
[x] Cancel search: key batteryPage 85 of 394

{CAUTION:
Stowing of articles under the passenger’s seat
or between the passenger’s seat cushion and
seatback may interfere with the proper
operation of the passenger sensing system.
Servicing Your Airbag-Equipped
Vehicle
Airbags affect how your vehicle should be serviced.
There are parts of the airbag system in several places
around your vehicle. You do not want the system to
inflate while someone is working on your vehicle. Your
dealer and the service manual have information
about servicing your vehicle and the airbag system. To
purchase a service manual, seeService Publications
Ordering Information on page 7-14.
{CAUTION:
For up to 10 minutes after the ignition key is
turned off and the battery is disconnected, an
airbag can still in�ate during improper service.
You can be injured if you are close to an
airbag when it in�ates. Avoid wires wrapped
with yellow tape or yellow connectors. They
are probably part of the airbag system. Be sure
to follow proper service procedures, and make
sure the person performing work for you is
quali�ed to do so.
The airbag system does not need regular maintenance.
1-79
Page 92 of 394

At times you may notice a decrease in range. This is
normal for any remote keyless entry system. If the
transmitter does not work or if you have to stand closer
to your vehicle for the transmitter to work, try this:
•Check the distance. You may be too far from your
vehicle. You may need to stand closer during
rainy or snowy weather.
•Check the location. Other vehicles or objects may
be blocking the signal. Take a few steps to the
left or right, hold the transmitter higher, and
try again.
•Check to determine if battery replacement or
resynchronization is necessary. See “Battery
Replacement” and “Resynchronization” under
Remote Keyless Entry System Operation on
page 2-4.
•If you are still having trouble, see your dealer or a
qualified technician for service.
Remote Keyless Entry System
Operation
Your vehicle may have this feature.
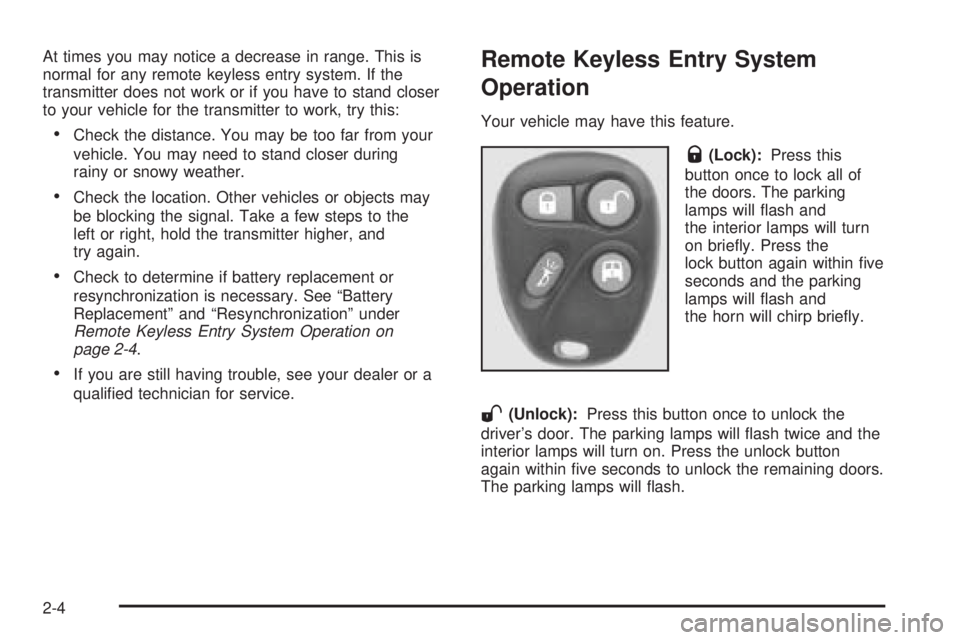
Q(Lock):Press this
button once to lock all of
the doors. The parking
lamps will flash and
the interior lamps will turn
on briefly. Press the
lock button again within five
seconds and the parking
lamps will flash and
the horn will chirp briefly.
W(Unlock):Press this button once to unlock the
driver’s door. The parking lamps will flash twice and the
interior lamps will turn on. Press the unlock button
again within five seconds to unlock the remaining doors.
The parking lamps will flash.
2-4
Page 94 of 394

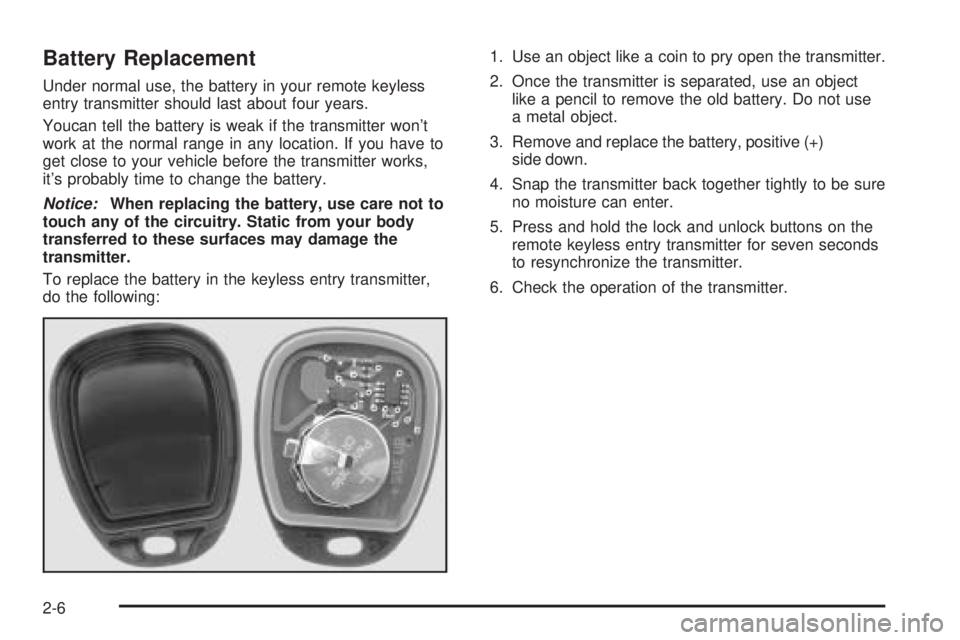
Battery Replacement
Under normal use, the battery in your remote keyless
entry transmitter should last about four years.
Youcan tell the battery is weak if the transmitter won’t
work at the normal range in any location. If you have to
get close to your vehicle before the transmitter works,
it’s probably time to change the battery.
Notice:When replacing the battery, use care not to
touch any of the circuitry. Static from your body
transferred to these surfaces may damage the
transmitter.
To replace the battery in the keyless entry transmitter,
do the following:1. Use an object like a coin to pry open the transmitter.
2. Once the transmitter is separated, use an object
like a pencil to remove the old battery. Do not use
a metal object.
3. Remove and replace the battery, positive (+)
side down.
4. Snap the transmitter back together tightly to be sure
no moisture can enter.
5. Press and hold the lock and unlock buttons on the
remote keyless entry transmitter for seven seconds
to resynchronize the transmitter.
6. Check the operation of the transmitter.
2-6
Page 106 of 394

Ignition Positions
Use the key to turn the ignition switch to four different
positions.
A (LOCK):This position locks the ignition and
transmission. It is a theft-deterrent feature. You will only
be able to remove the key when the ignition is turned
to LOCK.Notice:If your key seems stuck in LOCK and you
cannot turn it, be sure you are using the correct key;
if so, is it all the way in? Turn the key only with
your hand. Using a tool to force it could break the
key or the ignition switch. If none of these works,
then your vehicle needs service.
B (ACCESSORY):This position lets you use things like
the radio and the windshield wipers when the engine
is off.
Notice:Lengthy operation of features such as the
radio in the accessory ignition position may drain the
battery and prevent your vehicle from starting. Do not
operate your vehicle in the accessory ignition
position for a long period of time.
C (RUN):This is the position for driving.
D (START):This position starts the engine.
Retained Accessory Power (RAP)
The Retained Accessory Power (RAP) feature will allow
certain features on your vehicle to continue to work
for up to 10 minutes after the ignition key is turned to
LOCK or until one of the doors is opened.
2-18
Page 107 of 394

Starting the Engine
Move your shift lever to PARK (P) or NEUTRAL (N). Your
engine will not start in any other position — that is a
safety feature. To restart when you are already moving,
use NEUTRAL (N) only. If you have a diesel engine, refer
to the diesel supplement for the starting procedure.
Notice:Do not try to shift to PARK (P) if your
vehicle is moving. If you do, you could damage the
transmission. Shift to PARK (P) only when your
vehicle is stopped.
1. With your foot off the accelerator pedal, turn the
ignition key to START. When the engine starts,
let go of the key. The idle speed will go down as
your engine gets warm.
Notice:Holding your key in START for longer than
15 seconds at a time will cause your battery to
be drained much sooner. And the excessive heat
can damage your starter motor. Wait about
15 seconds between each try to help avoid draining
your battery or damaging your starter.
2. If it does not start within 10 seconds, push the
accelerator pedal all the way to the floor, while you
hold the ignition key in START. When the engine
starts, let go of the key and let up on the accelerator
pedal. Wait about 15 seconds between each try.When starting your engine in very cold weather
(below 0°F or−18°C), do this:
1. With your foot off the accelerator pedal, turn the
ignition key to START and hold it there up to
15 seconds. When the engine starts, let go of
the key.
2. If your engine still will not start, or starts but then
stops, it could be flooded with too much gasoline.
Try pushing your accelerator pedal all the way to the
floor and holding it there as you hold the key in
START for about three seconds. When the engine
starts, let go of the key and accelerator. If the
vehicle starts briefly but then stops again, do the
same thing, but this time keep the pedal down
for five or six seconds. This clears the extra
gasoline from the engine.
Notice:Your engine is designed to work with the
electronics in your vehicle. If you add electrical
parts or accessories, you could change the way the
engine operates. Before adding electrical equipment,
check with your dealer. If you do not, your engine
might not perform properly. Any resulting damage
would not be covered by your vehicle’s warranty.
2-19
Page 372 of 394

The offer is available for a very limited period of time
from the date of vehicle purchase/lease. For more
details, or to determine your vehicle’s eligibility, visit
gmmobility.com or call the GM Mobility Assistance
Center at 1-800-323-9935. Text telephone (TTY) users,
call 1-800-833-9935.
GM of Canada also has a Mobility Program. Call
1-800-GM-DRIVE (463-7483) for details. TTY users call
1-800-263-3830.
Roadside Assistance Program
As the owner of a new GMC vehicle, you are
automatically enrolled in the GMC Roadside Assistance
program. This value-added service is intended to
provide you with peace of mind as you drive in the city
or travel the open road. Call1-800-GMC-8782
(1-800-462-8782)to speak with a GMC Road Assistance
representative 24 hours a day, 365 days a year.
We will provide the following services during the
Bumper-to-Bumper warranty period, at no expense
to you:
•Fuel Delivery:Delivery of enough fuel
($5 maximum) for the customer to get to
the nearest service station.
•Lock-out Service (identi�cation required):
Replacement keys or locksmith service will
be covered at no charge if you are unable to gain
entry into your vehicle. Delivery of the replacement
key will be covered within 10 miles (16 km).
•Emergency Tow:Tow to the nearest dealership for
warranty service or in the event of a
vehicle-disabling accident. Assistance provided
when the vehicle is mired in sand, mud, or snow.
•Flat Tire Change:Installation of a spare tire will be
covered at no charge. The customer is responsible
for the repair or replacement of the tire if not
covered by a warrantable failure.
•Jump Start:No-start occurrences which require a
battery jump start will be covered at no charge.
•Dealer Locator Service
•Trip Routing:Your Roadside Assistance
Representative can provide you with specific
information regarding this feature.
•Trip Interruption Expense Bene�ts:Your
Roadside Assistance Representative can provide
you with specific information regarding this feature.
7-6
Page 388 of 394

Headlamps (cont.)
Front Turn Signal, Sidemarker and
Parking Lamps.........................................5-48
Halogen Bulbs............................................5-46
High/Low Beam Changer................................ 3-8
On Reminder..............................................3-14
Heater...........................................................3-17
Highbeam On Light.........................................3-41
Highway Hypnosis...........................................4-23
Hill and Mountain Roads..................................4-23
Hood
Checking Things Under................................5-10
Release.....................................................5-11
Horn............................................................... 3-6
How to Use This Manual...................................... ii
How to Wear Safety Belts Properly...................1-15
I
Ignition Positions.............................................2-18
Infants and Young Children, Restraints...............1-35
Inflation -- Tire Pressure..................................5-59
Instrument Panel
Overview..................................................... 3-4
Instrument Panel (I/P)
Brightness..................................................3-14
Cluster.......................................................3-24
J
Jump Starting.................................................5-39
K
Keyless Entry System....................................... 2-3
Keys............................................................... 2-2
L
Labeling, Tire Sidewall.....................................5-53
Lamps
Battery Run-Down Protection.........................3-16
Dome........................................................3-15
Dome Lamp Override...................................3-15
Exterior......................................................3-13
Reading.....................................................3-15
LATCH System
Child Restraints...........................................1-44
Light
Airbag Off..................................................3-28
Airbag Readiness........................................3-27
Anti-Lock Brake System Warning...................3-34
Brake System Warning.................................3-33
Change Engine Oil......................................3-39
Charging System.........................................3-32
Check Gages Warning.................................3-42
Cruise Control.............................................3-40
6