2006 GMC SAVANA heating
[x] Cancel search: heatingPage 119 of 394

Instrument Panel Overview...............................3-4
Hazard Warning Flashers................................3-5
Other Warning Devices...................................3-6
Horn.............................................................3-6
Tilt Wheel.....................................................3-6
Turn Signal/Multifunction Lever.........................3-7
Turn and Lane-Change Signals........................3-7
Headlamp High/Low-Beam Changer..................3-8
Flash-to-Pass.................................................3-8
Windshield Wipers..........................................3-9
Windshield Washer.........................................3-9
Cruise Control..............................................3-10
Exterior Lamps.............................................3-13
Headlamps on Reminder................................3-14
Daytime Running Lamps (DRL).......................3-14
Instrument Panel Brightness...........................3-14
Dome Lamps...............................................3-15
Dome Lamp Override....................................3-15
Entry Lighting...............................................3-15
Exit Lighting.................................................3-15
Reading Lamps............................................3-15
Battery Run-Down Protection..........................3-16
Accessory Power Outlet(s).............................3-16
Ashtray(s) and Cigarette Lighter......................3-17Climate Controls............................................3-17
Climate Control System.................................3-17
Outlet Adjustment.........................................3-20
Rear Heating System....................................3-21
Rear Air Conditioning and Heating System.......3-21
Warning Lights, Gages, and Indicators............3-23
Instrument Panel Cluster................................3-24
Speedometer and Odometer...........................3-25
Trip Odometer..............................................3-25
Engine Speed Limiter....................................3-25
Safety Belt Reminder Light.............................3-26
Passenger Safety Belt Reminder Light.............3-26
Airbag Readiness Light..................................3-27
Airbag Off Light............................................3-28
Passenger Airbag Status Indicator...................3-29
Charging System Light..................................3-32
Voltmeter Gage............................................3-32
Brake System Warning Light..........................3-33
Anti-Lock Brake System Warning Light.............3-34
StabiliTrak
®Not Ready Light..........................3-34
StabiliTrak®Indicator Light..............................3-35
Engine Coolant Temperature Gage..................3-35
Malfunction Indicator Lamp.............................3-36
Oil Pressure Gage........................................3-38
Section 3 Instrument Panel
3-1
Page 123 of 394

The main components of your instrument panel are the following:
A. Air Outlets. SeeOutlet Adjustment on page 3-20.
B. Turn Signal/Multifunction Lever. SeeTurn
Signal/Multifunction Lever on page 3-7.
C. Instrument Panel Cluster. SeeInstrument Panel
Cluster on page 3-24.
D. Shift Lever. SeeStarting the Engine on page 2-19.
E. Climate Control System. SeeClimate Control System
on page 3-17.
F. Audio System(s). SeeAudio System(s) on
page 3-43.
G. Exterior Lamp Controls. SeeExterior Lamps on
page 3-13.
H. Tow/Haul Mode Button. See “Tow/Haul Mode” under
Towing a Trailer on page 4-37.
I. Rear Heating System (If Equipped). SeeRear
Heating System on page 3-21.
J. Accessory Power Outlets/Cigarette Lighter. See
Accessory Power Outlet(s) on page 3-16and
Ashtray(s) and Cigarette Lighter on page 3-17.
K. Airbag Off Switch. SeeAirbag Off Switch on
page 1-71.
L. Storage Compartment. SeeStorage Areas on
page 2-30.M. StabiliTrak
®Button (If Equipped), Passenger Airbag
Status Indicator, and High-Idle System (If Equipped).
SeeStabiliTrak
®System on page 4-9orPassenger
Airbag Status Indicator on page 3-29.
Hazard Warning Flashers
Your hazard warning flashers let you warn others. They
also let police know you have a problem. Your front
and rear turn signal lamps will flash on and off.
The hazard warning
flasher button is
located on top of the
steering column.
Your hazard warning flashers work no matter what
position your key is in, and even if the key is not in
the ignition.
Press the button to make the front and rear turn signal
lamps flash on and off. Press the button again to
turn the flashers off.
When the hazard warning flashers are on, your turn
signals will not work.
3-5
Page 135 of 394

Ashtray(s) and Cigarette Lighter
Your vehicle may have this feature. The front ashtray
can be placed in the instrument panel extension at
the center of the instrument panel. Lift up on the ashtray
door to open it.
Notice:If you put papers, pins, or other �ammable
items in the ashtray, hot cigarettes or other
smoking materials could ignite them and possibly
damage your vehicle. Never put �ammable items in
the ashtray.
To use the cigarette lighter, push it in all the way and
let go. When it’s ready, it will pop back out by itself.
Notice:Holding a cigarette lighter in while it
is heating will not allow the lighter to back away
from the heating element when it is hot. Damage
from overheating may occur to the lighter or heating
element, or a fuse could be blown. Do not hold a
cigarette lighter in while it is heating.
Climate Controls
Climate Control System
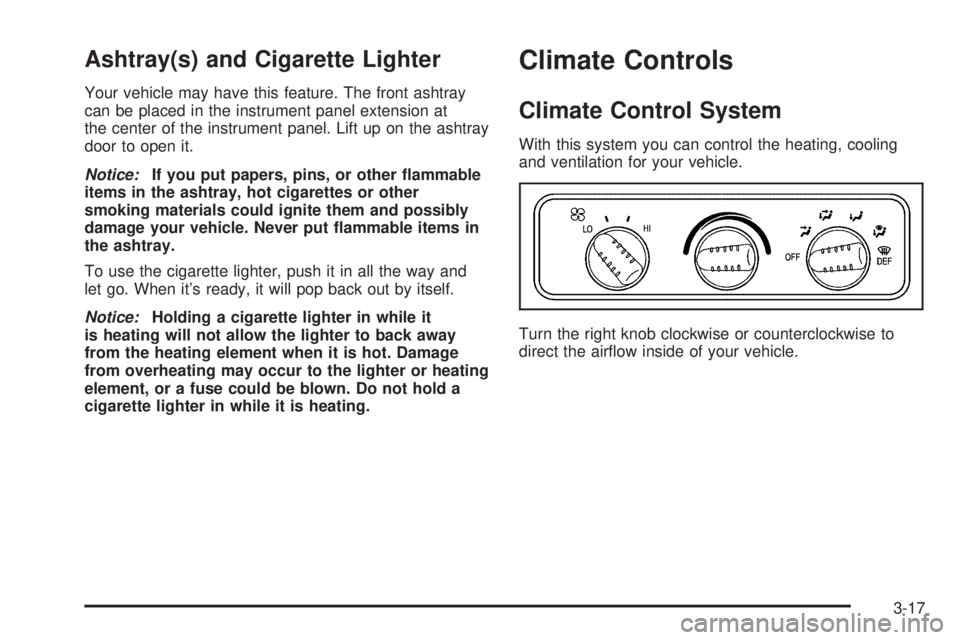
With this system you can control the heating, cooling
and ventilation for your vehicle.
Turn the right knob clockwise or counterclockwise to
direct the airflow inside of your vehicle.
3-17
Page 136 of 394

To change the current mode, select one of the following:
H(Vent):This mode directs air to the instrument
panel outlets.
)(Bi-Level):This mode directs about half of the air
to the instrument panel outlets, then directs most of
the remaining air to the floor outlets. Some air may be
directed toward the windshield.
6(Floor):This mode directs most of the air to the
floor outlets with some air directed to the outboard
outlets (for the side windows) and some air directed to
the windshield.
The right knob can also be used to select the defrost
and defog modes. Information on defogging and
defrosting can be found later in this section.
9(Fan):Turn the left knob clockwise or
counterclockwise to increase or decrease the fan speed.
Temperature Control:Turn the center knob clockwise
or counterclockwise to increase or decrease the
temperature inside your vehicle.If your vehicle has air conditioning, your heating/air
conditioning controls will look like this:
On hot days, open the windows to let hot inside air
escape; then close them. This helps to reduce the time
it takes for your vehicle to cool down. It also helps
the system to operate more efficiently.
A/C (Air Conditioning):This setting will begin to cool
and dehumidify the air inside of your vehicle.
MAX A/C (Maximum Air Conditioning):Turn the right
knob to MAX A/C for maximum cooling. This setting
cools the air the fastest, by recirculating the inside air.
3-18
Page 139 of 394

Rear Heating System
Your vehicle may have a rear heating system that
allows you to adjust the amount of air flowing into the
rear of the vehicle, from the front-seating area. This
feature works with the main climate-control system in
your vehicle.
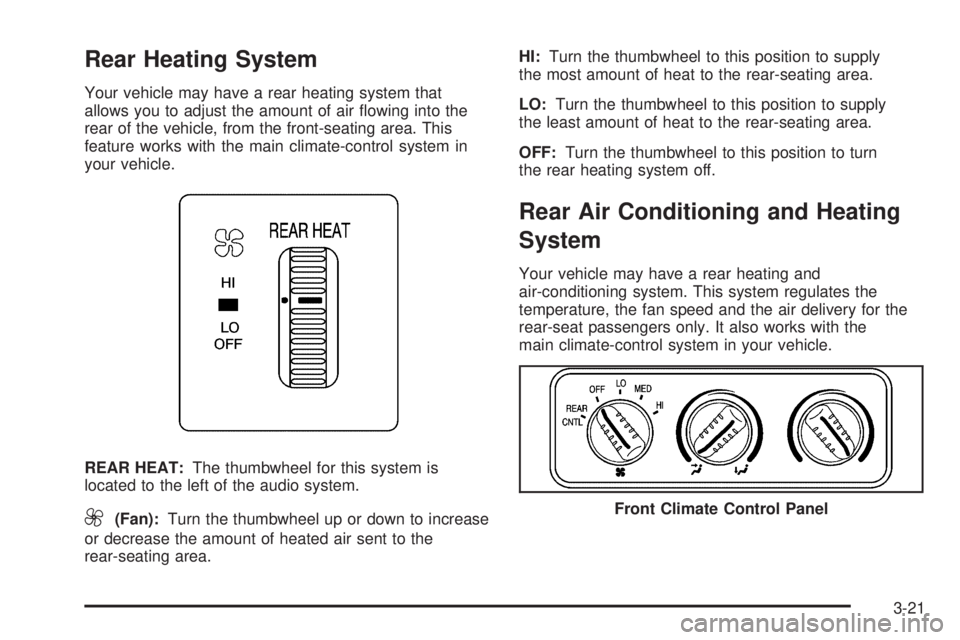
REAR HEAT:The thumbwheel for this system is
located to the left of the audio system.
9(Fan):Turn the thumbwheel up or down to increase
or decrease the amount of heated air sent to the
rear-seating area.HI:Turn the thumbwheel to this position to supply
the most amount of heat to the rear-seating area.
LO:Turn the thumbwheel to this position to supply
the least amount of heat to the rear-seating area.
OFF:Turn the thumbwheel to this position to turn
the rear heating system off.
Rear Air Conditioning and Heating
System
Your vehicle may have a rear heating and
air-conditioning system. This system regulates the
temperature, the fan speed and the air delivery for the
rear-seat passengers only. It also works with the
main climate-control system in your vehicle.
Front Climate Control Panel
3-21
Page 153 of 394

StabiliTrak®Indicator Light
If you have the
StabiliTrak®system,
this light will be on or
flashing, according to
the description table for
the StabiliTrak
®system.
For more information, seeStabiliTrak
®System
on page 4-9.
You will hear three chimes if the light turns on and
one chime if the light turns off.
If this light remains on steady, your vehicle needs
to be taken in for service.
Engine Coolant Temperature Gage
This gage shows the engine coolant temperature.
If the gage pointer moves into the red area your engine
is too hot!
It means that your engine coolant has overheated.
If you have been operating your vehicle under normal
operating conditions, you should pull off the road,
stop your vehicle, and turn off the engine as soon
as possible.
SeeEngine Overheating on page 5-24.
United StatesCanada
3-35
Page 244 of 394

Driving with a Trailer
{CAUTION:
If you have a rear-most window open and you
pull a trailer with your vehicle, carbon
monoxide (CO) could come into your vehicle.
You can not see or smell CO. It can cause
unconsciousness or death. SeeEngine
Exhaust on page 2-26. To maximize your safety
when towing a trailer:
Have your exhaust system inspected for
leaks, and make necessary repairs before
starting on your trip.
Keep the rear-most windows closed.
If exhaust does come into your vehicle
through a window in the rear or another
opening, drive with your front, main
heating or cooling system on and with the
fan on any speed. This will bring fresh,
outside air into your vehicle. Do not use
the climate control setting for maximum air
because it only recirculates the air inside
your vehicle. See Climate Control System
in the Index.Towing a trailer requires a certain amount of experience.
Before setting out for the open road, you’ll want to get
to know your rig. Acquaint yourself with the feel of
handling and braking with the added weight of the trailer.
And always keep in mind that the vehicle you are
driving is now a good deal longer and not nearly as
responsive as your vehicle is by itself.
Before you start, check all trailer hitch parts and
attachments, safety chains, electrical connector, lamps,
tires and mirror adjustment. If the trailer has electric
brakes, start your vehicle and trailer moving and then
apply the trailer brake controller by hand to be sure
the brakes are working. This lets you check your
electrical connection at the same time.
During your trip, check occasionally to be sure that the
load is secure, and that the lamps and any trailer
brakes are still working.Following Distance
Stay at least twice as far behind the vehicle ahead as
you would when driving your vehicle without a trailer.
This can help you avoid situations that require
heavy braking and sudden turns.
4-48
Page 246 of 394

When towing at high altitude on steep uphill grades,
consider the following: Engine coolant will boil at a lower
temperature than at normal altitudes. If you turn your
engine off immediately after towing at high altitude
on steep uphill grades, your vehicle may show signs
similar to engine overheating. To avoid this, let the
engine run while parked (preferably on level ground)
with the automatic transmission in PARK (P) for a
few minutes before turning the engine off. If you do get
the overheat warning, seeEngine Overheating on
page 5-24.
Parking on Hills
{CAUTION:
You really should not park your vehicle, with a
trailer attached, on a hill. If something goes
wrong, your rig could start to move. People
can be injured, and both your vehicle and the
trailer can be damaged.
But if you ever have to park your rig on a hill, here’s
how to do it:
1. Apply your regular brakes, but don’t shift into
PARK (P) yet. Then turn your wheels into the curb if
facing downhill or into traffic if facing uphill.2. Have someone place chocks under the
trailer wheels.
3. When the wheel chocks are in place, release the
regular brakes until the chocks absorb the load.
4. Reapply the regular brakes. Then apply your
parking brake and then shift to PARK (P).
5. Release the regular brakes.
When You Are Ready to Leave After
Parking on a Hill
1. Apply your regular brakes and hold the pedal down
while you:
•start your engine,
•shift into a gear, and
•release the parking brake.
2. Let up on the brake pedal.
3. Drive slowly until the trailer is clear of the chocks.
4. Stop and have someone pick up and store
the chocks.
4-50