2006 GMC SAVANA gas type
[x] Cancel search: gas typePage 76 of 394

Vehicles with dual stage airbags are also equipped with
special sensors which enable the sensing system to
monitor the position of both the driver and passenger
front seats. The seat position sensors provide
information which is used to determine if the airbags
should deploy at a reduced level or at full deployment.
What Makes an Airbag In�ate?
In an impact of sufficient severity, the airbag sensing
system detects that the vehicle is in a crash. The
sensing system triggers a release of gas from the
inflator, which inflates the airbag. The inflator, airbag,
and related hardware are all part of the airbag modules
inside the steering wheel and in the instrument panel
in front of the right front passenger.
How Does an Airbag Restrain?
In moderate to severe frontal or near-frontal collisions,
even belted occupants can contact the steering wheel or
the instrument panel. Airbags supplement the protection
provided by safety belts. Airbags distribute the force
of the impact more evenly over the occupant’s upper
body, stopping the occupant more gradually.But airbags would not help you in many types of
collisions, including rollovers, rear impacts and many
side impacts, primarily because an occupant’s motion is
not toward those airbags. Airbags should never be
regarded as anything more than a supplement to safety
belts, and then only in moderate to severe frontal or
near-frontal collisions.
What Will You See After an Airbag
In�ates?
After an airbag inflates, it quickly deflates, so quickly that
some people may not even realize the airbag inflated.
Some components of the airbag module — the steering
wheel hub for the driver’s airbag, or the instrument panel
for the right front passenger’s airbag —will be hot for a
short time. The parts of the airbag that come into contact
with you may be warm, but not too hot to touch. There will
be some smoke and dust coming from the vents in the
deflated airbags. Airbag inflation does not prevent the
driver from seeing or being able to steer the vehicle, nor
does it stop people from leaving the vehicle.
1-70
Page 254 of 394

California Fuel
If your vehicle is certified to meet California Emissions
Standards, it is designed to operate on fuels that
meet California specifications. See the underhood
emission control label. If this fuel is not available
in states adopting California emissions standards, your
vehicle will operate satisfactorily on fuels meeting
federal specifications, but emission control system
performance may be affected. The malfunction indicator
lamp may turn on and your vehicle may fail a
smog-check test. SeeMalfunction Indicator Lamp on
page 3-36. If this occurs, return to your authorized GM
dealer for diagnosis. If it is determined that the
condition is caused by the type of fuel used, repairs
may not be covered by your warranty.
Additives
To provide cleaner air, all gasolines in the United States
are now required to contain additives that will help
prevent engine and fuel system deposits from forming,
allowing your emission control system to work
properly. In most cases, you should not have to add
anything to your fuel. However, some gasolines contain
only the minimum amount of additive required to
meet U.S. Environmental Protection Agency regulations.
To help keep fuel injectors and intake valves clean,
or if your vehicle experiences problems due to
dirty injectors or valves, look for gasoline that is
advertised as TOP TIER Detergent Gasoline. Also, your
GM dealer has additives that will help correct and
prevent most deposit-related problems.
Gasolines containing oxygenates, such as ethers and
ethanol, and reformulated gasolines may be available in
your area. General Motors recommends that you use
these gasolines if they comply with the specifications
described earlier. However, E85 (85% ethanol)
and other fuels containing more than 10% ethanol must
not be used in vehicles that were not designed for
those fuels.
5-6
Page 294 of 394

Among those acts presumed to constitute tampering are
the acts listed below.
Insulation:
•
Removal of the noise shields or any underhood
insulation.
Engine:
•
Removal or rendering engine speed governor (if
equipped) inoperative so as to allow engine
speed to exceed manufacturer specifications.
Fan and Drive:
•
Removal of fan clutch (if equipped) or rendering
clutch inoperative.
•Removal of the fan shroud (if equipped).
Air Intake:
•
Removal of the air cleaner silencer.
•Modification of the air cleaner.
Exhaust:
•
Removal of the muffler and/or resonator.
•Removal of the exhaust pipes and exhaust
pipe clamps.
Bulb Replacement
For the proper type of replacement bulbs, see
Replacement Bulbs on page 5-50.
For any bulb changing procedure not listed in this
section, contact your dealer.
Halogen Bulbs
{CAUTION:
Halogen bulbs have pressurized gas inside and
can burst if you drop or scratch the bulb. You or
others could be injured. Be sure to read and
follow the instructions on the bulb package.
5-46
Page 299 of 394

Windshield Wiper Blade
Replacement
Windshield wiper blades should be inspected for wear
and cracking. SeeScheduled Maintenance (Gasoline
Engine) on page 6-4for more information on wiper blade
inspection.
Replacement blades come in different types and are
removed in different ways. To remove the type with a
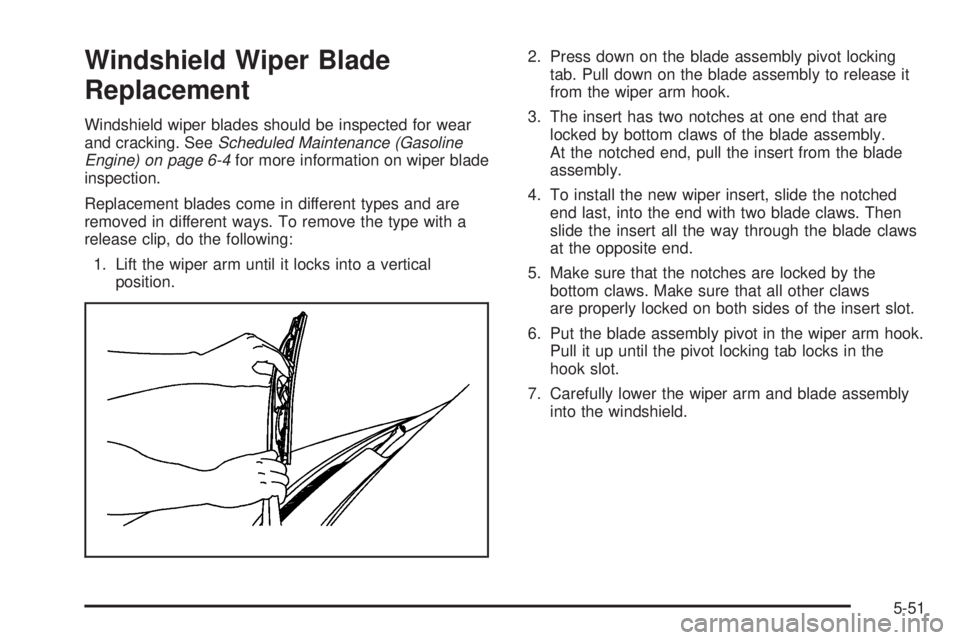
release clip, do the following:
1. Lift the wiper arm until it locks into a vertical
position.2. Press down on the blade assembly pivot locking
tab. Pull down on the blade assembly to release it
from the wiper arm hook.
3. The insert has two notches at one end that are
locked by bottom claws of the blade assembly.
At the notched end, pull the insert from the blade
assembly.
4. To install the new wiper insert, slide the notched
end last, into the end with two blade claws. Then
slide the insert all the way through the blade claws
at the opposite end.
5. Make sure that the notches are locked by the
bottom claws. Make sure that all other claws
are properly locked on both sides of the insert slot.
6. Put the blade assembly pivot in the wiper arm hook.
Pull it up until the pivot locking tab locks in the
hook slot.
7. Carefully lower the wiper arm and blade assembly
into the windshield.
5-51
Page 308 of 394

How to Check
Use a good quality pocket-type gage to check tire
pressure. You cannot tell if your tires are properly
inflated simply by looking at them. Radial tires may look
properly inflated even when they’re underinflated.
Check the tire’s inflation pressure when the tires are
cold. Cold means your vehicle has been sitting for
at least three hours or driven no more than 1 mile
(1.6 km).
Remove the valve cap from the tire valve stem. Press
the tire gage firmly onto the valve to get a pressure
measurement. If the cold tire inflation pressure matches
the recommended pressure on the tire and loading
information label, no further adjustment is necessary. If
the pressure is low, add air until you reach the
recommended amount.
If you overfill the tire, release air by pushing on the
metal stem in the center of the tire valve. Recheck the
tire pressure with the tire gage.
Be sure to put the valve caps back on the valve stems.
They help prevent leaks by keeping out dirt and
moisture.
Dual Tire Operation
When the vehicle is new, or whenever a wheel, wheel
bolt or wheel nut is replaced, check the wheel nut torque
after 100, 1,000 and 6,000 miles (160, 1 600 and
10 000 km) of driving. For proper wheel nut tightening
information, see “Removing the Flat Tire and Installing
the Spare Tire” later in this section, underChanging
a Flat Tire on page 5-70. Also see “Wheel Nut Torque”
underCapacities and Speci�cations on page 5-98.
The outer tire on a dual wheel setup generally wears
faster than the inner tire. Your tires will wear more
evenly and last longer if you rotate the tires periodically.
SeeTire Inspection and Rotation on page 5-61. Also
seeScheduled Maintenance (Gasoline Engine) on
page 6-4.
{CAUTION:
If you operate your vehicle with a tire that is
badly underin�ated, the tire can overheat. An
overheated tire can lose air suddenly or catch
�re. You or others could be injured. Be sure all
tires (including the spare) are properly in�ated.
SeeTires on page 5-52andIn�ation - Tire Pressure on
page 5-59for more information on proper tire inflation.
5-60
Page 309 of 394

Tire Inspection and Rotation
Tires should be rotated every 5,000 to 8,000 miles
(8 000 to 13 000 km).
Any time you notice unusual wear, rotate your tires as
soon as possible and check wheel alignment. Also
check for damaged tires or wheels. SeeWhen It Is Time
for New Tires on page 5-63andWheel Replacement
on page 5-67for more information.
Make sure the spare tire is stored securely. Push, pull,
and then try to rotate or turn the tire. If it moves,
use the ratchet/wheel wrench to tighten the cable. See
Changing a Flat Tire on page 5-70.
If your vehicle has dual rear wheels, also seeDual Tire
Operation on page 5-60.
The purpose of regular rotation is to achieve more
uniform wear for all tires on the vehicle. The first rotation
is the most important. SeeScheduled Maintenance
(Gasoline Engine) on page 6-4.If your vehicle has single rear wheels, always use the
correct rotation patterns shown here when rotating your
vehicle’s tires. Do not include the spare tire in the tire
rotation, if the spare tire/wheel assembly does not match
your vehicle’s road tires and wheels in size and type.Single Rear Wheels
5-61