2006 GMC SAVANA belt
[x] Cancel search: beltPage 119 of 394

Instrument Panel Overview...............................3-4
Hazard Warning Flashers................................3-5
Other Warning Devices...................................3-6
Horn.............................................................3-6
Tilt Wheel.....................................................3-6
Turn Signal/Multifunction Lever.........................3-7
Turn and Lane-Change Signals........................3-7
Headlamp High/Low-Beam Changer..................3-8
Flash-to-Pass.................................................3-8
Windshield Wipers..........................................3-9
Windshield Washer.........................................3-9
Cruise Control..............................................3-10
Exterior Lamps.............................................3-13
Headlamps on Reminder................................3-14
Daytime Running Lamps (DRL).......................3-14
Instrument Panel Brightness...........................3-14
Dome Lamps...............................................3-15
Dome Lamp Override....................................3-15
Entry Lighting...............................................3-15
Exit Lighting.................................................3-15
Reading Lamps............................................3-15
Battery Run-Down Protection..........................3-16
Accessory Power Outlet(s).............................3-16
Ashtray(s) and Cigarette Lighter......................3-17Climate Controls............................................3-17
Climate Control System.................................3-17
Outlet Adjustment.........................................3-20
Rear Heating System....................................3-21
Rear Air Conditioning and Heating System.......3-21
Warning Lights, Gages, and Indicators............3-23
Instrument Panel Cluster................................3-24
Speedometer and Odometer...........................3-25
Trip Odometer..............................................3-25
Engine Speed Limiter....................................3-25
Safety Belt Reminder Light.............................3-26
Passenger Safety Belt Reminder Light.............3-26
Airbag Readiness Light..................................3-27
Airbag Off Light............................................3-28
Passenger Airbag Status Indicator...................3-29
Charging System Light..................................3-32
Voltmeter Gage............................................3-32
Brake System Warning Light..........................3-33
Anti-Lock Brake System Warning Light.............3-34
StabiliTrak
®Not Ready Light..........................3-34
StabiliTrak®Indicator Light..............................3-35
Engine Coolant Temperature Gage..................3-35
Malfunction Indicator Lamp.............................3-36
Oil Pressure Gage........................................3-38
Section 3 Instrument Panel
3-1
Page 144 of 394

Safety Belt Reminder Light
When the key is turned to RUN or START, a chime will
be provided for several seconds to remind people to
buckle their safety belts. The driver safety belt light will
also be provided and stay on for several seconds,
then it will flash for several more. You should buckle
your seat belt.
This chime and light will be
repeated if the driver
remains unbuckled and the
vehicle is in motion.
If the driver’s belt is buckled, neither the chime nor the
light will be provided.
Passenger Safety Belt
Reminder Light
If equipped, several seconds after the key is turned to
RUN or START, a chime will sound for several seconds
to remind the front passenger to buckle their safety
belt. This would only occur if the passenger airbag is
enabled. SeePassenger Sensing System on page 1-74
for more information. The passenger safety belt light
will also come on and stay on for several seconds, then
it will flash for several more.
This chime and light will be
repeated if the passenger
remains unbuckled and
the vehicle is in motion.
If the passenger’s safety belt is buckled, neither the
chime nor the light will come on.
3-26
Page 150 of 394

Charging System Light
This light should come on
briefly when you turn on
the ignition, before starting
the engine, as a check
to show you it is working.
After the engine starts, the light should go out. If it stays
on or comes on while you are driving, you may have
a problem with your charging system. It could indicate a
problem with the generator drive belt, or some other
charging system problem. Have it checked right away.
Driving while this light is on could drain your battery.
If you must drive a short distance with this light
on, it helps to turn off all your accessories, such as the
radio and air conditioner.
Voltmeter Gage
When your engine is not
running, but the ignition is
on (in the RUN position),
this gage shows your
battery’s state of charge in
DC volts.
When the engine is running, the gage shows the
condition of the charging system. Readings between the
low and high warning zones indicate the normal
operating range.
Readings in the low warning zone may occur when a
large number of electrical accessories are operating in
the vehicle and the engine is left at an idle for an
extended period. This condition is normal since the
charging system is not able to provide full power
at engine idle. As engine speeds are increased, this
condition should correct itself as higher engine speeds
allow the charging system to create maximum power.
You can only drive for a short time with the reading
in either warning zone. If you must drive, turn off
all unnecessary accessories.
3-32
Page 194 of 394

When cleaning the cassette tape player with the
recommended non-abrasive cleaning cassette, it is
possible that the cassette may eject, because the cut
tape detection feature on the radio may recognize it as a
broken tape, in error. To prevent the cleaning cassette
from being ejected, use the following steps:
1. Turn the ignition on.
2. Turn the radio off.
3. Press and hold the TAPE DISC button for
five seconds. READY will appear on the display and
the cassette symbol will flash for five seconds.
4. Insert the scrubbing action cleaning cassette.
5. Eject the cleaning cassette after the manufacturer’s
recommended cleaning time.
When the cleaning cassette has been ejected, the
cut tape detection feature will be active again.
A non-scrubbing action, wet-type cleaner which uses a
cassette with a fabric belt to clean the tape head
can be used. This type of cleaning cassette will not
eject on its own. A non-scrubbing action cleaner may not
clean as thoroughly as the scrubbing type cleaner.
The use of a non-scrubbing action, dry-type cleaning
cassette is not recommended.After the player is cleaned, press and hold the eject
button for five seconds to reset the CLEAN indicator.
The radio will display --- or CLEANED to show the
indicator was reset.
Cassettes are subject to wear and the sound quality
may degrade over time. Always make sure the cassette
tape is in good condition before the tape player is
serviced.
Care of Your CDs
Handle CDs carefully. Store them in their original cases
or other protective cases and away from direct
sunlight and dust. The CD player scans the bottom
surface of the disc. If the surface of a CD is damaged,
such as cracked, broken, or scratched, the CD will
not play properly or not at all. If the surface of a CD is
soiled, take a soft, lint free cloth or dampen a clean, soft
cloth in a mild, neutral detergent solution mixed with
water, and clean it. Make sure the wiping process starts
from the center to the edge.
Do not touch the bottom side of a CD while handling it;
this could damage the surface. Pick up CDs by
grasping the outer edges or the edge of the hole and
the outer edge.
3-76
Page 198 of 394

Your Driving, the Road, and
Your Vehicle
Defensive Driving
The best advice anyone can give about driving is: Drive
defensively.
Please start with a very important safety device in your
vehicle: Buckle up. SeeSafety Belts: They Are for
Everyone on page 1-10.
{CAUTION:
Defensive driving really means “Be ready for
anything.” On city streets, rural roads, or
expressways, it means “Always expect the
unexpected.” Assume that pedestrians or other
drivers are going to be careless and make
mistakes. Anticipate what they might do and
be ready. Rear-end collisions are about the
most preventable of accidents. Yet they are
common. Allow enough following distance.
Defensive driving requires that a driver
concentrate on the driving task. Anything that
distracts from the driving task makes proper
defensive driving more difficult and can even
cause a collision, with resulting injury. Ask a
passenger to help do these things, or pull off
the road in a safe place to do them. These
simple defensive driving techniques could
save your life.
4-2
Page 209 of 394

Steering in Emergencies
There are times when steering can be more effective than
braking. For example, you come over a hill and find a
truck stopped in your lane, or a car suddenly pulls out
from nowhere, or a child darts out from between parked
cars and stops right in front of you. You can avoid these
problems by braking — if you can stop in time. But
sometimes you cannot; there is not room. That is the time
for evasive action — steering around the problem.
Your vehicle can perform very well in emergencies like
these. First apply your brakes.
SeeBraking on page 4-6. It is better to remove as much
speed as you can from a possible collision. Then
steer around the problem, to the left or right depending
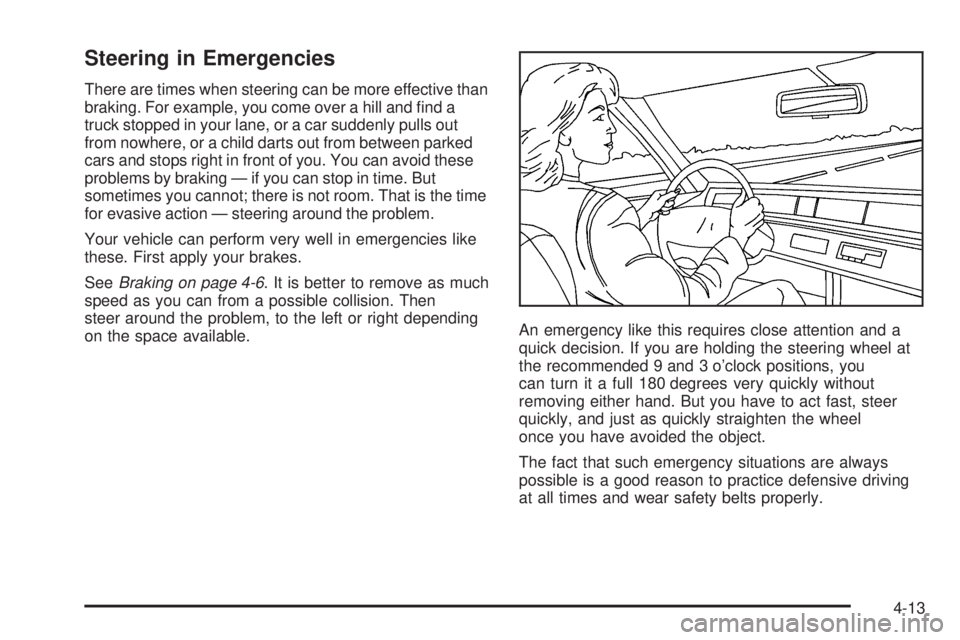
on the space available.An emergency like this requires close attention and a
quick decision. If you are holding the steering wheel at
the recommended 9 and 3 o’clock positions, you
can turn it a full 180 degrees very quickly without
removing either hand. But you have to act fast, steer
quickly, and just as quickly straighten the wheel
once you have avoided the object.
The fact that such emergency situations are always
possible is a good reason to practice defensive driving
at all times and wear safety belts properly.
4-13
Page 247 of 394

Maintenance When Trailer Towing
Your vehicle will need service more often when you’re
pulling a trailer. See the Maintenance Schedule for more
on this. Things that are especially important in trailer
operation are automatic transmission fluid (don’t overfill),
engine oil, axle lubricant, belt, cooling system and
brake system. Each of these is covered in this manual,
and the Index will help you find them quickly. If
you’re trailering, it’s a good idea to review these sections
before you start your trip.
Check periodically to see that all hitch nuts and bolts
are tight.
Trailer Wiring Harness
The optional heavy-duty trailer wiring package includes
a seven-wire harness assembly at the rear of the
vehicle and a four-wire harness assembly under the left
hand side of the instrument panel. The seven-wire
harness assembly is taped together and located in a
frame pocket at the driver side rear left corner of
the frame. The seven-wire harness includes a 30-amp
feed wire. Both harnesses come without connectors and
should be wired by a qualified electrical technician.
The technician can use the following color code chart
when connecting the wiring harness to your trailer
and trailer brake controller.Seven-Wire Harness
•Light Green: Back-up lamps
•Brown: Parking lamps
•Yellow: Left stoplamp and turn signal
•Dark Green: Right stoplamp and turn signal
•Dark Blue: Use for electric trailer brakes
•Orange: Trailer accessory
•White (heavy gage): Ground wire
Four-Wire Harness (Trailer Brake Controller)
•Black: Ground
•Red/White Stripe: Fused Battery
•Dark Blue: Trailer Brake Feed
•Light Blue: Fused Stoplamp/CHMSL
4-51
Page 250 of 394

Tires..............................................................5-52
Tire Sidewall Labeling...................................5-53
Tire Terminology and Definitions.....................5-56
Inflation - Tire Pressure.................................5-59
Dual Tire Operation.......................................5-60
Tire Inspection and Rotation...........................5-61
When It Is Time for New Tires.......................5-63
Buying New Tires.........................................5-63
Different Size Tires and Wheels......................5-65
Uniform Tire Quality Grading..........................5-65
Wheel Alignment and Tire Balance..................5-67
Wheel Replacement......................................5-67
Tire Chains..................................................5-68
If a Tire Goes Flat........................................5-69
Changing a Flat Tire.....................................5-70
Removing the Spare Tire and Tools................5-71
Removing the Flat Tire and Installing
the Spare Tire..........................................5-74
Secondary Latch System...............................5-79
Storing a Flat or Spare Tire and Tools............5-82
Spare Tire...................................................5-83
Appearance Care............................................5-84
Cleaning the Inside of Your Vehicle.................5-84
Fabric/Carpet...............................................5-85
Instrument Panel, Vinyl, and Other
Plastic Surfaces........................................5-86Care of Safety Belts......................................5-86
Weatherstrips...............................................5-86
Washing Your Vehicle...................................5-87
Cleaning Exterior Lamps/Lenses.....................5-87
Finish Care..................................................5-87
Windshield and Wiper Blades.........................5-88
Aluminum Wheels.........................................5-89
Tires...........................................................5-89
Sheet Metal Damage.....................................5-90
Finish Damage.............................................5-90
Underbody Maintenance................................5-90
Chemical Paint Spotting.................................5-90
Vehicle Care/Appearance Materials..................5-91
Vehicle Identi�cation......................................5-92
Vehicle Identification Number (VIN).................5-92
Service Parts Identification Label.....................5-92
Electrical System............................................5-93
Add-On Electrical Equipment..........................5-93
Headlamp Wiring..........................................5-93
Windshield Wiper Fuses................................5-93
Fuses and Circuit Breakers............................5-93
Floor Console Fuse Block..............................5-94
Engine Compartment Fuse Block....................5-95
Capacities and Speci�cations..........................5-98
Section 5 Service and Appearance Care
5-2