Page 310 of 394

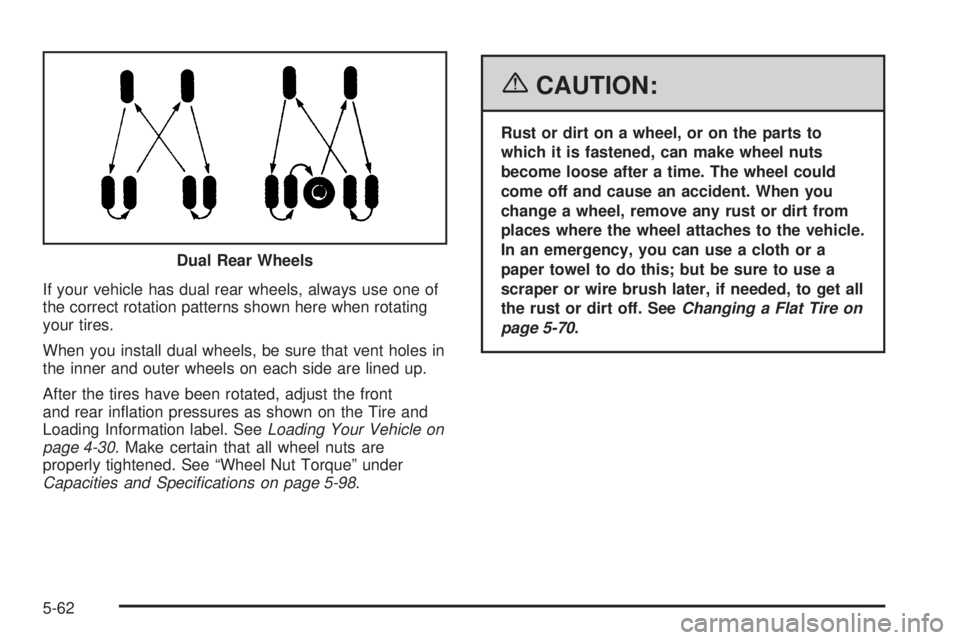
If your vehicle has dual rear wheels, always use one of
the correct rotation patterns shown here when rotating
your tires.
When you install dual wheels, be sure that vent holes in
the inner and outer wheels on each side are lined up.
After the tires have been rotated, adjust the front
and rear inflation pressures as shown on the Tire and
Loading Information label. SeeLoading Your Vehicle on
page 4-30. Make certain that all wheel nuts are
properly tightened. See “Wheel Nut Torque” under
Capacities and Speci�cations on page 5-98.
{CAUTION:
Rust or dirt on a wheel, or on the parts to
which it is fastened, can make wheel nuts
become loose after a time. The wheel could
come off and cause an accident. When you
change a wheel, remove any rust or dirt from
places where the wheel attaches to the vehicle.
In an emergency, you can use a cloth or a
paper towel to do this; but be sure to use a
scraper or wire brush later, if needed, to get all
the rust or dirt off. SeeChanging a Flat Tire on
page 5-70. Dual Rear Wheels
5-62
Page 317 of 394

Notice:If your vehicle does not have dual wheels
and is equipped with a tire size other than
P235/75R16, P245/75R16 or LT245/75R16, use tire
chains only where legal and only when you
must. Use chains that are the proper size for your
tires. Install them on the tires of the rear axle. Do not
use chains on the tires of the front axle. Tighten
them as tightly as possible with the ends securely
fastened. Drive slowly and follow the chain
manufacturer’s instructions. If you can hear the
chains contacting your vehicle, stop and retighten
them. If the contact continues, slow down until
it stops. Driving too fast or spinning the wheels with
chains on will damage your vehicle.
If a Tire Goes Flat
It is unusual for a tire to blowout while you are driving,
especially if you maintain your vehicle’s tires properly.
If air goes out of a tire, it is much more likely to leak out
slowly. But if you should ever have a blowout, here
are a few tips about what to expect and what to do:
If a front tire fails, the flat tire will create a drag that pulls
the vehicle toward that side. Take your foot off the
accelerator pedal and grip the steering wheel firmly.
Steer to maintain lane position, and then gently brake to
a stop well out of the traffic lane.A rear blowout, particularly on a curve, acts much like a
skid and may require the same correction you would
use in a skid. In any rear blowout remove your foot from
the accelerator pedal. Get the vehicle under control
by steering the way you want the vehicle to go. It may
be very bumpy and noisy, but you can still steer. Gently
brake to a stop, well off the road if possible.
{CAUTION:
Lifting a vehicle and getting under it to do
maintenance or repairs is dangerous without
the appropriate safety equipment and training.
The jack provided with your vehicle is
designed only for changing a �at tire. If it is
used for anything else, you or others could be
badly injured or killed if the vehicle slips off
the jack. Use the jack provided with your
vehicle only for changing a �at tire.
If a tire goes flat, the next part shows how to use the
jacking equipment to change a flat tire safely.
5-69
Page 318 of 394

Changing a Flat Tire
If a tire goes flat, avoid further tire and wheel damage
by driving slowly to a level place. Turn on your vehicle’s
hazard warning flashers. SeeHazard Warning Flashers
on page 3-5for more information.
{CAUTION:
Changing a tire can be dangerous. The vehicle
can slip off the jack and roll over or fall on you
or other people. You and they could be badly
injured or even killed. Find a level place to
change your tire. To help prevent the vehicle
from moving:
1. Set the parking brake �rmly.
2. Put the shift lever in PARK (P).
3. Turn off the engine and do not restart
while the vehicle is raised.
4. Do not allow passengers to remain in
the vehicle.
CAUTION: (Continued)
CAUTION: (Continued)
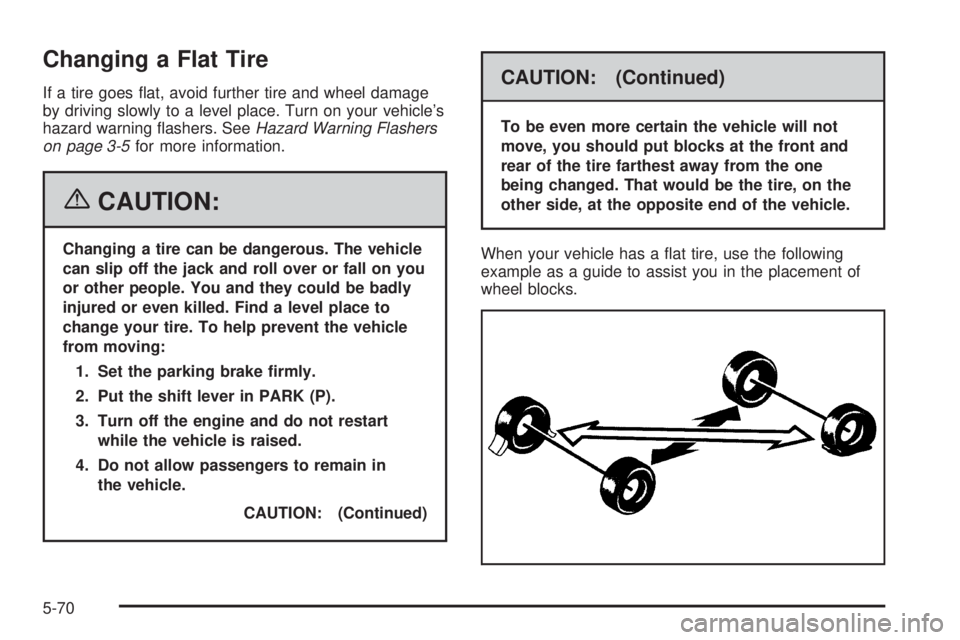
To be even more certain the vehicle will not
move, you should put blocks at the front and
rear of the tire farthest away from the one
being changed. That would be the tire, on the
other side, at the opposite end of the vehicle.
When your vehicle has a flat tire, use the following
example as a guide to assist you in the placement of
wheel blocks.
5-70
Page 325 of 394
4. Raise the vehicle by turning the ratchet clockwise.
Make sure the UP mark faces you. Raise the
vehicle far enough off the ground so there is enough
room for the spare tire to fit.
5. Remove all the
wheel nuts.
6. Take flat tire off of the mounting surface.
{CAUTION:
Rust or dirt on the wheel, or on the parts to
which it is fastened, can make the wheel nuts
become loose after a time. The wheel could
come off and cause an accident. When you
change a wheel, remove any rust or dirt from
the places where the wheel attaches to the
vehicle. In an emergency, you can use a cloth
or a paper towel to do this; but be sure to use
a scraper or wire brush later, if needed, to get
all the rust or dirt off.
7. Remove any rust or dirt
from the wheel bolts,
mounting surfaces
and spare wheel.
5-77
Page 393 of 394

Starting Your Engine.......................................2-19
Steering........................................................4-12
Steering Wheel, Tilt Wheel................................. 3-6
Storage Areas................................................2-30
Stuck in Sand, Mud, Ice or Snow......................4-29
Sun Visors.....................................................2-16
Swing-Out Side Door, 60/40.............................2-11
Swing-Out Windows........................................2-16
T
Taillamps.......................................................5-49
Theft-Deterrent, Radio.....................................3-74
Theft-Deterrent Systems...................................2-17
Passlock
®...................................................2-17
Tilt Wheel........................................................ 3-6
Tires.............................................................5-52
Aluminum Wheels, Cleaning..........................5-89
Buying New Tires........................................5-63
Chains.......................................................5-68
Changing a Flat Tire....................................5-70
Cleaning....................................................5-89
Different Size..............................................5-65
Dual Tire Operation.....................................5-60
If a Tire Goes Flat.......................................5-69
Inflation -- Tire Pressure...............................5-59
Inspection and Rotation................................5-61
Installing the Spare Tire................................5-74
Removing the Flat Tire.................................5-74
Removing the Spare Tire and Tools...............5-71Tires (cont.)
Secondary Latch System..............................5-79
Spare Tire..................................................5-83
Storing a Flat or Spare Tire and Tools............5-82
Tire Sidewall Labeling..................................5-53
Tire Terminology and Definitions....................5-56
Uniform Tire Quality Grading.........................5-65
Wheel Alignment and Tire Balance.................5-67
Wheel Replacement.....................................5-67
When It Is Time for New Tires......................5-63
Tow/Haul Mode Light.......................................3-42
Towing
Recreational Vehicle.....................................4-35
Towing a Trailer..........................................4-37
Your Vehicle...............................................4-35
Traction
StabiliTrak
®System....................................... 4-9
Transmission
Fluid, Automatic...........................................5-19
Transmission Operation, Automatic....................2-21
Trip Odometer................................................3-25
Turn and Lane-Change Signals.......................... 3-7
Turn Signal/Multifunction Lever........................... 3-7
U
Understanding Radio Reception........................3-75
Uniform Tire Quality Grading............................5-65
11