Page 20 of 232
16.EJ (Eject):Press to eject a CD.
17.AM/FM:Press to choose a
frequency band (AM/FM1/FM2).
CD changer (if equipped)
Your CD changer is either located in the trunk or the center console.
1. Slide the door to access the CD
changer magazine.
2. Press
to eject the magazine.
3. Turn the magazine (A) over.
4. Using the disc holder release
knob (C), pull the disc holder (B)
out of the magazine.
Do not pull too hard on the disc holder as the disc holder may come
completely out of the magazine. If this happens, reinsert the disc holder
back into the magazine while pressing on the lever.
AM
FM
AB
C
2006 Taurus(tau)
Owners Guide (post-2002-fmt)
USA(fus)
Entertainment Systems
20
Page 39 of 232
To replace the LED module:
1. Remove the two outboard
grommets from the inside of the
decklid.
2. On the inside of the decklid,
remove the three nuts that hold the
spoiler on and remove the spoiler.
3. On the underside of the spoiler,
remove the two decorative screw
covers (on the LED module).
4. Remove the two screws that are
holding the LED module in place.
5. Remove the wiring harness
grommet and disengage the
electrical connector.
6. Replace the LED module.
7. To complete installation, follow
the removal procedure in reverse order.
Replacing license plate lamp bulbs
1. Make sure headlamp switch is in
OFF position and open trunk lid.
2. Carefully twist and pull the
socket from the lamp housing.
3. Carefully pull the bulb from the
socket and push in the new bulb.
4. Reinstall the socket in the lamp
housing and twist to secure.
2006 Taurus(tau)
Owners Guide (post-2002-fmt)
USA(fus)
Lights
39
Page 40 of 232

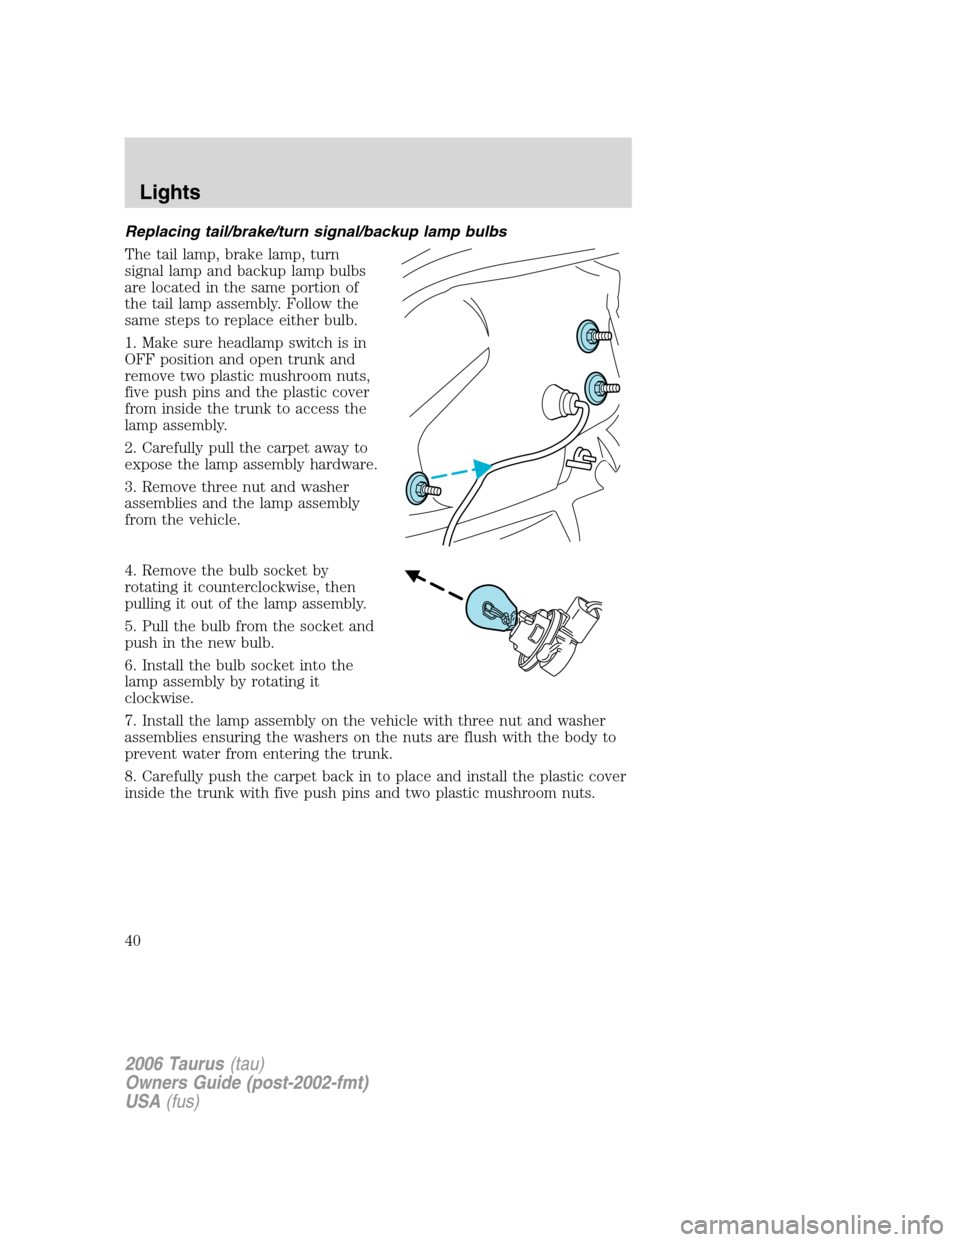
Replacing tail/brake/turn signal/backup lamp bulbs
The tail lamp, brake lamp, turn
signal lamp and backup lamp bulbs
are located in the same portion of
the tail lamp assembly. Follow the
same steps to replace either bulb.
1. Make sure headlamp switch is in
OFF position and open trunk and
remove two plastic mushroom nuts,
five push pins and the plastic cover
from inside the trunk to access the
lamp assembly.
2. Carefully pull the carpet away to
expose the lamp assembly hardware.
3. Remove three nut and washer
assemblies and the lamp assembly
from the vehicle.
4. Remove the bulb socket by
rotating it counterclockwise, then
pulling it out of the lamp assembly.
5. Pull the bulb from the socket and
push in the new bulb.
6. Install the bulb socket into the
lamp assembly by rotating it
clockwise.
7. Install the lamp assembly on the vehicle with three nut and washer
assemblies ensuring the washers on the nuts are flush with the body to
prevent water from entering the trunk.
8. Carefully push the carpet back in to place and install the plastic cover
inside the trunk with five push pins and two plastic mushroom nuts.
2006 Taurus(tau)
Owners Guide (post-2002-fmt)
USA(fus)
Lights
40
Page 62 of 232
POSITIVE RETENTION FLOOR MAT
Position the driver floor mat so that
the eyelet is over the pointed end of
the retention post and rotate
forward to lock in. Make sure that
the mat does not interfere with the
operation of the accelerator or the
brake pedal. To remove the floor
mat, reverse the installation
procedure.
INTERIOR TRUNK CONTROL
Press the remote trunk release
control on the instrument panel to
the left of the steering wheel.
CARGO AREA FEATURES
Cargo utility hooks
The utility hooks located inside the trunk can be used to attach a cargo
net to secure lightweight objects or hang small items on. Do not hang
more than 20 lbs (12 kg) on the hooks.
The hooks are not designed to restrain objects during a collision.
2006 Taurus(tau)
Owners Guide (post-2002-fmt)
USA(fus)
Driver Controls
62
Page 65 of 232

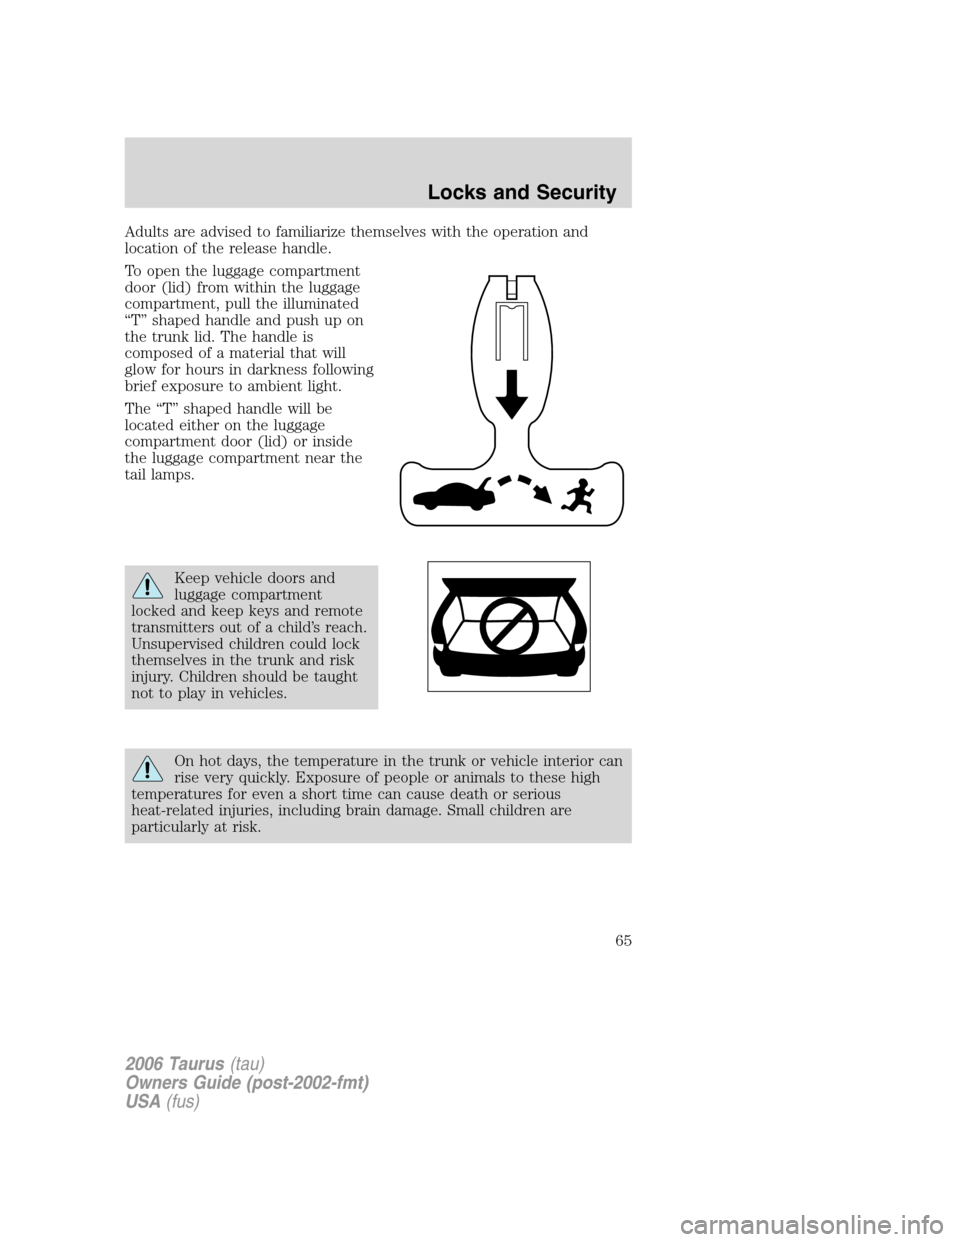
Adults are advised to familiarize themselves with the operation and
location of the release handle.
To open the luggage compartment
door (lid) from within the luggage
compartment, pull the illuminated
“T” shaped handle and push up on
the trunk lid. The handle is
composed of a material that will
glow for hours in darkness following
brief exposure to ambient light.
The “T” shaped handle will be
located either on the luggage
compartment door (lid) or inside
the luggage compartment near the
tail lamps.
Keep vehicle doors and
luggage compartment
locked and keep keys and remote
transmitters out of a child’s reach.
Unsupervised children could lock
themselves in the trunk and risk
injury. Children should be taught
not to play in vehicles.
On hot days, the temperature in the trunk or vehicle interior can
rise very quickly. Exposure of people or animals to these high
temperatures for even a short time can cause death or serious
heat-related injuries, including brain damage. Small children are
particularly at risk.
2006 Taurus(tau)
Owners Guide (post-2002-fmt)
USA(fus)
Locks and Security
65
Page 66 of 232

REMOTE ENTRY SYSTEM (IF EQUIPPED)
This device complies with part 15 of the FCC rules and with RS-210 of
Industry Canada. Operation is subject to the following two conditions:
(1) This device may not cause harmful interference, and (2) This device
must accept any interference received, including interference that may
cause undesired operation.
Changes or modifications not expressly approved by the party
responsible for compliance could void the user’s authority to
operate the equipment.
The typical operating range for your remote entry transmitter is
approximately 33 feet (10 meters). A decrease in operating range could
be caused by:
•weather conditions,
•nearby radio towers,
•structures around the vehicle, or
•other vehicles parked next to your vehicle.
The remote entry system allows you
to:
•lock or unlock all vehicle doors,
•open the trunk, and
•sound the panic alarm.
If there are problems with the
remote entry system, make sure to
takeALL remote entry
transmitterswith you to the
dealership in order to aid in
troubleshooting the problem.
Unlocking the doors
1. Pressand release to unlock the driver’s door.Note:The
headlamps, parking lamps and interior lamps will illuminate.
2. Press
and release again within three seconds to unlock all the
doors.
The remote entry system comes with an illuminated entry feature. This
feature turns on the interior lamps for 25 seconds or until the ignition is
turned to the the 4 (ON) position. If the dome lamp control is in theoff
position the illuminated entry feature will not work.
2006 Taurus(tau)
Owners Guide (post-2002-fmt)
USA(fus)
Locks and Security
66
Page 67 of 232

The inside lights will not turn off if:
•they have been turned on using the dimmer control or
•any door is open.
The battery saver feature will turn off the interior lamps 10 minutes after
the ignition is turned to the 3 (OFF) position.
Locking the doors
1. Pressand release to lock all the doors, turn off the interior lamps
(if they were on) and arm the anti-theft system.Note:The parklamps
will flash once if all doors are closed.
2. Press
and release again within three seconds to confirm that all the
doors are closed and locked.Note:The doors will lock again, the horn
will chirp once, and the parklamps will flash once.
If any of the doors are not properly closed the horn will make two quick
chirps, and the parklamps will not flash. As soon as all vehicle doors are
closed, the parklamps will flash once to confirm that all doors are closed.
Sounding a panic alarm
Press
to activate the alarm. Both the horn will sound and the
parklamps will flash for a maximum of 30 seconds. Press again or turn
the ignition to the 4 (ON) position to deactivate, or wait for the alarm to
timeout in 3 minutes.
Note:The panic alarm will only operate when the ignition is in the 1
(ACCESSORY), 2 (LOCK) or 3 (OFF) position.
Opening the trunk
Pressonce to release the trunk.
Replacing the battery
The remote entry transmitter uses one coin type three-volt lithium
battery CR2032 or equivalent.
2006 Taurus(tau)
Owners Guide (post-2002-fmt)
USA(fus)
Locks and Security
67
Page 71 of 232

Note:The puddle lamps (if equipped) cannot be deactivated; performing
this procedure will only deactivate the head, park and tail lamps.
KEYLESS ENTRY SYSTEM (IF EQUIPPED)
You can use the keyless entry
keypad to:
•lock or unlock the doors without
using a key,
•open the trunk, or
•activate or deactivate the autolock feature.
The keypad can be operated with the factory set 5–digit entry code; this
code is located on the owner’s wallet card in the glove box, is marked on
the computer module, and is available from your authorized dealer. You
can also create your own 5–digit personal entry code.
When pressing the controls on the keypad, press the middle of the
controls to ensure a good activation.
Programming a personal entry code
To create your own personal entry code:
1. Enter the factory set code.Note:The keyless entry keypad and
interior lights will illuminate and the driver’s door will unlock.
2. Within five seconds press the 1•2 on the keypad.
3. Enter your personal 5-digit code. Each number must be entered
within five seconds of each other.
4. The doors will again lock then unlock, to confirm that your personal
keycode has been programmed to the module.
Tips:
•Do not set a code that uses five of the same number.
•Do not use five numbers in sequential order.
•The factory set code will work even if you have set your own personal
code.
•If you set a second personal code it will erase your first personal code.
Note:To exit programming mode, either wait 5 seconds after pressing 1
•2 on the keypad, or press the 7•8 and 9•0 pads simultaneously to
lock all vehicle doors and end programming mode.
Erasing personal codes
1. Enter the factory set 5–digit code. The keyless entry keypad and
interior lights will illuminate and the driver’s door will unlock.
123
45678
90
2006 Taurus(tau)
Owners Guide (post-2002-fmt)
USA(fus)
Locks and Security
71