2006 FORD TAURUS clock
[x] Cancel search: clockPage 40 of 232

Replacing tail/brake/turn signal/backup lamp bulbs
The tail lamp, brake lamp, turn
signal lamp and backup lamp bulbs
are located in the same portion of
the tail lamp assembly. Follow the
same steps to replace either bulb.
1. Make sure headlamp switch is in
OFF position and open trunk and
remove two plastic mushroom nuts,
five push pins and the plastic cover
from inside the trunk to access the
lamp assembly.
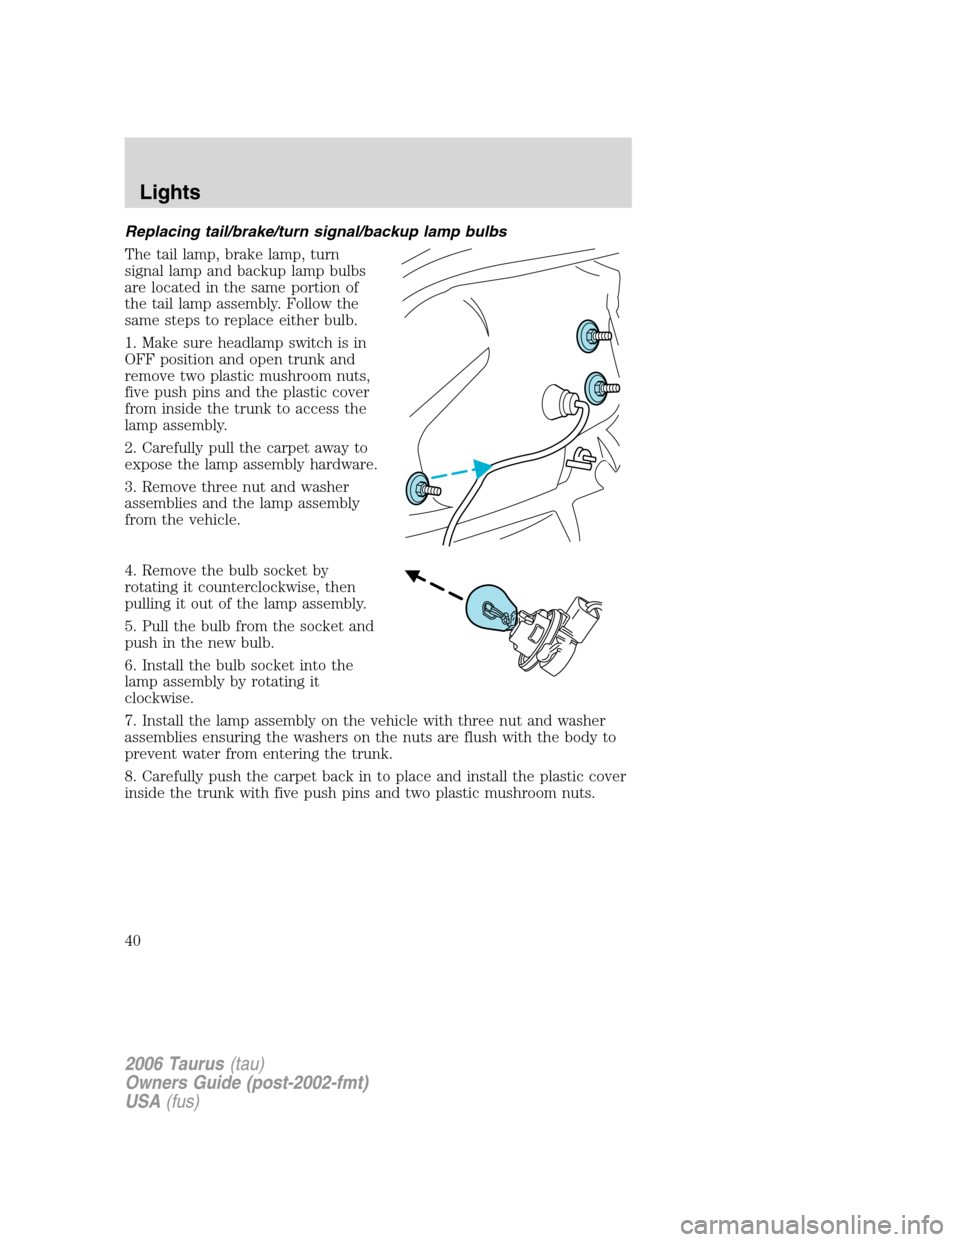
2. Carefully pull the carpet away to
expose the lamp assembly hardware.
3. Remove three nut and washer
assemblies and the lamp assembly
from the vehicle.
4. Remove the bulb socket by
rotating it counterclockwise, then
pulling it out of the lamp assembly.
5. Pull the bulb from the socket and
push in the new bulb.
6. Install the bulb socket into the
lamp assembly by rotating it
clockwise.
7. Install the lamp assembly on the vehicle with three nut and washer
assemblies ensuring the washers on the nuts are flush with the body to
prevent water from entering the trunk.
8. Carefully push the carpet back in to place and install the plastic cover
inside the trunk with five push pins and two plastic mushroom nuts.
2006 Taurus(tau)
Owners Guide (post-2002-fmt)
USA(fus)
Lights
40
Page 166 of 232

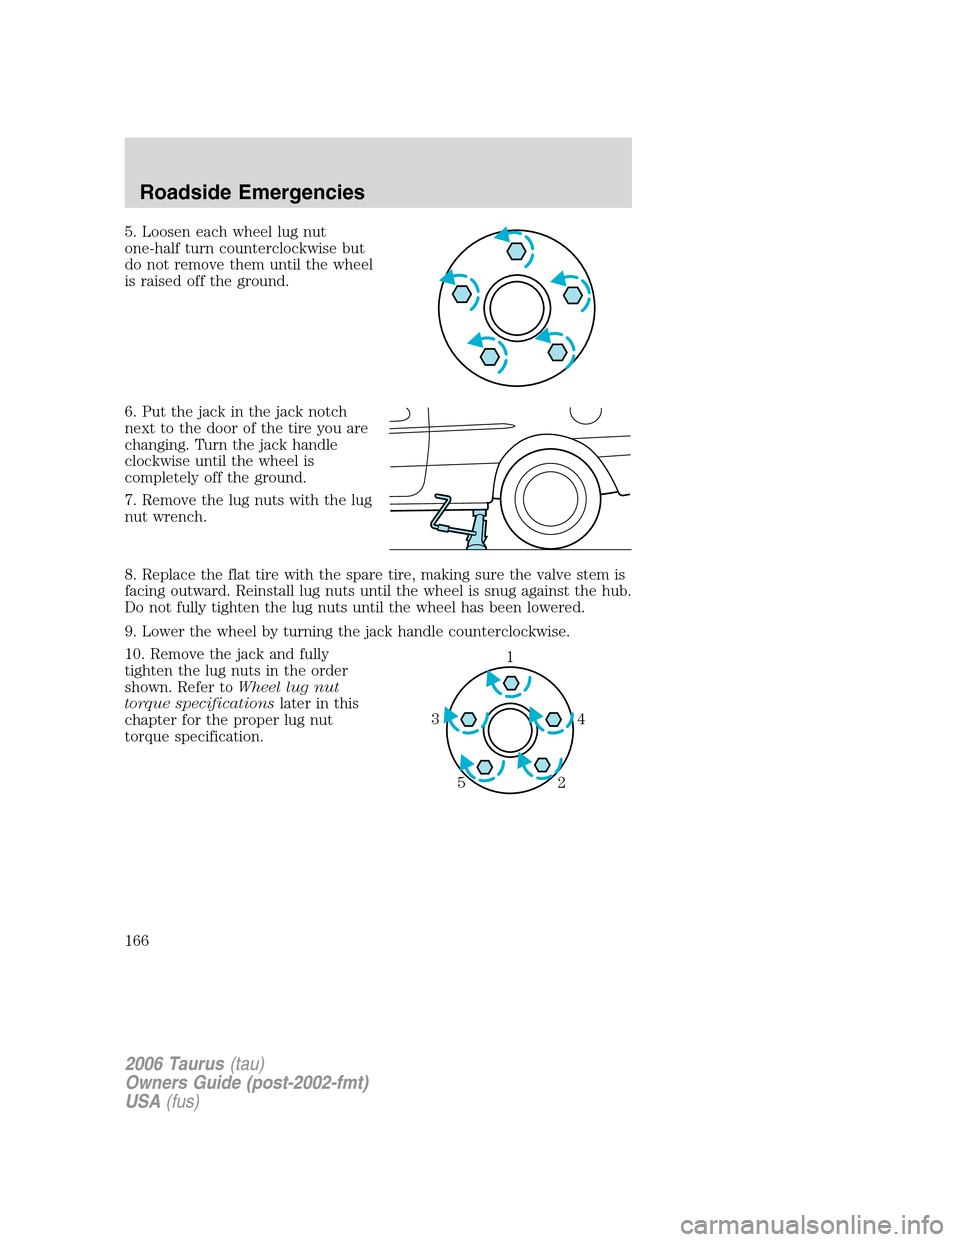
5. Loosen each wheel lug nut
one-half turn counterclockwise but
do not remove them until the wheel
is raised off the ground.
6. Put the jack in the jack notch
next to the door of the tire you are
changing. Turn the jack handle
clockwise until the wheel is
completely off the ground.
7. Remove the lug nuts with the lug
nut wrench.
8. Replace the flat tire with the spare tire, making sure the valve stem is
facing outward. Reinstall lug nuts until the wheel is snug against the hub.
Do not fully tighten the lug nuts until the wheel has been lowered.
9. Lower the wheel by turning the jack handle counterclockwise.
10. Remove the jack and fully
tighten the lug nuts in the order
shown. Refer toWheel lug nut
torque specificationslater in this
chapter for the proper lug nut
torque specification.
1
4 3
2 5
2006 Taurus(tau)
Owners Guide (post-2002-fmt)
USA(fus)
Roadside Emergencies
166
Page 195 of 232

7. Put the indicator back in and ensure it is fully seated.
Adding engine oil
1. Check the engine oil. For instructions, refer toChecking the engine
oilin this chapter.
2. If the engine oil level is not within the normal range, add only certified
engine oil of the recommended viscosity. Remove the engine oil filler cap
and use a funnel to pour the engine oil into the opening.
3. Recheck the engine oil level. Make sure the oil level is not above the
upper hole or MAX mark on the engine oil level indicator (dipstick).
4. Install the indicator and ensure it is fully seated.
5. Fully install the engine oil filler cap by turning the filler cap clockwise
until it stops.
To avoid possible oil loss, DO NOT operate the vehicle with the
engine oil level indicator and/or the engine oil filler cap removed.
Engine oil and filter recommendations
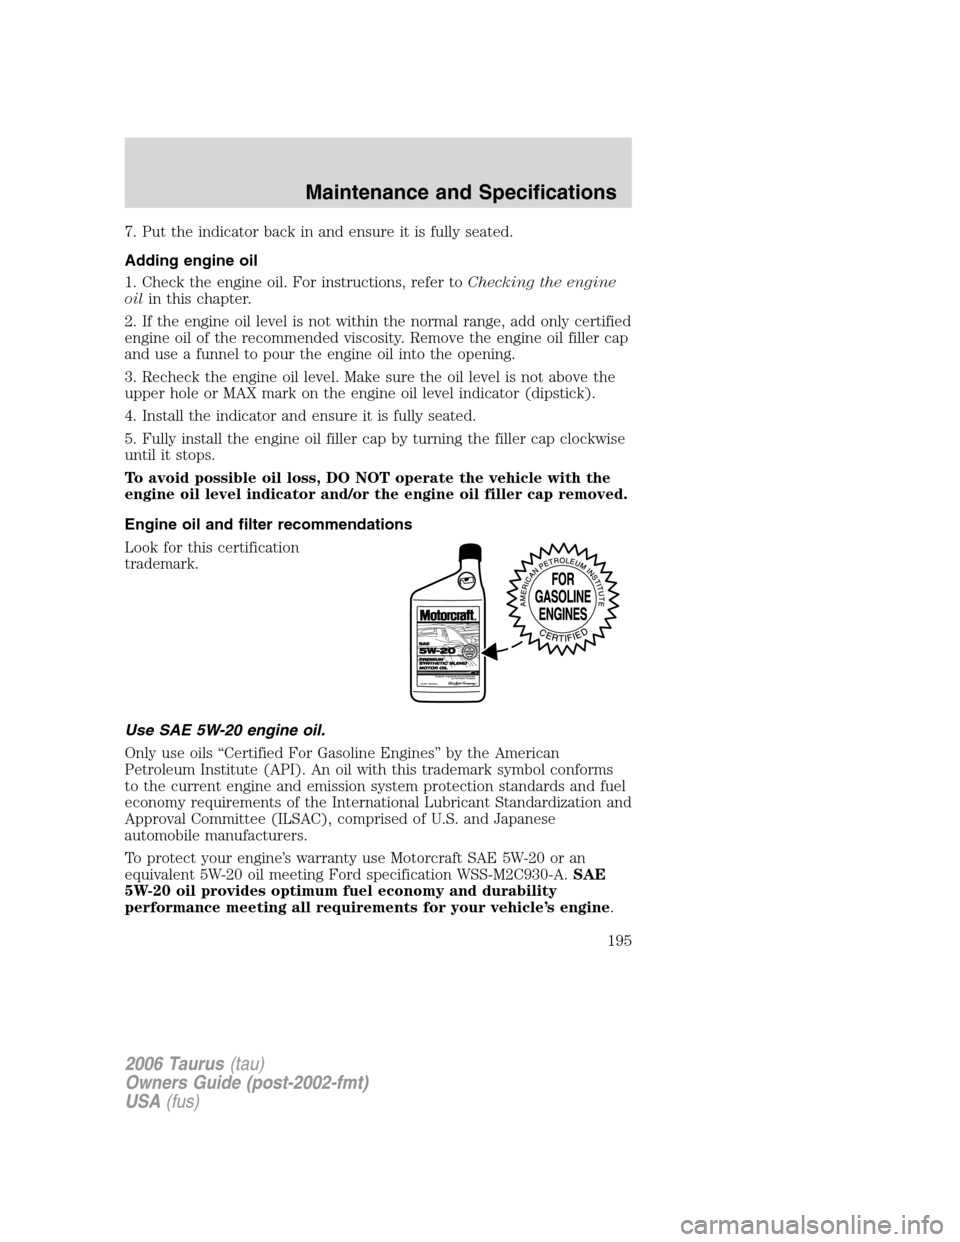
Look for this certification
trademark.
Use SAE 5W-20 engine oil.
Only use oils “Certified For Gasoline Engines” by the American
Petroleum Institute (API). An oil with this trademark symbol conforms
to the current engine and emission system protection standards and fuel
economy requirements of the International Lubricant Standardization and
Approval Committee (ILSAC), comprised of U.S. and Japanese
automobile manufacturers.
To protect your engine’s warranty use Motorcraft SAE 5W-20 or an
equivalent 5W-20 oil meeting Ford specification WSS-M2C930-A.SAE
5W-20 oil provides optimum fuel economy and durability
performance meeting all requirements for your vehicle’s engine.
2006 Taurus(tau)
Owners Guide (post-2002-fmt)
USA(fus)
Maintenance and Specifications
195
Page 198 of 232

7. Drive the vehicle to complete the relearning process.
•The vehicle may need to be driven 10 miles (16 km) or more to
relearn the idle and fuel trim strategy.
•If you do not allow the engine to relearn its idle trim, the idle
quality of your vehicle may be adversely affected until the idle
trim is eventually relearned.
If the battery has been disconnected or a new battery has been installed,
the clock and radio settings must be reset once the battery is
reconnected.
•Always dispose of automotive
batteries in a responsible manner.
Follow your local authorized
standards for disposal. Call your
local authorized recycling center
to find out more about recycling
automotive batteries.
ENGINE COOLANT
Checking engine coolant
The concentration and level of engine coolant should be checked at the
mileage intervals listed inscheduled maintenance information.The
coolant concentration should be maintained at 50/50 coolant and distilled
water, which equates to a freeze point of -34°F (-36°C). Coolant
concentration testing is possible with a hydrometer or antifreeze tester
(such as the Rotunda Battery and Antifreeze Tester, 014–R1060). The
level of coolant should be maintained at the “FULL COLD” level or
within the “COLD FILL RANGE” in the coolant reservoir. If the level falls
below, add coolant per the instructions in theAdding engine coolant
section.
Your vehicle was factory-filled with a 50/50 engine coolant and water
concentration. If the concentration of coolant falls below 40% or above
60%, the engine parts could become damaged or not work properly.A
50–50 mixture of coolant and water provides the following:
•Freeze protection down to -34°F (-36°C).
•Boiling protection up to 265°F (129°C).
•Protection against rust and other forms of corrosion.
L
E
A
D
RETURN
RECYCLE
2006 Taurus(tau)
Owners Guide (post-2002-fmt)
USA(fus)
Maintenance and Specifications
198
Page 201 of 232

coolant degas system with a pressurized cap, or if it is necessary to
remove the coolant pressure relief cap on the radiator of a vehicle with
an overflow system, follow these steps to add engine coolant.
To reduce the risk of personal injury, make sure the engine is
cool before unscrewing the coolant pressure relief cap. The
cooling system is under pressure; steam and hot liquid can come out
forcefully when the cap is loosened slightly.
1. Before you begin, turn the engine off and let it cool.
2. When the engine is cool, wrap a thick cloth around the coolant
pressure relief cap on the coolant reservoir (a translucent plastic bottle).
Slowly turn cap counterclockwise (left) until pressure begins to release.
3. Step back while the pressure releases.
4. When you are sure that all the pressure has been released, use the
cloth to turn it counterclockwise and remove the cap.
5. Fill the coolant reservoir slowly with the proper coolant mixture (see
above), to within the “COLD FILL RANGE” or the “FULL COLD” level on
the reservoir. If you removed the radiator cap in an overflow system, fill
the radiator until the coolant is visible and radiator is almost full.
6. Replace the cap. Turn until tightly installed. (Cap must be tightly
installed to prevent coolant loss.)
After any coolant has been added, check the coolant concentration (refer
toChecking engine coolant). If the concentration is not 50/50
(protection to –34° F/–36° C), drain some coolant and adjust the
concentration. It may take several drains and additions to obtain a 50/50
coolant concentration.
Whenever coolant has been added, the coolant level in the coolant
reservoir should be checked the next few times you drive the vehicle. If
necessary, add enough 50/50 concentration of engine coolant and
distilled water to bring the liquid level to the proper level.
If you have to add more than 1.0 quart (1.0 liter) of engine coolant per
month, have your dealer check the engine cooling system. Your cooling
system may have a leak. Operating an engine with a low level of coolant
can result in engine overheating and possible engine damage.
Recycled engine coolant
Ford Motor Company does NOT recommend the use of recycled engine
coolant in vehicles originally equipped with Motorcraft Premium Gold
Engine Coolant since a Ford-approved recycling process is not yet
available.
2006 Taurus(tau)
Owners Guide (post-2002-fmt)
USA(fus)
Maintenance and Specifications
201
Page 206 of 232

Fuel Filler Cap
Your fuel tank filler cap has an indexed design with a 1/4 turn on/off
feature.
When fueling your vehicle:
1. Turn the engine off.
2. Carefully turn the filler cap counterclockwise 1/4 of a turn until it
stops.
3. Pull to remove the cap from the fuel filler pipe.
4. To install the cap, align the tabs on the cap with the notches on the
filler pipe.
5. Turn the filler cap clockwise 1/4 of a turn until it clicks at least once.
If the “Check Fuel Cap”
indicator comes on or if “Service Engine
Soon/Check Engine” indicator comes on and stays on when you start the
engine, the fuel filler cap may not be properly installed. Turn off the
engine, remove the fuel filler cap, align the cap properly and reinstall it.
If you must replace the fuel filler cap, replace it with a fuel filler
cap that is designed for your vehicle. The customer warranty may
be void for any damage to the fuel tank or fuel system if the
correct genuine Ford or Motorcraft fuel filler cap is not used.
The fuel system may be under pressure. If the fuel filler cap is
venting vapor or if you hear a hissing sound, wait until it stops
before completely removing the fuel filler cap. Otherwise, fuel may
spray out and injure you or others.
If you do not use the proper fuel filler cap, excessive pressure or
vacuum in the fuel tank may damage the fuel system or cause
the fuel cap to disengage in a collision, which may result in possible
personal injury.
Choosing the right fuel
If your vehicle is a flexible fuel vehicle (FFV), use only UNLEADED
FUEL and FUEL ETHANOL (Ed75–Ed85)
Your vehicle was not designed to use fuel or fuel additives with metallic
compounds, including manganese-based additives. Studies indicate that
these additives can cause your vehicle’s emission control system to
deteriorate more rapidly. In Canada, premium grade fuel generally
2006 Taurus(tau)
Owners Guide (post-2002-fmt)
USA(fus)
Maintenance and Specifications
206
Page 228 of 232

washing ....................................183
waxing .....................................183
wheels ......................................184
wiper blades ............................185
Climate control (see Air
conditioning or Heating) ............25
Clock adjust
AM/FM/Cassette ........................15
AM/FM/CD .................................18
Compass
zone/calibration adjustment ....56
Compass Display .........................55
Console ........................................42
Controls
power seat .................................79
Coolant
checking and adding ..............198
refill capacities ................202, 218
specifications ..................219–220
Cruise control
(see Speed control) ....................45
Customer Assistance ................154
Ford Extended Service
Plan ..........................................180
Getting assistance outside the
U.S. and Canada .....................181
Getting roadside assistance ...154
Getting the service you
need .........................................174
Ordering additional owner’s
literature .................................182
The Dispute Settlement
Board .......................................177
Utilizing the
Mediation/Arbitration
Program ...................................179D
Daytime running lamps
(see Lamps) ................................29
Defrost
rear window ..............................27
Dipstick
automatic transmission
fluid ..........................................215
engine oil .................................193
Doors
lubricant specifications ..........219
Driving under special
conditions ..................................153
through water .........................153
E
Electronic message center .........53
Emergencies, roadside
jump-starting ..........................168
Emergency Flashers .................155
Emission control system ..........212
Engine ................................220–221
cleaning ...................................184
coolant .....................................198
idle speed control ...................196
lubrication
specifications ..................219–220
refill capacities ........................218
service points ..........................191
starting after a collision .........155
Engine block heater .................144
Engine oil ..................................193
checking and adding ..............193
dipstick ....................................193
filter, specifications ........195, 217
recommendations ...................195
refill capacities ........................218
2006 Taurus(tau)
Owners Guide (post-2002-fmt)
USA(fus)
Index
228
Page 231 of 232

Safety belts (see Safety
restraints) ........................80, 84–88
Safety defects, reporting ..........182
Safety restraints ..............80, 84–88
belt minder ...............................90
extension assembly ..................94
for adults .............................85–87
for children .....................104–105
lap belt ......................................89
Occupant Classification
Sensor ........................................82
safety belt maintenance ...........94
warning light and chime ....89–90
Safety seats for children ..........107
Safety Compliance
Certification Label ....................222
Seat belts
(see Safety restraints) ...............80
Seats ............................................77
child safety seats ....................107
front seats .................................78
Servicing your vehicle ..............189
Setting the clock
AM/FM/Cassette ........................15
AM/FM/CD .................................18
Spare tire
(see Changing the Tire) ...........162
Spark plugs,
specifications .............217, 220–221
Specification chart,
lubricants ...........................219–220
Speed control ..............................45
Starting a flex fuel vehicle .......143
Starting your
vehicle ........................140–141, 143
jump starting ..........................168Steering wheel
tilting .........................................41
T
Tilt steering wheel ......................41
Tires ...........................116–117, 162
alignment ................................128
care ..........................................126
changing ..........................162, 164
checking the pressure ............119
inspecting and inflating .........118
label .........................................126
replacing ..................................121
rotating ....................................128
safety practices .......................127
sidewall information ...............121
snow tires and chains ............130
spare tire .................................163
terminology .............................117
tire grades ...............................117
treadwear ........................116, 126
Towing .......................................136
recreational towing .................139
trailer towing ..........................136
wrecker ....................................173
Traction control ........................147
Transaxle
fluid, refill capacities ..............218
lubricant specifications ..........220
Transmission .............................148
brake-shift interlock (BSI) ....148
fluid, checking and adding
(automatic) .............................215
lubricant specifications ..........219
Trunk .....................................62, 64
remote release ....................62, 67
Turn signal ..................................32
V
Vehicle dimensions ...................221
2006 Taurus(tau)
Owners Guide (post-2002-fmt)
USA(fus)
Index
231