2006 FORD FUSION (AMERICAS) flat tire
[x] Cancel search: flat tirePage 147 of 264
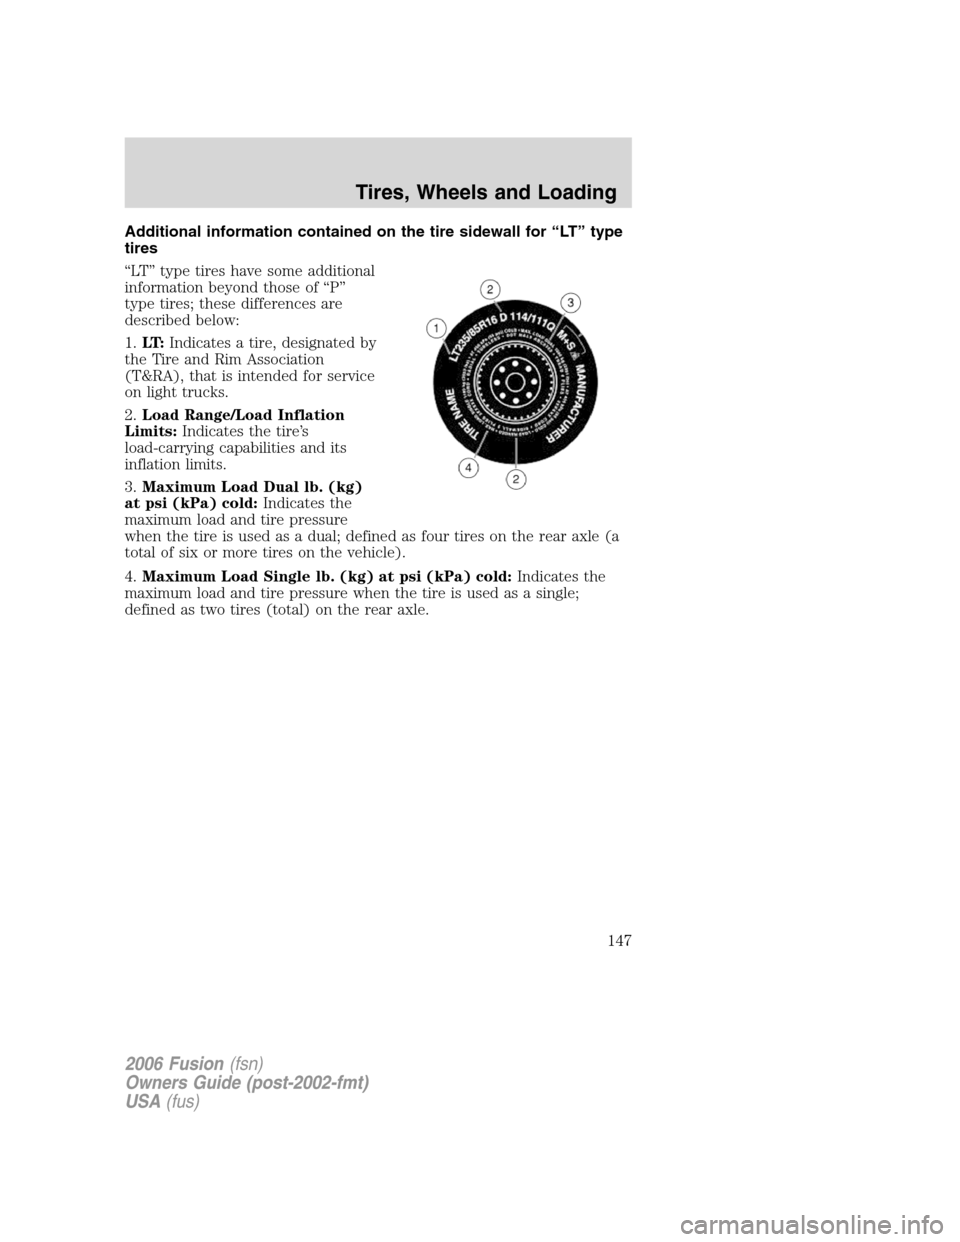
Additional information contained on the tire sidewall for “LT” type
tires
“LT” type tires have some additional
information beyond those of “P”
type tires; these differences are
described below:
1.LT:Indicates a tire, designated by
the Tire and Rim Association
(T&RA), that is intended for service
on light trucks.
2.Load Range/Load Inflation
Limits:Indicates the tire’s
load-carrying capabilities and its
inflation limits.
3.Maximum Load Dual lb. (kg)
at psi (kPa) cold:Indicates the
maximum load and tire pressure
when the tire is used as a dual; defined as four tires on the rear axle (a
total of six or more tires on the vehicle).
4.Maximum Load Single lb. (kg) at psi (kPa) cold:Indicates the
maximum load and tire pressure when the tire is used as a single;
defined as two tires (total) on the rear axle.
2006 Fusion(fsn)
Owners Guide (post-2002-fmt)
USA(fus)
Tires, Wheels and Loading
147
Page 148 of 264

Information on “T” type tires
“T” type tires have some additional
information beyond those of “P”
type tires; these differences are
described below:
T145/80D16 is an example of a tire
size.
Note:The temporary tire size for
your vehicle may be different from
this example.
1.T:Indicates a type of tire,
designated by the Tire and Rim
Association (T&RA), that is
intended for temporary service on
cars, SUVs, minivans and light
trucks.
2.145:Indicates the nominal width
of the tire in millimeters from
sidewall edge to sidewall edge. In general, the larger the number, the
wider the tire.
3.80:Indicates the aspect ratio which gives the tire’s ratio of height to
width. Numbers of 70 or lower indicate a short sidewall.
4.D:Indicates a “diagonal” type tire.
R:Indicates a “radial” type tire.
5.16:Indicates the wheel or rim diameter in inches. If you change your
wheel size, you will have to purchase new tires to match the new wheel
diameter.
Location of the tire label
You will find a Tire Label containing tire inflation pressure by tire size
and other important information located on the B-Pillar or the edge of
the driver’s door. Refer to the payload description and graphic in the
Vehicle loading — with and without a trailersection.
2006 Fusion(fsn)
Owners Guide (post-2002-fmt)
USA(fus)
Tires, Wheels and Loading
148
Page 163 of 264
STEERING
To prevent damage to the power steering system:
•Never hold the steering wheel at its furthest turning points (until it
stops) for more than a few seconds when the engine is running.
•Do not operate the vehicle with a low power steering pump fluid level
(below the MIN mark on the reservoir).
•Some noise is normal during operation. If excessive, check for low
power steering pump fluid level before seeking service by your
authorized dealer.
•Heavy or uneven steering efforts may be caused by low power steering
pump fluid level. Check for low power steering pump fluid level before
seeking service by your authorized dealer.
•Do not fill the power steering pump reservoir above the MAX mark on
the reservoir, as this may result in leaks from the reservoir.
If the power steering system breaks down (or if the engine is turned
off), you can steer the vehicle manually, but it takes more effort.
If the steering wanders or pulls, check for:
•an improperly inflated tire
•uneven tire wear
•loose or worn suspension components
•loose or worn steering components
•improper steering alignment
A high crown in the road or high crosswinds may also make the steering
seem to wander/pull.
Speed sensitive steering
The steering in your vehicle is speed sensitive. At high speeds, steering
assist will decrease to improve steering feel. At lower speeds,
maneuverability will be increased.
If the amount of effort required to steer your vehicle changes while
driving at a constant vehicle speed, have the power steering system
checked by your authorized dealer.
AUTOMATIC TRANSMISSION OPERATION
Brake-shift interlock
This vehicle is equipped with a brake-shift interlock feature that prevents
the gearshift lever from being moved from P (Park) when the ignition is
in the RUN position unless brake pedal is depressed.
2006 Fusion(fsn)
Owners Guide (post-2002-fmt)
USA(fus)
Driving
163
Page 170 of 264

ROADSIDE ASSISTANCE
Getting roadside assistance
To fully assist you should you have a vehicle concern, Ford Motor
Company offers a complimentary roadside assistance program. This
program is separate from the New Vehicle Limited Warranty. The service
is available:
•24–hours, seven days a week
•for the New Vehicle Limited Warranty period of three years or
36,000 miles (60,000 km), whichever occurs first on Ford and Mercury
vehicles, and four years or 50,000 miles (80,000 km) on Lincoln vehicles.
Roadside assistance will cover:
•a flat tire change with a good spare (except Ford GT which has a tire
inflation kit)
•battery jump start
•lock-out assistance (key replacement cost is the customer’s
responsibility)
•fuel delivery – Independent Service Contractors, if not prohibited by
state, local or municipal law shall deliver up to 2.0 gallons (7.5L) of
gasoline or 5 gallons (18.9L) of diesel fuel to a disabled vehicle.
•winch out – available within 100 feet (30.5 meters) of a paved or
county maintained road, no recoveries.
•towing – Ford/Mercury/Lincoln eligible vehicle towed to an authorized
dealer within 35 miles (56.3 km) of the disablement location or to the
nearest authorized dealer. If a member requests to be towed to an
authorized dealer more than 35 miles (56.3 km) from the disablement
location, the member shall be responsible for any mileage costs in
excess of 35 miles (56.3 km).
Trailers shall be covered up to $100 if the disabled eligible vehicle
requires service at the nearest authorized dealer. If the trailer is disabled,
but the towing vehicle is operational, the trailer does not qualify for any
roadside services.
Canadian customers refer to your Owner Information Guide for
information on:
•coverage period
•exact fuel amounts
•towing of your disabled vehicle
2006 Fusion(fsn)
Owners Guide (post-2002-fmt)
USA(fus)
Roadside Emergencies
170
Page 179 of 264
CHANGING THE TIRES
If you get a flat tire while driving:
•do not brake heavily.
•gradually decrease the vehicle’s speed.
•hold the steering wheel firmly.
•slowly move to a safe place on the side of the road.
Your vehicle may be equipped with a conventional spare tire that is
different in one or more of the following: type, brand, size, speed rating
and tread design. If this is the case, this dissimilar spare tire is still rated
for your vehicle loads (GAWR and GVWR).
The use of tire sealants may damage your tires.
Dissimilar spare tire/wheel information
Failure to follow these guidelines could result in an increased
risk of loss of vehicle control, injury or death.
If you have a dissimilar spare tire/wheel, then it is intended for
temporary use only. This means that if you need to use it, you should
replace it as soon as possible with a road tire/wheel that is the same size
and type as the road tires and wheels that were originally provided by
Ford. If the dissimilar spare tire or wheel is damaged, it should be
replaced rather than repaired.
A dissimilar spare tire/wheel is defined as a spare tire and/or wheel that
is different in brand, size or appearance from the road tires and wheels
and can be one of three types:
1.T-type mini-spare:This spare tire begins with the letter “T” for tire
size and may have “Temporary Use Only” molded in the sidewall
2.Full-size dissimilar spare with label on wheel:This spare tire has
a label on the wheel that states: “THIS TIRE AND WHEEL FOR
TEMPORARY USE ONLY”
When driving with one of the dissimilar spare tires listed above,do not:
•Exceed 50 mph (80 km/h)
•Load the vehicle beyond maximum vehicle load rating listed on the
Safety Compliance Label
2006 Fusion(fsn)
Owners Guide (post-2002-fmt)
USA(fus)
Roadside Emergencies
179
Page 181 of 264
•Wet weather driving capability
•All-Wheel driving capability (if applicable)
•Load leveling adjustment (if applicable)
When driving with the full-size dissimilar spare tire/wheel additional
caution should be given to:
•Towing a trailer
•Driving vehicles equipped with a camper body
•Driving vehicles with a load on the cargo rack
Drive cautiously when using a full-size dissimilar spare tire/wheel and
seek service as soon as possible.
How to change a flat tire
To help prevent the vehicle from moving when you change a tire,
be sure the parking brake is set, then block (in both directions)
the wheel that is diagonally opposite (other side and end of the
vehicle) to the tire being changed.
If the vehicle slips off the jack, you or someone else could be
seriously injured.
Do not attempt to change a tire on the side of the vehicle close
to moving traffic. Pull far enough off the road to avoid the
danger of being hit when operating the jack or changing the wheel.
Before changing the tire:
1. Park on a level surface.
2. Activate the hazard flashers.
3. Place the gearshift lever in P (Park) (automatic transmission) or
R (Reverse) (manual transmission).
4. Set the parking brake.
5. Turn off the ignition.
2006 Fusion(fsn)
Owners Guide (post-2002-fmt)
USA(fus)
Roadside Emergencies
181
Page 182 of 264
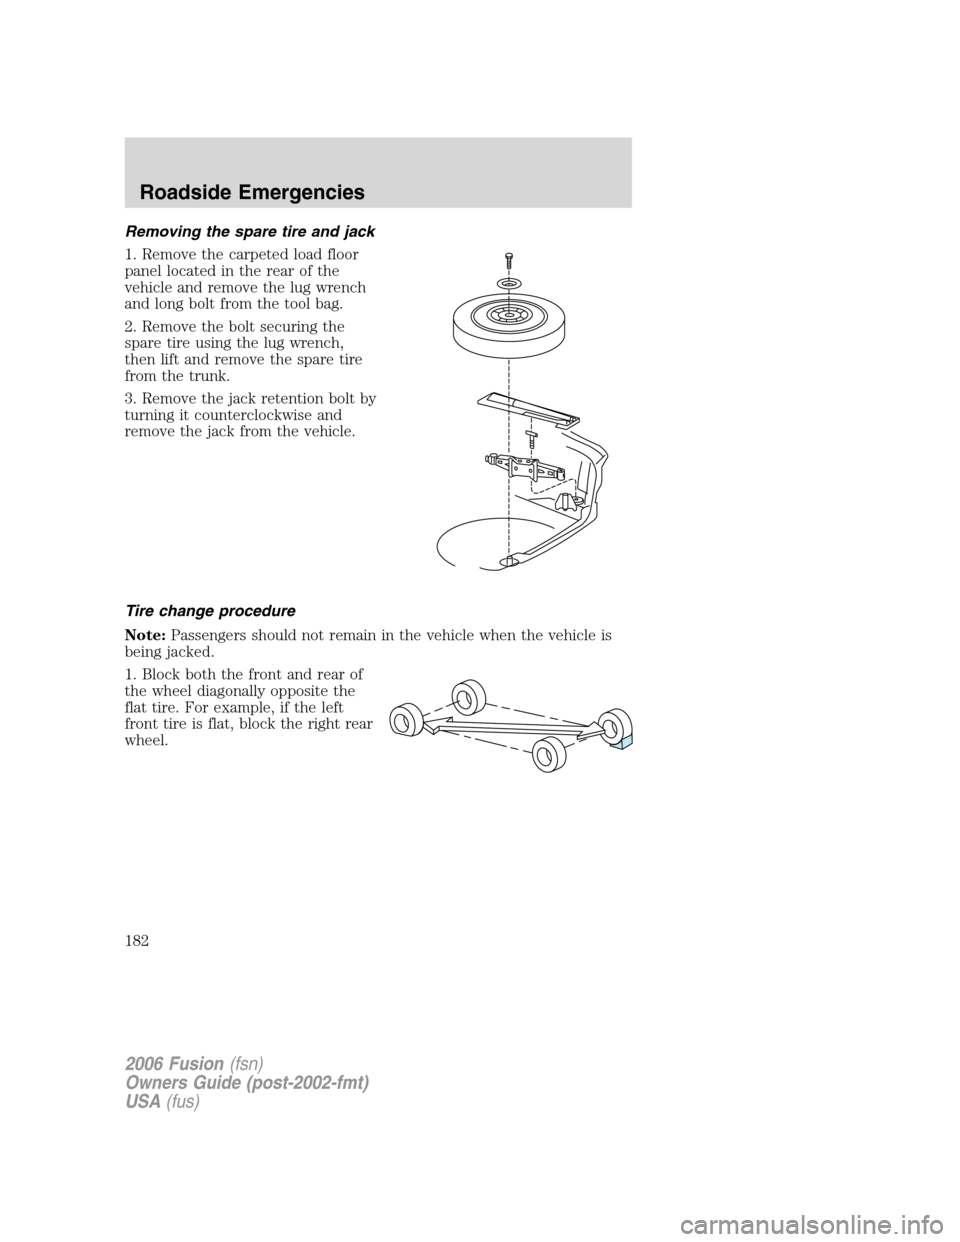
Removing the spare tire and jack
1. Remove the carpeted load floor
panel located in the rear of the
vehicle and remove the lug wrench
and long bolt from the tool bag.
2. Remove the bolt securing the
spare tire using the lug wrench,
then lift and remove the spare tire
from the trunk.
3. Remove the jack retention bolt by
turning it counterclockwise and
remove the jack from the vehicle.
Tire change procedure
Note:Passengers should not remain in the vehicle when the vehicle is
being jacked.
1. Block both the front and rear of
the wheel diagonally opposite the
flat tire. For example, if the left
front tire is flat, block the right rear
wheel.
2006 Fusion(fsn)
Owners Guide (post-2002-fmt)
USA(fus)
Roadside Emergencies
182
Page 183 of 264
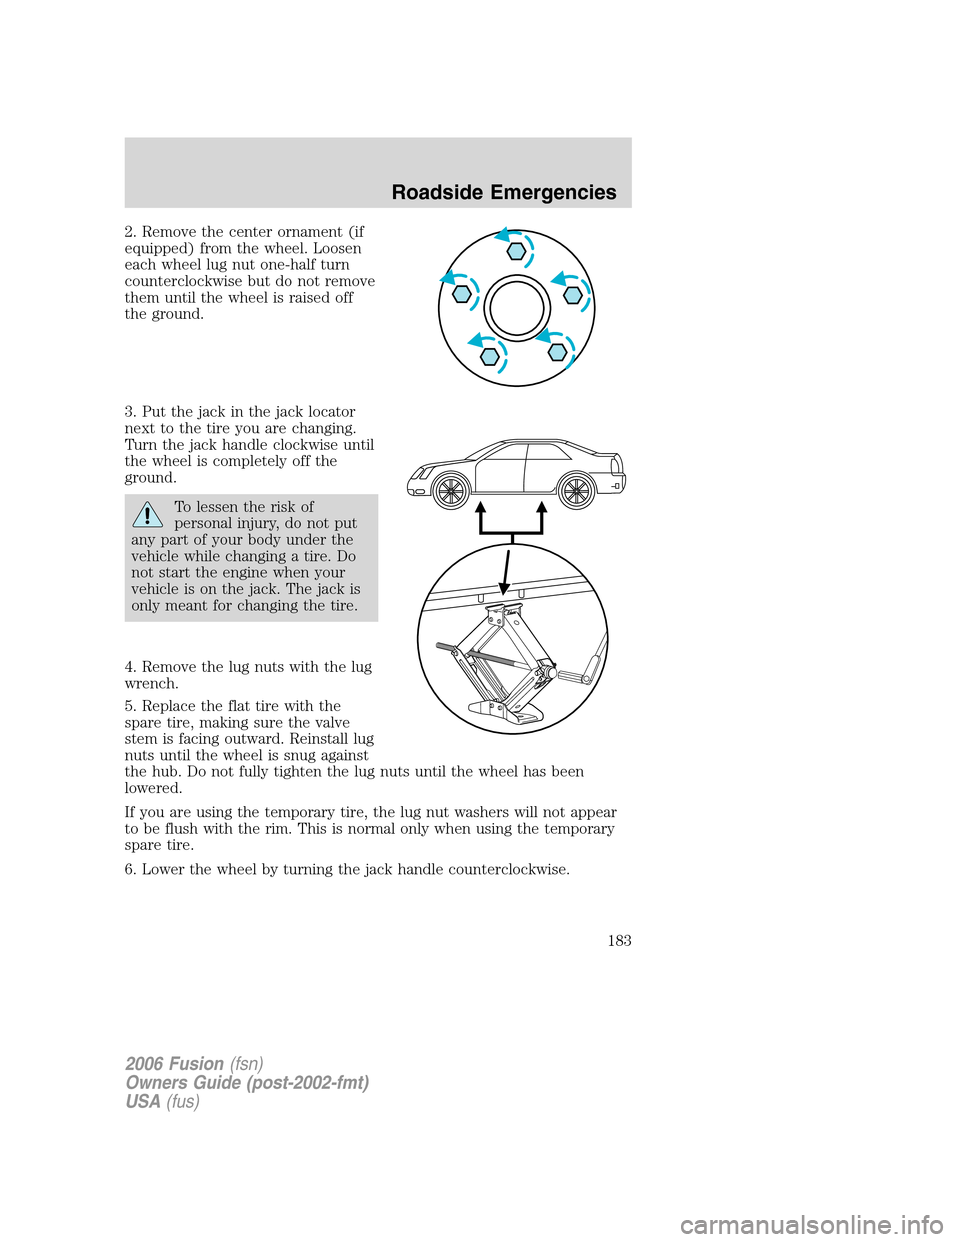
2. Remove the center ornament (if
equipped) from the wheel. Loosen
each wheel lug nut one-half turn
counterclockwise but do not remove
them until the wheel is raised off
the ground.
3. Put the jack in the jack locator
next to the tire you are changing.
Turn the jack handle clockwise until
the wheel is completely off the
ground.
To lessen the risk of
personal injury, do not put
any part of your body under the
vehicle while changing a tire. Do
not start the engine when your
vehicle is on the jack. The jack is
only meant for changing the tire.
4. Remove the lug nuts with the lug
wrench.
5. Replace the flat tire with the
spare tire, making sure the valve
stem is facing outward. Reinstall lug
nuts until the wheel is snug against
the hub. Do not fully tighten the lug nuts until the wheel has been
lowered.
If you are using the temporary tire, the lug nut washers will not appear
to be flush with the rim. This is normal only when using the temporary
spare tire.
6. Lower the wheel by turning the jack handle counterclockwise.
2006 Fusion(fsn)
Owners Guide (post-2002-fmt)
USA(fus)
Roadside Emergencies
183